
Image source: Bing (Web (fair-use with source credit))
Walking into a pet store's grooming aisle is overwhelming. Brushes, combs, clippers, sprays, and scissors all claim to be essential. But you don't need half of it, and you definitely don't need to spend $200 on gear your pet will hate.
Learning how to build a home grooming kit for any pet comes down to one thing: matching the tools to the animal actually sitting in front of you.
The truth most guides skip is that the perfect kit isn't universal. A short-haired Chihuahua, a double-coated Husky, and a long-haired Persian cat need fundamentally different tools. The American Veterinary Medical Association recommends grooming routines tailored to coat type, not a one-size-fits-all shopping list.
As of 2026, getting this right saves you money, prevents skin damage, and turns grooming from a wrestling match into a positive daily ritual.
Why Most Home Grooming Kits Miss the Mark
The biggest mistake people make is buying a pre-assembled kit before understanding their pet's coat. Those all-in-one sets look convenient, but they're usually packed with tools you'll never use and missing the one tool you actually need.
Think about the typical box set. It includes a slicker brush, a bristle brush, a comb, nail clippers, and maybe a grooming glove. That sounds comprehensive.
But if you own a double-coated Golden Retriever, that bristle brush is nearly useless for undercoat removal. If you own a short-haired Beagle, the slicker brush has too many fine pins and irritates sensitive skin. And if you own a cat, those dog-sized nail clippers are the wrong shape entirely.
The Root Problem Is Coat Diversity
Pet coats vary more than most owners realize. Beyond the obvious long-versus-short distinction, there's a critical difference between single and double coats.
A double coat has two layers. The topcoat is coarse and water-resistant. The undercoat is soft, dense, and sheds heavily.
Think Golden Retrievers, Huskies, German Shepherds, Corgis, and most herding breeds. These dogs blow their undercoat twice a year, and a regular brush won't touch the dead fur trapped beneath.
A single coat has just one layer. Poodles, Bichons, Yorkies, and many terriers fall into this category. Their hair grows continuously and tangles easily, but they don't have that massive seasonal shed.
They need different tools, primarily for mat prevention and trimming.
Cats add another wrinkle. Their skin is thinner and more delicate than a dog's. Their nails are shaped differently.
And their tolerance for grooming is famously low. Using dog tools on a cat rarely ends well.
Buying Blind Means Buying Twice
Here's the practical math. A generic kit costs $30 to $60. A coat-appropriate set of tools costs $50 to $100.
But if the generic kit doesn't work, you'll buy the right tools anyway. That's $80 to $160 total for tools you could have bought upfront for less.
The fix is simple. Identify the coat type first, then buy tools that match. That approach costs less, works better, and keeps your pet comfortable.
Quick Answer
Build your kit around your pet's specific coat type. Start with a brush matched to their fur, nail clippers designed for their species, pet-safe shampoo, and a microfiber towel. Add specialty tools like undercoat rakes for double-coated breeds or dematting combs for long-haired pets.
Skip generic sets. Match tools to the animal, not the packaging.
First, Figure Out Your Pet's Coat Type
Before you buy anything, take a good look at your pet. This single step determines everything else in your kit. Get it wrong, and you'll waste money on tools that don't work.
Get it right, and the rest is straightforward.
Ask Yourself Three Questions
Question one: Does your pet have a double coat or a single coat?
Run your fingers through the fur, parting it down to the skin. A double coat feels like two distinct layers. The top layer is coarser.
The bottom layer is soft, dense, and plush. A single coat has no obvious secondary layer. The hair feels uniform from top to bottom.
If you're unsure, check the breed standard. The American Kennel Club and The Cat Fanciers' Association both document coat types for every recognized breed. A quick lookup settles the question.
Question two: Is the fur short, medium, or long?
Length matters because it determines what kinds of tangles and mats you'll deal with. Short hair rarely mats. Long hair mats constantly.
Medium hair sits somewhere in between.
- Short (under 1 inch): Boxers, Beagles, Dalmatians, domestic shorthair cats
- Medium (1 to 3 inches): Golden Retrievers, Australian Shepherds, many spaniels
- Long (over 3 inches): Collies, Yorkies, Persians, Maine Coons
Question three: Is the hair straight, curly, or wiry?
Straight hair sheds and oils differently than curly hair. Curly coats, like those on Poodles and Doodles, don't shed much but tangle aggressively. Wiry coats, like those on many terriers, need stripping rather than brushing.
Each type responds to different tools.
A Quick Reference Table
| Coat Type | Examples | Primary Grooming Need |
|---|---|---|
| Short, single | Beagles, Boxers, domestic shorthair cats | Shedding control, shine |
| Short, double | Labradors, Corgis, Huskies | Undercoat removal |
| Medium, double | Golden Retrievers, German Shepherds | Undercoat + topcoat care |
| Long, double | Collies, Shelties | Mat prevention, de-shedding |
| Long, single/curly | Poodles, Bichons, Doodles | Tangle prevention, trimming |
| Wiry | Schnauzers, many terriers | Hand-stripping, minimal brushing |
When in Doubt, Ask a Professional
If you still can't figure out the coat type, ask your vet or a professional groomer. They see hundreds of coats and can identify yours in seconds. It's a free answer that saves you from buying the wrong tools.

Image source: Bing (Web (fair-use with source credit))
The Core Kit Every Pet Needs
Once you know the coat type, you can build the foundation. These are the non-negotiable items that every pet needs, regardless of breed. Skip these, and you're not really grooming.
You're just petting with extra steps.
The Right Brush
This is the single most important purchase in your entire kit. The wrong brush irritates the skin, fails to remove loose fur, and can even cause brush burn with repeated use.
For short, single coats, a bristle brush works best. The soft, densely packed bristles pick up loose hair and distribute natural oils evenly across the coat. That oil distribution gives the coat its healthy shine and helps protect the skin underneath.
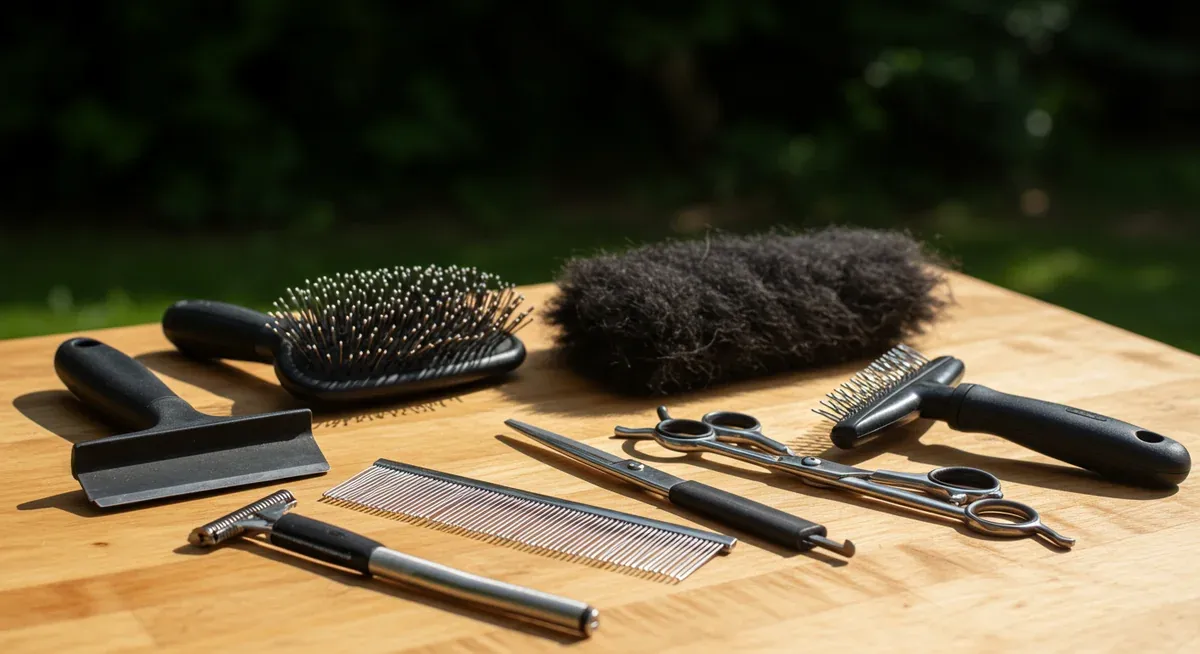
For long or medium coats, a slicker brush is the workhorse. It has fine, angled wire pins that reach deeper into the coat to remove tangles and loose undercoat fur. Look for one with rounded tips on the pins.
Sharp pins scratch the skin and cause irritation over time.
For double coats, you'll also need a dedicated undercoat rake. This tool has long, widely spaced metal teeth that reach through the topcoat to pull out the dead undercoat. It's the difference between managing shedding and fighting a losing battle.
For all coats, a pinning comb is a useful backup. It helps catch tangles that brushes miss, especially around the ears, tail, and britches.
Nail Clippers or a Grinder
Overgrown nails are more than a cosmetic problem. They cause pain when the pet walks, alter posture, and can lead to joint issues over time. The American Veterinary Medical Association lists regular nail maintenance as a core part of preventive care.
You have two solid options:
Guillotine clippers work well for small to medium pets. You insert the nail into a small hole and squeeze the handle. The blade slices cleanly through the tip.
They're precise once you learn the angle, but they take practice.
Scissor-style clippers are better for large dogs with thick nails. They operate like a pair of pliers, giving you good leverage and control. The blades are sturdy enough to handle heavy nails without splitting.
Nail grinders use a rotary abrasive bit to file the nail down gradually. They're less likely to cut the quick because you remove material a little at a time. The downside is noise and vibration.
Some pets never get comfortable with it.
Whichever option you choose, keep styptic powder in the kit. Accidents happen. If you cut the quick, the powder stops the bleeding immediately.
It's a $5 insurance policy that every pet owner needs.
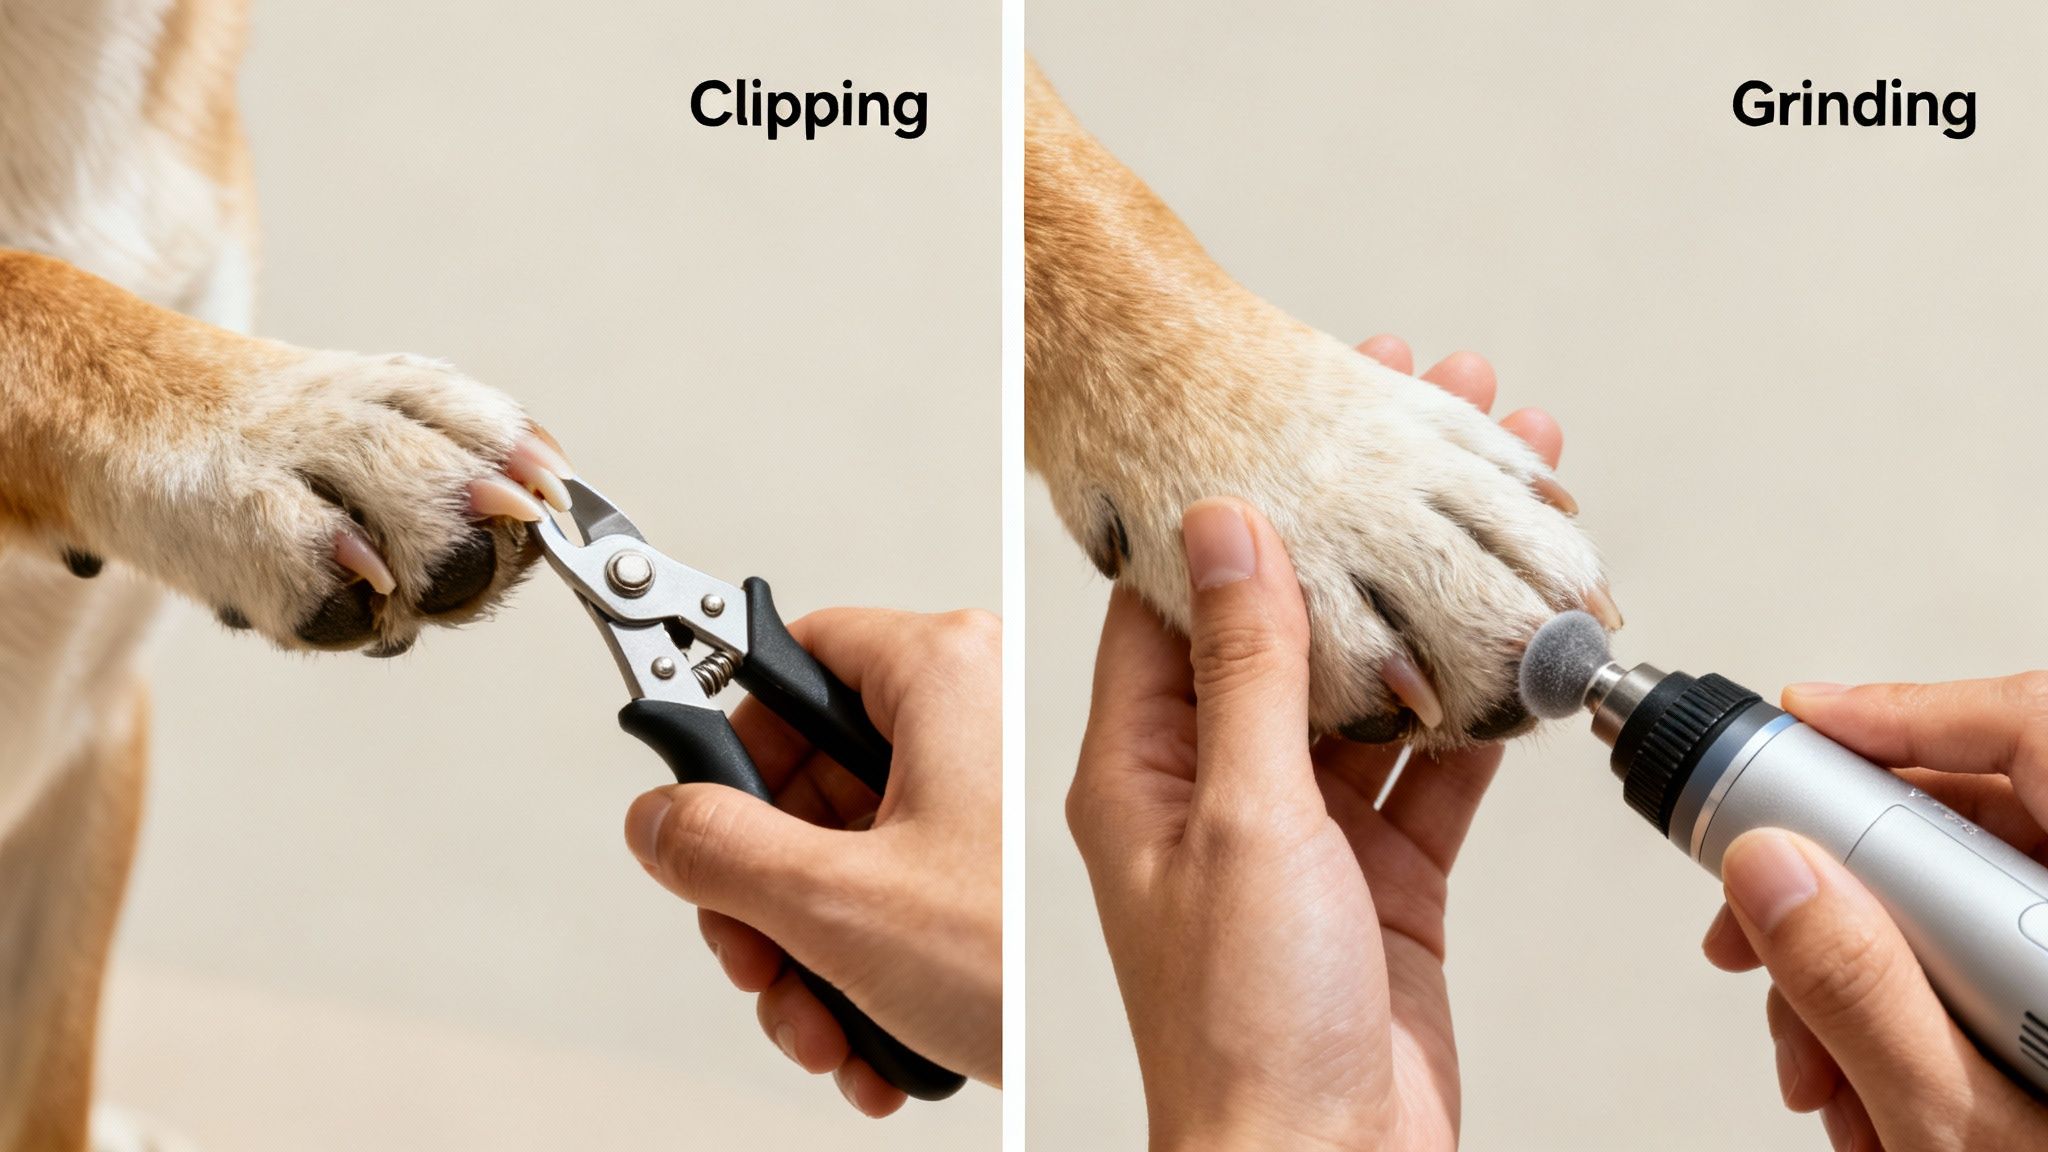
Image source: Bing (Web (fair-use with source credit))
Pet-Safe Shampoo
Human shampoo is off the table. It's formulated for human skin, which has a different pH balance than pet skin. Using it strips the coat of its natural protective oils and leaves the skin dry, itchy, and vulnerable to irritation.
Pet shampoo is pH-balanced for animal skin. Choose a mild, all-purpose formula unless your pet has specific needs like sensitive skin, flea control, or extra deodorizing. A quality basic shampoo works for most pets year-round.
Towels and Drying Strategy
Microfiber towels are the unsung heroes of grooming. They absorb significantly more water than cotton towels and cut drying time in half. Buy at least two.
One for the initial wet rubdown, one for the final dry.
For long-coated or double-coated pets, a blow dryer set to low or cool is essential. Without it, the coat dries slowly and mats form overnight. Human dryers run too hot.
Use the lowest setting and keep the nozzle moving constantly to avoid burning the skin.
Ear Cleaning Supplies
Weekly ear checks catch problems before they become infections. This matters most for floppy-eared breeds like Labs, Spaniels, and Poodles, which trap moisture and debris in the ear canal.
You need a pet-safe ear cleaning solution and cotton balls. Pour the solution into the ear, massage the base gently, and let the pet shake its head. Then wipe the visible part of the ear clean with a cotton ball.
Never use cotton swabs. They push debris deeper into the canal and can damage the eardrum.
Customizing for Double-Coated Breeds
If you own a double-coated dog, your grooming kit needs one critical addition: an undercoat rake. This tool changes everything.
Why Double Coats Shed So Much
A double coat has two layers with different functions. The topcoat protects against weather and moisture. The undercoat provides insulation.
When seasons change, the dog sheds the undercoat to regulate temperature. For breeds like Huskies and German Shepherds, this "blowing the coat" phase creates mountains of loose fur.
A regular brush removes surface hair but barely touches the dense undercoat. Dead undercoat fur sits trapped beneath the topcoat, causing overheating and skin irritation. The undercoat rake reaches down through the topcoat and pulls that dead fur out at the root.
How to Use an Undercoat Rake
Using the rake properly makes all the difference. Work in small sections. Gently pull the rake through the coat in the direction of hair growth.
The wide-spaced teeth grab the loose undercoat without cutting or pulling live hair.
Don't press hard. The rake does the work with light pressure. Excessive force scratches the skin and causes discomfort.
If the dog flinches, you're pushing too hard.
The Deshedding Tool Question
Deshedding tools like the FURminator have become popular for a reason. They work impressively well at removing loose undercoat hair. But they come with a warning.
Veterinarians and professional groomers caution against using deshedding tools too frequently. Overuse can damage the topcoat by cutting live hairs, leaving the coat thin and brittle over time. Use a deshedding tool once a week during heavy shedding season at most.
Use the undercoat rake for regular maintenance.
Shedding Season Frequency
Double-coated breeds go through one or two major shedding periods each year. Spring and fall are the most common. During these windows, groom your dog three to four times per week.
Outside of shedding season, once-weekly maintenance is enough.
Customizing for Long-Haired and Curly-Coated Pets
Long-haired and curly-coated pets face a different enemy: mats. These tight clumps of tangled fur form when loose hair rubs against itself and the skin. They're painful, trap dirt and moisture, and can hide skin infections underneath.
The Dematting Comb
When mats form, a regular brush won't cut it. You need a dematting comb. This tool has curved, sharp blades set into a handle.
The blades slice through tangles lengthwise without cutting the skin.
Use it carefully. Work from the outside of the mat inward, slowly teasing apart the tangle. Never yank.
Pulling tugs the skin painfully and damages the coat. For severe mats, use electric clippers instead.
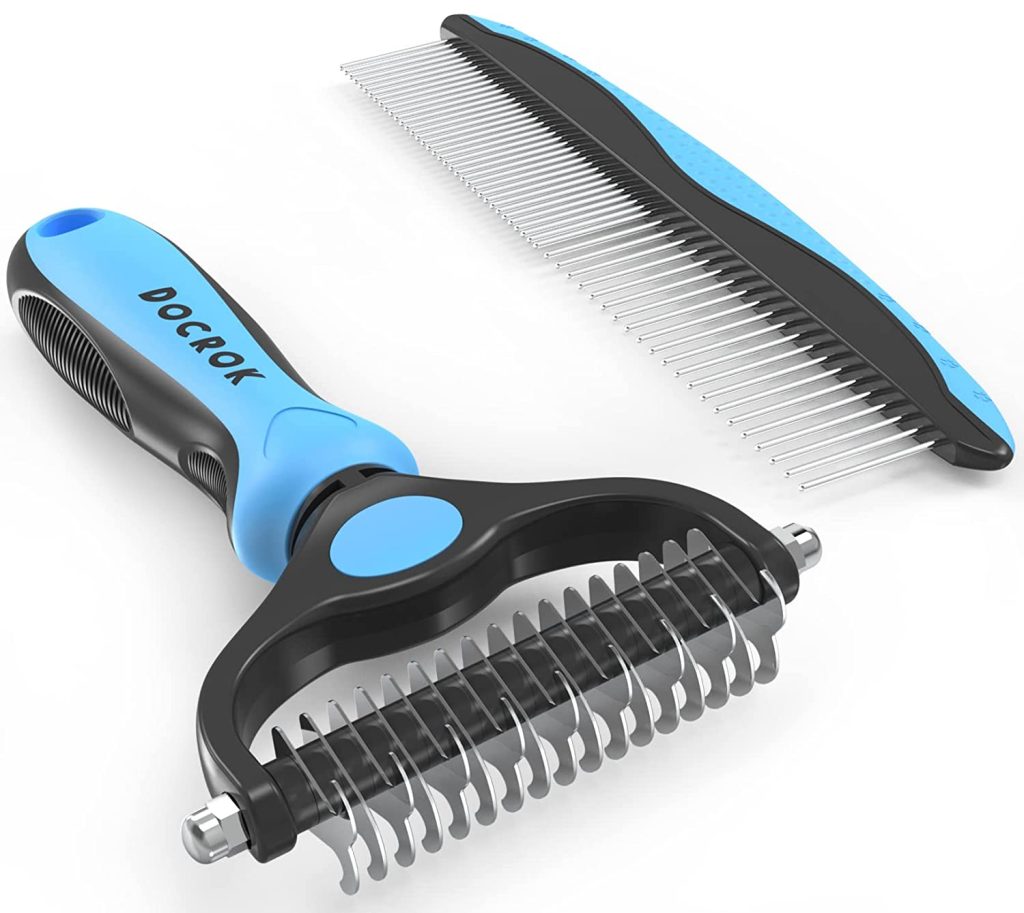
Image source: Bing (Web (fair-use with source credit))
Rounded-Tip Scissors
For trimming around the face, paws, and sanitary areas, you need grooming scissors with rounded tips. The rounded edges prevent accidental stabbing if the pet moves suddenly. Sharp-pointed scissors are for professionals who know exactly what they're doing.
Use these scissors for small touch-ups only. Trim the hair between paw pads, tidy up the eye area, and clean up the rear. Full haircuts require clippers.
Electric Clippers for Regular Trims
If your pet needs regular haircuts, electric clippers are worth the investment. Doodle owners, Poodle owners, and anyone with a continuously growing coat will save significant money over professional grooming appointments.
Look for clippers with adjustable blade lengths. A #10 blade gives a close cut. A #7 leaves about a half-inch of hair.
A #5 or #3.75 leaves more length. Start with a longer blade and work shorter if needed.
Noise is a concern. Some pets panic at the sound of clippers. Choose a model with a quieter motor and introduce the clippers gradually.
Let the pet sniff them while turned off, then run them nearby without touching, then use them for a quick pass. Desensitization takes patience but prevents trauma.
The Cat Owner's Adjustments
Cats are not small dogs. That's the first thing to understand when building a grooming kit for a feline. Their skin is thinner, their nails are shaped differently, and their patience for grooming is famously short.
Using dog tools on a cat rarely ends well.
Nail Trimming Is a Different Game
Cat nails are thinner and more curved than dog nails. They retract into the paw when not in use, which means you have to gently press on the pad to extend them. Dog nail clippers are too bulky for this job.
They crush the nail instead of cutting cleanly, which causes discomfort and splintering.
Cat-specific clippers come in two styles. The guillotine style works well for most cats. You slide the nail through a small opening and squeeze.
The blade slices through the tip. The scissor style is easier for cats with larger nails, like Maine Coons.
Here's the technique. Hold the cat securely in your lap or on a stable surface. Press gently on the paw pad to extend the nail.
Look for the quick, the pink area inside the nail. Cut just below it, at a slight angle. If the nail is dark and you can't see the quick, take off tiny slivers at a time.
Brushes That Cats Actually Tolerate
Many cats hate traditional brushes. The sensation of wire pins dragging across their skin reads as a threat. A grooming glove with rubber nubs changes the game.
The glove lets you pet the cat while collecting loose fur. It feels like affection rather than a tool. Most cats relax into it within minutes.
You'll collect a surprising amount of hair, especially during shedding season.
For cats that tolerate brushing, a soft slicker brush with rounded tips works well. Look for one with fine, flexible pins. Use light pressure and short strokes.
Always follow the direction of hair growth.
A grooming glove handles the basics. A slicker brush handles deeper coat care. Keep both in the kit and let the cat decide which one gets used on any given day.
Matting in Long-Haired Cats
Long-haired cats, like Persians and Maine Coons, mat just like long-haired dogs. The same dematting comb and rounded scissors work, but you'll need more patience.
Cats have a much lower tolerance for restraint than dogs. They squirm, they swat, and they leave. The trick is to do short sessions.
Two to three minutes at a time, several times a week, works far better than one long battle.
Work from the outside of the mat inward. Tease the tangle apart slowly with the dematting comb. If the mat is tight against the skin, clip it out with rounded scissors instead of pulling.
Never yank a mat. It tugs the skin painfully and damages the coat.
Ear Care for Cats
Cat ears are delicate. Use a pet-safe ear cleaning solution and cotton balls. Never use cotton swabs, which push debris deeper into the canal and risk eardrum damage.
Lift the ear flap and squeeze a few drops of solution into the canal. Massage the base gently for about 30 seconds. Let the cat shake its head.
Wipe the visible part of the ear with a cotton ball. That's the entire process.
The Step-by-Step Grooming Workflow
Now that your kit matches your pet, you need a process. The order of operations matters more than most owners realize. Doing things in the wrong sequence stresses the pet out and makes grooming harder than it needs to be.
Here's the sequence that works across species and coat types.
Step 1: Brush Before Bath, Not After
Brushing before a bath removes loose fur, tangles, and mats while the coat is dry. Mats tighten when wet. Brushing them out afterward is painful for the pet and frustrating for you.
Work through the entire coat methodically. Start at the head and move toward the tail. Brush in the direction of hair growth.
Use the undercoat rake first for double-coated breeds, then follow with the slicker brush. Pay extra attention to the areas where mats form: behind the ears, under the armpits, and around the britches.
Step 2: Trim the Nails Before Handling Water
Wet paws are slippery paws. A wet, soapy dog or cat is harder to hold still for nail trimming. Do the nails first while the pet is dry and stable on a non-slip surface.
Remember the technique. Look for the quick on light nails. Cut small slivers on dark nails.
Keep styptic powder within arm's reach. One accident without it turns nail trimming into a emergency vet visit.
Step 3: Check the Ears While You're Already Down There
With the pet calm from brushing and nail trimming, move to the ears. Use the pet-safe cleaning solution and cotton balls. Wipe the visible parts of the ear canal.
Check for redness, odor, or excess wax. Any of those signs warrant a vet visit, not a home remedy.
Step 4: Bathe With Warm Water and Pet-Safe Shampoo
Water temperature matters. Warm, not hot. Cold water makes the pet shiver and tense up.
Hot water burns sensitive skin.
Wet the coat thoroughly. Apply shampoo and work it into a lather, starting at the neck and moving down. Avoid the face and ears.
Rinse thoroughly. Soap residue causes itching and dulls the coat. Rinse twice if you're not certain you got it all.
Step 5: Dry Methodically, Especially for Long Coats
Towel drying comes first. Press the microfiber towel against the coat to absorb water. Rub gently, don't scrub.
Scrubbing causes tangles.
For long-coated and double-coated pets, follow with a blow dryer on low or cool. Keep the nozzle moving constantly. Never hold it in one spot for more than a few seconds.
The goal is to prevent mats from forming as the coat dries.
Step 6: Finish With a Quick Brush
Once the coat is dry, do a final pass with the slicker brush. This catches any tangles that formed during drying and gives the coat a polished look. For cats, this is the perfect moment to use a grooming glove.
They're relaxed after the bath and more tolerant of handling.
The Realistic Grooming Schedule
Consistency beats intensity. A ten-minute grooming session twice a week does more for your pet's coat than a two-hour marathon once a month. The schedule below reflects what works for most pets based on their coat type and lifestyle.
| Coat Type | Brushing Frequency | Bathing Frequency | Nail Trimming |
|---|---|---|---|
| Short, single | 2-3 times per week | Every 6-8 weeks | Every 3-4 weeks |
| Short, double | 3-4 times per week | Every 6-8 weeks | Every 3-4 weeks |
| Long, double | Daily during shed, 3-4x weekly otherwise | Every 4-6 weeks | Every 3-4 weeks |
| Long, single/curly | Daily | Every 4-6 weeks | Every 3-4 weeks |
| Cat, shorthair | 2-3 times per week | Every 8-12 weeks | Every 2-3 weeks |
| Cat, longhair | Daily | Every 6-8 weeks | Every 2-3 weeks |
Seasonal Adjustments
Double-coated breeds blow their undercoat in spring and fall. During those windows, daily brushing with the undercoat rake is essential. Outside those windows, you can ease back to a few times per week.
Cats shed more during warmer months. A grooming glove session every other day helps manage the extra fur and reduces hairballs. Some cats need more frequent brushing as they age because they groom themselves less effectively.
Life Stage Considerations
Puppies and kittens need shorter, more frequent grooming sessions. They're learning tolerance. Keep sessions to two or three minutes and end on a positive note with treats.
Senior pets need gentler handling. Their skin is thinner and more fragile. Their joints may ache, making positioning uncomfortable.
Use softer brushes and be prepared to skip a bath in favor of a wipe-down if they're having a rough day.
Common Mistakes That Hurt More Than Help
Everyone makes grooming mistakes at some point. The key is learning from them without traumatizing your pet in the process. Here are the most common ones, based on aggregate owner feedback and veterinary guidance.
Using Human Shampoo
Human shampoo is formulated for human skin, which has a different pH balance. Using it on a pet strips the coat of natural oils and irritates the skin. The result is dry, itchy, flaky skin that invites scratching and infection.
Pet shampoo is pH-balanced for animal skin and costs roughly the same. There's no reason to risk it.
Cutting the Quick
Nail trimming is the most anxiety-inducing part of home grooming for a reason. The quick, the blood vessel and nerve inside the nail, is easy to nick. Light nails show the pink quick clearly.
Dark nails hide it.
Cut small slivers at a time. Stop the moment you see a dark dot in the center of the cut surface. That's the beginning of the quick.
If you do cut it, apply styptic powder immediately and apply gentle pressure for a minute.
Brushing Only the Top Layer
This is one of the most common mistakes with double-coated breeds. Owners brush the topcoat, see some hair in the brush, and assume they're done. The undercoat remains untouched, trapping dead fur against the skin.
Part the fur with your fingers and brush down to the skin. Use the undercoat rake to reach the lower layer. You'll be amazed at how much fur comes out that the topcoat brush completely missed.
Overusing Deshedding Tools
Deshedding tools like the FURminator work impressively well. They also come with a warning from veterinarians and professional groomers. Overuse can damage the topcoat by cutting live hairs, leaving it thin and brittle over time.
Limit deshedding tool use to once per week during heavy shedding seasons. Use the undercoat rake for regular maintenance. Moderation keeps the coat healthy while still managing the shed.
Bathing Too Often
Baths strip the coat of natural oils that keep it healthy and shiny. Bathing more than once every four weeks can cause dry skin, dull coat, and increased shedding.
Most dogs need a bath every 6 to 8 weeks. Cats need one even less often, typically every 8 to 12 weeks. If your pet gets dirty between baths, spot-clean with a damp cloth or use a waterless shampoo instead.
Skipping Ear Care Until It's a Problem
Ear infections are painful and expensive to treat. They're also largely preventable with a two-minute weekly check. Redness, odor, and excessive wax are early warning signs.
Catching them early means a simple cleaning instead of a vet visit with antibiotics.
Safety First: What Not to Do at Home
Home grooming is safe for most pets most of the time. But there are situations where attempting it causes harm, and recognizing those limits is part of being a responsible owner.
Severe Mats Are Not a DIY Project
When mats become felted, meaning they're matted flat against the skin, brushing them out is painful and dangerous. The skin underneath is often irritated, and yanking at the mat can tear it. Even professional groomers shave out severe mats rather than trying to brush them out.
If you can't get a comb through a mat, it's too far gone. Book a professional groomer to shave it out safely. The resulting haircut looks rough, but the coat grows back and the skin heals.
Aggressive Pets Need Professional Help
Some pets genuinely cannot tolerate grooming. Cats that attack when they see a brush. Dogs that snap during nail trims.
In these cases, DIY grooming is a safety risk for both you and the pet.
A professional groomer has the training, the restraint equipment, and the experience to handle difficult animals. They also know when a pet is beyond their capabilities and needs veterinary sedation. There's no shame in recognizing your limits.
Skin Irritation or Infection
If your pet has red, inflamed, or flaky skin, stop grooming and see a vet. Brushing or bathing an irritated skin condition makes it worse. The vet can diagnose the underlying issue, whether it's allergies, parasites, or a fungal infection, and prescribe appropriate treatment.
Similarly, if you notice lumps, bumps, or unusual odors during grooming, get them checked. Grooming often catches health issues early, which is one of its hidden benefits.
The Temperature Rules
Never use a human blow dryer on high heat. Pet skin burns faster than human skin because it's thinner and less protected by hair in certain areas. Always use the cool or low-warm setting and keep the nozzle moving.
Bath water should be warm but never hot. Test it on your inner wrist. If it's too hot for you, it's too hot for your pet.
What It Actually Costs to Build Your Kit
Let's talk money. This is where most owners either overspend on gear they don't need or underbuy and end up paying for professional grooming anyway. The sweet spot is a kit that handles routine maintenance while leaving the hard jobs to the pros.
The Budget Breakdown
A sensible home grooming kit costs between $50 and $120 depending on your pet's coat type. That might sound like a lot upfront. Compare it to one professional groom at $40 to $90 and the math gets obvious fast.
The kit pays for itself in one to two visits.
| Kit Tier | What's Included | Estimated Cost |
|---|---|---|
| Entry-Level | Bristle brush, slicker brush, nail clippers, styptic powder, pet shampoo, microfiber towel | $40-$70 |
| Mid-Range | Adds undercoat rake, ear cleaning solution, grooming scissors, second towel | $70-$110 |
| Professional-Grade | Adds electric clippers, nail grinder, dematting comb, multiple brush types, waterless shampoo | $150-$250 |
Where to Save and Where to Splurge
Not every tool deserves the same budget. Here's the honest breakdown based on aggregate owner feedback and manufacturer specs.
Save on: Brushes. A $12 slicker brush with rounded tips works as well as a $40 one for most pets. The key is the tip design, not the brand name.
Replace brushes when pins bend or the handle cracks.
Save on: Shampoo. A quality all-purpose pet shampoo in the $10 to $15 range handles most needs. Specialty formulas for sensitive skin or flea control add cost but only help if your pet actually needs them.
Splurge on: Nail clippers. Cheap clippers dull quickly, crush nails instead of cutting cleanly, and cause discomfort. A $15 to $25 pair with sharp, replaceable blades lasts years and makes trims faster and less stressful.
Splurge on: Electric clippers. If your pet needs regular haircuts, cheap clippers overheat, pull hair, and die within months. Quality clippers in the $80 to $150 range last a decade with proper maintenance.
The Versus Question
Here's the decision tree for whether to buy or skip each tool category.
If your pet has short hair only: Buy a bristle brush, nail clippers, styptic powder, and shampoo. Skip the undercoat rake, dematting comb, and electric clippers entirely.
If your pet has a double coat: Buy the undercoat rake. It's non-negotiable. Skip the dematting comb unless you're seeing mats form.
If your pet has long or curly hair: Buy the dematting comb and grooming scissors. Consider electric clippers if you're committed to doing trims at home.
If your pet is a cat: Buy cat-specific nail clippers and a grooming glove. Skip the electric clippers. Most cats never need a full clip.
Hidden Costs to Budget For
Replacement parts sneak up on you. Clipper blades dull and need replacing every 6 to 12 months depending on use. That's $15 to $30 per blade.
Undercoat rake teeth bend over time. Slicker brushes collect hair that needs regular cleaning.
Styptic powder runs out. Shampoo gets used up. Towels wear thin.
Budget $30 to $50 per year for consumables and replacements. That's still a fraction of what professional grooming costs.
When Professional Grooming Still Pays Off
Home grooming handles maintenance. It doesn't replace professional skills for certain jobs. Severe matting, breed-specific haircuts, and anal gland expression are all jobs for a pro.
Factor one or two professional visits per year into your budget for these tasks.
Maintaining Your Tools So They Last
Grooming tools take abuse. Hair, dirt, moisture, and friction wear them down. With basic maintenance, quality tools last years.
Without it, they fail within months.
Brushes and Combs
Clean brushes after every few uses. Hair wraps around the pins and reduces effectiveness. Use a comb to lift out trapped hair.
Wash the brush head in warm, soapy water monthly and dry it completely.
Slicker brushes with retractable pins make cleaning easier. Pull the pin mechanism back, and trapped hair lifts out in one piece. Undercoat rakes need a deep clean after every use during shedding season.
Nail Clippers
Wipe the blades after each use to remove nail dust and debris. Check for dullness every few months. Dull blades crush instead of cut.
Sharpen them or replace them depending on the model.
Guillotine clippers have replaceable blades. Scissor-style clippers can be sharpened with a fine file. Nail grinders need their abrasive bits replaced when they wear smooth, typically every 3 to 6 months.
Electric Clippers
Clippers need the most care. Brush out hair from the blades after every use. Oil the blades with clipper oil before each grooming session.
Check the manufacturer's instructions for the recommended oil type.
Disinfect blades with a blade wash or spray between pets. This prevents the spread of skin conditions. Store clippers in a dry place.
Humidity causes rust and motor damage.
When to Replace Instead of Repair
Some tools aren't worth saving. If a brush has bent or missing pins, replace it. Bent pins scratch the skin.
If clipper blades pull hair even after sharpening, replace them. If a nail grinder's motor sounds strained, retire it.
The rule of thumb is simple. If a tool causes your pet discomfort or fails to do its job, replace it. The cost of replacement is always less than the cost of fixing a grooming injury or a vet visit.
Frequently Asked Questions
How often should I groom my pet at home?
Most pets need brushing two to three times per week. Double-coated breeds need daily brushing during shedding season. Baths happen every 6 to 8 weeks for dogs and every 8 to 12 weeks for cats.
Nail trims happen every 3 to 4 weeks for most pets.
What's the best brush for a pet that hates brushing?
A grooming glove is the best starting point for pets that hate brushes. The rubber nubs feel like petting rather than grooming. You can also try a soft slicker brush with flexible pins.
Introduce the brush slowly with treats and keep sessions under two minutes.
Can I use a human blow dryer on my pet?
You can, but only on the cool or lowest warm setting. Human dryers run hotter than pet dryers and can burn animal skin. Keep the nozzle moving constantly and stop if the pet shows signs of distress.
A low-heat pet-specific dryer is safer for regular use.
How do I know if my pet's ears need attention?
Healthy ears are pale pink, clean, and odor-free. Brown or black discharge, a foul smell, redness, or excessive head shaking all warrant a vet visit. Weekly cleaning with a pet-safe solution prevents most problems, but if infection signs appear, skip the home remedy and see a professional.
When should I stop home grooming and see a professional?
Book a professional for severe mats that won't comb out, breed-specific haircuts, anal gland expression, and aggressive pets that can't be safely handled. Also see a pro if your pet has irritated skin or you're unsure about a health issue you've noticed during grooming.
Is it cheaper to groom at home or at a professional?
Home grooming costs $50 to $120 to start plus $30 to $50 per year in supplies. Professional grooming costs $40 to $90 per visit. If you groom your pet every 6 to 8 weeks, that's $350 to $700 per year.
Home grooming pays for itself within one or two professional appointments.
The Verdict: Build Smart, Groom Consistently
The perfect grooming kit isn't the most expensive one on the shelf. It's the one that matches your pet's actual coat, addresses their specific needs, and fits into a routine you'll actually stick with.
Start with the core essentials. A proper brush for the coat type, nail clippers suited to the species, styptic powder, pet-safe shampoo, microfiber towels, and ear cleaning supplies. That's the foundation.
Add the specialized tools only if your pet needs them. Double-coated breeds get an undercoat rake. Long-haired and curly-coated pets get a dematting comb and rounded scissors.
Cats get grooming gloves and cat-specific clippers. Dogs that need regular trims get electric clippers.
Skip everything else. There's no reason to own four different brushes when two do the job properly. The money you save by buying only what you need goes toward replacing the tools that genuinely wear out.
The Final Checklist
Before you buy anything more, review this list. It covers everything a well-built home grooming kit should include.
- Identify your pet's coat type first. Double, single, short, long, curly, or wiry changes everything.
- Buy the right brush. Bristle for short coats. Slicker with rounded tips for medium and long coats. Undercoat rake for double coats.
- Get species-appropriate nail clippers. Dog clippers for dogs. Cat clippers for cats. Never swap them.
- Keep styptic powder in the kit. You will cut the quick eventually. Everyone does.
- Use pet-safe shampoo only. Human shampoo damages the skin's pH balance.
- Have at least two microfiber towels. They absorb faster and dry the coat more effectively than cotton.
- Add specialized tools only when needed. Dematting comb for long hair. Electric clippers for regular trims. Grooming glove for cats.
- Clean your tools monthly. Brushes, clippers, and combs all need maintenance to keep working properly.
- Keep a consistent schedule. Ten minutes twice a week beats two hours once a month.
- Know your limits. Severe mats, aggressive pets, and skin issues require professional help.
What Actually Matters Long-Term
Every grooming session is data. You learn what your pet tolerates. You spot early signs of skin problems, parasites, or injuries that a professional groomer might mention but never catch because they only see the pet every few weeks.
That early detection alone is worth the cost of the kit. The savings on professional grooming are a bonus. The improved comfort and health of your pet is the real payoff.
So build the kit that fits your animal. Keep the brushes clean. Trim the nails before they grow too long.
Check the ears weekly and the skin every session. Stay consistent and patient, especially with cats and young animals.
Your pet won't ever love grooming the way they love dinner. But with the right tools and a steady routine, they'll tolerate it. They might even learn to enjoy it.
That's the sign you've built the right kit.