

Image source: Bing (Web (fair-use with source credit))
If you've just brought home a Pomsky, you've probably realized something pretty fast: that gorgeous, fluffy coat is a full-time job. The breed's signature look, that perfect blend of Pomeranian fluff and Husky strikingness, comes with a dense double coat that sheds, tangles, and mats if you don't stay on top of it. Learning how to groom a Pomsky isn't optional.
It's the difference between a happy, healthy dog and one that ends up with painful mats or a ruined coat.
The good news? It's entirely manageable once you understand the mechanics. As of 2026, grooming standards for Nordic-type breeds emphasize working with the coat's natural cycle, not against it.
A Pomsky blows its undercoat twice a year, and that's when the real work happens. A consistent weekly routine keeps everything else in check. Let's walk through exactly what you need, what to do, and what to avoid.
Quick Answer
Brush your Pomsky two to three times per week with a slicker brush and an undercoat rake. Bathe every four to six weeks using dog-safe, pH-balanced shampoo and conditioner. Always dry with a high-velocity dryer on cool.
Never rub the coat with a towel. Trim nails every three to four weeks. Check and clean ears biweekly.
Line brushing is the core technique: section the fur, brush from the skin outward, and never shave a double coat.
Why Grooming a Pomsky Is Different From Other Dogs
A Pomsky is not a single-coat dog, and that's where most grooming mistakes start. The breed inherits a double coat from both parent breeds. That means two distinct layers: a soft, dense undercoat that keeps the dog warm, and a harsher, longer topcoat (called guard hairs) that repels water and dirt.
They evolved for cold climates, and that coat does a lot of work.
Most people treat a Pomsky's coat like a regular dog's fur. They brush the surface, see no tangles, and assume everything is fine. They don't realize the undercoat is matting close to the skin, where they can't see it.
By the time they find it, the mat is tight against the skin, and the only fix is shaving. That's a disaster for a double-coated breed.
The Double Coat Reality
Here's what the double coat actually does. The undercoat is the insulation layer. It's soft, woolly, and sheds heavily twice a year during what's called "blowing coat." The topcoat is the protection layer.
It's coarser, longer, and grows slower. These two layers work together to regulate temperature, but they also trap dead fur. If you don't physically remove the dead undercoat, it stays trapped against the skin.
That causes irritation, hot spots, and eventually mats.
The key difference with a Pomsky versus a single-coated dog: you can't just brush the surface. You have to work through the topcoat to reach the undercoat, remove the dead hair before it tangles, and do it without damaging the guard hairs. That requires specific tools and a specific technique.
How Your Pomsky's Generation Affects Grooming
Not all Pomskies are groomed the same way. The generation matters more than most owners realize.
An F1 Pomsky is 50% Pomeranian and 50% Husky. Their coat tends to be a blend, often medium-length with a moderate undercoat. An F1b is 75% Pomeranian and 25% Husky.
These dogs usually have fluffier, more Pomeranian-like coats with a thicker undercoat that mats faster. An F2 is a Pomsky-to-Pomsky breeding, which can produce wildly varied coat types, from short and sleek to extremely plush with a dense, cottony undercoat.
Some Pomskies even inherit a gene for a "wooly" coat. This is longer, softer, and more prone to matting than a standard coat.
| Generation | Parent Split | Typical Coat | Grooming Need |
|---|---|---|---|
| F1 | 50/50 | Medium, blend | Standard |
| F1b | 75/25 | Fluffy, thick undercoat | High, mats faster |
| F2 | Variable | Unpredictable | Assess individually |
| Wooly | Gene variant | Long, soft | Very high, daily brushing |
Look at your dog's coat and feel it. If it's soft and cottony rather than coarse and straight, plan on more frequent brushing. If it's harsher and shorter, you can stretch sessions a bit further.
Adapt to what's on your dog's back.
The Tools You Actually Need (And What You Can Skip)
Walk into any pet store and you'll face a wall of brushes, combs, and gadgets. Most of them you don't need. Research across breeder forums, professional groomer recommendations, and manufacturer guidelines shows a clear consensus: four core tools plus a few extras cover almost everything.
Essential Brushes and Combs
First, you need a slicker brush. This is a flat or slightly curved brush with fine, angled wire pins. It's your everyday tool, perfect for removing loose fur, working through light tangles, and smoothing the topcoat.
Look for one with bent pins. They grab more hair and cause less skin irritation.
Second, you need an undercoat rake. This has longer, widely spaced teeth designed to reach deep into the undercoat and pull out dead hair without cutting the topcoat. This is your heavy-duty tool for blow-out season.
Use it gently. Aggressive raking can scratch the skin.
Third, get a metal comb. This is your precision tool. Use it to check your work, find tangles the brushes missed, and work through sensitive areas like the tail, ears, and behind the legs.
You want one with both wide and fine teeth.
Fourth, a dematting tool, sometimes called a dematting comb. It has bladed edges that slice through mats lengthwise. Use it carefully, and only on mats that aren't tight against the skin.
You also need a grooming spray or detangler. This provides slip, reduces static electricity, and helps brushes glide through the coat. It's your secret weapon between baths.
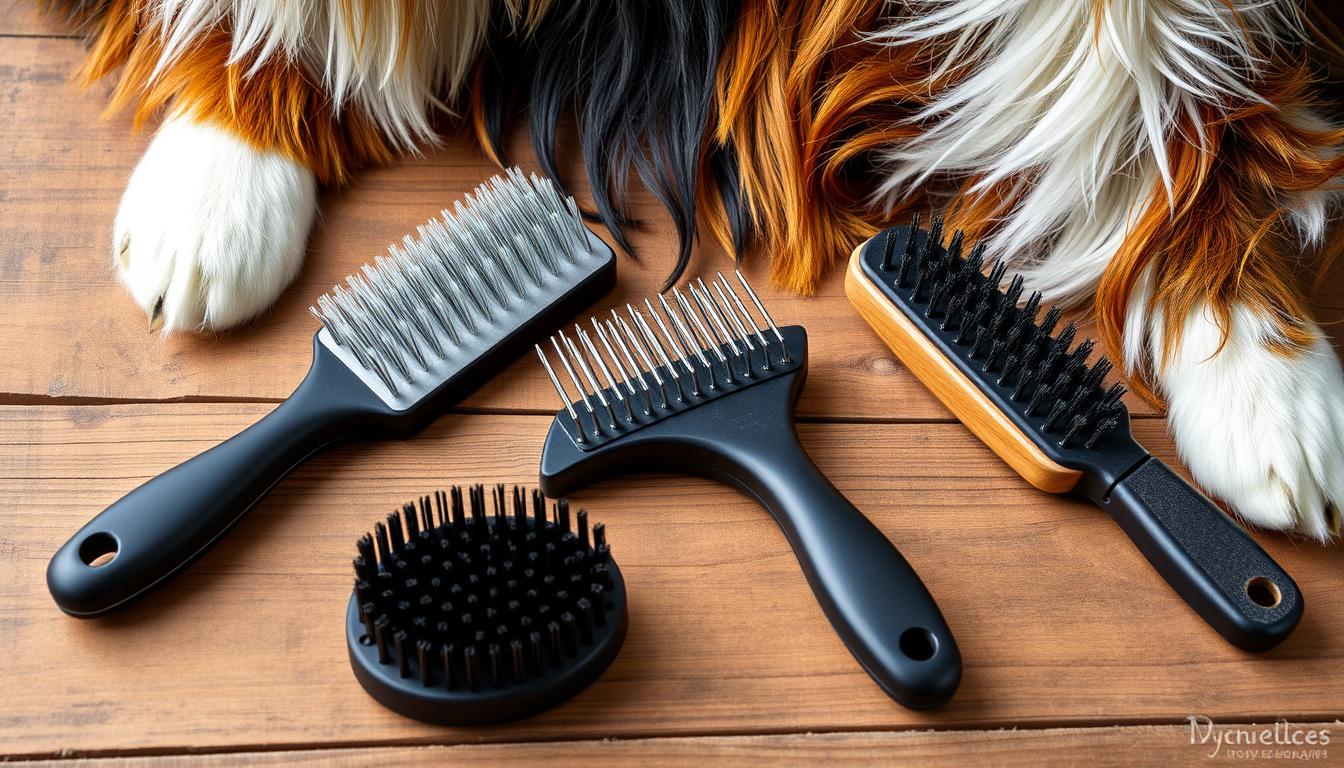
Image source: Web (Bing) / aussiecanine.com (Web image (fair-use with source credit))
Bathing and Drying Equipment
For bathing, you need dog-safe shampoo and conditioner. That's non-negotiable. Human shampoo has a different pH level, around 5.5, while a dog's skin is closer to 7.
Using human products disrupts the skin barrier, leading to dryness, itching, and a dull coat. Choose a pH-balanced formula designed for dogs with double coats.
You also need a high-velocity dryer. This is the single most important piece of equipment you might not own yet. These dryers blow room-temperature air at high force.
They're essential for two reasons. First, they dry the coat thoroughly, down to the skin. Second, they blast out dead undercoat that brushing alone can't reach.
Never rub a Pomsky dry with a towel. That friction creates tangles. Instead, press the towel to absorb water, then use the dryer.
Nail, Ear, and Paw Tools
Finally, you need nail clippers or a nail grinder. Grinders are often easier on anxious dogs because there's no "snip" sensation. Clippers are faster.
You also need styptic powder to stop bleeding if you accidentally cut the quick. For ears, use a vet-approved ear cleaner and cotton balls or pads. Never use Q-tips.
For paws, keep a small pair of blunt-tipped scissors for trimming fur between the toes.
Skip the razor-style "deshedding" tools that look like rakes with blades. Aggressive use of these can cut the topcoat, permanently damaging it. Stick with a good undercoat rake and a high-velocity dryer.
That combination achieves everything the fancy gadgets promise, without the risk.
Step-by-Step: The Full Home Grooming Process
A full home grooming session takes about 45 to 60 minutes once you get the hang of it. It's not a single activity. It's a sequence with a specific order.
Do it right, and grooming becomes a relaxed routine. Do it in the wrong order, and you'll be fighting the coat, your tools, and your dog.
Step 1: Pre-Groom Inspection
Start before you even pick up a brush. Run your hands over your dog's entire body, feeling for mats, burrs, and skin issues. Pay special attention to the friction spots: behind the ears, under the collar, armpits, and the britches, which is the furry area on the back of the thighs.
If you feel a mat, assess its severity. A light, surface tangle can be broken up with your fingers. A tight, dense mat close to the skin requires a different approach.
Never try to cut out a mat with scissors. The skin beneath is paper-thin and moves independently. You'll end up at the vet.
This inspection doubles as a health check. Look for redness, bumps, flakes, or signs of flea dirt. Grooming time is the best time to catch problems early.
Step 2: Brushing in the Right Order
This is where most owners go wrong. They brush the topcoat in the direction of hair growth and call it done. That barely touches the undercoat.
The correct technique is called line brushing.
Here's how it works. Lay your dog on their side, or have them stand on a non-slip surface. Using a metal comb, part the fur in a straight line from the spine down toward the belly.
This exposes the skin and the deepest layer of undercoat.
Now, starting at the skin, brush outward with your slicker brush. Work in small sections, using short, flicking motions. This removes dead undercoat without pulling painfully on the live hair.
After each section, use the comb to check for remaining tangles and to smooth the topcoat.
Work in a systematic order: back, sides, legs, belly, tail, then the chest and neck. The tail is a common matting area, so work through it slowly. The mane around the neck is another spot.
Always start by parting the fur and work from the skin outward.
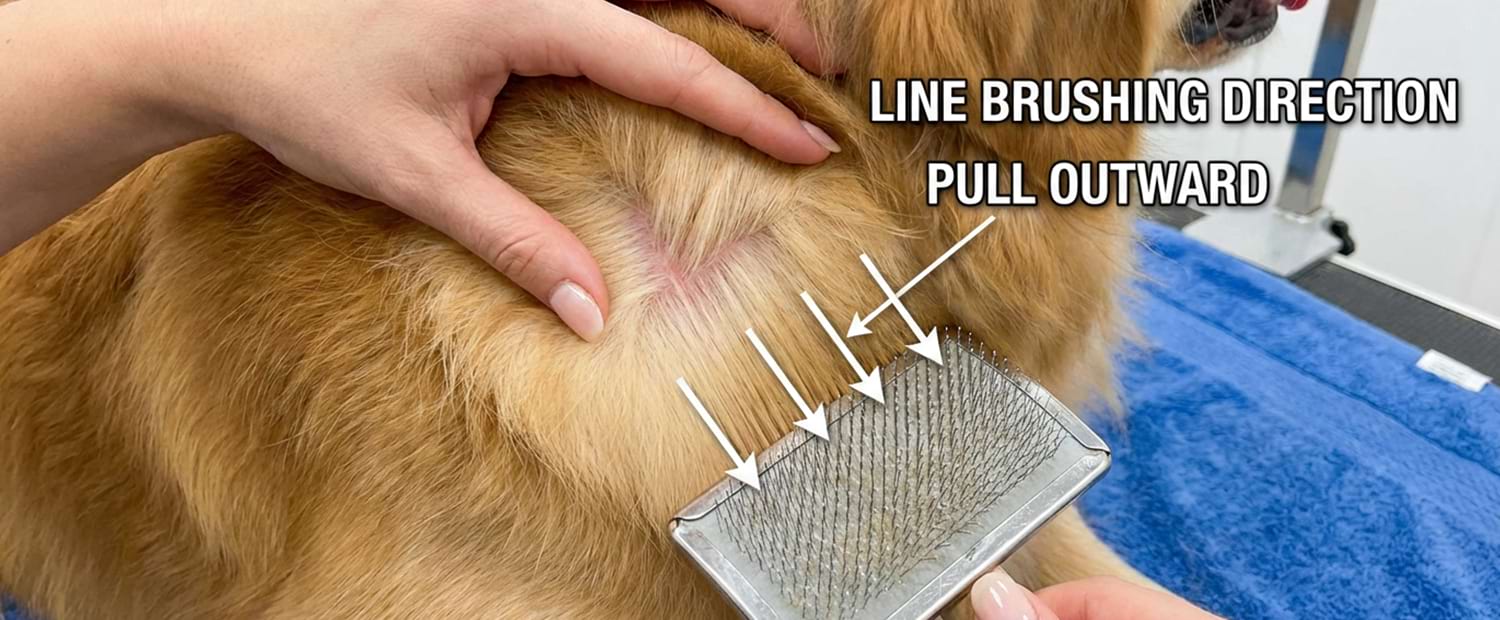
Image source: Bing (Web (fair-use with source credit))
Step 3: Bathing Without Ruining the Coat
Only bathe your Pomsky when they're already brushed out. Bathing a matted coat makes mats tighter. A thorough brush-out before the bath prevents this and removes the loose fur that would otherwise clog your drain.
Use lukewarm water, about body temperature. Too hot, and you'll dry out their skin. Wet the coat completely and apply shampoo.
Work it into a lather all the way down to the skin. Let it sit for the time specified on the bottle, usually two to three minutes.
Here's something most owners don't realize: the undercoat holds onto soap like a sponge holds water. Rinse thoroughly, then rinse again. Residual shampoo causes itching.
After rinsing, apply conditioner. This step is crucial for a double coat. Conditioner smooths the fur, prevents static, and makes future brushing easier.
Leave it for the recommended time, then rinse completely.
Step 4: Drying the Correct Way
Never let a Pomsky air dry. A wet double coat takes hours to dry on its own, and trapped moisture causes skin irritation, hot spots, and a musty smell. Worse, rub-drying with a towel creates friction, which causes tangles and mats.
Press the coat with a towel to remove excess water. Don't rub. Then use a high-velocity dryer on the cool or low-heat setting.
Hold the nozzle a few inches from the coat and move it steadily. As you dry, you'll see dead undercoat flying out. That's a good thing.
You're removing the loose fur before it has a chance to tangle.
Keep the dryer moving. Concentrating on one spot for too long can irritate the skin. Watch your dog's reaction.
Some dogs are scared of the noise. Introduce the dryer slowly, with treats and low power, before you ever point it at their body.
Step 5: Nails, Ears, Paws, and Sanitary Trims
Nail trimming should happen after a bath. Warm water softens the nails slightly, making them easier to cut. Cut small amounts at a time, looking for the quick, which is the pink part inside the nail.
On dark nails, trim tiny bits and look at the cut surface. If you see a dark, moist center, you're getting close to the quick. Stop there.
Ears are simple. Use a cotton ball with a vet-approved ear cleaner. Wipe the visible part of the ear canal and the outer flap.
Never insert anything inside the ear canal itself. If the ear looks red, smells bad, or your dog is shaking their head constantly, skip the cleaning and call your vet.
Paw fur between the toes needs a trim. Long fur here cakes with mud and can cause matting. Use blunt-tipped scissors and trim carefully.
The sanitary area, around the rear, also needs regular trimming to keep things clean.
Step 6: Finishing Touches and Coat Maintenance
The last step is a final brush-through with a slicker brush and comb. This smooths everything out and catches any tangles you missed. Finish with a light mist of grooming spray and brush one final time.
The coat should look shiny, lie flat, and your dog should feel comfortable.
A full groom doesn't end here. The weekly maintenance between full grooms should take about 15 minutes, twice a week. A quick line-brush of the high-tangle zones keeps mats from ever forming in the first place.
Common Grooming Mistakes That Damage a Pomsky's Coat
There are a few classic mistakes that show up over and over again in owner forums and grooming communities. They're easy to make if you don't know any better. But they can permanently damage your dog's coat.
Why Shaving Is Never the Answer
The worst mistake you can make is shaving a Pomsky down, either to "cool them off" in summer, or to fix a badly matted coat. Shaving a double-coated breed is widely considered a cardinal sin by veterinarians and groomers alike.
The undercoat and topcoat grow at different rates. When you shave them, the topcoat can take up to a year or more to regrow. Sometimes it never grows back properly.
What often comes in is a soft, woolly, patchy mess that doesn't look or function like the original coat. Plus, the topcoat provides UV protection and temperature regulation. Shave it off, and your dog is at higher risk for sunburn, insect bites, and overheating.
Over-Bathing and Skin Issues
Bathing too often strips the coat of natural oils. Those oils keep the skin moisturized and act as a barrier against dirt and allergens. When you wash them away, the skin gets dry and itchy.
The dog scratches. The skin gets irritated. The coat gets dull.
Your Pomsky needs a bath every four to six weeks during regular conditions. During blow-out season, you can bathe slightly more often to help loosen dead undercoat. But always use a conditioner to replenish moisture.
Brushing Wrong (Surface vs. Deep)
Brushing only the surface might make your dog look neat, but it's fooling you. The proof is in how much fur you've removed. If after a good brushing session you only have a small pile of fur, you're not getting the undercoat.
You need to see a significant amount of fur when you brush a double coat. If you're not, either your brush isn't cutting through the topcoat, or you're not parting the fur properly. Switch to an undercoat rake and use the line-brushing technique described earlier.
The key signal: if you're brushing for 10 minutes and ending up with almost nothing, you're brushing wrong.
| Mistake | Why It's Bad | What to Do Instead |
|---|---|---|
| Shaving | Ruins coat regrowth, causes sunburn | Line-brush regularly; never shave |
| Human shampoo | Disrupts pH, dries skin | Use dog-safe pH-balanced shampoo |
| Rubbing with towel | Causes tangles and mats | Press-dry, then use high-velocity dryer |
| Surface-only brushing | Leaves undercoat matted | Line-brush using an undercoat rake |
| Air drying | Traps moisture, causes hotspots | Always dry fully with a dryer |
How to Handle the Seasonal Blow-Out
Twice a year, usually in spring and fall, your Pomsky will blow their coat. This is a natural process where the undercoat sheds out entirely to make room for the new season's growth. The amount of fur is shocking if you've never seen it.
It looks like you're grooming a second entire dog.
Recognizing When It's Starting
The signs are obvious if you're looking for them. The coat suddenly loosens, and you can pull out tufts of fur with your fingers. Your dog starts leaving visible fur clouds on the floor.
The undercoat looks patchy and lifting away. This is normal. It's your chance to really address that under layer.
Extra Tools and Techniques for Shedding Season
During blow-out season, increase your brushing frequency to daily. The most effective approach is alternating between your slicker brush and undercoat rake. A bath with high-velocity drying can dramatically speed up the process, as the dryer blows dead fur right out of the coat.
The line-brushing technique is even more critical now. Section the coat, brush the undercoat out, and watch the fur pile grow. This can be messy, so do it outside or in a space where you don't care about the fur.
The process can take several sessions over a week.
Remember, the undercoat has to come out eventually. Removing it sooner rather than later prevents mats and keeps your dog comfortable. Once it's out, there's so much less to manage for the rest of the season.
When the blow-out is over, the coat will feel much lighter. You'll go back to your regular twice-weekly brushing routine.
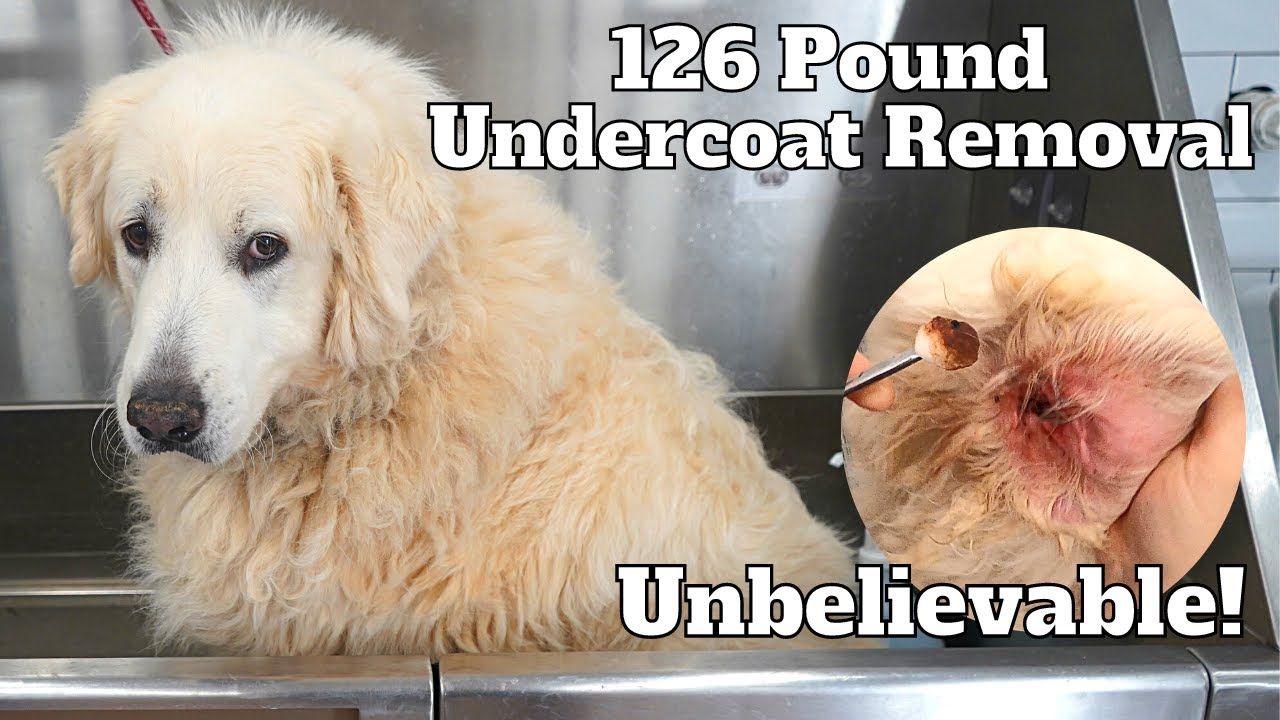
Image source: Bing (Web (fair-use with source credit))
Deshedding vs. Dematting vs. De-Shedding Tools
The grooming aisle is full of products that sound like they do the same thing. Deshedding, dematting, and de-shedding tools look similar. They're not the same, and using the wrong one for the job can cause serious problems.
What Each Actually Does
Deshedding is the process of removing loose undercoat fur. It's a maintenance activity that happens year-round. The goal is to pull out dead hair before it tangles, mats, or ends up all over your furniture.
Dematting is more intensive. It's the process of breaking up existing tangles and mats. This can be done with your fingers, a dematting tool, or in severe cases, a professional groomer.
Dematting is always more painful and stressful than deshedding. That's why prevention matters so much.
De-shedding tools are a specific product category. Think of them as specialized rakes with blades or teeth designed to pull out the undercoat. These can be effective, but they're also risky when used incorrectly.
Choosing the Right Tool for Your Dog's Coat
Use a slicker brush and undercoat rake for regular deshedding. These are gentle enough for weekly use and won't damage the topcoat. If you're dealing with a light surface tangle, use your fingers and a detangling spray first.
Let the spray sit for a minute, then gently work the tangle loose.
Only use a de-shedding tool when your Pomsky has a healthy, well-brushed coat. These tools work by cutting through the undercoat. If you use them on a matted coat, you're pulling mats tighter against the skin, which is painful.
For actual dematting, skip the de-shedding tools. They're not designed for that job. Instead, use a dematting comb, which has bladed edges that slice through the mat without pulling.
Or make an appointment with a professional groomer. For mats that are tight to the skin, that's the safest option.
| Task | Right Tool | Wrong Tool |
|---|---|---|
| Weekly maintenance | Slicker brush + undercoat rake | De-shedding tool (overuse) |
| Seasonal blow-out | Undercoat rake + high-velocity dryer | De-shedding tool on matted fur |
| Light tangles | Fingers + detangling spray | Scissors (too risky) |
| Tight mats | Dematting comb or professional groomer | De-shedding tool (makes mats worse) |
Pro Groomer Tips for a Calm, Cooperative Pomsky
Getting your Pomsky to sit still for grooming is a challenge. These dogs are clever enough to resist things they don't like. A calm, cooperative Pomsky is the result of deliberate training, not luck.
Puppy Socialization and Handling Practice
If your Pomsky is still a puppy, you have a golden window. Start grooming-related handling from the day they come home. Touch their paws, ears, tail, and belly while they're relaxed.
Pair each touch with a high-value treat. You're teaching them that being handled leads to good things.
Introduce the tools slowly. Let the puppy sniff the brush. Run it gently on their back for two seconds, then reward them.
Repeat this over several days. Build up to longer sessions. The dryer is often the scariest tool.
Turn it on in another room. Reward calm reactions. Gradually bring it closer.
If your Pomsky is an adult and hasn't had early training, don't lose hope. The process takes longer but still works. Use the same principle of positive association: high-value treats, short sessions, and plenty of breaks.
Reading Your Dog's Stress Signals
Dogs communicate through body language. If you can't read the signs, you'll push too hard and damage trust. Common stress signals include yawning when they're not tired, lip licking, and whale eye, which is when they show the whites of their eyes.
A tight mouth, pinned ears, and a tucked tail are more obvious signals.
If you see any of these, stop what you're doing. Take a break, let them reset, and try again later. Pushing through stress makes the problem worse.
The dog learns that grooming is scary and will fight harder next time.
Many owners report that grooming sessions after a long walk go smoother. A tired dog is a more relaxed dog.
Building a Grooming Routine That Sticks
Routine creates predictability. Dogs thrive on knowing what comes next. That's why a consistent grooming schedule works better than sporadic marathon sessions.
Set a dedicated grooming time, like every Saturday morning. Use the same spot in your home and the same tools. Your Pomsky will quickly learn the drill.
The mat goes down, the brush comes out, and the treats appear.
Keep sessions short. A 15-minute session twice a week is more effective than a 60-minute session once a month. Short sessions prevent boredom and stress.
They also make it easier to keep up with mats before they form. Always end on a positive note with a treat or play session.
When to Call a Professional Groomer
There's a difference between handling your dog's grooming at home and knowing when to hand it over. Understanding where that line sits can save your Pomsky from pain and save you from frustration.
Signs You Need Backup
Some situations are beyond home grooming. If you find a tight mat close to the skin, book a professional. Trying to brush it out causes pain, and your dog will learn to avoid grooming.
Professionals use specific techniques that remove mats without pulling.
You should also consider a professional if your Pomsky is severely anxious or aggressive during grooming. A professional groomer has experience handling difficult dogs. They also have the right tools and restraints to keep both of you safe.
How Often to Book a Full Groom
Most owners book a full professional grooming every 8 to 12 weeks. This catches tasks that are hardest at home: a thorough blow-out, nail grinding, ear cleaning, and sanitary trims.
During heavy shed seasons, you might add an extra appointment. Blow-out season is the highest demand period for groomers. Book early if you want a spot.
Regular professional grooming costs $60 to $90 per visit, depending on your area and the groomer's experience.
The average professional groom takes 90 minutes and costs around $75. The average home groom takes 45 minutes and costs a few dollars in consumables. Both are valid.
The right answer is the one that works for you and your dog.
Cost Breakdown: Home Grooming vs. Professional Grooming
Let's get into the numbers. Understanding the actual costs helps you make a smart decision about your grooming approach. There's no single right answer, but there is a right answer for your situation.
What You'll Spend Upfront and Over Time
If you groom at home, you'll need to invest in tools upfront. Here's a realistic estimate for a basic toolkit:
| Tool | Estimated Cost | Notes |
|---|---|---|
| Slicker brush | $15-$30 | Spend a bit more for comfortable grip |
| Undercoat rake | $15-$25 | Choose one with rounded tips |
| Metal comb | $10-$20 | Look for wide and fine tooth in one |
| Dematting tool | $15-$25 | Only needed if mats form |
| Grooming spray | $10-$15 | Lasts for several months |
| Dog-safe shampoo & conditioner | $20-$35 | Replace every 2-3 months |
| High-velocity dryer | $60-$150 | The biggest single investment |
| Nail clippers or grinder | $15-$40 | Grinders run higher |
| Styptic powder | $5-$10 | Essential for accidents |
| Grooming wipes | $10-$15 | For between-bath cleanups |
Your initial investment lands around $175 to $365. Most of these tools last for years. The ongoing costs, shampoo, conditioner, and spray, add up to roughly $20 to $30 per month.
Professional grooming costs vary by region. Urban areas run $80 to $90 per session. Suburban and rural areas often see $60 to $80.
If you book every 8 weeks, you're looking at $390 to $585 per year, excluding tips.
The math is clear. Home grooming costs less long-term, but the price is your time and effort. Many owners find a middle ground.
They do basic home maintenance, then treat their Pomsky to a professional groom every few months for a thorough blow-out. This keeps costs manageable while ensuring the coat gets professional attention during peak shed seasons.
FAQ: Pomsky Grooming Questions You Didn't Know You Had
Sometimes the questions that aren't asked are the ones that matter most. Real owners ask specific things beyond the basics. Here are answers to the most useful ones.
How do I handle a Pomsky who hates being brushed?
Start by using a softer brush, and pair gentle brushing with a highly valued treat, like small bits of chicken. Keep sessions to two minutes max for the first week. When your dog stays calm, gradually extend the time.
If your dog gets overwhelmed, stop and try again later in the day. Never hold them down. That teaches them grooming is a fight.
Can I use a Furminator on my Pomsky?
Yes, but with strict caution and only on a clean, thoroughly brushed coat. The Furminator's blade removes dead undercoat efficiently, but applying too much pressure can cut the topcoat. Use it sparingly, no more than once a week, and never on tangles.
Many groomers prefer a standard undercoat rake for this reason, since it's gentler on the guard hairs.
Should I trim my Pomsky's paw fur?
Yes. Fur between the toes collects dirt, mud, and even ice in winter. It mats easily, especially on active Pomskies.
Use blunt-tipped scissors to trim the hair flush with the paw pads. Keep the scissors parallel to the pad so you don't accidentally cut the skin.
Can I apply coconut oil to my Pomsky's coat?
Small amounts of unrefined coconut oil can help with dry skin, but apply it correctly. Rub a minimal amount into your hands and massage it into the coat. Too much will make your dog's fur look greasy and attract dirt.
Never apply it directly to the skin in large amounts. If your dog has sensitive skin, check with your vet first.
How do I get rid of that "wet dog" smell?
Make sure your Pomsky is completely dry after a bath. Moisture trapped in the undercoat creates the perfect environment for odor-causing bacteria. That's why using a high-velocity dryer is non-negotiable.
You need to dry down to the skin, not just the topcoat. If the smell persists after full drying, it may be a sign of a skin infection that needs veterinary attention.
If the smell shows up between baths, check for a different cause. Sometimes it's a skin infection, like yeast or bacteria, which needs a vet's diagnosis. Other times it's simple dirt trapped in the undercoat.
A quick spot-clean with grooming wipes often fixes this. But don't rely on wipes for more than a few days. They don't clean deep enough.
Only a proper bath and thorough dry will reset the coat's condition.
Is it safe to use a blow dryer on my Pomsky?
Yes, but only if you use the right type and settings. A human hair dryer is too hot and too weak. It can burn your dog's skin while leaving the undercoat damp.
A high-velocity dryer specifically designed for dogs moves large volumes of air at room temperature or low heat. Always start on the lowest setting and hold the nozzle several inches away from the coat. Keep it moving constantly.
Can I use baby wipes on my Pomsky?
Baby wipes aren't ideal. They contain ingredients that can irritate a dog's skin, especially one as sensitive as a Pomsky's. Choose dog-specific grooming wipes instead.
They're formulated with a dog's skin pH in mind and are free of harsh alcohols and fragrances. They're perfect for quick wipe-downs after muddy walks.
How do I groom my Pomsky's face without hurting them?
The face is delicate, so you need the right tools and a light hand. Use a fine-tooth metal comb for the muzzle and around the eyes. For eye boogers, use a damp cotton ball or a soft grooming wipe.
Never use scissors near the eyes unless you're a professional. The skin is too thin and the risk of injury is too high.
What should I do if I find a tick or flea during grooming?
Stop brushing, and remove the tick immediately with fine-tipped tweezers. Grasp the tick as close to the skin as possible and pull straight up with steady pressure. Don't twist it.
Clean the bite area with rubbing alcohol. If you find fleas or flea dirt, bathe your dog with a vet-approved flea shampoo and treat your home to break the flea life cycle. Daily grooming is a key line of defense against parasites.
Why is my Pomsky's coat turning brown or reddish?
This usually happens in the areas that get wet frequently, like around the mouth, paws, and legs. The color change comes from a compound in saliva and tears called porphyrins. It reacts with light and air to leave reddish-brown stains.
Preventing this comes down to drying those areas thoroughly after your dog drinks or walks in wet grass.
If the brown color appears anywhere else, it could be a sign of a skin condition. Some Pomskies develop yeast infections on their feet or belly, which can cause a brown tint. You'd also see your dog licking or chewing at the area constantly.
In that case, call your vet for a proper diagnosis.
Final Verdict: Your Simplified Weekly Grooming Plan
You've got the tools, the techniques, and the troubleshooting knowledge. Let's put it all together into a simple, repeatable plan. Consistency beats intensity every time.
A quick routine you stick to is more valuable than a perfect one you skip.
The 15-Minute Routine
Twice a week, you'll spend about 15 minutes on maintenance. This is enough to prevent mats, control shedding, and keep your Pomsky looking sharp between full grooms.
Start with a quick inspection. Run your hands over the coat, checking for tangles, burrs, or skin issues. Then grab your slicker brush.
Starting at the back, brush in the direction of hair growth, working in small sections. Follow up with your undercoat rake to reach the deeper layer. Use the slicker again to smooth everything out.
Finish with your metal comb on the tail, britches, and behind the ears, the mat-prone zones. End with a treat, and you're done.
Every second week, add nail trimming and ear checks to the routine. If your dog's nails click on the floor, it's nail time. Look for redness, debris, or smells in the ears.
A quick wipe with a cotton ball and ear-cleaning solution handles most maintenance.
The Monthly Deep-Clean Routine
Once a month, or every six weeks, give your Pomsky a full bath. Start with a thorough brush-out to remove dead fur. Then shampoo and condition with dog-safe products.
Rinse completely and press-dry with a towel. Use your high-velocity dryer to finish, working through the coat to ensure it's dry down to the skin. Those dryer passes are also perfect for blowing out any remaining loose undercoat.
Finish with a final brush-through.
During spring and fall, increase your brushing to daily and consider an extra bath to help the coat release faster. If your schedule allows, book a professional groom at the beginning of each blow-out season. That gets you a clean start and takes the heaviest shedding off your hands.
That's the entire plan. It's simple, effective, and designed to work with your dog's coat, not against it. Grooming a Pomsky is a commitment, but it's also a chance to bond.
Your dog gets steady, gentle attention, and you get a home free of floating fur. The routine becomes second nature quickly. And after a few months, you'll know exactly what your Pomsky's coat needs before your brush even touches it.