
Your cat has been hiding under the bed for three days. You finally coax her out, and that's when you see it: the fur along her back has turned into a solid, felted mass. It looks painful.
It probably is. Learning how to shave a matted cat safely is one of those tasks that sounds simple until you're holding a pair of scissors near a squirming animal with paper-thin skin.
Here's the uncomfortable truth: matting isn't just a cosmetic issue. When fur felts tightly against the skin, it pulls with every movement and traps moisture. That creates the perfect environment for bacterial infections, flea infestations, and even bruising.
Severe matting can also restrict a cat's ability to move normally, which often signals an underlying health problem. The safest approach combines the right tools, a clear understanding of feline anatomy, and an honest assessment of when to hand the job to a professional.
Quick Answer
Shave a matted cat by using pet-specific clippers with a #10 blade. Never use scissors. Work on a dry cat, pull the skin taut, and clip in the direction of hair growth.
Stop immediately if your cat panics. For tight, skin-level mats, see a vet or professional groomer.
Why This Matters More Than You Think
Matted fur is not a surface problem. It's a skin problem, a comfort problem, and sometimes a medical problem hiding in plain sight. When loose fur, dander, and debris pack together at the base of the coat, they form tight knots that tug at the skin with every movement.
Over time, that constant tension causes pain, restricts mobility, and creates a warm, damp environment where bacteria and fungi thrive.
Once a mat reaches skin level, brushing it out is no longer an option. You cannot brush a pelted coat. Trying to do so only causes more pain and skin trauma.
Shaving is the only humane solution, and it needs to happen before the mat gets worse.
When Matting Becomes a Health Emergency
There's a difference between a small tangle behind the ears and a full-body pelt. A single loose mat near the tail might be manageable at home. But when mats cover large areas, sit directly on the skin, or hide wounds underneath, you're dealing with a welfare issue that requires professional attention.
- Skin lesions and bruising: Tight mats can cut off circulation and cause deep bruising underneath. Once shaved, these areas look alarming and may need veterinary treatment.
- Flea infestations: Mats trap fleas and their eggs near the skin where you can't see or treat them effectively.
- Mobility restriction: Severe matting across the legs or belly can literally hobble a cat, making it difficult to walk, jump, or use the litter box.
- Emotional distress: Cats in constant pain from skin tension often become withdrawn, aggressive, or stop grooming entirely.
The Cost of Waiting
Every day you put off addressing a matted coat makes the problem worse. Small mats grow into larger ones. Loose fur continues to tangle.
The skin underneath gets more irritated. And your cat's tolerance for handling drops with each painful experience.
Veterinarians report that cats brought in for severe matting often need sedated shave-downs. These cost anywhere from $150 to $400 depending on your location and the cat's condition. That's significantly more than the $60 to $150 you'd spend on a quality set of pet clippers.
And if the mats are hiding skin infections, you're adding exam fees and medication costs on top.
Addressing matting early is kinder to your cat and cheaper for your wallet.
What You Need Before You Start
Before you even bring the clippers near your cat, you need the right equipment. Using the wrong tools isn't just ineffective. It's dangerous.
The Clippers: This Is Non-Negotiable
You cannot use human hair clippers on a cat. Human clippers are designed for fine, thin human hair and lack the power to cut through dense, matted animal fur. They'll jam, overheat, and ultimately fail, leaving you with a half-shaved cat and a tool that's now dangerous.
Pet-specific clippers are engineered with stronger motors, cooling systems, and blades designed to handle thick coats. When choosing clippers, look for:
- Low vibration: Cats are sensitive to movement and sound. High-vibration clippers feel threatening.
- Quiet operation: A loud motor will send most cats running before you even touch them.
- Ceramic or titanium blades: These stay cooler during longer sessions and hold their edge longer.
- Corded options for home use: Cordless clippers are convenient, but they lose power as the battery drains. That can cause the blade to snag or pull at the fur.

Image source: Bing (Web (fair-use with source credit))
The Blade: Size Matters More Than You Think
The blade determines how close you shave, and for cats, that's a critical safety decision. The most common recommendation for dematting is a #10 blade, which leaves approximately 1/8 inch of fur. This length provides enough protection to prevent sunburn and skin irritation while still removing the matted coat.
| Blade Number | Cut Length | Best Use | Risk Level |
|---|---|---|---|
| #10 | ~1/8 inch | Standard dematting, surgical prep | Low |
| #7 | ~1/4 inch | Light mats, sensitive areas | Low |
| #15 | ~1/16 inch | Very tight mats, vet use only | High |
| #30 | ~1/100 inch | Surgical prep, not for home use | Extreme |
Avoid anything finer than a #10 for home use. The closer the shave, the higher the risk of nicks, razor burn, and ingrown hairs. If a mat is so tight that you feel you need a finer blade to remove it, that mat is severe enough to warrant professional attention.
Scissors: Know When They're Actually Safe
Here's a hard rule: never use scissors on a matted cat if you can't see exactly where the skin is. Veterinary emergency rooms see a steady stream of cats with V-shaped wounds from owners trying to snip out mats with scissors. Cat skin is incredibly thin and elastic, and it bunches up in the folds of mats.
One wrong cut can slice open a wound that requires stitches.
The only safe use for scissors is on a mat that sits high off the skin with clear separation visible. If you must use scissors for this, choose blunt-tipped safety scissors and angle them so the tips point away from the skin.
Supporting Supplies
Beyond the clippers, these items make the job safer and more comfortable:
- Dematting spray: A light application helps lubricate the fur and reduce static. Avoid heavy sprays that gum up the blades.
- Clipper cooling spray: Blades heat up with use, and a hot blade can cause serious burns.
- Styptic powder: This clotting agent stops bleeding from minor nicks. Cornstarch or flour can work in a pinch.
- A second person: An extra set of hands to hold the cat gently but firmly can make the difference between a calm session and a frantic one.
- Thick towels: Wrapping a struggling cat in a towel provides security and limits movement without causing panic.
How to Tell If Your Cat's Mats Are Too Severe for Home Shaving
Not every mat can be handled at home. Knowing when to stop and seek professional help is the single most important safety decision you'll make.
The Visual Test
Gently part the fur with your fingers and look at the base of the mats. You're checking for two things: how close the mat sits to the skin, and what the skin looks like underneath.
| Signs Home Shaving Is Safe | Signs You Need a Professional |
|---|---|
| You can see skin between sections of the mat | The mat is fused to the skin with no visible separation |
| The mat has clear separation from the skin | The skin underneath looks red, inflamed, or oozing |
| The skin underneath looks pink and healthy | You notice fleas, ticks, or scabs beneath the mat |
| Mats are localized to one or two areas | Mats cover more than 30% of your cat's body |
| Your cat tolerates handling | The mat has a strong odor suggesting infection |
| — | Your cat shows signs of pain when you touch the area |
The Touch Test
Run your fingers gently over the matted area. If your cat flinches, pulls away, or vocalizes, that's a pain response, not just protest. Cats hide pain instinctively, so any visible reaction means significant discomfort.
Now try to lift the mat away from the skin. If it moves freely, you have some working room. If it's welded to the skin like glue, stop immediately.
Attempting to clip a skin-level mat without proper technique will result in injury.
The Temperament Test
Honesty here can save you a trip to the emergency room. Consider your cat's history and current mood.
- Does your cat tolerate being held? If grooming is already a battle, shaving will be worse.
- Has your cat ever bitten or scratched during handling? An anxious cat can deliver serious injury in seconds.
- Is your cat sick, elderly, or in pain? These cats have lower stress tolerance and may react unpredictably.
According to the Cornell University College of Veterinary Medicine, stressed cats can experience a spike in blood pressure and heart rate during handling. For cats with underlying health conditions, that stress can trigger dangerous complications. If you have any doubt about your cat's temperament, start with a professional groomer.
When Mats Hide Something Worse
Mats don't form in a vacuum. They often develop because something else is wrong.
- Obese cats may have mats because they can't twist around to groom their backs and hindquarters.
- Cats with dental pain stop grooming because the process hurts.
- Arthritic cats find the contortions of grooming too painful.
- Cats with skin allergies over-groom, causing excess oil and dander that accelerates matting.
A vet visit may be the right first step before any grooming attempt. If your cat has never had matting issues before and suddenly develops severe mats, that change warrants investigation. Underlying medical conditions need treatment, not just a shave.
Step-by-Step: How to Shave a Matted Cat Safely
You've assessed the situation. Your cat's mats are accessible, the skin looks healthy, and your cat tolerates handling. Here's the step-by-step process that minimizes risk and maximizes comfort.
Step 1: Prepare Your Space and Your Tools
Setup matters more than most people realize. A calm, controlled environment reduces your cat's stress and gives you better access.
- Choose a quiet room away from other pets, children, and loud noises.
- Lay down a non-slip mat on a table or counter at a comfortable height.
- Have all tools within reach before you bring in your cat.
- Plug in your clippers and let them run for a minute so your cat can get used to the sound.
Step 2: Acclimate Your Cat to the Clippers
Do not skip this step. The most common reason home shaving attempts fail is because owners rush this stage.
- Let the clippers run on the floor while your cat watches from a distance.
- Gradually bring the clippers closer, offering treats and praise.
- Touch the back of the clippers to your cat's shoulder while they're off.
- Turn them on and touch them to the same area briefly.
- Reward calm behavior and stop if your cat shows signs of severe stress.
Step 3: Position Your Cat Safely
How you hold your cat determines how safe the process is. You need enough restraint to prevent sudden movement, but not so much that your cat panics.
The most effective approach for a single person:
- Place your cat on a flat surface, facing away from you.
- Gently place one hand on the back of their neck, using light pressure to keep them in position.
- Use your other hand to hold the clippers.
- If your cat tries to escape, stop moving the clippers and hold them still until they settle.
For cats that resist, the towel wrap technique works well. Wrap your cat snugly in a thick towel like a burrito, leaving only the area you're working on exposed.
Step 4: Start With the Easiest Area First
Begin with the least sensitive area to build confidence, for you and your cat. The back and shoulders are generally the safest starting points. Work from the back of the neck toward the tail, following the natural direction of hair growth.
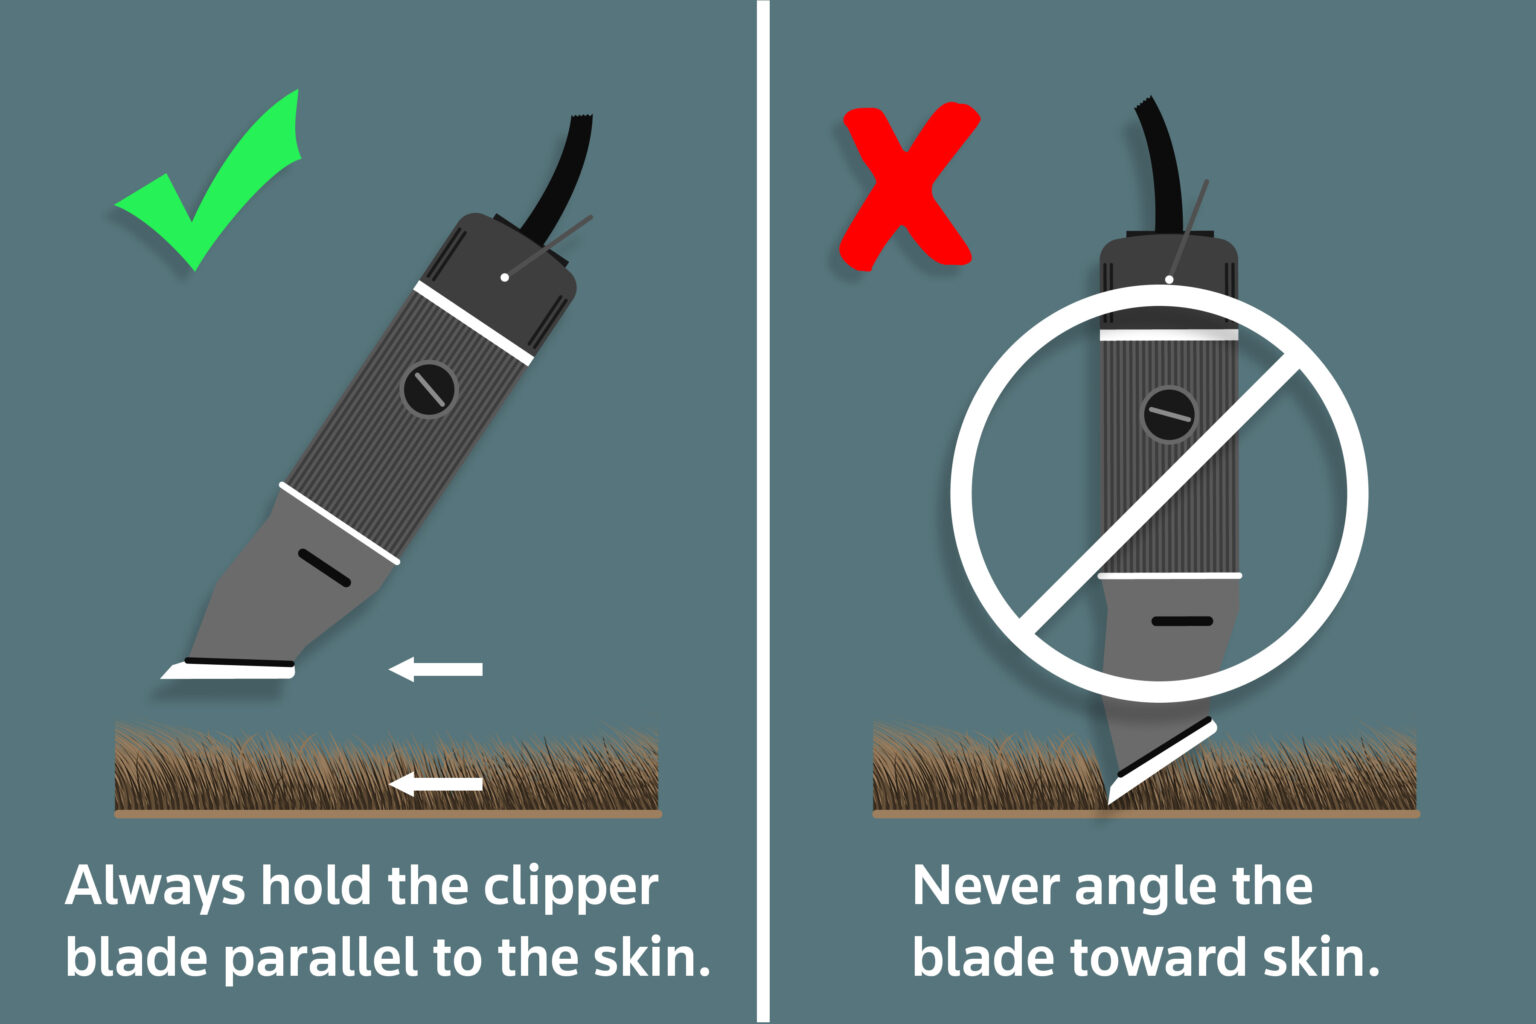
Image source: Bing (Web (fair-use with source credit))
The correct technique:
- Pull the skin taut with your free hand ahead of where you're clipping. This prevents the skin from bunching up into the blade.
- Hold the clipper flat against the skin at a parallel angle, never at an angle where the blade teeth can dig in.
- Use slow, steady strokes in the direction of hair growth.
- Take short passes rather than long sweeps across the body.
Step 5: Work Through Mats Layer by Layer
Mats rarely come off in one pass. Here's how to approach them safely:
- Brush away loose surface fur around the mat with a dematting comb or slicker brush.
- Apply a light mist of dematting spray to help the clipper slide through.
- Make your first pass along the top of the mat, not at the base. This reduces the bulk.
- Make subsequent passes slightly deeper, working your way down to the skin level.
- Stop 1/8 inch above the skin. Do not push the blade hard against the skin for a closer shave.
If a mat is extremely tight and the clipper keeps snagging, do not force it. Stop, reassess, and consider whether the mat needs professional attention.
Step 6: Monitor Blade Heat
Clipper blades generate significant heat during use. A hot blade against your cat's skin causes burns, which are painful and can become infected.
- Test the blade temperature on the back of your hand every few minutes.
- Apply clipper cooling spray as directed by the manufacturer.
- Stop and let the clippers cool if the blade feels hot to the touch.
- Have a backup blade ready so you can swap out when the first gets warm.
Step 7: Handle Panic the Right Way
No matter how well you prepare, your cat might panic. How you respond determines whether you end up with a minor setback or a serious injury.
Do not:
- Grab or squeeze your cat harder
- Raise your voice or react with frustration
- Continue clipping while your cat struggles
Do:
- Turn off the clippers immediately
- Set them down out of sight
- Hold your cat gently and let them calm down
- Offer treats and praise for settling
- Take a break. It's okay to come back later or the next day.
Step 8: Know When to Stop for Good
Some cats are never going to tolerate a home shave. This isn't a failure. It's reality.
If your cat is so stressed that you can't safely continue, stop and call a professional.
Signs that you should stop immediately:
- Your cat is panting, drooling, or trembling
- Your cat is growling, hissing, or attempting to bite
- You've made several cuts or nicks
- Your cat has escaped and won't come back to you
- You're feeling frustrated or rushed
The Dangerous Zones: Where Cats Get Cut
Some areas of a cat's body are significantly more dangerous to shave than others. Understanding these high-risk zones before you start can prevent the most common injuries.
The Groin and Genital Area
This is the most dangerous area to shave on a cat. The skin is extremely thin, loose, and often bunched up in folds. Mats here are common because this area is hard for cats to groom effectively, but they're also the hardest to remove safely.
- Do not attempt to shave mats directly on the genitals.
- If mats are affecting urination or defecation, seek veterinary assistance immediately.
- A deep cut in this area can sever blood vessels or nerves, causing severe bleeding and long-term damage.
The Armpits (Axillary Region)
The armpits are another high-risk zone. The skin here is loose and folds easily, making it very easy to catch in the clipper blade. Additionally, hair growth directions are erratic, so the clipper can grab and pull unevenly.
How to approach armpits safely:
- Pull the leg gently away from the body to stretch the skin.
- Use a lighter blade pressure in this area.
- Work very slowly, making multiple short passes.
- If the area is severely matted, leave it to a professional.
The Belly
The belly is tricky because the skin is loose and the area is highly sensitive. A cat's natural instinct is to protect its belly, so getting them to hold still here requires significant trust.
The real danger isn't just cuts. It's punctures. The abdominal wall is very thin, and a slip with scissors or a sharp clipper blade can potentially cause a penetrating wound that leads to peritonitis, a life-threatening infection.
The Neck and Throat
The skin around the neck is loose and mobile, allowing cats to turn their heads freely. That same mobility makes it dangerous to shave because the skin moves with every head turn.
A common mistake is wrapping one hand around the cat's neck to hold it still. This actually bunches the skin and increases the risk of catching the blade.
The Tail
Mats on the tail are frustrating because the tail moves constantly. Even a calm cat will twitch its tail instinctively when touched.
- Work from the base toward the tip, following the direction of hair growth.
- Hold the tail firmly but gently at the base to minimize movement.
- Never shave the very tip of the tail. The skin is too close to the bone, and there's no room for error.
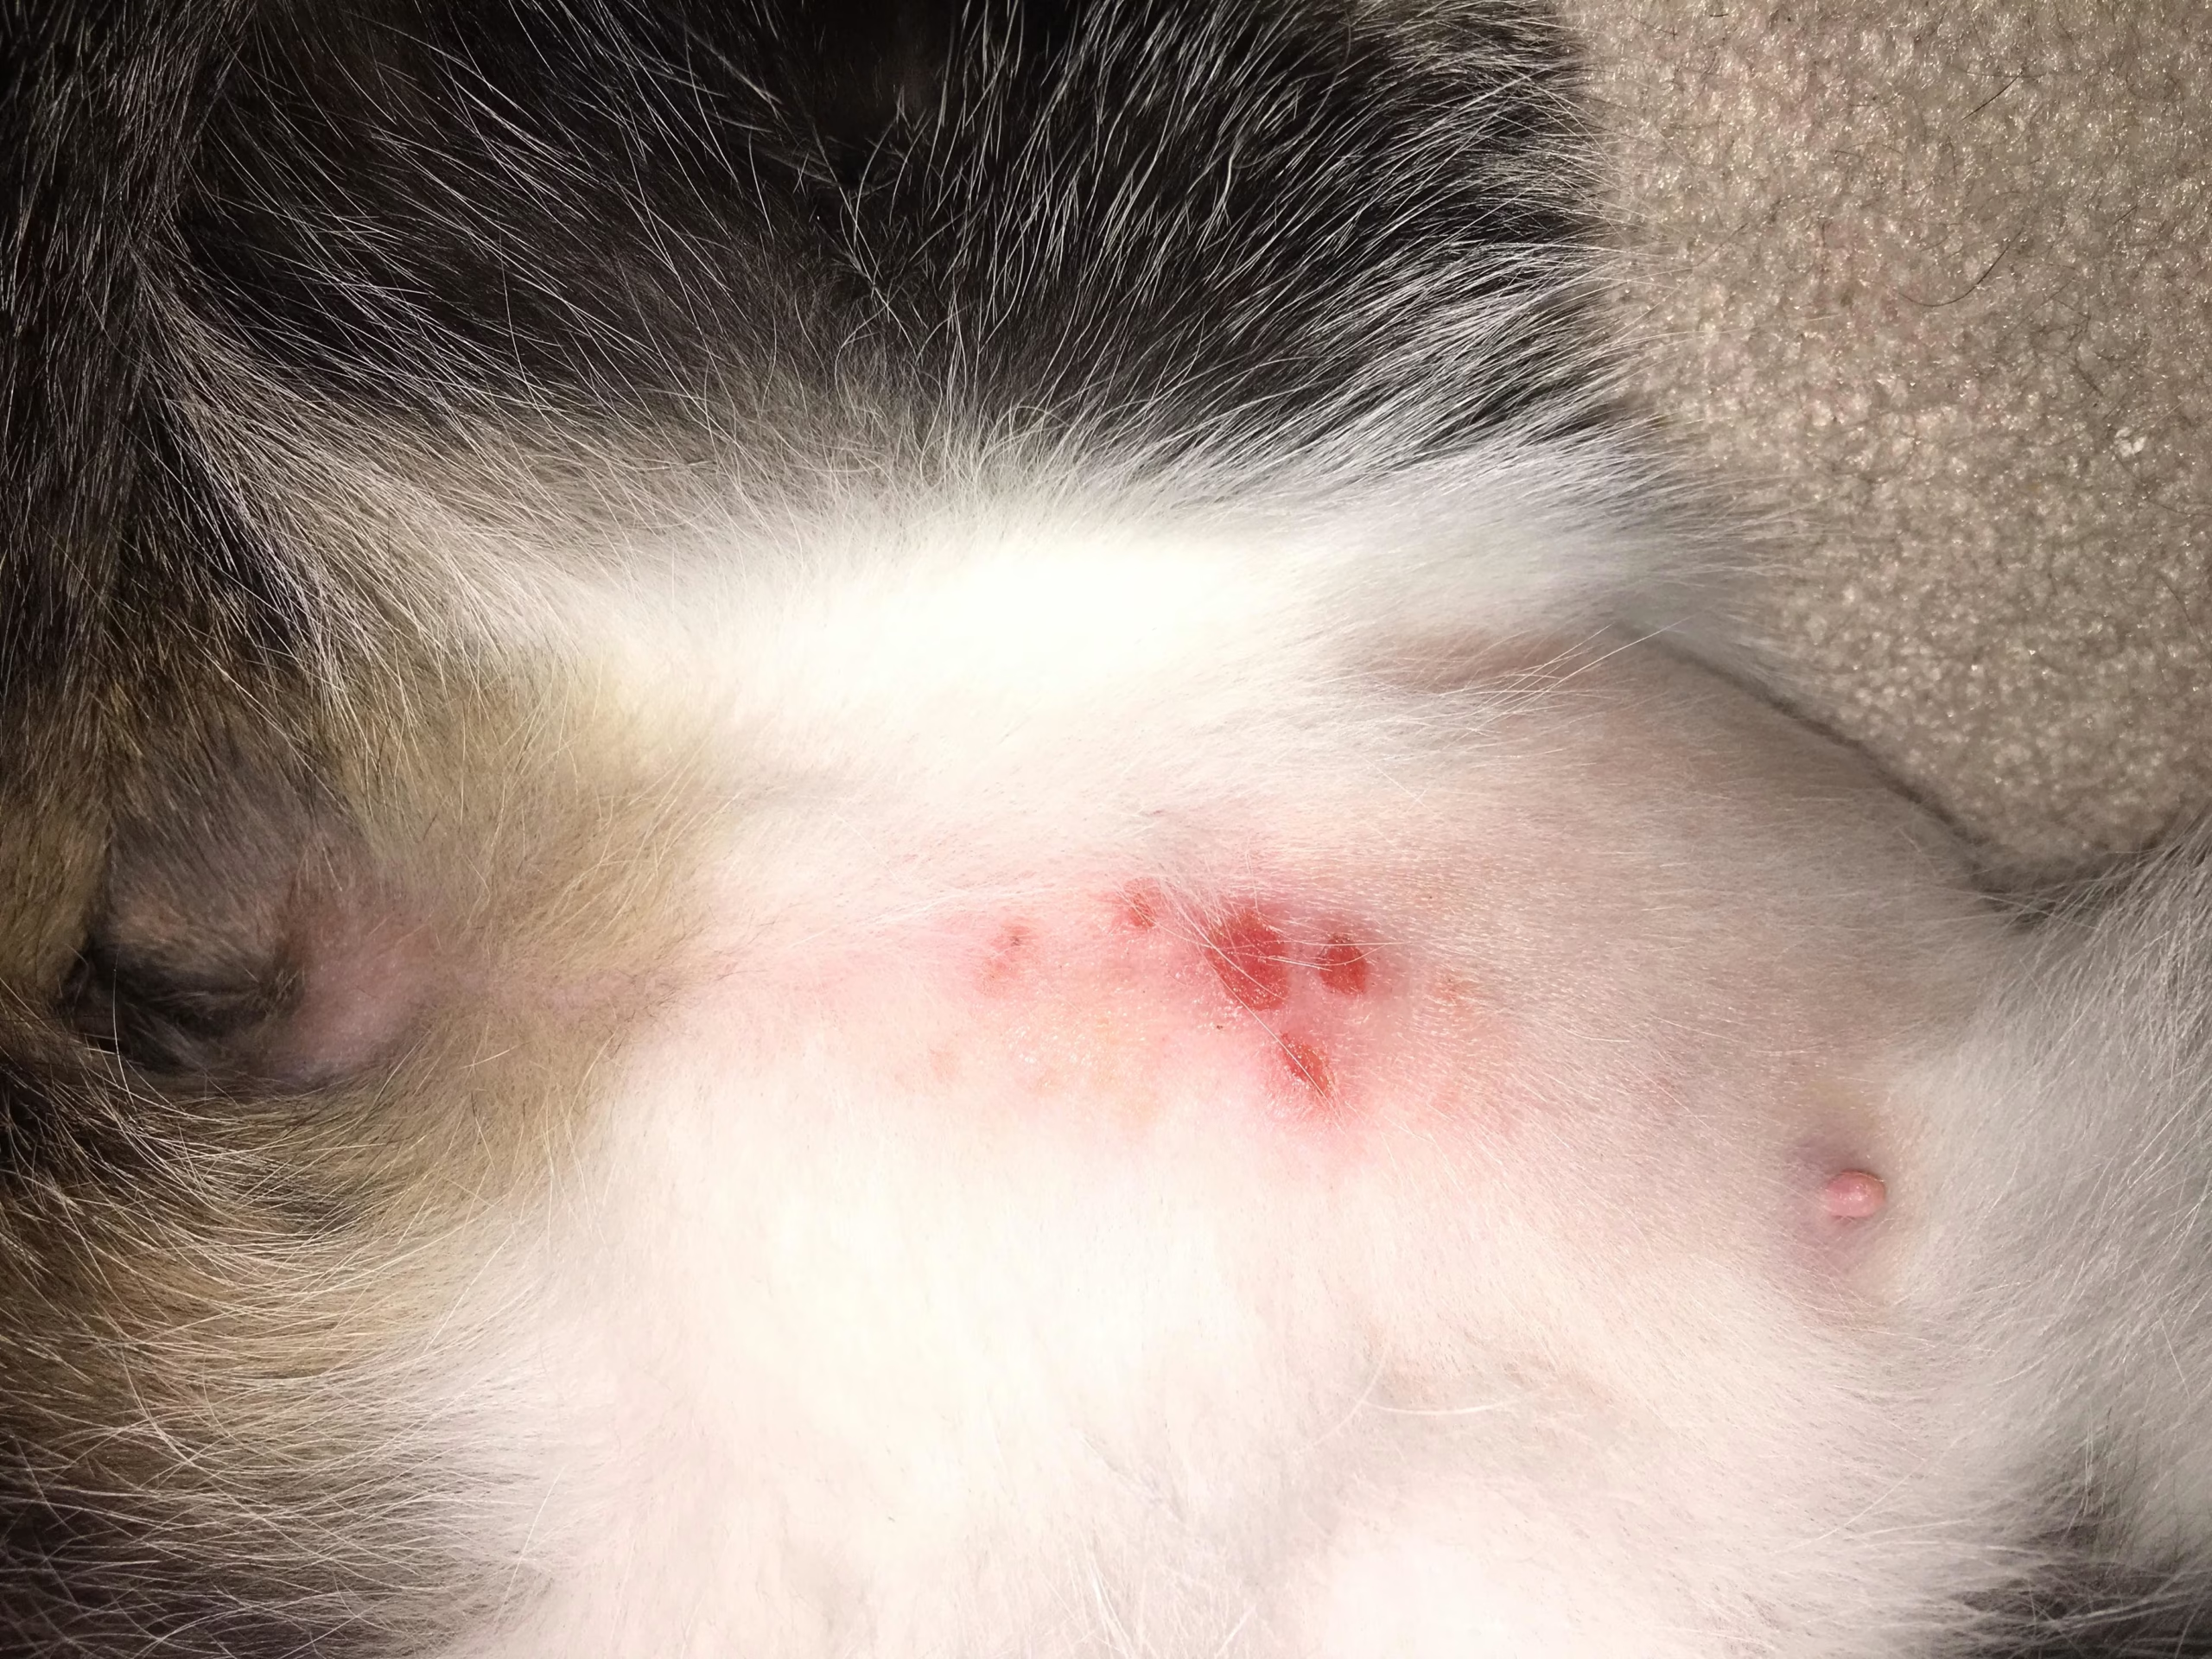
Image source: Bing (Web (fair-use with source credit))
The Lion Cut: Should You Go Full Body or Spot-Shave?
You've got the clippers out and your cat is tolerating the process. Now comes the strategic decision. Do you shave the entire body or just the problem areas?
The answer depends on how widespread the matting is, your cat's tolerance, and the season.
The Full-Body Lion Cut
The "lion cut" involves shaving the entire body from the neck down, leaving fur on the head, tail tip, and sometimes the lower legs. It's the standard approach for severely matted cats.
Who it's best for:
- Cats with mats covering more than 30% of their body
- Cats with pelted coats where mats have fused together
- Senior or obese cats that can't groom themselves
- Cats with recurring seasonal matting issues
Pros of the lion cut:
- Removes all existing mats in one session
- Eliminates the risk of missing hidden mats
- Makes future brushing dramatically easier
- Allows you to inspect and treat skin conditions thoroughly
Cons of the lion cut:
- Your cat loses insulation for several weeks
- Skin becomes exposed to sunburn and cold drafts
- Cats may feel vulnerable and act skittish for a few days
- Regrowth can take 3 to 6 months to fully return
The Targeted Spot-Shave
Spot-shaving removes mats only from specific areas while leaving the rest of the coat intact. This approach works when matting is localized to one or two trouble spots.
Who it's best for:
- Cats with one or two isolated mats
- High-anxiety cats that won't tolerate a long session
- Cats with mild matting that hasn't reached skin level
- Owners who want to preserve the coat's natural appearance
Pros of spot-shaving:
- Less emotional stress for your cat
- Keeps most of the coat for insulation
- Faster process, often completed in 10 to 15 minutes
- Less dramatic appearance change
Cons of spot-shaving:
- Remaining mats can worsen if not monitored
- The shaved area will look patchy against the longer coat
- Hidden mats may be missed until they become severe
How to Decide
Here's the decision logic that works in most situations:
If mats are localized and you can see healthy skin around them, spot-shave. This preserves the coat and minimizes stress.
If mats are widespread, fused together, or hiding skin issues, go for the lion cut. Leaving partially matted areas behind just means you'll be dealing with the same problem in a few weeks.
If your cat is elderly or has heart disease, stop and consult a vet. The stress of a full-body shave can be too much for some cats.
The Middle Ground: Partial Lion Cut
Some owners opt for a compromise. They shave the back, sides, and belly, but leave the legs, tail, and chest longer. This removes the most problematic matting while preserving a more natural look.
Talk to your groomer or vet about this option. It's a popular choice for cats with moderate matting.
What to Do If You Cut Your Cat
Even with the best technique and the calmest cat, accidents happen. The clipper blade catches a fold of skin. Your cat jerks suddenly.
You see blood. Here's what to do, step by step.
Assess the Severity
Not every cut requires a vet visit. Small surface nicks that stop bleeding quickly can be treated at home. Deep cuts, punctures, or wounds that bleed heavily need professional attention.
Minor cuts you can handle at home:
- Less than half an inch long
- Shallow surface wound
- Bleeding stops within 2 to 3 minutes
- No visible fat, muscle, or tendon
Cuts that require veterinary care:
- Bleeding that doesn't stop after 5 minutes of pressure
- Gaping wound with visible tissue underneath
- A puncture wound anywhere on the belly or groin
- Any cut near the eyes, mouth, or genitals
- Signs of infection within 24 hours: redness, swelling, discharge, fever
Immediate First Aid
If the cut is minor, here's your response plan:
- Turn off the clippers immediately and set them down.
- Apply direct pressure with a clean cloth or gauze for 2 to 3 minutes.
- Clean the wound gently with warm water or a mild antiseptic solution made for pets.
- Apply styptic powder or cornstarch to a small nick to help stop bleeding.
- Monitor the wound over the next 24 hours for signs of infection.
Do not apply human antibiotic ointments like Neosporin. Cats can be sensitive to the ingredients, and some will lick it off immediately. Stick with vet-approved wound care products.
The Danger of Puncture Wounds
Punctures are different from cuts. A small puncture can appear harmless on the surface but cause significant internal damage. This is especially true on the belly and groin, where the skin is thin and organs sit close beneath.
If you suspect your clipper caused a puncture wound anywhere on the torso, call your veterinarian. Even a tiny puncture can introduce bacteria into the abdominal cavity, leading to peritonitis.
When Emergency Care Is Needed
Certain signs demand immediate veterinary attention:
- Uncontrolled bleeding: Pressure doesn't stop the flow after 5 minutes.
- Shock symptoms: Pale gums, rapid breathing, weak pulse, collapse.
- Your cat is hiding and refusing to move: This suggests significant pain.
- Visible body cavity: If you can see fat, muscle, or organs, wrap the area in clean gauze and get to the vet immediately.
The Emotional Aftermath
A cut is traumatizing for both you and your cat. Take a deep breath. Process what happened.
Remember that the matting itself was already causing discomfort.
After the wound is treated, give your cat space. Do not attempt to resume shaving for at least 24 hours. Your cat needs time to relax and rebuild trust.
When to Stop and Call a Professional
There's no shame in admitting that home shaving isn't working. In fact, recognizing your limits is the most responsible thing you can do for your cat.
Behavioral Red Flags
Your cat is telling you they're done. The question is whether you're listening.
- Hissing and growling: This isn't protest. It's a warning. Continuing to shave a cat that's hissing at you is asking for a serious bite injury.
- Attempted biting or scratching: If your cat has lunged at you or swiped, end the session immediately.
- Freezing or rigid posture: A cat that goes completely still isn't calm. It's terrified.
- Attempted escape: If your cat bolts and refuses to come back, they've reached their limit.
- Panting, drooling, or trembling: These are signs of severe stress, not just annoyance.
Physical Red Flags
Some situations are physically beyond what home equipment and technique can handle.
- Mats fused to the skin: If you can't see any separation between mat and skin, you risk serious injury trying to remove it.
- Coat is dirty or greasy: Clippers dull quickly on greasy fur, causing snagging and pulling.
- Skin conditions underneath: Redness, pustules, scabs, or oozing indicate an active skin infection that needs vet treatment.
- The mat is huge: Large mats covering the entire back or belly are extremely difficult to remove safely at home.
What a Professional Groomer Does Differently
Professional groomers and veterinarians have advantages you don't. They have heavy-duty grooming tables with restraints, high-end clippers, and years of experience handling difficult cats.
Most importantly, they have access to sedation when needed. Veterinarians can administer light sedation that keeps cats calm and pain-free during shave-downs. This is safer for everyone involved.
Vet vs. Groomer
| Factor | Professional Groomer | Veterinarian |
|---|---|---|
| Sedation available | No | Yes |
| Cost | $60 to $150 | $150 to $400 |
| Skin condition diagnosis | Limited | Full diagnostic capability |
| Best for | Calm cats, moderate mats | Aggressive or severely matted cats |
| Can treat infections | No | Yes |
If you suspect skin issues beneath the mats, skip the groomer and go straight to the vet. The vet can treat the medical problem while shaving the coat, saving you two separate visits.
The Cost of Waiting
Delaying professional care doesn't just prolong your cat's discomfort. It makes the problem worse. Mats continue to tighten.
Skin conditions spread. Your cat's tolerance for handling decreases with each stressful experience.
| Scenario | Estimated Cost |
|---|---|
| At-home shave with proper tools | $60 to $150 |
| Professional groomer | $60 to $150 |
| Vet sedated shave-down | $150 to $400 |
| Emergency vet visit for a cut or bite | $500 to $2,000 |
When in doubt, professional care is the financially safer bet, not to mention the kinder one for your cat.
Why Did This Happen? Preventing Future Matting
Shaving your cat was the emergency fix. Now it's time to address the root cause. Because if you don't, you'll be back here in a few months with a new set of mats.
Understanding Why Cats Matt
Matting happens when loose undercoat fur tangles with the topcoat and felts into a dense mass. The process accelerates when something interrupts normal grooming, sheds the coat excessively, or creates friction.
The primary causes:
- Insufficient grooming: Long-haired cats need daily brushing. Short-haired cats need weekly sessions.
- Seasonal shedding: Cats blow their undercoat twice a year, typically spring and fall.
- Excess body weight: Overweight cats can't reach their back, hindquarters, or tail base.
- Age-related mobility issues: Arthritis makes grooming positions painful.
- Dental disease: A cat with painful gums won't groom properly.
- Humidity and static: Humid environments cause fur to clump. Dry indoor heat creates static that tangles the coat.
Building a Sustainable Grooming Routine
The fix isn't complicated, but it does require consistency.
For Long-Haired Breeds
| Frequency | Task |
|---|---|
| Daily | Full-body brushing with a slicker brush |
| Daily | Check behind ears, under armpits, and around the tail |
| Twice weekly | Comb through with a wide-toothed metal comb |
| Weekly | Inspect skin for fleas, scabs, or irritation |
| Monthly | Trim the sanitary area professionally if needed |
For Short-Haired Breeds
| Frequency | Task |
|---|---|
| 2-3 times per week | Slicker brush or grooming glove session |
| Weekly | Check for mats behind ears and under collars |
| During shedding season | Increase to daily brushing |
The Tools That Actually Help
Your brushing tools matter as much as your technique.
- Slicker brush: The workhorse of cat grooming. Use gentle, short strokes.
- Undercoat rake: Designed for heavy-shedding breeds. Reaches deep into the undercoat.
- Wide-toothed metal comb: Perfect for checking your work.
- Dematting comb: If you catch a tangle early, this tool can often save the coat.
- Grooming gloves: Great for cats that hate traditional brushes.
The "Two-Minute Rule"
Prevention doesn't have to be a marathon session. The two-minute rule is simple: brush your cat for two minutes every day.
That's it.
Two minutes of focused brushing removes loose fur before it tangles. It also builds trust between you and your cat. Over time, your cat learns that grooming is a positive experience.
Diet Impacts Coat Health
You can't brush your way out of a poor diet. Coat quality starts from the inside. Cats need adequate protein, omega-3 fatty acids, and essential vitamins to maintain healthy skin and fur.
- High-quality protein: Look for named animal proteins as the first ingredient.
- Omega-3 and omega-6 fatty acids: These support skin health and coat shine.
- Hydration: Dehydrated cats have drier, more brittle coats that tangle faster.
- Biotin and zinc: These micronutrients support hair follicle health.
If your cat's coat feels dry, brittle, or dull despite regular grooming, talk to your vet about nutritional adjustments.
When to Consider a Preventative Trim
Some cats are simply prone to matting, no matter how diligent you are. For these cats, a preventative trim can save everyone the stress of emergency dematting.
- Sanitary trim: Keeping the fur short around the rear and tail base prevents urine and feces from matting into the coat.
- Belly shave: For cats that like lying on cool surfaces, a belly shave reduces matting where the coat rubs against the ground.
- Full lion cut for problem groomers: If your cat consistently mats despite daily brushing, a seasonal lion cut every 3 to 4 months may be more humane.
Common Mistakes That Make Matting Worse
Every groomer and vet has a story about a well-meaning owner who made things worse. Here are the mistakes we see most often, and the correct approach for each.
Mistake #1: Bathing a Matted Cat
Wet fur shrinks. When you bathe a matted cat, the mats tighten as the coat dries. You end up with a cat that's cleaner but significantly more matted.
The fix: Never bathe a cat before addressing matting. Shave first, then bathe if needed. And only shave a completely dry coat.
Mistake #2: Using Human Clippers
Human hair clippers lack the power and blade design for animal fur. They overheat quickly, dull fast, and jam on thick undercoat.
The fix: Use pet-specific clippers with a powerful motor designed for dense coats.
Mistake #3: Cutting Along the Mat Surface
Some owners try to "thin out" a mat by snipping across the top with scissors. This creates a rough, uneven surface that tangles faster. It also leaves the base of the mat tight against the skin.
The fix: Remove the mat entirely by shaving at the base. Leaving partial mats just means they'll reform worse than before.
Mistake #4: Forcing the Clippers Through a Mat
When clippers snag, owners often push harder. This is exactly how cuts happen. The blade catches a fold of skin.
The fix: If the clipper snags, stop. Pull the mat away from the skin and clip from a different angle. If the mat won't release, it's either too dirty or too tight.
Mistake #5: Skipping the Acclimation Phase
You can't just pick up a cat, turn on a loud clipper, and expect cooperation. Aggressive handling creates a negative association that makes future grooming attempts even harder.
The fix: Spend several days acclimating your cat to the clipper sound and vibration.
Mistake #6: Shaving Against the Grain
Clipping against the direction of hair growth causes the blade to grab and pull. It also leaves an uneven finish that can irritate the skin.
The fix: Always clip in the direction of hair growth.
Mistake #7: Not Checking for Skin Issues First
Shaving a matted cat without inspecting the skin underneath is like cutting paper without checking what's on the other side.
The fix: Before shaving, part the fur and examine the skin. If you see redness, pustules, scabs, or anything unusual, stop and call your vet.
Mistake #8: Attempting a Full Shave in One Session
A single long session stresses your cat and increases the risk of injury. It also causes the blade to heat up.
The fix: Work in short sessions of 5 to 10 minutes. Take breaks, let your cat settle, and continue later.
Mistake #9: Ignoring Post-Shave Skin Care
The skin under mats is often irritated, sensitive, or compromised. Shaving exposes it to the air.
The fix: After shaving, monitor the skin for a few days. Use vet-approved soothing products if needed.
Mistake #10: Forgetting the Emotional Aftermath
The matting may be gone, but your cat remembers the experience. If grooming ended with both of you stressed, your cat will resist future attempts.
The fix: End every grooming session on a positive note. Offer high-value treats, give your cat space, and rebuild trust before the next session.
Frequently Asked Questions
How long does a cat's fur take to grow back after a shave?
Most cats regrow a full coat in 3 to 6 months, depending on breed, age, and health. Long-haired breeds like Persians and Maine Coons may take closer to 6 months. Short-haired cats often regrow their coat in 2 to 3 months.
Regrowth can look patchy initially. Don't be alarmed if the new coat feels slightly different.
Is it cruel to shave a cat?
Shaving is not cruel when done for medical or welfare reasons. Severe matting causes real pain, restricts movement, and can lead to skin infections. Removing the mats relieves that suffering.
However, shaving for purely cosmetic reasons without a veterinary or welfare need is unnecessary and can cause anxiety.
Can I use human clippers on my cat?
No. Human clippers are designed for fine, thin human hair and lack the motor power to cut through dense animal fur. They overheat, dull quickly, and jam on undercoat.
Using human clippers on a matted cat risks pulling, snagging, and burns.
What if my cat has mats near the skin and I can't separate them?
If a mat is fused to the skin with no visible separation, do not attempt to remove it at home. The risk of cutting the cat is too high. This is a job for a professional groomer or veterinarian.
A vet may use sedation to safely remove skin-level mats.
Does shaving cause long-term coat damage?
For most cats, shaving is temporary and the coat regrows normally. However, some long-haired breeds can experience coat changes after shaving. The regrown fur may be slightly different in texture, color, or density.
In rare cases, the coat doesn't regrow evenly.
How do I calm my cat before shaving?
Start with acclimation. Let your cat hear the clippers running without touching them. Offer treats and praise.
Next, touch the clippers to your cat's back while they're off. Gradually turn them on and make brief contact. Always keep sessions short and positive.
If your cat remains anxious, ask your vet about calming supplements.
Final Verdict: What's the Safest Path for Your Cat?
Every cat is different. Every matting situation has its own severity, location, and underlying causes. So there isn't a single universal answer to whether you should shave at home or seek professional help.
But there is a logical decision path that works when you follow it honestly.
Start With the Facts
Before deciding anything, answer these questions:
- How severe is the matting? Localized and loose, or widespread and skin-level?
- How is your cat's temperament? Calm and tolerant, or anxious and reactive?
- Is the skin underneath healthy? Pink and clean, or red and irritated?
- What's your experience level? Comfortable with grooming tools, or a first-timer?
Follow the Decision Tree
If mats are loose and you have the right tools, and your cat is calm enough to handle it, shave at home. Use a #10 blade, work in short sessions, and stop at any sign of stress.
If mats are tight or fused to the skin, or skin issues exist underneath, see a professional. A vet should always handle skin-level mats, infections, or anything requiring sedation.
If you're on the fence or your cat is a challenge, default to professional care. It's the safer choice, and honestly, the cheaper one than an emergency visit later.
The One Mistake You Should Avoid
Trying to shave a matted cat exactly like someone else does on social media isn't realistic. Every cat has a different temperament, every coat mats differently, and every owner has different skill levels.
The Bottom Line
The safest path is a clear one: assess honestly, prepare properly, and know when to stop. If you're confident and equipped, at-home shaving is a practical option. If you're not, professional help is the responsible choice.
Give yourself permission to make that call. Your cat's safety matters more than your pride.
And no matter which path you choose, make prevention your priority. Daily brushing, seasonal attention, and early intervention will keep the clippers in a drawer where they belong.