
You know that feeling when you've spent hours on your horse's coat, only to have the judge glance past you without a second look? Or worse, you spot a clipper burn on your horse's neck at 6 AM and know you've got to fix it before the class? That's why learning how to groom a horse for a show properly matters.
It's not just about looking pretty. It's about presenting your horse's health, condition, and temperament in the best possible light, while keeping them comfortable and stress-free.
Show grooming is a multi-day process, not a morning-of event. According to the United States Equestrian Federation (USEF) rulebook and manufacturer guidelines from major clipper brands like Oster and Andis, a proper show groom involves pre-conditioning weeks ahead, strategic clipping, careful bathing, and discipline-specific mane and tail work. As of 2026, the standards haven't changed much, but the tools have gotten smarter.
Let's walk through the entire process, step by step, so you can walk into that ring with confidence.

Image source: Bing (Web (fair-use with source credit))
Quick Answer
Show grooming starts 72 hours before the class. Clip strategically, bathe thoroughly, and lay the coat flat with blanketing. Pull or braid the mane according to your discipline.
Finish with trimmed legs, polished hooves, and a clean face. Avoid clipper burns by cooling blades regularly. Prepare everything the night before to reduce show-day stress.
Why Show Grooming Is a Whole Different Game
Daily grooming keeps your horse clean and healthy. Show grooming takes that foundation and elevates it into presentation. The difference is in the details: the precision of a clipped bridle path, the uniformity of braids, the mirror-like shine on hooves.
Judges see dozens of horses in a day. What sets yours apart is the care that goes into the finish.
Most riders mess up in one of three places. They clip without proper blade cooling, leaving burns or tracks. They bathe too close to the class, leaving residue that dulls the coat.
Or they braid the night before without letting the mane set, ending up with frizz and slips by the afternoon. These are the exact pain points that professional grooms plan around.
The fix is a systematic approach. Break the process into phases: preparation, clipping, bathing, mane and tail work, and finishing touches. Each phase has its own timeline and its own risk factors.
When you understand why each step matters, you stop making the same mistakes under pressure.
There's also a safety angle that most owners overlook. Clipper burns are painful and can take weeks to heal. Allergic reactions to grooming products happen more often than you'd think.
And a horse that's stressed by a rushed, rough grooming session can carry that tension into the ring, affecting their performance. Show grooming done right is calm, methodical, and gentle.
What Judges Actually Look For Before You Walk In
Before you pick up a clipper, understand what you're aiming for. Judges assess turnout in the first few seconds. They look at the overall shine and condition of the coat.
They check for a clean, well-shaped head and ears. They notice whether the mane is tidy and appropriately braided for the discipline. And they always glance at the legs and hooves.
A clean horse is a healthy horse. Judges know that a dull, dandruff-covered coat can indicate poor nutrition, internal parasites, or inadequate grooming habits. A glossy coat signals good health and careful management.
Similarly, trimmed legs and neat hooves show attention to detail that translates to overall horsemanship.
Different disciplines have different expectations. Hunter classes favor a natural, elegant look with a pulled mane and white yarn braids. Dressage riders braid the mane in a smaller, more uniform style.
Western pleasure horses often have a completely unbraided, neatly pulled mane with a glossy, well-conditioned coat. Know your discipline's expectations before you start.
Let's be realistic about what you can achieve. A horse that's been living out in a muddy pasture for months won't look ring-ready overnight. It takes consistent care over several weeks.
But for most horses, a solid 72-hour plan will transform their appearance dramatically.
Here's a breakdown of what judges notice first:
| What Judges Notice | Where They Look | First Impression Window |
|---|---|---|
| Coat condition | Overall body, especially shoulder and hindquarters | First 5 seconds |
| Mane and braids | Neck, poll area | First 10 seconds |
| Face and ears | Head, muzzle, eye area | First 10 seconds |
| Legs and hooves | Lower legs, coronet band, hoof walls | First 15 seconds |
| Overall cleanliness | Entire horse, including tail | First 15 seconds |
The takeaway? You don't get a second chance at a first impression. Every detail matters.
The 72-Hour Countdown: Pre-Show Coat and Mane Conditioning
Show grooming starts days before the actual event. The 72-hour mark is your starting line. This is when you shift from maintenance to preparation.
Begin by assessing your horse's coat. Is it long and fuzzy? Is it sun-bleached?
Is it dull from excessive bathing? These factors determine your next steps. If the coat is heavy, you'll need to clip.
If it's dry, you'll need to build up natural oils. If it's sun-bleached, you might need a color-enhancing shampoo.
Feeding for Coat Health: What Actually Works
A shiny coat starts from the inside. Omega-3 and omega-6 fatty acids are the building blocks of a glossy coat. You can find them in flaxseed, rice bran, and specialized coat supplements.
Feeding a consistent source of these fats for at least six weeks before a show produces noticeable improvements in coat texture and shine.
Protein matters too. Horse hair is made of keratin, a protein. If your horse isn't getting enough quality protein, hair growth slows and the coat becomes brittle.
Alfalfa, soybean meal, and quality commercial feeds provide the amino acids needed for strong, healthy hair.
Don't forget hydration. Dehydrated horses have dull, dry coats. Ensure fresh, clean water is always available in the days leading up to the show.
Some riders add electrolytes to encourage drinking, especially in hot weather.
Blanketing and Sweat Sheets: Laying the Coat Flat
This is the secret weapon of professional grooms. A horse's coat naturally stands up to trap air and keep them warm. To make it lie flat and shiny, you need to encourage the hairs to settle.
Blanketing does exactly that.
Start 72 hours before the show. After your last training ride, wash and thoroughly dry your horse. Then, once the coat is completely dry, apply a medium-weight sheet or blanket.
The pressure and warmth will help the coat lay flat. Leave it on for at least 12 hours at a time.
Sweat sheets are also useful. These mesh or waffle-weave blankets wick moisture while allowing airflow. They're ideal after a bath or a hard workout when you want to cool the horse out without messing up the coat.
Many pros layer a sweat sheet under a stable sheet to create a "sweat tent effect" that pulls even more oil to the surface.
Here's a quick guide to blanketing for coat condition:
| Time Before Show | What to Do | Why |
|---|---|---|
| 72 hours | Full bath, then light blanketing at night | Lay the coat flat |
| 48 hours | Continue blanketing, add extra layer if cold | Build warmth for oil distribution |
| 24 hours | Final bath, then full-length sweat sheet | Maximize shine |
| Show morning | Remove blanket, gently wipe with damp cloth | Preserve the finish |
Clipping: The Highest-Risk, Highest-Reward Step
If there's one step that separates the pros from the amateurs, it's clipping. Done well, it highlights your horse's muscles and creates a crisp, polished silhouette. Done poorly, it leaves harsh tracks, skin burns, and a horse that's terrified of the clippers.
The first rule of clipping is safety. Always use sharp blades. Dull blades pull at the hair, cause irritation, and overheat quickly.
Replace your blades regularly and keep spares on hand. The second rule is patience. Rushing with clippers is how accidents happen.
Choosing the Right Clip Style for Your Discipline
Your clip style depends on your discipline, the season, and your horse's coat thickness. Common options include:
- Full body clip for horses in heavy work that will stay blanketed. This removes all hair from the neck, body, and upper legs. It's the most demanding clip and takes 2 to 3 hours.
- Hunter clip keeps hair on the legs and saddle area. This protects the most sensitive areas while giving a tidy look to the body. It's popular for hunter and equitation classes.
- Trace clip removes hair from the neck and chest only. It's ideal for horses that work hard but still need some warmth. It's also faster, taking about 30 to 45 minutes.
- Belly clip focuses on the underside where sweat accumulates most. It's minimal and often used for horses that get sweaty quickly.
For most A-rated hunter shows, a full body clip or hunter clip is standard. Western pleasure horses are often body-clipped in show season to showcase their muscling. Dressage horses might have a trace clip if competing in cooler months.

Image source: Bing (Web (fair-use with source credit))
Clipper Safety: Avoiding Burns and Ruined Blades
Clipper burn is the most common clipping injury. It happens when the blade gets too hot and literally burns the horse's skin. The result is red, swollen, painful skin that can take weeks to heal.
Prevention is simple: keep your blades cool.
Always have a blade coolant or a cold block available. Aluminum cooling blocks are the gold standard. Submerge the block in ice water, then rest your hot blade on it.
The block pulls heat from the metal quickly and safely. Spray-on coolants also work well, but they leave a residue that can irritate sensitive skin if not wiped off properly.
Another common mistake is clipping a dirty coat. Dirt and dust dull blades instantly. Always brush or vacuum the coat thoroughly before clipping.
You should also wipe the blades clean every 10 to 15 minutes during the clip, using a brush designed for clipper blades.
Blade Selection and Cooling Cheat Sheet
Get to know your blade numbers. Each number corresponds to a specific cutting length:
| Blade Number | Cutting Length | Best Used For |
|---|---|---|
| #10 | 1/16 inch (1.5 mm) | Sensitive areas: face, ears, bridle path |
| #15 | 1/32 inch (0.8 mm) | Close body clip, creating sharp edges |
| #30 | 1/64 inch (0.4 mm) | Very close trimming, not for body clipping |
| #40 | Surgical close | Show-specific detailing only |
As a rule, use a #10 for the face and ears. A #10 or #15 works well for the body, depending on how close you want the cut. Never use a #30 or higher on the body.
These blades cut so close they can cause irritation and even nicks.
You'll also need a sharpener or replacement blades. Most pros sharpen their blades every two to three full body clips. If the blade pulls or leaves tracks, it's time to change it.
According to Oster's maintenance guidelines, proper blade care extends their lifespan significantly and prevents skin irritation.
The Show Bath: More Than Just Soap and Water
A show bath is different from a regular bath. It's about removing every trace of dirt, sweat, and grease while leaving the coat with a brilliant shine. This takes more than one wash.
For most show horses, a two-wash system works best.
Start with a high-quality equine shampoo that matches your horse's coat color. White horses benefit from purple or blue-tinted shampoos that neutralize yellowing. Dark horses need a shine-enhancing formula that won't strip natural oils.
Shampoo and Conditioner Selection by Coat Color
Pick your shampoo based on your horse's coat color and condition. Here's a simple guide:
| Coat Color | Recommended Shampoo Type | Purpose |
|---|---|---|
| White or grey | Purple or blue pigment shampoo | Neutralizes yellow stains, brightens |
| Black or bay | Color-enhancing shampoo | Deepens richness, adds gloss |
| Chestnut | Brightening shampoo | Prevents dullness, tones red |
| Any color | Tea tree or medicated shampoo | Treats skin issues, fungus |
Conditioner matters just as much. After shampooing, apply a lightweight conditioner to the mane, tail, and body. This helps prevent tangles, reduces static, and adds shine.
Rinse thoroughly. Any residue left behind can cause irritation and dull the coat.
Rinsing Rules: The #1 Cause of a Dull Coat
The most common reason for a dull coat after a bath is incomplete rinsing. Shampoo residue coats the hair shafts and attracts dust. It also blocks the natural oils from coming through.
Rinse until the water runs completely clear, then rinse twice more. Yes, it takes longer. Yes, it's worth it.
Water temperature matters too. Use tepid water, never hot. Hot water strips too many oils, leaving the coat dry and brittle.
Cold water won't lift the dirt effectively. Tepid is the sweet spot.
Drying the Right Way to Prevent Skin Issues
Drying is more complex than just soaking up water. Most pros use a combination of methods: a sweat scraper to remove excess water, then a thick terry towel to absorb the rest, then a hair dryer or sweat sheet for the final stage.
Never rub a horse dry with a towel. This causes friction that breaks hair and creates frizz. Instead, blot and squeeze the coat gently.
A hair dryer set on low heat can fluff the hair and help it dry in a lying-flat position. Just keep it moving to avoid overheating one spot.
Once the coat is dry, apply a final layer of detangler or shine spray. This locks in moisture and creates a glass-like finish. And resist the urge to blanket until the horse is completely dry.
Blanketing a damp horse can cause chills or skin fungus.
Mane and Tail Work: Braids, Pulling, and the Tail Bag Method
Now we get to the part that takes the most patience: the mane and tail. This is where your discipline's standards really come into play. Hunter braids need to be uniform and tight.
Dressage braids are smaller and closer together. Western horses often have a pulled mane that lies flat against the neck.
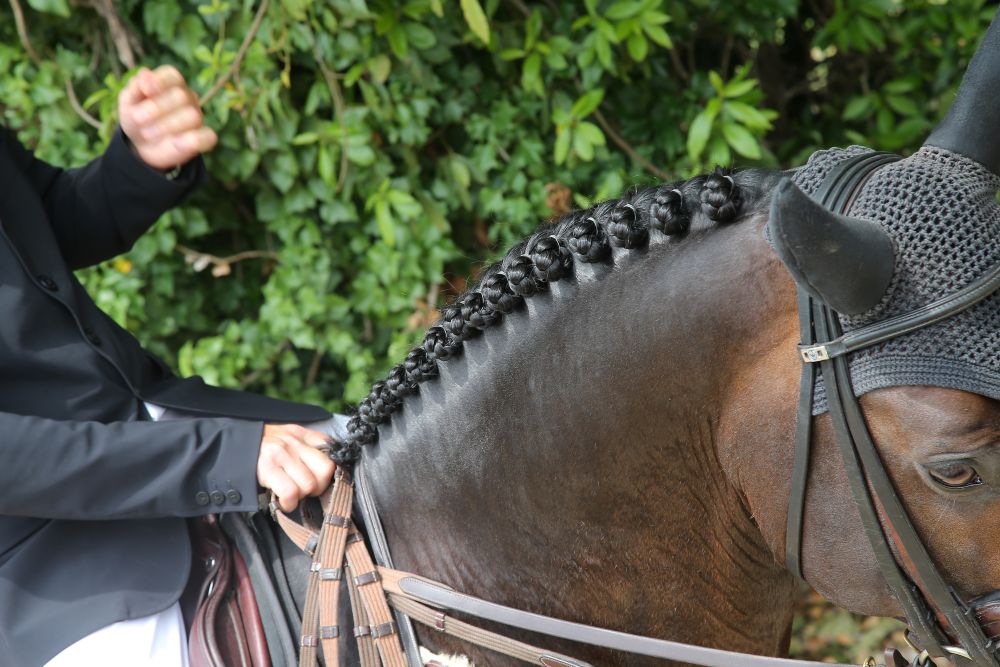
Image source: Bing (Web (fair-use with source credit))
Hunter vs. Dressage vs. Western: Which Braid Belongs Where
Let's break down the braid styles by discipline:
| Discipline | Braid Style | Spacing | Finish |
|---|---|---|---|
| Hunter | Hunter braids (large, round) | 3 to 4 inches apart | White yarn, folded under |
| Dressage | Button braids (small, flat) | 2 to 3 inches apart | Yarn or thread, tight |
| Eventing | Running braids (continuous) | Continuous along neck | Yarn, sometimes with ribbon |
| Western | No braids | Pulled mane, lays flat | Natural or roached |
Hunter braids are the classic. They're big, round, and sit on top of the neck. Each braid is about 3 to 4 inches apart and folded under itself.
Dressage button braids are smaller, flatter, and closer together. Eventing riders often use running braids, which are a continuous braid down the neck, because they're more durable across multiple phases.
How to Pull a Mane Without Breaking Hair
Pulling a mane is an art. The goal is to thin it to the correct length, usually 4 to 5 inches, so it lies flat and braids cleanly. Use a pulling comb or a standard mane comb.
Work in small sections along the underside of the mane. Backcomb the hair upward, then pull the longest strands from underneath. This removes bulk without creating a choppy, uneven look.
Never pull from the top, as this creates a spiky edge.
Pull a little bit over several days. Doing it all at once can make the mane sore and uneven. After pulling, brush the mane gently to blend the lengths.
A coat conditioner applied to the mane can help reduce irritation and static.
Tail Bags: The Pros' Secret for Show-Ready Hair
A tail bag protects the tail during travel and between classes. It keeps the hair clean, prevents breakage, and maintains the shape you've created. Use a tail bag after washing and conditioning the tail.
Here's how to get the best result:
- Wash the tail thoroughly and apply a generous amount of conditioner.
- Comb out all tangles starting from the bottom.
- Apply a leave-in detangler or light oil to keep the hair supple.
- Wrap the tail in a protective sleeve or braid it loosely before placing it in the bag.
The bag should be secure but not too tight. Too much pressure can break hair or cause rubbing sores at the dock. Check the bag every few hours to ensure it's not twisted or too tight.

Image source: Bing (Web (fair-use with source credit))
Legs, Hooves, and Finishing Touches
The legs and hooves are the finishing details that complete your picture. Judges notice them instantly. A clean, well-trimmed leg and a polished hoof show attention to detail that goes beyond the obvious areas.
Trimming Legs and Ears: The Scissor Work That Sets You Apart
Start with the ears. Use a small pair of scissors designed for equine grooming or a clipper with a #10 blade. Work slowly and carefully, trimming only the hair that extends beyond the inner edge of the ear.
Never go deep into the ear canal, as this is highly sensitive.
For the legs, trim the long hair around the fetlocks and pasterns. Use a #10 blade for a clean, sharp finish on the lower legs. On the back of the legs, around the ergot area, use scissors to blend the hair smoothly.
This gives a tidy, refined look.
Hoof Dressings: Matte vs. Gloss for Different Disciplines
Hoof dressings are not one-size-fits-all. Hunter and jumper riders often prefer a matte or natural look. Western pleasure and reining riders favor a high-gloss shine.
The dressing should complement your discipline without looking overdone.
| Discipline | Finish | Type |
|---|---|---|
| Hunter/Jumper | Natural matte | Clear, non-staining |
| Dressage | Subtle gloss | Clear, light conditioning |
| Western | High shine | Clear gloss or black polish |
| Eventing | Natural matte | Dry, not slippery |
Apply the dressing to the hoof wall only. Avoid the coronet band, where the hair meets the hoof. Products applied to the coronet can interfere with hoof growth and cause soft tissue damage.
The Final Face Clean: Eyes, Nose, and Muzzle Details
The face is what the judge sees at eye level. Clean the corners of the eyes with a soft, damp cloth. Remove any tear stains using a gentle eye wipes product designed for horses.
Then, clean the nostrils and muzzle area thoroughly.
A small amount of petroleum jelly or a show face highlighter can add a subtle shine to the muzzle and around the eyes. This brightens the horse's expression without looking greasy.
The 7 Biggest Show Grooming Mistakes (And How to Fix Them Fast)
Even the pros make mistakes. The difference is that they know how to fix them quickly. Here are the seven most common show grooming errors and their fast solutions.
1. Clipper burn. Too much pressure or a hot blade causes red, raw skin. Cool the area with cold water immediately.
Apply a zinc oxide cream or antibiotic ointment to soothe and protect. Skip clipping that area for at least a week.
2. Dull, flat coat. Overbathing strips natural oils. Stop washing daily.
Use a dry shampoo or a damp cloth for spot cleaning. Add a coat supplement with omega fatty acids for a longer-term fix.
3. Braids slipping out. This happens when the mane is too short or greasy. Re-braid with damp hair and use a thicker yarn.
Secure each braid with a tight knot and a small rubber band if needed.
4. White leg stains. Grass stains and urine yellowing are stubborn. Use a whitening shampoo or a paste made of baking soda and water.
Apply, let sit for five minutes, then rinse thoroughly.
5. Tail breakage at the dock. Too much tension from a tail bag or braid. Loosen the wrap and apply a moisturizing conditioner to the area.
Give the tail a break from bags for a few days.
6. Greasy forehead or face. Some shine products are too heavy for the face. Wipe with a damp cloth and a drop of mild shampoo.
Reapply a lightweight, water-based highlight instead.
7. Static and flyaway hair. Dry weather causes static. Spray the coat lightly with water or a silicone-free detangler.
Brush through with a natural bristle brush to distribute the moisture evenly.
Show Morning Crash Plan: What to Do When Everything Goes Wrong
Show mornings are chaos. Flat tires, late trailers, nervous horses. You need a crash plan that covers the worst-case grooming scenarios.
Your horse rolled in the stall overnight. Grab a bag of grooming wipes, dry shampoo, and a stiff brush. Spot clean the dirty areas, then use the brush to redistribute the natural oils. Skip the full bath if the coat isn't too bad.
A full bath will make the coat lie flat again, but it takes time to dry. If the coat is only dusty, a vacuum groomer works wonders.
The braids came out overnight. Re-braid the mane with damp hair. If you're pressed for time, do a simple running braid instead of individual braids. It's faster and still looks polished.
Your horse is sweaty from the trailer ride. Wipe down with a damp sponge, then use a sweat scraper to pull off the moisture. Follow with a dry towel to blot, then a light coat of spray shine. This restores some gloss without a full bath.
Hoof dressing dried white or flaking. Remove it with a hoof pick and a damp cloth. Reapply a thin, even layer and let it set for two minutes. Use a natural matte finish to avoid streaks.
A clipper cut or nick is bleeding. Apply pressure with a clean cloth for two minutes. Use a styptic powder or cornstarch to stop the bleeding. Clean the area gently and apply an antibacterial ointment.
Check with the show veterinarian if the cut is deep.
A Quick Reference Checklist for the Night Before and Morning Of
Use this checklist to stay organized and reduce stress. Print it, laminate it, and keep it in your tack trunk.
The Night Before:
- Horse is bathed, dried, and blanketed.
- Mane and tail are pulled, braided, or prepped as needed.
- Legs are trimmed and hooves are polished.
- Tail bag is secure.
- Show attire: coat, boots, helmet, and gloves are ready.
- Tack is cleaned and polished.
- Water buckets are filled and electrolytes are added if needed.
- Trailer is loaded with hay, water, and emergency grooming supplies.
Show Morning:
- Remove blankets and wipe the coat with a damp cloth.
- Check braids and re-secure any loose ones.
- Clean the eyes, nose, and muzzle.
- Apply final coat shine and hoof dressing.
- Brush the tail and re-secure the tail bag.
- Check legs for any overnight swelling or dirt.
- Do a final once-over with a grooming mitt.
- Walk your horse to the ring with confidence.
Expert Tips: What Professional Grooms Do Differently
Professional grooms make show grooming look effortless. They've developed habits that save time and protect the horse. Here are the strategies we've seen working at top barns.
They use a vacuum groomer. It may feel like a splurge, but a good vacuum system removes deep dirt and stimulates circulation better than any curry comb. It also cuts grooming time in half.
They never skip the pre-bath brushing. A thorough dry brush before washing loosens dirt and prevents shampoo from creating a paste that's hard to wash out. Five minutes of brushing saves ten minutes of rinsing.
They keep their blades sharp and cold. A spare set of blades is essential. Rotate them every 15 minutes during a full body clip. Keep a freezer block or an aluminum cooling block in a cooler of ice water.
They use baby oil sparingly. A dime-sized drop on a soft cloth can add shine to the muzzle and around the eyes. But too much oil attracts dust and dirt. Use it last, right before entering the ring.
They stay calm. Horses read your energy. If you're rushing and panicking, your horse will tense up. Professional grooms work quickly, but they never show stress.
Safety Alerts: Products and Practices to Avoid
Show grooming comes with its own set of hazards. Knowing what to avoid protects your horse's skin, coat, and overall health.
Never use human shampoo on your horse. Human shampoos have a different pH balance than equine products. They can strip natural oils and cause dryness. Always use a shampoo designed specifically for horses.
Avoid oil-based shine products in cold weather. They can become sticky and attract dust. In cold conditions, use a water-based silicone spray instead. It dries quickly and leaves a smooth finish.
Don't apply hoof dressing to the coronet band. This area is highly vascular and plays a role in hoof growth. Any chemical applied there can interfere with healthy hoof development. Apply dressing to the hoof wall only.
Never clip a wet or dirty coat. You'll wind up with dull blades and a poor result. Clip only a clean, dry coat. If you need to clip a horse that's sweaty, wait until they've cooled down completely.
Don't pull the mane when it's dry. Pulling a dry mane causes breakage and discomfort. Dampen the mane first with a spray bottle or wash the horse earlier in the day. This makes the hair more pliable and reduces pain.
Frequently Asked Questions
How many days before a show should I bathe my horse?
Bathe your horse 24 to 48 hours before the show. This gives the coat time to dry fully and allows natural oils to resurface, creating a natural shine. Bathing too close to the class leaves residue and a flat coat.
Bathing too early allows dust and dirt to settle back in.
Should I clip my horse before a show?
Only if the coat is heavy or your discipline requires it. Hunter and western pleasure horses are commonly body-clipped to highlight muscle definition. Dressage and eventing horses may only need a trace clip.
Clipping is a significant task, so plan for 2 to 3 hours if doing a full body clip.
How do I keep braids in overnight?
Braids will hold overnight if they're done on a slightly damp mane. Use a good quality yarn and tie each braid securely. Cover the braided mane with a tubular bandage or a light hood to prevent rubbing.
Check them in the morning and re-braid any that look loose.
What is the best way to make my horse's coat shiny?
A shiny coat comes from good nutrition, consistent grooming, and minimal overbathing. Feed a diet rich in omega-3 and omega-6 fatty acids. Groom daily with a curry comb to distribute natural oils.
Use a shine spray only on the day of the show, and keep it light to avoid attracting dust.
Is it okay to use baby oil on my horse's coat?
Use baby oil sparingly. A small amount on a cloth can add shine to the muzzle and around the eyes. But using it all over the body attracts dust and can make the coat appear greasy.
Opt for a water-based spray shine for the body instead.
How long does a full body clip take?
A full body clip takes 2 to 3 hours for an experienced person. The exact time depends on the horse's size, coat thickness, and temperament. Plan for breaks to cool the blades and let the horse stretch.
Use this time to check your blade condition and swap in spares if needed.