
Your Labrador is basically a fur factory with a heartbeat. If you've ever run your hand along their back and watched a cloud of hair drift through the air, you already know the struggle. Learning how to groom a Labrador at home isn't just about keeping your house semi-clean.
It's about your dog's comfort, skin health, and overall wellbeing.
The good news? Labs are one of the easiest breeds to groom at home once you understand their coat. They don't need fancy haircuts or professional styling.
But they do need consistent brushing, proper bathing technique, and regular ear and nail care. According to the American Kennel Club, a Labrador's double coat requires specific tools and techniques that most owners simply don't know about. That's what we're going to fix today.
Quick Answer
Groom your Labrador at home by brushing 2, 3 times weekly with an undercoat rake. Bathe every 6, 8 weeks with dog-specific shampoo. Trim nails every 3, 4 weeks.
Clean ears every 2 weeks. Dry thoroughly after every bath.
Why Grooming Your Lab at Home Is Totally Doable
Professional grooming costs add up fast. A typical full groom for a Labrador runs anywhere from $50 to $90 per visit. If you're going every 6 to 8 weeks, that's somewhere between $400 and $600 a year.
For what? Brushing, a bath, nail trim, and ear cleaning. All things you can absolutely do yourself with the right tools and a little patience.
Here's what most people don't realize. Labs don't need haircuts. Unlike poodles or terriers that require regular clipping, a Lab's coat grows to a set length and stops.
The maintenance is entirely about managing shedding, keeping the skin healthy, and preventing matting in specific trouble spots.
There's also the health monitoring angle. When you groom your own dog weekly, you're running your hands over every inch of their body. You'll notice lumps, ticks, hot spots, and skin irritations days or weeks before you'd spot them on a dog that only sees a professional every two months.
Early detection matters.
And here's the practical bit. Labs are active, outdoorsy dogs. They swim in lakes, roll in mud, and generally find ways to get filthy.
Between professional grooms, they need maintenance. If you know how to handle a rinse, spot-clean, and brush properly, you're not at the mercy of someone else's schedule. As of 2026, with grooming prices climbing and appointment availability shrinking in many areas, self-sufficiency is genuinely valuable.
The Quick Answer: Your Labrador Grooming Routine at a Glance
Let's break this down into a realistic schedule. You don't need to block out a full afternoon every week. Consistency beats marathon sessions every time.
Weekly Maintenance (15–20 Minutes)
- Brushing: 2, 3 times per week with an undercoat rake and slicker brush
- Teeth: 2, 3 times per week with dog-specific toothpaste
- Paw check: Quick visual inspection for debris, cracks, or foreign objects
Monthly Maintenance (45–60 Minutes)
- Full bath: Every 6, 8 weeks with a proper double-coat drying routine
- Nail trim: Every 3, 4 weeks, depending on how much your dog wears their nails down naturally
- Ear cleaning: Every 2 weeks, more often after swimming
Seasonal Maintenance (The Blow Coat)
Twice a year, usually in spring and fall, your Lab will "blow" their undercoat. This means the entire winter or summer undercoat sheds out over a 2-to-3-week period. During this window, you'll want to brush daily.
Sometimes twice a day. Expect to fill multiple grocery bags with fur. It's completely normal.
The Full Grooming Session Checklist
Here's everything that happens during a proper home grooming session:
| Step | Tool Needed | Time Estimate |
|---|---|---|
| Pre-brush (remove tangles and loose surface fur) | Slicker brush | 5–10 minutes |
| Deep deshed (reach the undercoat) | Undercoat rake | 10–15 minutes |
| Nail trim | Clippers or grinder | 5–10 minutes |
| Ear cleaning | Cotton balls + vet-approved solution | 3–5 minutes |
| Bath | Dog shampoo + conditioner | 10–15 minutes |
| Towel dry | Absorbent microfiber towels | 5–10 minutes |
| Force dry (critical for double coats) | High-velocity dryer | 10–15 minutes |
| Final brush and inspection | Wide-toothed metal comb | 5 minutes |
Total time: roughly 45 to 60 minutes. That's the full deal. Once you get the hang of it, you'll probably shave that down further.
What You Need Before You Start: The Essential Tool Kit
You don't need to drop $300 on professional equipment. But you do need the right tools. Using the wrong brush on a Labrador is like using a comb on a sheepdog.
It just doesn't work. Here's exactly what you need, what each tool does, and how to pick the right one.
Brushes and Combs
Undercoat Rake
This is your most important tool. An undercoat rake has long, sturdy metal teeth that reach through the topcoat and pull out the dense, soft undercoat. Without it, you'll only be brushing the surface while the real shedding happens underneath.
Look for a rake with rotating or slightly curved teeth. It's gentler on the skin and less likely to snag.
Slicker Brush
The slicker brush has fine, short wire bristles set close together on a flat or slightly curved pad. It's perfect for removing loose topcoat hair, debris, and working through minor tangles. It's not for deep undercoat removal, but it's essential for finishing work and getting that smooth, shiny look.
Wide-Toothed Metal Comb
This is your finishing tool. After brushing, run a wide-toothed comb through your Lab's coat to catch anything the brushes missed. It also helps you spot problem areas like developing mats behind the ears or in the thigh area.
Rubber Curry Mitt (Optional but Nice)
A rubber curry mitt is great for the initial pass on a Lab's short coat. It pulls loose hair to the surface, stimulates the skin, and spreads natural oils through the coat. Many dogs absolutely love the massage feel.
It's also fantastic for bath time to work shampoo into the coat.
Bathing Supplies
Dog-Specific Shampoo
This is non-negotiable. Human shampoo has a different pH balance and will strip the natural oils from your Lab's skin. Look for an oatmeal-based formula if your dog has sensitive or itchy skin.
If your Lab swims frequently, consider a shampoo designed to remove pond odor and restore coat health.
Dog Conditioner
Conditioner helps restore moisture after shampoo opens up the hair follicles. It also makes brushing easier afterward. Skip it if your dog has naturally oily skin, but most Labs benefit from a light conditioning after each bath.
Absorbent Microfiber Towels
Standard bath towels absorb water too slowly and get soaked through quickly. Microfiber towels are designed to absorb several times their weight in water. With a double coat that holds water like a sponge, you'll want at least two large microfiber towels for every bath.
High-Velocity Dryer
This is the one piece of equipment that separates a good home groom from a great one. A high-velocity dryer blows air at high speed to force water out of the undercoat. Unlike a human hair dryer, it uses room-temperature or slightly warm air.
It doesn't burn the skin, and it dramatically reduces drying time. It's a $60 to $150 investment, but it pays for itself in your first few baths.
Nail and Ear Care
Canine Nail Clippers
You have two main options. Guillotine-style clippers have a hole where you insert the nail and a blade that slices down. They're great for small to medium dogs but can crush the nail if used at the wrong angle.
Scissor-style clippers work like a pair of pliers and give more control. For a Labrador, scissor-style is generally the better choice due to their thick, strong nails.
Nail Grinder (Dremel-Style)
A nail grinder files the nail down gradually rather than cutting. It's slower than clippers, but it's nearly impossible to cut the quick if you go slowly. Many Labs tolerate the grinding sensation better than the sudden snap of clippers.
It also leaves a smooth edge, which means fewer scratches on your floors and furniture.
Styptic Powder
This is the emergency tool. If you accidentally cut the quick, styptic powder stops the bleeding instantly. It's a must-have for every home grooming kit.
You can also use cornstarch or flour in a pinch, but real styptic powder works faster and helps prevent infection.
Ear Cleaning Solution
Look for a vet-approved ear cleaner with a drying agent. This is crucial for Labs because their floppy ears trap moisture, which creates the perfect environment for yeast and bacterial infections. A good ear cleaner dissolves wax, removes debris, and helps evaporate trapped water.
Dental Care
Dog Toothbrush and Toothpaste
Dog toothpaste comes in flavors like poultry, peanut butter, and malt. It's formulated without xylitol, a sweetener that's toxic to dogs. Human toothpaste is off-limits.
It contains fluoride and foaming agents that can upset a dog's stomach. A finger brush or a soft-bristled dog toothbrush works fine.
Understanding the Labrador Double Coat (Without Getting Technical)
Here's the deal. Labs have what's called a double coat. It's two distinct layers of fur with completely different jobs.
The topcoat is the outer layer you see and touch. It's made up of short, dense, slightly coarse hairs that are water-repellent. This layer protects your dog from rain, snow, and brush.
It's why Labs can swim in cold water and shake off most of the moisture.
The undercoat is the hidden layer closer to the skin. It's soft, fine, and incredibly dense. Think of it like a built-in down jacket.
It traps body heat in winter and provides insulation against heat in summer. The undercoat is where most of the shedding happens.
Here's why this matters for grooming. Most owners only brush the topcoat. They run a brush over their Lab's back, see a little hair come off, and assume they're done.
Meanwhile, the undercoat is matting up against the skin, shedding in clumps, and trapping dirt and moisture. The result? An uncomfortable dog, a dirty house, and a coat that's not doing its job.
What "Blowing Coat" Really Looks Like
Twice a year, your Lab's body gets the signal to shed the undercoat. This is called "blowing coat." In the spring, they lose the thick winter undercoat to stay cool. In the fall, they lose the lighter summer undercoat to make room for the dense winter layer.
During this 2-to-3-week window, the undercoat comes out in clumps. You'll see tufts of soft fur sticking out. Brushing daily during this period is essential.
An undercoat rake will pull out incredible amounts of fur. We're talking about filling a large grocery bag. Maybe two.
This is normal, and it's exactly what should happen.
How the Coat Changes with Seasons and Indoor Heating
Here's a twist many owners don't expect. Indoor heating disrupts the natural coat cycle. If your Lab lives mostly indoors, their body doesn't get the strong temperature signals it would in the wild.
So instead of a clean two-times-per-year blowout, you might see year-round shedding with periodic heavier bursts.
The fix is simple. Stick to a consistent brushing schedule regardless of the season. In the winter, when indoor heating dries out the air, your Lab's skin can get flaky.
A humidifier in the main living area helps. So does a high-quality dog food with appropriate omega fatty acids.

Image source: Bing (Web (fair-use with source credit))
Step-by-Step: Brushing and Deshedding Like a Pro
Alright, let's get into the hands-on part. This is where understanding the double coat pays off. Brushing a Lab isn't just running a brush over their back.
It's a specific sequence of techniques designed to remove loose fur at both layers without irritating the skin.
Pre-Brushing: Where to Start and Which Direction to Go
Start with the slicker brush. This removes surface debris, loose topcoat hair, and any dirt that's sitting on top of the coat. Work in the direction of hair growth, from head to tail.
This gets the coat ready for deeper work.
Important tip: don't press hard. Slicker brushes can scratch the skin if you apply too much pressure. Let the bristles do the work.
Use light, sweeping strokes.
The Undercoat Rake Technique That Actually Removes Loose Fur
This is the money step. Switch to your undercoat rake. Stand behind your dog.
Start at the base of the neck and work your way down the back.
Here's the key technique. You don't brush in the direction of hair growth. Instead, you use short, firm strokes that go against the grain, pulling the rake upward and outward.
This catches the undercoat and lifts it away from the skin. You'll see significant clumps of soft fur coming off. That's exactly what should happen.
Work section by section. Do the back. Then the sides.
Then the chest. Then the rear and thighs. The thigh area is where Labs tend to mat up the most, especially if they've been swimming or have high activity levels.
How to Tell If You're Only Scratching the Surface
Here's a simple test. After you've done a full pass with the undercoat rake, run your fingers against the grain of your dog's coat. If you still feel a dense, thick layer of padding underneath, you're not done.
Keep raking until you feel a noticeable reduction in undercoat thickness.
Another sign? Your rake should be pulling out visible fur with every stroke. If you're getting almost nothing, either your dog has already shed out, or you're not reaching the undercoat.

Image source: Bing (Web (fair-use with source credit))
Dealing with Mats Behind Ears, Tail, and Thighs
Mats are clumps of tangled fur that have solidified into a dense, sometimes painful knot. In Labs, they form most commonly behind the ears, on the tail, and on the rear thighs.
For small mats, work them loose with your fingers first. Gently pull the mat apart with your fingertips, starting at the edges and working toward the center. Then brush through with the slicker brush.
For larger mats, apply a dog-safe detangling spray. Let it sit for a few minutes to soften the mat. Then work it through with a wide-toothed comb, starting at the tip and working toward the skin.
Never yank a mat. That's painful and creates a negative association with grooming.
If a mat is right against the skin and won't come loose, clip it out with blunt-nosed scissors. Slip the blade between the mat and the skin, angling it away from the body, and cut carefully. If you're nervous or the mat is in a delicate area like near the genitals or armpits, see a professional groomer.
The Finishing Pass with a Wide-Toothed Comb
Once you've raked the undercoat and brushed through any mats, do a final pass with the wide-toothed comb. Run it through the entire coat, head to tail. This catches anything the brushes missed and smooths the topcoat back into place.
Run your hands over your dog's body. You should feel a smooth, even coat with no dense clumps or rough patches. If you find a spot that still feels thick, go back over it with the rake.
Step-by-Step: Bathing Your Labrador Without the Chaos
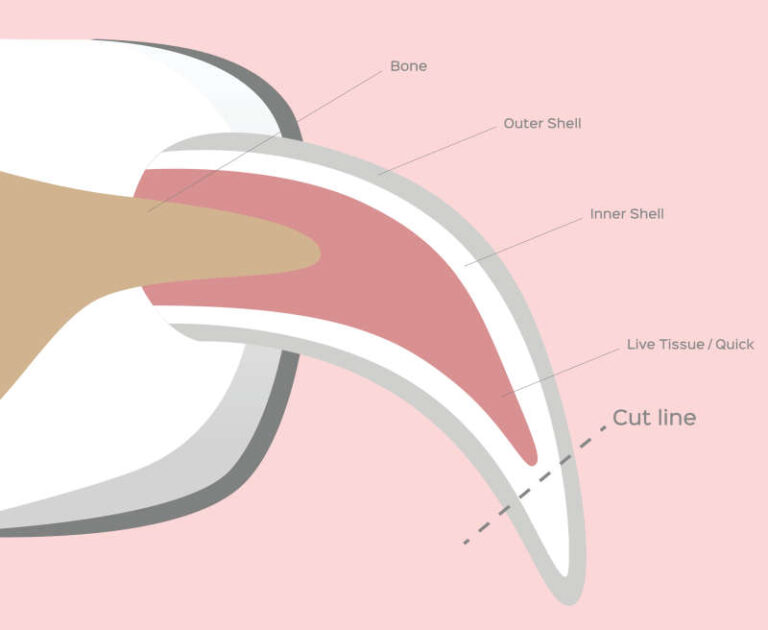
Image source: Bing (Web (fair-use with source credit))
Bathing a Lab is a full-contact sport. They're big, they're excited, and they hate being told what to do when water is involved. But with the right setup, you can get through it without flooding your bathroom.
Pre-Bath Prep: Brushing First, Always
Never skip this step. Brush your Lab thoroughly before the bath. This removes loose fur and tangles before they get wet and mat down further.
Wet fur is harder to work with, and wet mats are infinitely harder to remove.
You should already have done the full brushing routine above. If not, do it now. The pre-bath brush is non-negotiable.
Water Temperature and Shampoo Dilution
Warm water, not hot. Aim for 90, 100°F or 32, 38°C. Hot water strips natural oils and irritates the skin.
Cold water won't clean effectively and your dog will hate you. Test the water on your inner wrist before you start.
For shampoo, don't pour it directly onto your dog's coat. Dilute it first. Mix one part shampoo with one to two parts water in a small cup or bottle.
This makes it easier to work through the coat and prevents concentrated residue from sitting on the skin.
The Lather and Rinse Technique That Prevents Residue Buildup
Wet your Lab's entire coat thoroughly. Start at the neck and work backward. The neck and shoulders need the most attention since that's where dirt, oil, and dead fur accumulate.
Apply the diluted shampoo and work it into a lather with your hands or a rubber curry mitt. Massage in circular motions, working against the grain slightly to reach the undercoat. Don't forget the belly, the tail, and the legs.
Here's the critical part: rinsing. Shampoo residue is a leading cause of skin irritation and itching. Rinse thoroughly.
Then rinse again. And again. Keep running water through the coat until it runs completely clear.
For a double coat, this takes longer than you think. Dig your fingers through the fur and make sure every inch gets rinsed.
After rinsing, apply conditioner if you're using it. Work it through the coat, let it sit for a couple of minutes, then rinse just as thoroughly.
How to Dry a Double Coat Properly (Skip This and You'll Regret It)
This is where most home groomers fail. Air-drying a Lab's double coat is a recipe for disaster. The dense undercoat traps moisture close to the skin, leading to hot spots, fungal infections, and that signature "wet dog" smell that never quite goes away.
Here's the proper drying sequence:
Step 1: Squeeze, Don't Rub
Use your hands to squeeze water out of the coat. Press down firmly and slide your hands along the fur. This is more effective than rubbing, which causes tangles.
Step 2: Towel Dry
Use your microfiber towels to absorb as much water as possible. Press the towel onto the coat, then squeeze. Repeat until the towels are soaked and you've switched to fresh ones.
Step 3: High-Velocity Dryer
This is where the high-velocity dryer earns its keep. Set it to room temperature or low heat. Keep the nozzle at least 6 inches away from your dog's skin.
Use a sweeping motion, always aiming the airflow back toward the tail.
Here's the technique. Fluff the coat with the dryer. Use your free hand to lift the fur and direct the air down to the skin.
This forces moisture out from the base of the undercoat. Work section by section until the coat is completely dry. You'll need 10 to 15 minutes for a full dry.
Step 4: Final Brush
Once completely dry, do a final pass with the wide-toothed comb. This restores the topcoat and catches any tangles that formed during the bath.
Never, ever use a human hair dryer. They operate at temperatures that can easily burn a dog's skin, especially through a dense coat that insulates the heat. High-velocity dryers are designed specifically for canine coats.
Step-by-Step: Nail Trimming Without the Fear
Nail trimming is the part most owners dread. The fear of cutting the quick, the blood, and the resulting trust damage. But here's the truth.
Once you learn the anatomy and technique, it's a 5-minute job.
How to Spot the Quick on White, Black, and Mixed Nails
The quick is the pink tissue inside the nail that contains blood vessels and nerves. Cut into it, and you've got bleeding and pain.
On white or clear nails, the quick is visible as a pink line. You can see exactly where it ends. On black nails, it's invisible.
You're working blind.
Here's how to spot the quick on black nails. Look at the underside of the nail. The quick appears as a darker area or a subtle ridge.
Another trick is to press on the nail tip. If your dog reacts with a flinch, you're close.
When in doubt, cut less. You can always trim more. But you can't un-cut a nail.
Guillotine vs. Scissor Clippers vs. Grinder: Which Suits You
| Tool | Pros | Cons | Best For |
|---|---|---|---|
| Guillotine | Fast, single-slice cut | Can crush nail if angled wrong | Owners confident with nail anatomy |
| Scissor-style | More control, precise | Slower, requires good hand strength | Most home groomers |
| Grinder | Near-zero quick risk | Slower, noisy, some dogs dislike the vibration | Nervous owners or anxious dogs |
Scissor-style clippers are the best starting point for most people. They give you precise control and are harder to misuse. Guillotine clippers are faster but less forgiving.
Grinders are the safest option but require patience and acclimation.
The 45-Degree Angle Rule
Angle matters more than speed. Position the clippers at a 45-degree angle to the nail. Look at the underside of the nail as you cut.
This angle creates a clean cut and reduces the risk of splitting.
For scissor-style clippers, place the nail in the opening with the blade below the quick. For guillotine clippers, insert the nail so the quick is above the blade, then squeeze firmly.
Cut in one quick, decisive motion. Hesitation causes crushing and ragged edges.
The Bleed Emergency: What Works and What Doesn't
Even the pros nick the quick sometimes. If it happens, don't panic. Your dog is more scared of your reaction than the actual pain.
Apply styptic powder immediately. Press it directly onto the bleeding area for 30 seconds. It will clot quickly.
If you don't have styptic powder, cornstarch or flour works as a temporary stopgap. But use the real thing. It works faster and helps prevent infection.
After the bleeding stops, give your dog a treat and some praise. No scolding. Make this a positive experience so the next trim isn't a battle.
For the first few trims, do one or two nails per session. Lay on the positive reinforcement. Build up to a full session over several weeks.
Your dog will learn to tolerate, or at least accept, the process.
Step-by-Step: Ears, Teeth, and Paws
The last piece of the puzzle. These are the areas that get ignored because they're less visible. But they're also where infections start.
The Floppy Ear Trap: Why Labs Get Ear Infections
Labs have floppy ears. It's part of their charm. But those floppy ears create a closed, warm, moist environment that yeast and bacteria love.
Water from swimming or baths gets trapped in the ear canal, and the flap keeps it there. The result? Ear infections.
Painful, smelly, and surprisingly common.
How Deep Is Too Deep When Cleaning Ears
Here's the golden rule. You only clean the outer ear and the visible part of the ear canal. You never insert anything deep into the canal.
Using a cotton ball or pad is the safe method. Soak it with a vet-approved ear cleaning solution. Gently wipe the inner surface of the ear flap and the visible opening of the ear canal.
Use a fresh cotton ball for each ear to avoid cross-contamination.
How to Clean a Labrador's Ears
Hold your Lab's head steady with one hand. Use the other hand to wipe the visible part of the ear with the soaked cotton ball. Work out any wax or debris you can see.
Don't dig. Don't use cotton swabs. They push debris deeper and can damage the eardrum.
If your Lab's ears look red, swollen, or have a dark, smelly discharge, skip the cleaning. That's a vet visit. Cleaning an infected ear without professional treatment won't fix the underlying issue.
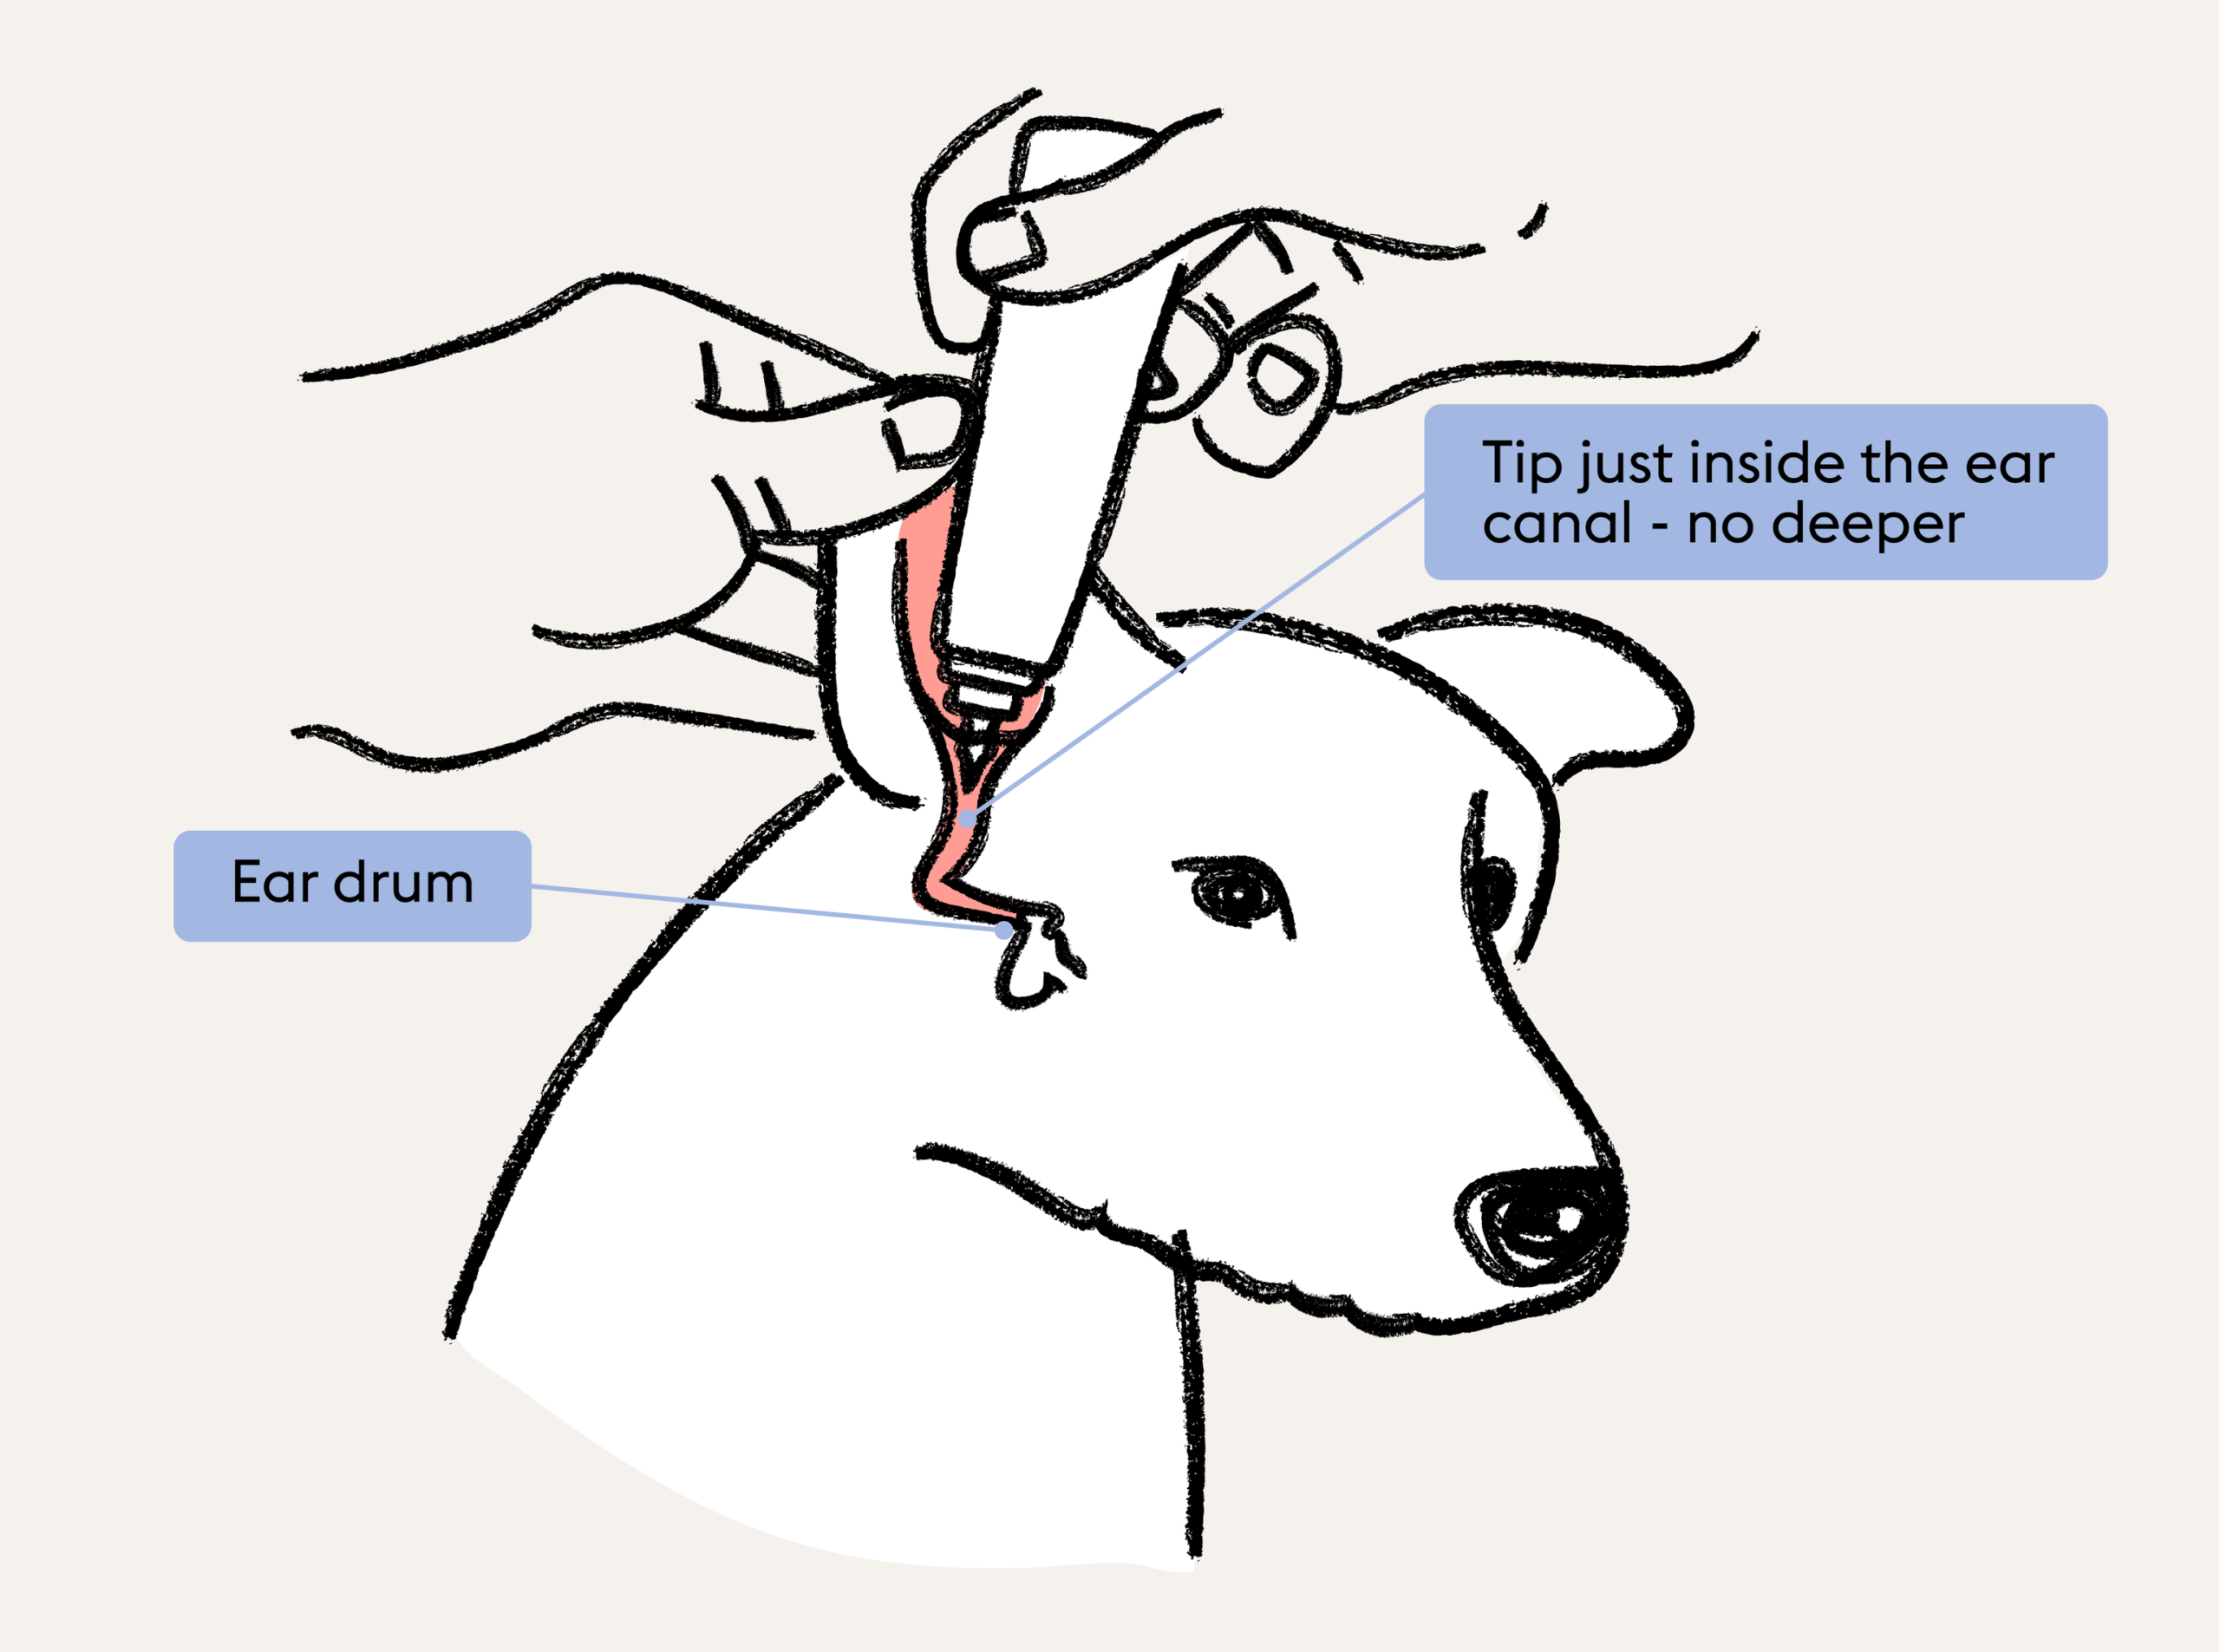
Image source: Bing (Web (fair-use with source credit))
Tooth Brushing That Doesn't Turn into a Wrestling Match
Dental care is the most skipped grooming task. But it matters. Dental disease is one of the most common health issues in dogs, and it's largely preventable with 2, 3 minutes of brushing, 2, 3 times per week.
Start slow. Let your dog lick the toothpaste off your finger first. Then introduce the toothbrush.
Lift their lips gently and brush in small circular motions. Focus on the gumline, where plaque and tartar accumulate.
Use a soft-bristled brush or a finger brush. Never use human toothpaste. The fluoride and foaming agents can upset a dog's stomach, and xylitol, an artificial sweetener in many human toothpastes, is toxic to dogs.
Paw Pad Inspection and Between-Toe Care
Labs are outdoor dogs. Their paws take a beating. Between-toe areas collect dirt, debris, and sometimes burrs or small stones.
Check each paw thoroughly. Look between the toes and around the pads. Remove any foreign objects.
Look for cracks, cuts, or redness. If your Lab runs on hot pavement or rough terrain, paw pads can dry out and crack. A dog-safe paw balm helps.
Squeeze the toes gently apart. Look for signs of irritation or swelling. If you find a foreign object that's embedded deep, don't dig for it yourself.
See a vet.
Mistakes Even Experienced Owners Make
You'd think after months of practice, we'd have it all figured out. But there are some mistakes that even dedicated home groomers keep making. Let's fix them.
Over-Bathing and the Dry-Skin Spiral
Bathing too often strips the natural oils from a Lab's coat and skin. This triggers the skin to overproduce oil to compensate, which leads to a greasy, smelly coat. Then you bathe again to get rid of the smell, and the cycle continues.
Stick to the 6, 8 week schedule. Between baths, use a waterless shampoo or dog wipes for spot cleaning. If your Lab swims frequently, a plain warm-water rinse (no shampoo) is fine to remove lake or pool residue.
Brushing Only the Topcoat (The Most Common Error)
We've already covered this, but it deserves repeating. Brushing only the topcoat is like sweeping the floor while the entire contents of the shelves are falling down around you. It looks like you're doing something, but the real mess is happening elsewhere.
Always start with the slicker brush, then follow up with the undercoat rake. Without the rake reaching the undercoat, you're only seeing a fraction of the shedding.
Using Human Shampoo, Human Dryers, or Human Toothpaste
This is a triple threat. Human products are formulated for human skin, hair, and pH levels. They're all wrong for a dog.
Use dog-specific shampoo, a high-velocity dryer, and dog-specific toothpaste. Every time.
Skipping the "Squeeze, Don't Rub" Drying Rule
Rubbing a wet Lab with a towel creates tangles and matting. Squeezing water out with your hands, then pressing towels onto the coat to absorb moisture, is more effective and gentler. It also preserves the coat's natural lay.
Ignoring the Areas You Can't See
The behind, the belly, the armpits, between the toes. These are the areas that get ignored because they're awkward to reach and your dog might squirm. But these are exactly where mats form and skin issues start.
Every grooming session should include a full-body inspection, including the spots that don't get direct eye contact.
Home Grooming vs. Professional Grooming: What's Worth It
Money matters. But so do results. Here's an honest breakdown.
Cost Comparison Over a Year
| Option | Cost Per Session | Frequency | Annual Cost |
|---|---|---|---|
| Professional groomer | $50–$90 | Every 6–8 weeks | $400–$600 |
| Home grooming (full tool kit) | $75–$150 (one-time) | Weekly brushing + monthly bath | $75–$150 first year, then near $0 for tools |
The math is clear. Home grooming pays for itself in the first few months. The tools last for years if cared for properly.
What Professional Groomers Do That You Probably Can't
Let's be fair. Professional groomers are skilled at things that are hard to replicate at home:
- Expression of anal glands: Most groomers do this routinely. It's not pleasant, and it's not something you want to learn at home.
- Handling difficult dogs: Professional groomers have experience with dogs that bite, squirm, or panic during grooming.
- Professional-grade equipment: Their high-velocity dryers and grooming tables are on a different level from consumer models.
When It's Actually Smarter to See a Professional
There are times when the $60 is worth it:
- Your Lab is severely matted. Trying to brush out a coat that's been left for months is painful. Professionals can demat safely or recommend a shave-down.
- Your Lab is aggressive or fearful during grooming. Don't risk a bite or a bad experience that ruins grooming for life.
- You're dealing with a medical issue like an ear infection, skin condition, or anal gland problem. See a vet, not a groomer, for these.
Tools That Make Home Grooming Feel Professional
If you want to close the gap, these upgrades are worth the money:
- Grooming table: A non-slip, elevated table saves your back and improves control.
- Grooming arm and loop: This harness system holds your dog gently in place. It's a game-changer for nail trims and brushing.
- Deshedding shampoo: Some grooming shampoos, especially those with oatmeal or omega fatty acids, help loosen the undercoat during bath time.
Expert Tips for a Calm, Cooperative Labrador
Grooming a scared or anxious dog is miserable for everyone. Your Lab should associate grooming with treats, attention, and pleasant sensations. Here's how to make that happen.
Start Early with Puppies
If you have a puppy, start grooming them from day one. Touch their ears, their paws, and their tail regularly. Make it part of play time.
Get them used to being handled before they need actual grooming. Puppies that are handled early become adult dogs who tolerate, even enjoy, grooming sessions.
It's not too late for an adult dog, but it takes more patience. Go slow. Do a little bit every day.
The Treat-Distraction Technique That Works
Labs are food-motivated. Use this to your advantage. During nail trims, have a family member offer high-value treats cheese, peanut butter, or small training treats.
Your dog learns that a nail trim means delicious snacks. This works for brushing, ear cleaning, and teeth brushing too.
Timing matters. Give the treat while you're doing the unpleasant task, not just after. This means the waiting goes away.
The act itself becomes connected to the reward.
How to Read Your Dog's Stress Signals
Dogs communicate with their bodies. Learn the signs:
- Tight, panting mouth with lips pulled back
- Whale eye (showing the whites of their eyes)
- Ears pinned back flat against the head
- Tail tucked or held stiff and low
- Yawning or lip-licking (these can be stress signals)
- Body stiffness, trembling, or freezing
If you see these, stop the grooming session. A stressed dog is more likely to snap or bite. End on a positive note.
Take a break. Try again later.
Wake Up With a Routine
Dogs thrive on predictability. If your lab knows that every Saturday morning means brushing and a treat, they'll pounce on the couch with a wagging tail. Store the tools in one place.
Use the same order of operations: brush, then ears, then treats. Consistency reduces stress.
When to Call the Vet or a Professional Groomer
Grooming is about more than you and your tools. Sometimes it's a medical issue that needs expert eyes.
Skin Issues That Look Like Grooming Problems But Aren't
A hot spot is a moist, red, irritated patch of skin, often caused by bacteria or allergies. It can look like your dog just scratched too much or got a small cut. But hot spots spread quickly and need vet treatment to heal properly.
Redness, pustules, flaking, and hair loss are also red flags. Before attempting to groom any skin issue, visit the vet. You might be dealing with an allergy, a fungal infection, or mites.
You won't know until a professional makes a diagnosis.
Nail Quick Injuries That Won't Stop Bleeding
If the quick bleeds for more than 10 minutes despite styptic powder, or if the nail looks split, get to the vet. An exposed quick is an infection risk. Your vet can cauterize the area and prescribe antibiotics if needed.
Ear Infections That Need More Than Cleaning
If you notice a foul odor, dark discharge, or if your dog keeps shaking their head, see the vet. Ear infections are painful, and the longer they go untreated, the harder they are to clear up. Your vet will clean the ears properly and prescribe drops or medication.
Signs of Pain or Sensitivity During Routine Handling
If your Lab suddenly flinches when you touch a certain spot, or growls when you approach their paws, something's wrong. That's not a training problem. That's a pain response.
Follow up with your vet. It could be anything from a grass seed stuck between toes to early arthritis.
Frequently Asked Questions
How often should I bathe my Labrador?
Every 6 to 8 weeks, unless they get visibly dirty or smelly in between. Bathing more frequently strips the natural oils from their coat and skin. If your Lab swims often, rinse them with plain warm water after each swim to remove chlorine, salt, or bacteria without stripping oils.
Why does my Lab still shed after brushing?
Because even the best brushing only removes the dead fur that's already come loose. The undercoat is dense and continuously regenerates. During blow-out season, you'll see more shedding even with daily brushing.
If your Lab sheds excessively year-round, consider a deshedding treatment or diet check. Poor nutrition shows up in the coat.
Should I shave my Lab in summer?
No. Shaving a double coat is a terrible idea. It ruins the coat's natural insulation and water-repellent properties.
It exposes your dog's skin to sunburn, insect bites, and heat. The coat often comes back damaged and uneven, sometimes permanently. Instead, brush your Lab regularly to remove the undercoat, which is how they naturally cool down.
How do I get rid of the wet dog smell?
The smell comes from bacteria and yeast in the coat reacting with water. The fix is thorough drying, especially of the undercoat. If the smell persists after a proper bath, you may be dealing with an ear infection or skin condition.
Check the smell's source. If it's coming from the ears, see the vet.
Can I use a human hair dryer on my dog?
No. Human hair dryers operate at temperatures that can burn a dog's skin. They also don't have the force to dry a double coat.
Use a high-velocity dryer. If you can't get one, be prepared for a long, careful towel-drying session and frequent re-drying throughout the day.
What's the best deshedding tool for a Lab?
An undercoat rake with rotating or curved teeth is the most effective. Pair it with a slicker brush for the topcoat. A wide-toothed comb for finishing.
This combination covers all the needs of a Labrador double coat. Deshedding tools that claim to remove 90% of loose fur are marketing. Stick to the basics.
The Bottom Line: Your Realistic Home Grooming Plan
You've got the tools. You've got the technique. Now let's put it all together into a realistic plan you'll actually stick to.
The Weekly 15-Minute Routine
- Brush: 2, 3 times per week with slicker brush first, then undercoat rake
- Teeth: 2, 3 times per week
- Paw check: Quick scan during brushing
The Monthly Deep-Groom Session
- Full bath with dog-specific shampoo and conditioner
- Nail trim and file if needed
- Ear cleaning (every 2 weeks, or after swimming)
- Full drying with high-velocity dryer
- Final inspection for lumps, ticks, mats, or skin issues
The Seasonal Post-Blowout Reset
Twice a year, during the heavy shedding windows, ramp up to daily brushing and add a deshedding treatment to bathtime. This is the 2, 3 week grind. It's worth the effort.
Your house will thank you, and your Lab will be more comfortable without the dense undercoat's weight.
The One Habit That Makes Everything Else Easier
Start slow. It doesn't matter if your first grooming session only lasts 5 minutes before your Lab gets antsy. End on a positive note, give a treat, and try again tomorrow.
Consistency beats duration. Within a month, you'll have a routine that takes less time, feels less stressful, and produces a healthy, happy, clean-smelling Lab. That's the whole goal.
And honestly, it feels pretty great when you get there.