
Your bird has stopped preening. Or maybe they're trying, but you can see pin feathers piling up on their head that they just can't reach. You've typed "how to help a bird preen" into a search bar, hoping for a straight answer.
Here it is: helping a bird preen means softening those brittle feather sheaths, gently breaking them open, and knowing exactly when to back off. Do it right, and you're a hero. Do it wrong, and you can cause bleeding, pain, or a bird that loses trust in you entirely.
This is one of those tasks where good intentions aren't enough. The difference between helping and harming comes down to feather anatomy, timing, and reading your bird's body language. As of 2026, avian veterinarians still report that more feather-related injuries come from well-meaning owners than from actual bird fights.
So let's slow down, learn what a feather actually is, and build a safe, step-by-step approach that protects your bird at every stage.
Quick Answer
To help a bird preen, soften the feather sheaths with a lukewarm mist first. Then gently roll the dry, flaky sheath between your thumb and forefinger. Never touch blood feathers.
Stop if the bird shows stress. Call an avian vet if preening stops for 48 hours.
Why This Matters: Preening Isn't Optional, It's Survival
Preening isn't vanity. It's a biological necessity. Birds spend up to 30 percent of their waking hours grooming their feathers, and for a good reason.
Each feather is a precision instrument made of keratin, the same protein that makes up your fingernails. But unlike a fingernail, a feather has to stay perfectly aligned to do its job.
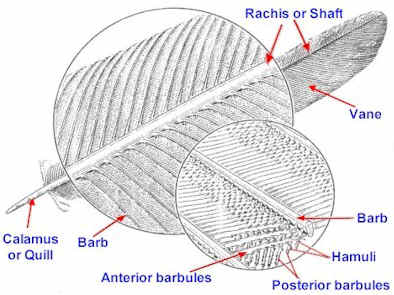
Feathers interlock like a zipper. Tiny barbules hook together to form a smooth, aerodynamic surface. When those hooks separate, the feather becomes ragged and useless.
Preening reconnects them. It also spreads oil from the uropygial gland across the plumage, which waterproofs the bird and keeps the feathers flexible.
Skip preening for a few days, and you'll see the difference. Feathers look dull. They fray at the edges.
They lose their waterproofing. A bird that can't preen is a bird that can't fly well, can't stay warm, and can't regulate its body temperature. For a pet bird, the stakes are a little different, but the principle holds.
Feathers are their skin, their coat, their insulation, and their identity all rolled into one.
The uropygial gland sits at the base of the tail. Birds squeeze it with their beak to release a waxy, slightly oily substance. They then work that oil through their feathers.
Some species, like cockatoos and cockatiels, produce a fine powder instead of oil. These are called powder-down birds. They have a different feather texture and, as you'll see later, different preening needs.
Here's the practical reality. A healthy bird preens automatically, multiple times a day. It's not something you have to teach.
Your job is to support that natural behavior, not to replace it. When you help a bird preen, you're filling in the gaps that the bird can't reach, usually the head and neck, and you're providing an assist during heavy molts. You are not the bird's primary groomer.
You're the backup.
First, Rule Out Illness: When Preening Stops or Fails
Before you touch a single feather, stop and ask yourself why the bird needs help. A bird that stops preening altogether is a red flag. This isn't a grooming problem.
It's a medical symptom.
The most common underlying causes include liver disease, psittacine beak and feather disease (PBFD), bacterial or fungal infections, and external parasites like mites or lice. Pain is another culprit. Arthritis in older birds can make it physically painful to twist around and reach those back feathers.
A bird in pain will often stop grooming entirely because it hurts too much.
Here's a simple rule to remember: if a bird has stopped preening for 48 hours or more, call an avian vet. Not a general vet. An avian specialist.
These birds hide illness incredibly well, and a lack of grooming is often one of the earliest visible signs that something is wrong.
What about a bird that's preening but failing? You'll see them trying to reach head feathers, making awkward movements, or leaving half-opened pin feathers scattered around the cage. That's different.
That's a bird with good intentions but mechanical trouble. The feathers might be too dry, the bird might be too stiff, or the molt might simply be heavier than usual.
Let's break down the warning signs that mean "stop and call the vet":
| Sign | Possible Cause | Action |
|---|---|---|
| No preening for 48+ hours | Systemic illness, pain, stress | Call avian vet immediately |
| Feather plucking with bald patches | Behavioral or medical | Vet visit to rule out PBFD, allergies, liver disease |
| Chewing/barbering feathers (leaving shafts) | Often behavioral, sometimes nutritional | Vet visit, dietary review |
| Lethargy with unkempt feathers | Infection, metabolic disease | Emergency vet visit |
| Excessive flaking skin | Dry environment, vitamin A deficiency, parasites | Vet visit, humidity check |
| Swollen or blocked preen gland | Impaction or infection | Vet visit; do NOT squeeze it |
Here's the nuance that really matters. Feather plucking is not the same as a preening problem. Pluckers pull feathers out.
That's destructive behavior, often rooted in stress, boredom, or underlying illness. Helping a plucker preen won't fix the problem. In fact, actively handling a plucking bird can make things worse by reinforcing the behavior with attention.
If your bird plucks, you need a behaviorist and a vet, not a grooming session.
Similarly, feather barbering, where the bird chews the feather shaft but leaves the base, is usually a sign of frustration or nutritional deficiency. Again, not something assisted preening fixes.
So your first step is always the same. Look at the bird's overall condition. Are they eating?
Active? Vocal? Bright-eyed?
If yes, and the only issue is stuck pin feathers, you're cleared to help. If anything seems off, even slightly, the bird goes to the vet before you touch a feather. That's non-negotiable.
The Anatomy of a Feather: Understanding What You're Handling

Let's get technical for a minute, because this is where most people get into trouble. A feather grows from a follicle in the skin, much like a hair on your head. But it doesn't emerge fully formed.
It starts as a small, dark, blood-filled tube called a pin feather or blood feather.
This tube is fragile and highly sensitive. It has a blood supply running through its core. That blood supply nourishes the growing feather and eventually recedes as the feather matures.
You can see this process visually: new pin feathers look dark and waxy. Mature pin feathers look lighter, drier, and flaky. That flaky, white casing is the keratin sheath that protected the feather as it grew.
Here's the critical part. You only touch pin feathers that are ready. A ready pin feather has a brittle, white, or pale casing that crumbles when you apply light pressure.
An unready pin feather is dark, translucent, or waxy, and it has active blood flow. Touching an unready pin feather is painful for the bird, and breaking one open can cause significant bleeding.
A broken blood feather is a genuine emergency. The shaft is hollow and connected directly to the bird's circulatory system. A break can bleed profusely and won't clot easily because the shaft keeps the wound open.
If this happens, you need to apply pressure with a clean cloth or cornstarch and get to a vet immediately. Do not try to pull the feather unless you know what you're doing. Pulling, if done incorrectly, can cause further tissue damage and make the bleeding worse.
So how do you tell the difference just by looking? Here's a quick chart:
| Pin Feather Stage | Appearance | Handle? |
|---|---|---|
| New | Dark, translucent, waxy, thick | Never |
| Maturing | Lighter, some color visible through sheath | Very carefully |
| Ready | Pale, dry, brittle, flaking | Yes, gently |
| Open | Sheath crumbled away, feather unfurls | No action needed |
Feather anatomy also varies by location on the body. Head feathers are small and tightly packed. Flight feathers on the wings are long, rigid, and have a hollow shaft that runs nearly the entire length.
Tail feathers are similar. You don't normally need to help with wing or tail feathers, since the bird can reach those. Focus your attention on the head, neck, and sometimes the back, which are the spots the bird physically cannot reach with its beak.
The uropygial gland deserves its own note here. It produces the oil that keeps feathers supple. If it's blocked, the bird's feathers will stay dry and brittle no matter how much you mist.
A blocked gland looks swollen, red, or has a dark plug visible at the top. This requires a vet's attention. Never squeeze the gland yourself.
You can cause a rupture or an infection.
One more thing about feather anatomy. Feathers aren't alive. Once a feather is fully formed, it's essentially dead keratin, like your fingernails.
That's why a broken feather doesn't hurt, but pulling it out does. The pain comes from the follicle, the skin, and the nerves around the base. So be gentle near the skin, and don't worry too much about the feather itself.
Feathers can be bent, trimmed, or replaced during molts.
Step-by-Step: How to Help a Bird Preen Safely

Now we get to the actual process. I'm going to walk you through this step by step, the same way I'd guide a friend standing in front of their bird for the first time. Take your time.
Rushing is the enemy.
Step 1: Raise the Humidity
Dry feather sheaths are brittle and hard to remove. Moist sheaths soften and crumble easily. So the very first thing you do is increase the humidity around your bird.
Mist your bird with lukewarm water from a clean spray bottle. Use a fine mist, not a jet stream. Hold the bottle about 12 inches away and spray above the bird's head, letting the mist fall gently onto their back.
You want a light dew, not a soaking. Your bird should enjoy this. Most parrots do.
If your bird panics, stop and try again in a few minutes.
The water temperature matters. Lukewarm means around 98 to 100 degrees Fahrenheit, roughly body temperature. Cold water shocks the system and can cause respiratory distress.
Hot water can scald. Test the spray on your own inner wrist first, just like you would with a baby's bottle.
Step 2: Let the Bird Dry Partially
Here's a step most guides skip. If you try to work with pin feathers while they're soaking wet, the sheaths become slippery and hard to grip. If they're bone dry, they're brittle and shatter into sharp pieces.
You want them approximately 70 percent dry. Slightly damp, but no longer dripping.
This takes about 10 to 15 minutes in a warm room. Let your bird sit on a perch or a clean towel. Don't use a hairdryer on a bird.
The noise terrifies them, and birds are extremely sensitive to airborne particles. Blow-drying can easily overheat them or dry out their skin further.
Step 3: Position Yourself and Your Bird Correctly
Now you need to handle the bird. The goal is gentle restraint, not immobilization. Sit down and place your bird on a towel on your lap, or offer your hand as a perch.
Many birds prefer to stand while being groomed. That's fine.
For head feathers, you'll be working around the bird's eyes and ears, so you need to be careful. If your bird fidgets, rest your cupped hand gently over its back to steady it. Never grab, squeeze, or pin the bird's body.
Squeezing around the chest can restrict breathing and cause panic.
If your bird absolutely refuses to sit still, stop. Forcing a cooperative session is counterproductive. You'll stress the bird out, and you risk accidental injury when they jerk suddenly.
Try again later, or try a different approach like a shower perch in the bathroom where you can work together in a calm, confined environment.
Step 4: Identify Ready Pin Feathers
Scan the bird's head and neck. Look for white or pale waxy-looking tubes sticking out from the surrounding feathers. Some will look like tiny pale matchsticks pointing outward.
Those are ready or nearly ready.
What you're looking for:
- Pale, dry casing that looks flaky or crumbly
- Feather color visible through the base of the sheath
- Sheath that slides easily when you pinch it
- No dark red or purple color showing through (that's active blood)
What you're avoiding:
- Dark, wine-colored, or bluish tubes
- Tubes that feel thick and squishy
- Tubes that are still stuck tight to the feather base
- Any area that looks swollen or red
Step 5: Roll, Don't Pull
Here's the trick. You do not pull the sheath off. You roll it.
Place your thumb and forefinger at the base of the feather, right where it emerges from the skin. Gently pinch, and roll your fingers upward toward the tip of the feather. The pressure should be just enough to crack the dry casing.
Usually, it crumbles away with a light roll, revealing a fresh, healthy feather underneath.
If the casing doesn't give way easily, it's not ready. Leave it alone and move on to another feather. A ready sheath gives way almost immediately.
There's no need for force. If you're pressing so hard your fingers turn white, you're pressing too hard and you're about to hurt your bird.
Step 6: Work Slowly and According to Your Bird's Tolerance
Start with two or three feathers. Just that. Then step back and let your bird groom itself for a bit.
This serves two purposes. It lets the bird adjust to the sensation, and it lets you see if there's any adverse reaction. Most birds enjoy this, especially during heavy molts, but you need to earn that trust gradually.
If your bird flinches every time you touch a particular area, stop touching it. There could be a pain point, a sensitive blood feather, or a skin rash. Move to another spot.
If the bird vocalizes in distress, tries to bite, or shows other signs of stress, the session is over for now. That's fine. You can always come back in an hour or tomorrow.
Step 7: Clean Up
Once you've removed the open sheaths, those tiny white flakes and bits of casing will be scattered through your bird's feathers. You can leave them. Your bird will shake them off or remove them during its next preening bout.
Or you can give another light mist to help wash them away, if your bird tolerates it.
The full process from start to finish usually takes 10 to 20 minutes, but only if your bird is calm and cooperative. A heavy molt might require multiple sessions spread over several days. Don't try to do everything at once.
That's how accidents happen.
And, for the record, here's what you should have ready before you begin:
| Item | Purpose |
|---|---|
| Clean spray bottle with lukewarm water | Soften sheaths |
| Soft, dry towel | Drying, handling, clean up |
| Bright, natural light | Identify pin feather stages |
| Cornstarch or styptic powder (for emergencies) | Stop bleeding from accidentally broken blood feather |
| Avian vet phone number | For emergencies or doubt |
Mistakes That Hurt: What NOT to Do
I've covered the right way to help a bird preen. Now let's talk about the wrong way, because these mistakes are common, and they all have real consequences.
Never Pop a Blood Feather
I can't say this enough. A blood feather, one that's still dark and waxy-looking, has an active blood supply running through its shaft. If you crush or bend it, you can cause internal bleeding that won't stop easily.
The shaft is hollow and open at the base, so blood flows out freely. This is one of the most common reasons birds end up in emergency vet visits during a molt.
If you accidentally break one, apply firm pressure with a clean cloth or a pinch of cornstarch. If the bleeding doesn't stop within a few minutes, get to an avian vet immediately. Do not attempt to pull the feather out on your own unless you've been trained.
Pulling is only done in an emergency when no vet is reachable, and it must be done with precision using hemostats. Done wrong, it makes the injury much worse.
Don't Use Human Lotions, Oils, or Creams
Your skin products are not bird-safe. Moisturizers often contain mineral oil, lanolin, fragrance, and preservatives. Birds preen, which means they will ingest whatever you put on their feathers.
These chemicals can cause gastrointestinal upset, liver damage, or allergic reactions. You also risk coating the feathers with heavy fats that destroy their natural waterproofing.
Stick to lukewarm water. That's it. If you want to use a commercial bird-safe conditioner, ask your avian vet for a recommendation, and follow the product's dilution instructions exactly.
Even a drop of cold-pressed coconut oil can help in dry climates, but it must be used sparingly and only with your vet's sign-off.
Don't Force the Bird
A bird that feels trapped will fight back. When a bird fights during handling, it jerks, flails, and can easily injure itself or you. A sudden wing flap while you're holding a pin feather near the head can snap that feather.
The best handling is the handling the bird consents to.
Start with short sessions. Watch for signs of stress: dilated pupils, hissing, biting, rapid breathing, tail fanning, or attempts to flee. If you see any of these, end the session immediately.
Reassess your approach. Maybe the bird is just tired. Maybe it's molting and the area is too sensitive.
Maybe it doesn't trust you yet. All of those are valid reasons to wait.
Don't Over-Help
This might surprise you, but you can help too much. Over-assisting with preening has its own set of problems.
First, you're removing the natural stimulation that encourages feather health. The friction of a bird working through its own sheaths stimulates blood flow to the follicles. Over-trimming or over-pinching can lead to weak feather structure.
Second, you're teaching dependence. A bird that gets all its head feathers groomed by you will start to expect it. If you're gone for a week, the bird might become stressed because it can't cope with a heavy molt on its own.
This is especially true for parrots that bond closely with their owners.
Third, you risk removing healthy feather casing too early. Each sheath protects the new feather as it emerges. Removing it prematurely exposes fragile tissue to air and friction, which can cause discomfort and increase the chance of broken feathers.
Don't Pull on Feathers That Are Stuck
Feathers get stuck sometimes. Especially during a bad molt or in dry environments. If the sheath won't budge with a gentle roll, leave it.
Pulling or picking at it can damage the skin at the follicle. The feather might be attached to a small scab or a bit of tissue, and pulling will rip that out too. Patience beats force every time.
Don't Self-Treat What Needs a Vet
A bird that stops grooming, shows signs of pain, or has visibly damaged skin should see an avian vet. Not all feather problems are preening problems. Some are symptoms of serious disease.
A simple rule: if in doubt, check it out. That vet call could save your bird's life.
Here's a quick rundown of what to avoid:
| Mistake | Why It's Harmful | What to Do Instead |
|---|---|---|
| Touching dark/waxy pin feathers | Active blood supply | Wait for casing to turn pale and brittle |
| Using human lotions | Toxic if ingested; ruins waterproofing | Use lukewarm water only |
| Forcing the bird to stay still | Stress, risk of injury | Stop the session; build trust slowly |
| Over-assisting | Weak feathers, dependence | Limit to a few feathers and let the bird finish |
| Pulling stuck feathers | Skin damage at follicle | Leave it; try again after misting |
| Delaying vet visit | Missed underlying disease | Call vet for any 48-hour grooming stall |
I've seen the aftermath of all of these. A broken blood feather is a trip to the emergency room. A toxic reaction from coconut oil is a long, painful recovery.
A bird that lost trust in its owner is a heartbreak that can take months to repair. None of these are worth rushing for the sake of a clean head.
Species Differences: What Works for a Budgie vs. a Cockatoo
Here's a truth that surprises a lot of owners. Not all birds need the same kind of help. Species differences in feather structure, oil production, and temperament change everything about how you approach assisted preening.
Small birds like budgies, canaries, and finches generally need less hands-on help. Their feathers are small, their molts are lighter, and they're naturally more skittish about handling. For these birds, your best tool is a shallow dish of lukewarm water placed in the cage.
They'll bathe themselves, softening their sheaths naturally and working them off on their own. If you must help a budgie with a stubborn head sheath, use a single finger rather than two. Their skin is fragile, and their feather follicles are delicately anchored.
Cockatoos and cockatiels sit at the opposite end of the spectrum. They're powder-down birds. Instead of producing oil from a uropygial gland, they produce a fine, chalky powder that coats their feathers.
This powder affects how their sheaths behave. They tend to be flakier, more brittle, and more prone to accumulating on the head and neck during a heavy molt. These birds often welcome hands-on help.
They're social, physical creatures that naturally allopreen each other in the wild. Your assistance is a natural extension of that behavior.
African greys fall somewhere in the middle. Their feathers produce more oil, which means their sheaths are slightly softer and easier to remove. They also tend to be more sensitive about head-touching than cockatoos.
An African grey may need multiple short sessions to build tolerance, even if they're itchy and uncomfortable.
Macaws have the densest feather coverage. Their pin feathers are thick, and during a molt, they can look like a pincushion around the head. The sheaths are tough and require a firm, consistent rolling motion to crack.
They also have a very strong beak and a strong opinion about handling. Approach a macaw only after they've expressed clear interest in being touched.
Amazon parrots are prone to feather-destructive behaviors when stressed. If you're helping an Amazon with pin feathers and they start plucking or chewing elsewhere, stop immediately. The physical comfort of having sheaths removed can trigger grooming behavior, which is good.
But it can also trigger an obsessive spiral in a bird with anxiety. Watch their body language carefully.
Here's a quick comparison table:
| Species | Feather Type | Sheath Texture | Handling Style | Bathe Preference |
|---|---|---|---|---|
| Budgie/Finch | Fine, light | Thin, brittle | Minimal, hand-off | Shallow dish |
| Cockatiel | Powder-down | Flaky, dry | Gentle, short sessions | Shallow dish or mist |
| Cockatoo | Powder-down, dense | Flaky, thick | Accepts and enjoys help | Shower perch |
| African Grey | Oily, dense | Soft, waxy | Slow, patience-building | Misting |
| Amazon | Oily | Medium | Caution with pluckers | Misting or dish |
| Macaw | Dense, heavy | Thick, tough | Firm, confident handling | Shower perch |
Your bird's personality matters as much as its species. A young, hand-raised cockatoo might never let you touch its head. A rescue Amazon might beg for head scratches within a week.
The key is observation. Watch how your bird interacts with toys, with your hands, and with its own feathers. That will tell you more than any species chart.
When You Can't Fix It at Home: The Vet's Role
Sometimes assisted preening isn't enough. Sometimes the problem is medical, and no amount of misting and patience will solve it. Knowing when to hand this over to a professional is part of being a responsible bird owner.
The most common medical condition that mimics a preening problem is a blocked uropygial gland. This gland, remember, sits at the base of the tail. It produces the oil that keeps feathers conditioned.
When it gets plugged, the oil backs up, and the bird can't properly groom itself. You'll notice feathers appearing dry, brittle, and dull. The gland itself might look swollen, red, or have a dark waxy plug visible at its tip.
This condition requires a vet's intervention. They'll express the gland, possibly flush it, and address any underlying infection.
Skin infections are another hidden cause. Fungal and bacterial infections can make preening painful. The bird will avoid the area, leaving feathers matted and unclean.
You might see redness, flaking, pustules, or feather loss around the affected region. These need prescription topicals or systemic medications. Over-the-counter bird sprays rarely solve a true infection.
External parasites like mites and lice are less common in well-cared-for pet birds, but they do happen. They cause intense itching. A bird with mites will preen obsessively, often to the point of damaging its own feathers.
You might notice ragged, broken, patchy feathers despite the bird spending hours grooming. A skin scrape under a microscope confirms the diagnosis. Treatment involves specific antiparasitic medications.
Let's talk about feather plucking again. This is the big one. If your bird is pulling feathers out, not just failing to preen, you're dealing with a behavioral or medical puzzle.
Medical causes include allergies, liver disease, heavy metal toxicity, and PBFD. Behavioral causes include boredom, lack of foraging opportunities, hormonal stress, and attention-seeking. A vet should rule out medical causes first.
Only then should you work with an avian behaviorist on the psychological side.
What does a vet visit actually involve? Expect a full physical exam, a blood panel to check organ function, and possibly a skin or feather biopsy. They'll also examine the uropygial gland and check for any masses.
Diagnostic imaging like X-rays might be recommended if they suspect internal issues. The workup isn't cheap. Budget between $200 and $600 for a comprehensive avian exam and diagnostics as of 2026 prices.
But it's the only way to know you're treating the real problem.
There's one more scenario that belongs in a vet's office. A bird that develops a fear response to handling. If your bird screams, bites, or shows extreme stress when you reach toward its head, that's often a sign of pain.
Something hurts. The bird is telling you as clearly as it can. Forcing your help will only reinforce that fear.
A vet can examine the bird safely under anesthesia if needed and identify what's wrong.
Long-Term Feather Health: Building a Better Environment
Helping your bird preen once isn't the goal. You want to create conditions where your bird rarely needs your help. That means building an environment that supports healthy feather growth from the inside out.
Humidity is the single most important environmental factor. Feather sheaths need moisture to soften and crumble. In dry climates or during winter heating season, indoor humidity can drop below 20 percent.
That makes every molt a miserable, itchy ordeal. The ideal range for most pet birds is 40 to 55 percent relative humidity. A room humidifier is the simplest fix.
Aim to keep the cage area within that range, especially during molt.
What about temperature? Birds tolerate a wide range, but rapid swings stress them. Keep your bird away from drafty windows, heating vents, and air conditioning units.
A steady temperature between 65 and 80 degrees Fahrenheit is comfortable for most companion species. Avoid placing the cage in the kitchen. Cooking fumes from non-stick pans release PTFE, which is lethally toxic to birds.
Diet is the foundation of feather quality. Feathers are almost pure protein, specifically keratin. A bird building feathers needs quality protein in its diet.
High-quality pellets should make up 60 to 70 percent of a parrot's diet. Fresh vegetables add vitamins and minerals. Vitamin A is critical for skin and feather health.
Dark leafy greens, carrots, sweet potatoes, and squash are excellent sources. Vitamin E supports overall skin integrity. Nuts and seeds provide healthy fats, but they should be limited to 10 to 15 percent of the diet because of their calorie density.
Here's a key fact that many owners miss. A bird that eats only seeds will almost always have poor feather quality. Seeds are high in fat and low in essential vitamins.
This leads to dry, brittle feathers and skin problems. If your bird is a seed-only eater, that's your first thing to fix. Transition them to pellets gradually over several weeks to avoid refusal and weight loss.
Bathing is part of long-term feather health too. A bird that bathes regularly has cleaner feathers with better sheaths. How often should you offer a bath?
At least twice a week. Daily is better during a molt. The bath doesn't need to be elaborate.
A shallow dish, a gentle mist, or a shower perch in the bathroom all work. The key is consistency. Regular bathing keeps feather casings soft and prevents the painful pile-up of dry sheaths.
Natural sunlight is another piece of the puzzle. Full-spectrum lighting helps birds synthesize vitamin D, which is essential for calcium metabolism and overall health. Direct window light filters out most UVB rays, so it doesn't count.
Your bird needs either supervised outdoor time in a safe carrier or a proper avian UVB lamp. Use these lamps for 6 to 8 hours a day, positioned 12 to 18 inches above the cage. Replace the bulbs every 6 to 12 months because their UVB output diminishes over time.
Regular grooming is part of the maintenance picture. Nails that are too long make it uncomfortable for a bird to perch and balance, which can indirectly affect preening. Overgrown beaks can interfere with a bird's ability to reach feathers.
Wing trims, if you choose to do them, should be balanced enough that the bird doesn't struggle to maintain its balance. An off-balance bird can't groom effectively. A vet or professional groomer should handle these tasks if you're not confident.
Real Scenarios: What Other Owners Got Right and Wrong
Sometimes the best way to understand a process is to see it fail first. Let me walk you through a few real scenarios, drawn from aggregated owner reports and avian vet case discussions. The names are changed, but the patterns are real.
The Rescue Cockatoo With 30 Unopened Pin Feathers
A family adopted a 5-year-old umbrella cockatoo named Mango from a local rescue. Mango had been through three homes in two years. He was wary, but he loved head scratches.
His new owners noticed he had a thick cap of brown, waxy-looking tubes covering his crown, and he kept rubbing his head against perches.
Instead of grabbing him, the owners started with a shower perch. They let Mango stand in the warm mist while they took their own showers. After five days, the larger sheaths had softened.
Then, with Mango standing on the perch, they gently rolled the ready sheaths between their fingers. They worked for about 15 minutes total, breaking off the dry casing in small sections. Mango leaned into the process.
What went right: they softened the sheaths first, they let the bird set the pace, and they stopped every few minutes to let Mango shake and readjust. The owners repeated this routine every other day for two weeks. By the end, Mango's head was clean and his trust in his new family was solid.
The Senior Parakeet With Arthritis
An 8-year-old budgie named Kiwi started looking rough. His chest feathers were frayed, and his head had several stubborn pin feathers that hadn't opened in weeks. His owner assumed Kiwi was just bad at grooming.
A vet visit revealed moderate arthritis in Kiwi's neck and shoulders. The bird physically couldn't twist around to reach his own feathers. Forcing him to sit still for manual pin feather removal would have caused pain.
Instead, the vet prescribed a mild anti-inflammatory. The owner also bought a small, shallow water dish and placed it near a heat source, set to the right distance to warm without overheating. Kiwi started taking daily baths, which loosened his sheaths and reduced his need for stretching.
What the owner got wrong initially: she assumed it was a behavioral issue. What she got right: she took him to the vet when home care wasn't working. The lesson here is that a bird refusing to preen often has a physical reason.
Pain is a powerful inhibitor.
The Chronic Plucker: When Helping Made It Worse
A blue-and-gold macaw named Tango had a long history of feather plucking. His owner, trying to help, began actively removing any pin feather she found on his chest. Tango would allow it, then immediately chew at the new feather after the sheath was gone.
The owner thought she was helping keep him comfortable. In reality, she was interrupting the natural molting cycle and stimulating more grooming behavior.
Tango's vet explained that plucking is often a behavioral loop. Intervening manually doesn't break the cycle. It feeds it.
The owner stopped all hands-on "help." Instead, she increased Tango's foraging enrichment, changed his diet to a hypoallergenic pellet, and worked with a behaviorist to build a more predictable daily routine. Over six months, Tango's feather condition improved.
What this owner got wrong is a common trap: helping feels productive, but it can be the wrong action. Sometimes the best help is to stop helping and address the root cause.
The Grey With a Blocked Gland
An African grey named Coco showed up at the vet with a swollen spot near her tail base. The owner had been misting her for weeks, trying to help with what she assumed was a tough molt. The feathers around the area were clumped and greasy.
It turned out Coco had a blocked uropygial gland. The buildup was trapping oil and debris. Misting alone would never have solved that.
The vet expressed the gland, flushed it with sterile saline, and prescribed a short course of anti-inflammatory medication. They also instructed the owner to gently clean the gland area weekly with a cotton ball dampened in warm water. Coco's feather quality improved within a month.
The takeaway: don't treat a symptom you don't understand. A swollen gland looks like a grooming problem, but it's a plumbing problem. It requires professional help.
Frequently Asked Questions
How long does it take for pin feathers to open on their own?
A pin feather takes about 10 to 14 days from emerging from the follicle to fully opening. The blood supply recedes within the first week, leaving a dry, brittle sheath that crumbles. Your help can speed up the last few days of this process, but you should never try to open a feather that's still in its active growth stage.
Can I help my bird preen every day?
Daily help is usually unnecessary and can create dependency. During a heavy molt, a short session every other day is reasonable. Between molts, you might assist only when you spot a stubborn sheath on the head or neck.
Pay attention to the signs: flaky, white casings are ready to go. That's your signal.
Is it safe to use coconut oil on bird feathers?
Coconut oil is safe only in very small amounts and only with your vet's approval. A tiny dab on a finger can help condition dry skin and soften sheaths. But coconut oil is high in fat, and birds will ingest it during preening.
Too much can cause digestive upset or pancreatic issues. In our research, most avian vets recommend against regular use. Lukewarm water misting is safer and just as effective.
Why does my bird rub its head on perches and cage bars?
This is natural behavior. Birds rub their head on surfaces to help crack open itchy pin feather sheaths they can't reach with their beaks. It's a sign that the head molt is active.
You can help by offering a shower or misting session before sheaths get too dry and stuck.
What if my bird hates being misted?
Not all birds like being sprayed. Some prefer a shallow dish bath, a wet leafy green like lettuce, or standing on a shower perch in a warm steamy bathroom. Watch what your bird tolerates and adapt.
The goal is humidity, not a specific application method.
When should I see an avian vet about preening issues?
See a vet if your bird stops preening entirely for 48 hours, if you see signs of bleeding or skin lesions, if there are bald patches, or if your bird's feather condition doesn't improve with regular bathing and assisted help. A single stubborn pin feather isn't an emergency. But a systemic change in grooming behavior is always worth a professional opinion.
The Bottom Line: Help With Your Hands, Heal With Your Head
Helping a bird preen is a skill, not a guess. It starts with understanding feather anatomy and ends with a gentle, confident touch. You now know the difference between a blood feather and a ready sheath.
You know when to mist, when to roll, and when to put your hands down and call a vet.
Here's your final checklist:
- Rule out illness first. If preening stopped for 48 hours, call the vet.
- Mist with lukewarm water before handling.
- Work in good light. Identify ready sheaths and skip all blood feathers.
- Roll the sheath between thumb and forefinger. Never pull.
- Work for 10 minutes max. Stop when the bird shows stress.
- End with praise and a treat. Build trust every session.
The one rule that overrides everything: assist, don't interfere. Your bird knows how to preen. Your job is just to help where they can't reach.
Do that with patience and care, and you'll have a bird that's healthy, comfortable, and confident in your hands.