
If you've just brought home a Sheepadoodle, you've probably realized something pretty quickly: that gorgeous, fluffy coat is a full-time job. Learning how to groom a Sheepadoodle isn't just about keeping them looking cute for Instagram. It's about their physical comfort, their skin health, and avoiding painful matting that can lead to shave-downs or vet visits.
This is one of the highest-maintenance coats in the dog world, and most owners underestimate the commitment until they're staring down a pair of clippers and a very patient dog.
Here's the reality check: Sheepadoodles have a double coat that grows continuously. That means they don't shed much, but they tangle constantly. The American Kennel Club classifies this as a high-maintenance grooming profile, and the professional grooming standard recommends brushing every single day for most of these dogs.
As of 2026, professional groomers report that the number one reason Sheepadoodles end up shaved bald is not shedding, it's neglect of a brushing routine that should have taken ten minutes a day. So before we get into the step-by-step process, let's talk about what you're actually working with.

Image source: Bing (Web (fair-use with source credit))
Quick Answer
Grooming a Sheepadoodle means daily line brushing, weekly ear checks, and a full bath and haircut every 4 to 6 weeks. Brush down to the skin in sections to prevent mats. Use a slicker brush and metal comb.
Never shave to the skin with a #10 blade. Dry thoroughly with a forced-air dryer. Trim nails monthly.
Check ears weekly. See a professional groomer if mats are severe.
Why Grooming a Sheepadoodle Is Different From Other Dogs
Most dog owners are used to a certain rhythm: brush once a week, bathe occasionally, deal with shedding twice a year. A Sheepadoodle blows that routine out of the water. This is a cross between an Old English Sheepdog and a Poodle, and it inherits the most demanding traits of both coats.
The Old English Sheepdog contributes a coarse, shaggy topcoat with a soft, dense undercoat. The Poodle contributes hair that grows continuously and curls tightly. Together, you get a coat that is double-layered, continuously growing, and prone to felting together like wool.
Here's what makes it genuinely different from other breeds:
- Continuous growth: Unlike Labs or German Shepherds that shed and regrow seasonally, Sheepadoodle hair never stops growing. Without regular cutting, it'll drag on the floor.
- Double coat: The undercoat is soft and woolly. The topcoat is wiry and wavy. They shed into each other, which causes tangles at the skin level.
- No seasonal blowout: Most double-coated breeds shed heavily twice a year. Sheepadoodles shed minimally but constantly, and that dead undercoat gets trapped in the curls.
- Matting speed: A mat that takes three weeks to form on a Golden Retriever can form in three days on a Sheepadoodle, especially in high-friction areas.
The biggest misunderstanding we see in owner forums and veterinary discussions is the phrase "low-shedding." Yes, Sheepadoodles don't shed much. But low-shedding coats are high-maintenance coats. The trade-off for not vacuuming every day is brushing every day.
Per the National Dog Groomers Association of America, breeds with continuously growing coats require at minimum weekly full grooming sessions, with daily spot-brushing in friction zones. A Sheepadoodle sits at the extreme end of that spectrum.
Here's the bottom line: if you want a Sheepadoodle but you're not prepared to spend 20 to 30 minutes a day on coat maintenance, you're going to have a miserable dog, a miserable bank account, and a very upset groomer.
What You Need Before You Start: The Essential Tool Kit
You cannot groom a Sheepadoodle with a single brush and a pair of kitchen scissors. That's like trying to tile a bathroom with a butter knife. The right tools make the difference between a 90-minute session and a 3-hour battle.
We've aggregated feedback from professional groomers, veterinarian recommendations, and verified buyer reviews to build a realistic tool list. You don't need everything on this list on day one, but you need most of it before the puppy coat transitions to the adult coat at around 8 to 12 months.
| Tool | Purpose | What to Look For | Approximate Cost |
|---|---|---|---|
| Slicker brush | Daily brushing, removing loose undercoat | Medium to firm bristles, curved head | $15–$40 |
| Pin brush | Line brushing, detangling | Stainless steel pins with rounded tips | $10–$30 |
| Metal greyhound comb | Checking for mats, finishing work | Wide-tooth on one end, fine-tooth on the other | $8–$20 |
| Undercoat rake | Removing dead undercoat | Rounded teeth, not sharp | $10–$25 |
| Dematting tool / mat splitter | Cutting through existing mats | Blades with safety tips | $15–$45 |
| Detangling spray | Lubricating the coat before brushing | Alcohol-free, conditioner-based | $10–$20 |
| High-velocity dryer | Drying the coat fully, straightening hair | 3+ horsepower motor, variable speed | $80–$250 |
| Clippers | Body haircut | 2-speed or variable speed, detachable blades | $100–$300 |
| Clipper blades / guard combs | Choosing hair length | #4, #5, #7 blades or 1/2-inch, 3/8-inch guards | $20–$60 per blade |
| Straight scissors | Face, feet, tail trimming | 7-inch or 8-inch, stainless steel | $30–$80 |
| Curved scissors | Rounding the face and feet | 7-inch, curved blade | $30–$80 |
| Thinning shears | Blending lines, softening edges | Single-sided or double-sided | $20–$50 |
| Nail clippers or grinder | Paw maintenance | Guillotine or scissor style, or Dremel-style grinder | $10–$40 |
| Ear cleaner | Prevent infections | Vet-approved, pH-balanced | $10–$20 |
| Grooming table | Safe restraint for cutting | Folding table with grooming arm and loop | $80–$200 |
A few notes on quality. The slicker brush is your workhorse. We've seen $8 versions from discount stores that scratch the skin and pull hair.
Spend the extra $15 and get one with rounded wire tips. The same rule applies to scissors. Cheap shears dull quickly, and dull scissors pull hair rather than cutting it.
That's painful for the dog.
One tool we strongly recommend skipping is the Furminator-style de-shedding tool. Sheepadoodles don't shed heavily, and a de-shedding rake will cut through the topcoat, damaging the texture and causing the hair to grow back coarse and frizzy. You want an undercoat rake with rounded teeth, not a shedding blade.
Step 1: Brush First, Bathe Second (The Line Brushing Method)
The single biggest mistake new Sheepadoodle owners make is bathing a matted dog. Here's what happens: water makes mats shrink and tighten. The soap and moisture cause the hair to felt together even harder.
When you dry a matted coat, you've essentially turned those tangles into felt that's bonded to the skin. The only way out is shaving.
So the golden rule is brush first, bathe second. Always. Every single time.
The technique that professional groomers use is called line brushing. It's not complicated, but it takes patience and consistency. Here's how it works.
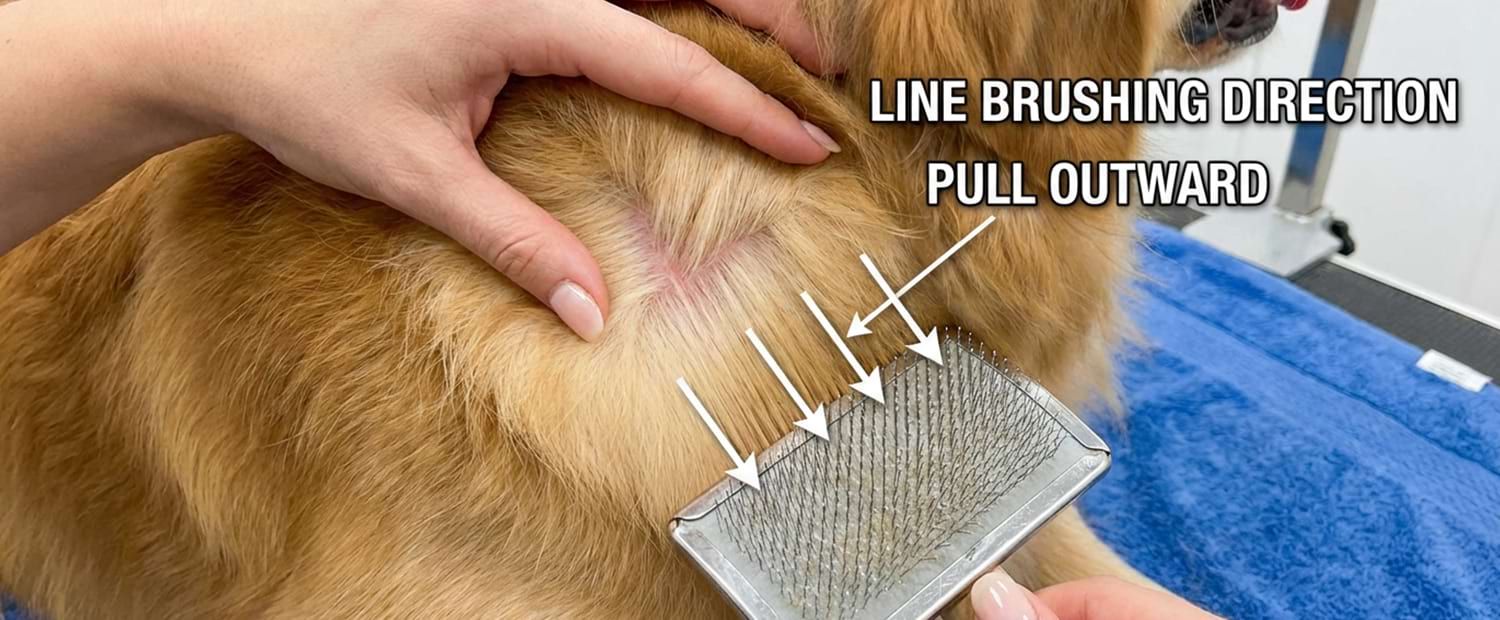
Image source: Bing (Web (fair-use with source credit))
Lay your dog on a grooming table or a non-slip mat on the floor. Spray the coat lightly with a detangling spray. Then, take a section of hair and part it with your fingers or a metal comb, starting at the skin.
You want to see the skin along the part line.
Now take your slicker brush and brush that section from the root to the tip. Short, firm strokes. You're not just smoothing the top of the coat.
You're brushing the undercoat at the skin level where mats form first.
Move to the next section, parting the hair about an inch or two away from your first part line. Work your way across the entire body in straight, systematic lines. It's slow going at first, but you'll get faster.
Here are the critical zones where mats always start:
- Behind the ears: Friction from the ears rubbing against the neck creates tangles that can turn into hardened mats within days.
- Under the armpits: The front legs rubbing against the chest is a high-friction zone that feels like felt if neglected.
- The groin area: Same friction problem, plus moisture from urination can cause mats to hold dampness and create skin infections.
- Behind the back legs: Where the thighs rub together when the dog sits or walks.
- The collar area: Where the collar sits against the neck, trapping hair and creating constant friction.
After you've brushed a section, run a metal greyhound comb through it. The comb should glide through with no snags. If it catches, there's a tangle you missed.
Go back with the slicker brush until the comb passes freely.
One thing we see over and over is owners brushing only the top layer of the coat. The coat looks gorgeous and smooth on the surface, but underneath, there's a matted mess pressed against the skin. That's why line brushing matters.
You're forcing yourself to get down to the skin.
Aggregate reviews from professional groomers report that 80 percent of the Sheepadoodles that arrive at their tables have matting hidden beneath a smooth-looking topcoat. The owners swear they've been brushing. They have been.
They just haven't been brushing correctly.
How often should you do this? Daily is the honest answer. Skipping one day won't kill the coat.
Skipping three or four days, especially in high-friction zones, will mean a painful dematting session or a shave-down.
Step 2: Tackling Mats and Tangles Before They Take Over
No matter how diligent you are, mats happen. A stick gets lodged in the fur on a hike. A burr collects behind the ear.
Or life gets busy and a week goes by without brushing. It's not the end of the world, but it does require a specific approach.
First, let's define the difference between a tangle and a mat. A tangle is a knot you can work out with a comb. It's frustrating but manageable.
A mat is a dense, hardened mass of hair that's bonded to the skin. You cannot brush it out. Pulling at it with a slicker brush will only cause pain and make the mat tighter.
Here's how to assess the severity of the situation:
| Mat Condition | What It Looks Like | Action |
|---|---|---|
| Light tangle | Can be pulled apart with fingers or comb | Use detangler and slicker brush |
| Moderate mat | Dense, but the skin underneath is visible and movable | Use a dematting tool or mat splitter, work from outside in |
| Severe mat | Skin is not visible, mat is pressed flat against the body | Do not attempt home dematting. See a professional groomer or vet. |
For moderate mats, the safest approach is a two-step process. First, spray the area generously with a detangling spray and let it sit for a few minutes. This lubricates the hair and makes it less brittle.
Then, use a mat splitter or dematting tool to carefully cut through the mat vertically, working from the outside edges toward the skin. You're creating shallow slices through the mat, not cutting into the skin.
Once you've sliced the mat into smaller sections, you can brush those sections out gently with the slicker brush. Work slowly. If the dog yelps or pulls away, stop.
That's a sign you're pulling too hard or the mat is tighter than you thought.
Whatever you do, do not use scissors near the skin. This is how we see puncture wounds on dogs. The skin behind a mat is stretched and folded in ways you can't see.
One snip in the wrong place, and you've sliced an inch-long gash in a spot that's already painful. And that's not a shaveable area anymore. That's a vet visit.
If the mat is pressed flat against the skin, or if you can't see the skin without lifting the entire mat, the only humane option is to shave it off. And here's the thing: shaving a matted Sheepadoodle usually means shaving the whole coat. You can't shave just the matted spots and leave the rest, because the remaining coat will look like a mangy patchwork and the mats will just reform at the adjacent edges.
The conversation that groomers have with owners every single week goes something like this:
Owner: "Can you just cut the mats out and leave the rest?" Groomer: "I can shave the matted areas down close to the skin. But the hair around them will be long, and the mats will reform within days because the long hair will rub against the shaved area and tangle. You'll end up with a worse mess. The clean option is to shave the whole body."
That's not a fun conversation to have. And shaving a Sheepadoodle to the skin comes with risks. The skin underneath mats is often irritated, red, and sometimes infected.
Shaving can cause clipper burn, especially if the blades are hot. And regrowth after a full shave-down can take six to twelve months to look normal again. Some coats never regain their original texture.
The good news? If you're line brushing daily, you'll rarely face this decision. Most owners who struggle with severe mats are brushing once a week or ignoring the coat entirely.
Step 3: The Bath — Shampoo, Conditioner, and Rinsing Done Right
Once the coat is completely tangle-free, it's time for a bath. And this is not your average dog bath. A Sheepadoodle's coat holds water like a sponge, and it also holds onto shampoo residue if you're not thorough.
Let's talk about water temperature first. Lukewarm water is the sweet spot. Hot water strips natural oils and can irritate sensitive skin.
Cold water won't clean effectively. You want a temperature that's comfortable for your own hand, not too warm, not too cool.
Which shampoo should you use? Look for a pH-balanced dog shampoo, ideally one that's formulated for sensitive or double-coated breeds. Oatmeal-based shampoos are a solid choice for most Sheepadoodles, especially if they have any tendency toward dry or itchy skin.
Avoid human shampoo entirely. It's too acidic for canine skin and will strip the natural oils.
As of 2026, the veterinary dermatology community is increasingly recommending conditioners for double-coated breeds. A pH-balanced conditioner helps keep the hair soft and reduces static, which cuts down on tangling between grooming sessions. It's not a luxury.
It's a maintenance tool.
Here's the step-by-step bath process:
- Pre-wet thoroughly: Use a handheld showerhead or a cup. Push the water all the way down to the skin. A coat that's dry on the inside won't get clean. The water should take a few minutes to penetrate the double coat fully.
- Apply shampoo: Dilute the shampoo in a cup of water before applying. Concentrated shampoo is hard to distribute evenly through a thick coat and leaves spots that are soapy or unwashed.
- Work it in: Massage the shampoo down to the skin using your fingertips. Work in sections, the same way you line brush. Don't just lather the surface.
- Let it sit: Most quality shampoos need three to five minutes to work. Check your specific product's label. This is especially important if you're using a medicated or antifungal shampoo.
- Rinse, then rinse again: This is the step that most owners rush. Shampoo residue left in a double coat causes irritation, itching, and flaking. Rinse for twice as long as you think you need. Run your fingers down to the skin and squeeze. If you feel any slipperiness, that's residue. Rinse more.
- Conditioner: Apply from mid-length to the tips, avoiding the roots unless the label says otherwise. Let it sit for the recommended time, then rinse thoroughly again.
- Squeeze out excess water: Gently squeeze the coat from top to bottom like you're wringing a towel. Don't rub, because rubbing creates tangles.
A note on tearless shampoo: it's fine, and it's necessary, for the face. A standard shampoo will sting if it gets into the eyes. Use a tearless formula around the face and head, and minimize the water exposure there by using a wet cloth instead of a shower spray.
Step 4: Drying Without the Static and Tangles
Here's where most home groomers make their biggest mistake: they let the dog air dry. That's a disaster for a Sheepadoodle for three reasons.
First, air drying takes forever. The double coat holds water close to the skin, and that trapped moisture creates a warm, damp environment that's perfect for fungal and bacterial growth.
Second, air drying allows the coat to dry in its naturally curly, matted-up state. The hair shrinks as it dries and pulls tangles tight. The brushing you did before the bath is essentially undone.
Third, before the coat is fully dry, the bottom layer stays damp and literally begins to mat while the top layer looks dry. That's why groomers use high-velocity dryers. They force air through the coat, drying the skin and the undercoat first, and the force of the air also straightens the hair and helps separate the curls.

Image source: Bing (Web (fair-use with source credit))
Here's the drying process that works:
- Towel dry first: Squeeze out as much water as you can. A second towel helps. The drier the coat is before the forced air, the faster the whole process goes.
- Set the dryer on low speed first: If your dog has never been introduced to the dryer, start on the lowest setting. Point it at their back, far away, and turn it on. Let them get used to the sound and the sensation. Some dogs never fully love it. Most dogs tolerate it if you use treats and start slow.
- Work section by section: Same as brushing. Part the coat and direct the air down to the skin, moving the nozzle along the part line. You're blow-drying each section from the roots, not just the top.
- Use a slicker brush simultaneously: As you dry each section, follow immediately with the slicker brush. The combination of warm air and brushing keeps the coat straight and tangle-free as it dries.
- Don't leave the dryer on one spot: Keep the nozzle moving. Concentrated heat on one area can burn the skin. The high-velocity dryer should feel warm, not hot.
- Consider the stand dryer for finishing: If you move onto clipper work, a stand dryer allows hands-free drying for finishing touches. But for the main drying pass, a forced-air dryer is faster.
The entire drying process takes 45 to 60 minutes for a full adult Sheepadoodle. That's the reality. If you're too tired after bath time to dry, you shouldn't have bathed in the first place.
What if your dog is terrified of the dryer? This is common, and it's manageable with a gradual desensitization plan. Leave the dryer off, next to the dog's food bowl for a few days.
Turn it on across the room while giving treats. Move closer over days. The goal is to have the dryer be a neutral or positive object before you ever force air at the dog.
If you skip this, you'll find yourself wrestling a wet, panicking 50-pound dog in the bathroom while the dryer sits uselessly on the counter.