
You know that feeling when your guinea pig squirms, you're holding the clippers, and you suddenly realize you can't actually see where the pink part of the nail ends? That moment of hesitation is exactly where most nail-trimming accidents happen. Learning how to trim guinea pig nails isn't complicated, but it does require the right technique, proper tools, and a solid understanding of the anatomy involved.
In our research across veterinary resources and small-animal care guidelines, the most common injury isn't from cutting too deep by accident. It's from owners who are too scared to cut at all, letting nails curl into the paw pad. As of 2026, the standard recommendation from exotic pet veterinarians is a trim every three to four weeks, with the average guinea pig having 14 nails total across four paws.
Let's walk through the entire process so you can do this confidently and safely.
Image source: Bing (Web (fair-use with source credit))
Quick Answer
Trim guinea pig nails every three to four weeks. Use small animal guillotine clippers, never human nail clippers. Press the toe pad to extend the nail.
Identify the quick before cutting. Cut at a 45-degree angle in small slivers. Keep styptic powder nearby for emergencies.
Reward with a treat after each session.
Why Trimming Matters More Than You Think
Most owners don't realize how serious overgrown nails can get. It's not just a cosmetic issue. When nails grow too long, they change the way your guinea pig walks, putting unnatural pressure on their feet and joints.
Over time, this can lead to a painful condition called bumblefoot, or pododermatitis, where the footpad becomes inflamed and infected.
Overgrown nails also curl. Once a nail curls far enough, it can actually grow into the pad of the foot, creating an open wound that's prone to infection. This is genuinely painful for the animal, and treating it requires a vet visit, antibiotics, and sometimes even surgery.
Beyond the physical risks, there's the trust factor. A bad nail-trimming experience can make your guinea pig afraid of being handled altogether. They're prey animals, so they remember stress vividly.
One painful cut can undo months of careful bonding, making future trims and even routine health checks significantly harder.
What Happens When You Skip Trims
Let's be specific about the timeline. Guinea pig nails grow continuously, much like human nails. When left untrimmed, they can double in length within six to eight weeks.
Here's what typically happens at each stage:
- 4 weeks without trimming: Nails are noticeably longer, may click on hard floors, and begin to catch on fleece or bedding.
- 6 weeks without trimming: Nails are curling slightly and the quick has extended further into the nail, making future trims riskier.
- 8 weeks without trimming: Nails are curling under the foot, affecting gait and potentially starting to press into the paw pad.
- 10+ weeks without trimming: Nails are likely embedded in the footpad, and the risk of infection is high. Professional veterinary care is likely necessary.
The Hidden Cost of Deferred Care
Nail trims are a standard part of small-animal wellness care. The American Veterinary Medical Association includes routine grooming in their general small-mammal care guidance. But here's the practical side: a vet visit for a nail trim can cost anywhere from $30 to $70.
Over a year with a monthly trim schedule, that adds up to several hundred dollars.
Learning to trim at home isn't just about saving money. It's about keeping your pig comfortable and stress-free in their own environment. Trips to the vet are necessary for illness, but for routine maintenance, home care is often less traumatic for the animal.
What You'll Need Before You Start
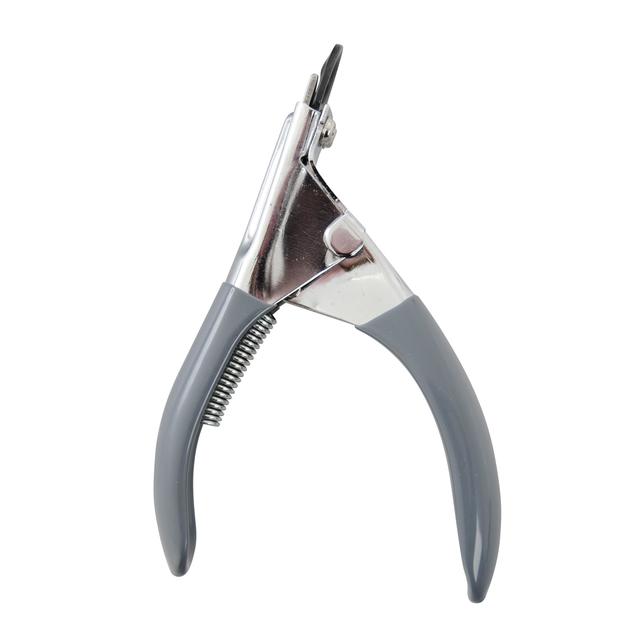
Image source: Bing (Web (fair-use with source credit))
You don't need a lot of equipment, but what you use matters. The wrong tools can crush the nail, cause splintering, or make it impossible to see what you're doing. Here's the full list of essentials.
Clippers: Guillotine vs. Scissor Style
There are two main types of small-animal nail clippers, and each has its supporters. Both can work, but they behave differently in practice.
| Feature | Guillotine Style | Scissor Style |
|---|---|---|
| Mechanism | Nail slides through a hole, blade presses down | Two blades squeeze together like scissors |
| Best for | Guinea pigs and small rodents | Small dogs, cats, and slightly larger animals |
| Visibility | Good, but you must position the nail carefully | Excellent, you can see the nail from above |
| Control | Requires a steady hand and precise placement | Easier to make small, controlled cuts |
| Risk of crushing | Can crush if the nail isn't fully inserted | Less likely to crush if blades are sharp |
For guinea pigs specifically, the guillotine style is the most commonly recommended because their nails are thin and fit neatly through the hole. However, some owners find scissor-style clippers easier to control, especially if they're nervous about cutting too much.
The Case Against Human Nail Clippers
This is one of the most common mistakes we see in research and owner forums. Human nail clippers are too thick and blunt for guinea pig nails. They tend to crush or splinter the nail rather than making a clean cut.
A crushed nail can crack upward toward the quick, causing pain and bleeding even when you didn't cut the quick itself.
If the tool fits the nail incorrectly, it also reduces your control and visibility. You're more likely to cut too much or at the wrong angle. Spend the eight dollars on proper small-animal clippers.
It's the single best investment you can make for this task.
Essential Supplies Checklist
- Small-animal guillotine nail clippers: The core tool, designed specifically for thin rodent nails.
- Styptic powder: Stops bleeding immediately if you cut the quick. This is non-negotiable.
- Cornstarch or flour: A backup option if styptic powder isn't available. Not as fast-acting, but works in a pinch.
- Bright light source: A desk lamp or flashlight to see through translucent nails and locate the quick.
- Small treats: Plain pellets, a slice of cucumber, or a small piece of bell pepper. Use these for positive reinforcement.
- Towel: For creating a stable, non-slip surface on your lap. Not for wrapping the pig.
- Second person (optional but ideal): One person holds, one person cuts. This reduces stress and motion.
Why Lighting Is Non-Negotiable
You cannot safely trim what you cannot see. Guinea pig nails are often translucent, which means you can see the pink quick running through them when held up to light. But this only works if you have adequate lighting.
A bright desk lamp positioned to shine through the nail from the side is ideal. Many experienced owners recommend using a small flashlight held behind the nail. This backlights the quick and makes it clearly visible as a dark pink or red line.
Understanding the Quick: The #1 Thing to Master
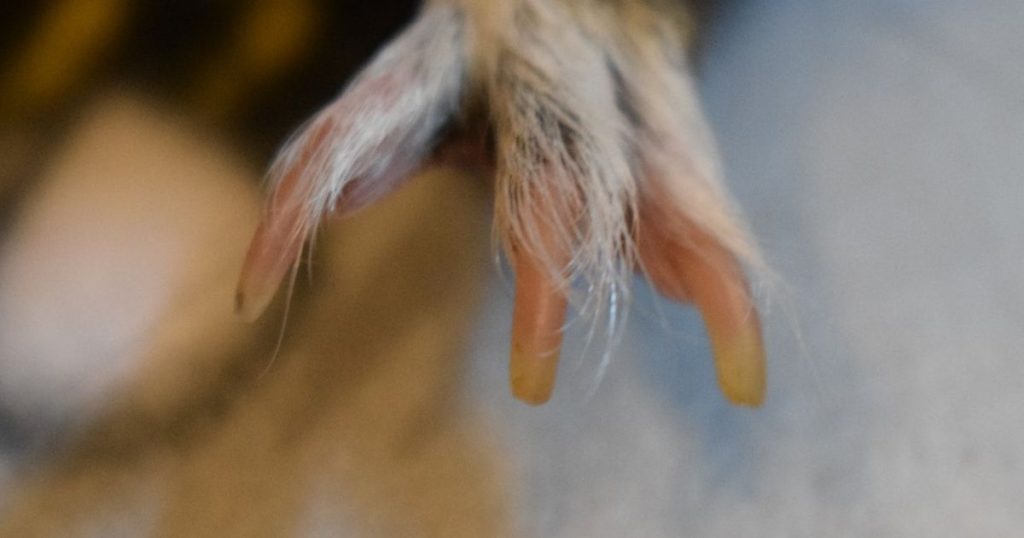
Image source: Bing (Web (fair-use with source credit))
The quick is the blood vessel and nerve bundle that runs through the center of each nail. Cutting it is painful, causes significant bleeding, and can make your guinea pig terrified of future trims. Understanding exactly where it is and how to avoid it is the entire game.
Translucent Nails: The Easy Case
On guinea pigs with light-colored or white nails, the quick is clearly visible as a pink or red line running through the nail. It stops before the end of the nail, usually leaving a small translucent tip. Your goal is to cut only the tip, well below where the quick ends.
The key insight here is that the quick extends further into the nail over time. When a nail is overgrown, the quick grows with it. This means you can't simply cut a long nail back to what looks like a "normal" length in one go.
You would hit the quick. Instead, you need to trim gradually, a small amount every few days, allowing the quick to recede.
Dark Nails: The Challenging Case
Dark or black nails make the quick impossible to see directly. This is where many owners panic. But there's a reliable technique for these cases.
Shine a bright light from behind the nail. In our research, this is the most commonly recommended approach. While you won't see a distinct pink line, you'll often see a slight shadow or change in opacity where the quick begins.
It's subtle, but it's there.
If you genuinely cannot see anything, use the gradual sliver method. Cut a tiny amount off the tip, then examine the cross-section. If you see a small dark dot in the center of the cut surface, you're getting close to the quick.
Stop there. The nail is now shorter, and you can wait a few days for the quick to recede before cutting again.
The 45-Degree Angle Rule
Cutting straight across can leave sharp edges that snag on bedding or scratch your pig when they scratch themselves. Instead, cut at a 45-degree angle, following the natural curve of the nail tip.
This creates a clean, smooth edge that's less likely to catch on anything. It also helps prevent the nail from splitting upward, which is a risk if you cut flat and the nail is dry.
Step-by-Step: The Calm, Safe Way to Trim
Now we get to the actual process. This is where preparation meets execution, and it's where most people either succeed or struggle. Let's break it down into manageable steps.
Step 1: Set Up Your Space
Choose a quiet room with no other pets and minimal noise. Guinea pigs spook easily, and a sudden sound can cause a jerk at exactly the wrong moment. Sit on a comfortable chair with good lighting positioned beside you.
Place your towel on your lap to create a non-slip surface. Lay out all your supplies within arm's reach: clippers, styptic powder, treats, and the flashlight. You should not have to reach for anything mid-trim.
Step 2: Position Your Guinea Pig
How you hold your pig matters more than almost anything else. The common advice to wrap them in a towel like a burrito is actually counterproductive. It can cause panic and restrict their breathing, which makes them fight harder.
Instead, place them on your lap, facing away from you, with their rear end against your stomach. This naturally prevents them from backing away. Use one hand to gently hold their body still and the other to work on the nails.
Many owners find it easiest to have a second person hold the pig while they focus on the feet.
Step 3: Extend the Nail
Guinea pig nails are usually tucked up under their toes. You cannot cut what you cannot see. Press gently on the toe pad from the top and bottom.
This extends the nail out from the fur and gives you a clear view of the entire nail.
Be gentle here. The toe pads are sensitive, but a steady, firm press is necessary to get the nail into position. You'll feel the nail pop into view as the toe pad compresses.
Step 4: Identify the Quick
Now we use everything from the previous section. Hold the foot steady, shine your light through the nail, and locate the pink line.
If you can see the quick clearly, aim to cut at least 1 to 2 millimeters below where it ends. Never cut flush against the quick. Leaving a small margin of safety is always the right call.
Step 5: Cut in Small Slivers
This is the single most important technique tip in this entire article. Do not try to remove the whole nail in one clip. Instead, take off a tiny sliver at a time.
After each sliver, reassess the nail and the quick position.
The reason for this is simple. The quick can be closer to the surface than you think, especially on nails that haven't been trimmed in a while. A small sliver might reveal that you're right at the edge of the quick, allowing you to stop before causing damage.
Make your cut at a 45-degree angle, smooth and deliberate. A sharp clipper will make a clean cut with minimal pressure. If you feel the nail crushing or splintering, your clippers are either too dull or the wrong tool.
Step 6: Reward and Move On
After each paw is done, give your pig a treat immediately. This builds a positive association with the process. Between paws, let them relax for a few seconds if they're getting stressed.
If your pig is extremely agitated, it's better to stop and try again later in the day than to force through and risk an injury. Guinea pigs have a threshold for stress, and a bad experience teaches them to fight harder next time.
One Person vs. Two People: What Actually Works Best
This is a practical question that comes up constantly. Can you do this alone? Yes.
Is it easier with two people? Almost always. Let's break down both scenarios so you can decide what's right for your situation and your pig's temperament.
When Solo Trimming Is Realistic
Solo trimming works well when your guinea pig is naturally calm and comfortable being handled. Some pigs are just chill. They'll sit on your lap, tolerate the pressure on their feet, and let you work through all 14 nails without much fuss.
The key advantage of solo trimming is control. You're the only one handling the pig, so there's no miscommunication between a holder and a cutter. You can feel exactly how much pressure you're applying and adjust in real time.
If you're going solo, your positioning is critical. Sit with your pig on your lap, facing away from you. Use one forearm to gently pin their body against yours while you use that same hand to hold and extend the foot.
Your other hand works the clippers. It's awkward at first, but most owners get the hang of it within a few trims.
When You Need a Second Person
Two-person trimming is the better choice when your pig is squirmy, nervous, or has done this before and remembers it negatively. It's also the right call if you're a new owner still building confidence.
The division of labor is simple. One person holds the pig securely and keeps them calm. The other person handles the clippers and focuses entirely on nail placement and cutting.
The holder can also shine the flashlight or offer treats to keep the pig distracted.
Here's the thing about the holder's role. It's not just about restraint. It's about calm, confident handling that doesn't trigger the pig's prey instincts.
A panicked holder makes a panicked pig. The holder should speak softly, keep a steady grip, and release pressure the moment the pig gets too stressed.
Towel Wrapping: What Works and What Doesn't
Let's clear up the towel debate. You'll see advice online about wrapping your guinea pig in a towel like a burrito. Some owners swear by it.
Others say it causes more harm than good.
The truth is that it depends entirely on your pig. Some pigs feel secure when gently swaddled. It mimics the feeling of being in a tight tunnel or hideout, which can be calming.
Other pigs panic when their movement is restricted and will fight harder than they would without the towel.
If you try towel wrapping, watch your pig's reaction closely. If they're struggling, wheeking in distress, or trying to escape, stop and switch to the lap method instead. Never use the towel as a way to hold their head or cover their eyes.
That will trigger panic every time.
Here's a safer approach. Instead of wrapping the whole body, fold the towel into a thick pad and place it on your lap. Your pig sits on the towel, which gives them traction and a sense of stability.
This is often enough to calm them without the stress of being confined.
How Often Should You Trim? (And Why It Varies)
The general rule of thumb is every three to four weeks. But that's a starting point, not a universal law. Several factors can push your schedule earlier or later.
The Baseline Schedule
For most guinea pigs, a three to four week cycle keeps nails at a healthy length without letting them get out of control. At this frequency, you're maintaining the nail and the quick stays short, which makes each trim easier and less stressful.
Here's what that looks like on a calendar. If you trim on the first Saturday of the month, you'll never go more than five weeks between trims. Setting a recurring reminder on your phone makes it automatic.
Why Some Pigs Need More Frequent Trims
Indoor guinea pigs tend to have softer, faster-growing nails than those housed outdoors. This is because outdoor pigs naturally wear their nails down on harder surfaces like concrete patios, paving stones, or wooden runs. Indoor pigs spend most of their time on soft fleece, paper bedding, or hay, which does very little to wear nails down.
If your pig lives indoors, check their nails weekly. You might find that three weeks is the sweet spot, or you might need to trim every two and a half weeks. The nail growth rate varies from pig to pig, so observation is your best tool.
Why Some Pigs Need Less Frequent Trims
Senior guinea pigs often have slower nail growth. If you're trimming a pig who's over five years old, you might stretch the schedule to every five weeks or even longer.
Similarly, pigs who get regular supervised outdoor time on hard surfaces will naturally wear their nails down. These pigs might only need a trim every six weeks. The key is to check the nails weekly and use your judgment rather than blindly following a calendar.
How to Check If Your Pig Needs a Trim
This is a simple test you can do in under a minute. Gently press on your pig's toe pad to extend the nail. Look at the tip.
- The nail should be roughly flush with the toe pad, extending just slightly beyond it.
- If the nail curves downward or sideways, it's too long.
- If you hear clicking sounds when your pig walks on hard floors, it's past time to trim.
- If the nail curls past the point where the quick ends, it's overdue.
That last point is critical. If the nail is bent or curling, trimming is more urgent and you may need to do multiple small trims over a week to get the length right without hitting the quick.
Mistakes That Make Trims Worse
Even with the best technique, mistakes happen. The goal is to minimize them and know how to recover when they do. Here are the most common errors we see, based on our research of owner forums and veterinary guidance.
The Towel Trap
We touched on this earlier, but it deserves its own entry. Wrapping your pig so tightly that they can't move or breathe is dangerous. It causes panic, and a panicked prey animal will fight with everything they have.
If your pig is fighting the towel, put the towel down and use the lap method instead. A calm pig is safer than a restrained pig.
The One-Big-Snip Mistake
This is the most direct cause of cut quicks. You see the long nail, you line up the clippers, and you go for the whole thing in one motion. The problem is that the quick extends further into the nail than you think, and one big snip takes out more nail than you intended.
The fix is simple. Take off tiny slivers. Each cut should remove no more than a millimeter or two of nail.
Yes, it takes longer. Yes, it's tedious. But it's infinitely better than a bleeding, terrified pig.
Trimming a Stressed Pig
Guinea pigs have good days and bad days, just like we do. If your pig is already upset about something else, whether that's a recent move, a new cage mate, or just a bad mood, trimming is more likely to go wrong.
Read your pig's signals. Teeth chattering, loud wheeking, and trying to bite are all signs that they're not in the right headspace. If you see these signs, stop and try again in a few hours or the next day.
Forcing a trim on a stressed pig teaches them that being handled is scary.
Using Dull or Wrong Clippers
We've covered this, but it's worth repeating. Dull clippers crush the nail. Wrong clippers cause splintering.
Both lead to pain and bleeding. If your clippers are more than a year old or if you've dropped them, replace them. They're cheap enough that there's no excuse for using worn-out tools.
Skipping Emergency Supplies
The "it won't happen to me" mentality is dangerous. It only takes one slip to cut the quick. If you don't have styptic powder or cornstarch within reach when that happens, you're left scrambling with a bleeding pig and a growing panic.
Keep your emergency supplies out and ready every single time you trim. You can't predict when you'll need them. But you can be prepared.
What to Do When You Cut the Quick
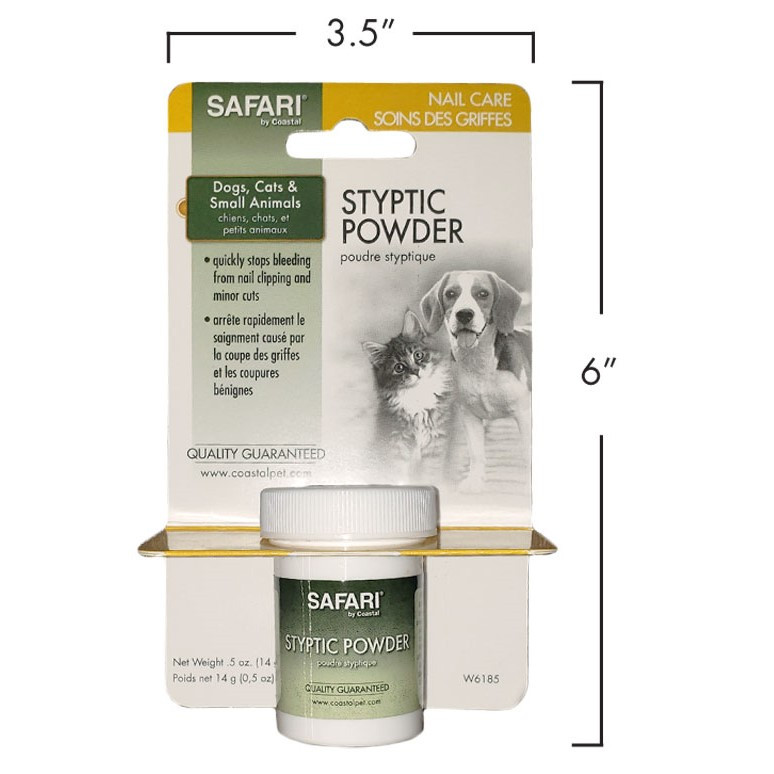
Image source: Bing (Web (fair-use with source credit))
It happens. Even experienced owners cut the quick occasionally. What matters is how you respond.
Staying calm and acting quickly will minimize the pain, stop the bleeding, and reduce the emotional impact on your pig.
Immediate Response: The First 30 Seconds
The moment you cut the quick and see blood, your job is to stay calm. Your guinea pig will sense your panic, so keep your movements steady and your voice low.
Apply firm, direct pressure to the cut end of the nail with a clean cotton ball or tissue. Hold it there for 30 to 60 seconds. This simple pressure often stops minor bleeding on its own, without any additional products.
Using Styptic Powder
Styptic powder is the gold standard for stopping nail bleeding. It contains a compound called ferric subsulfate that works by constricting blood vessels and promoting clotting.
Dip the cut nail directly into the powder, or press a cotton swab coated in powder against the bleeding end. Hold it for about 30 seconds. The bleeding should stop almost immediately.
If it doesn't, apply another layer.
Cornstarch and Flour: The Backup Plan
If you don't have styptic powder, cornstarch or plain flour can work in a pinch. They're not as fast-acting, but they're almost certainly in your kitchen.
Press the bleeding nail into a small pile of cornstarch and hold it for 30 seconds. The powder absorbs moisture and helps form a clot. This is a temporary fix, but it buys you time and usually stops the bleeding.
When to Call the Vet
Bleeding that doesn't stop within five minutes of applying pressure and styptic powder is a red flag. This can indicate that you've cut deeper than just the quick, or that your pig has an underlying clotting issue.
Also, call your vet if the bleeding restarts once you release pressure. And if you notice any signs of infection in the days following a cut, such as swelling, redness, or discharge, that's a definite emergency.
Aftercare for the Next Few Days
Once the bleeding stops, keep an eye on the nail for a few days. It's normal for it to be slightly tender, and your pig might be a bit cautious about that foot. But it should heal quickly and show no signs of infection.
Keep the cage bedding clean during the healing process to prevent any bacteria from entering the nail bed. If your pig is a chewer and is nibbling at the paw, you may need to distract them with extra hay or a new toy.
When to Skip the DIY Trim and See a Vet
Knowing when to trim at home and when to hand it over to a professional is part of being a responsible owner. Some situations are beyond what you should handle yourself.
Severely Overgrown or Curled Nails
If you've inherited a guinea pig with nails that have already curled into the footpad, don't attempt to fix this at home. The quick has grown far into the nail, and cutting it back requires significant skill and precision.
A vet can trim these nails gradually over several sessions, allowing the quick to recede safely. They can also clean and treat any wounds caused by the curling.
Signs of Infection
If the nail bed is swollen, red, warm to the touch, or has any discharge, that's a sign of infection. Trimming will only make it worse. This needs veterinary attention and likely antibiotics.
A Pig That Cannot Be Safely Handled
Some guinea pigs are genuinely too aggressive or too terrified for safe handling. This is more common in rescue pigs or those with a history of trauma. If your pig bites, scratches, or panics to the point of self-harm, stop trying.
A vet or experienced groomer has the tools and training to handle difficult pigs safely. They may also be able to recommend desensitization techniques to make future home trims possible.
Underlying Health Conditions
If your guinea pig has a condition that affects clotting, like a liver problem or a nutritional deficiency, any cut carries additional risk. Your vet should be aware of their health status and can advise on whether home trims are safe.
Building Trust Between Trims
The relationship you build between trims is what determines how easy the next trim will be. A pig who trusts you is a pig who stays calm on your lap. A pig who fears you is a pig who fights.
Daily Handling Habits
Spend at least ten minutes a day handling your guinea pig, even when you're not trimming nails. Pick them up gently, hold them on your lap, and let them explore your hands. This normalizes being held and touched, making future trims feel less like a violation.
Touch Their Feet Regularly
Between trims, gently press on their toe pads and handle their feet during your daily cuddle time. This desensitizes them to the specific sensation of having their feet manipulated. By the time you actually need to trim nails, they're used to having their feet touched.
Treat-Based Desensitization
Pair handling and foot-touching with treats. Every time you touch their feet and they tolerate it, give them a small reward. This creates a positive association between foot-handling and good things.
Reading Stress Signals
Learn to recognize when your pig is stressed before they escalate to fighting. Common signs include:
- Teeth chattering (a warning sound)
- Loud, urgent wheeking
- Trying to hide or burrow
- Flattening their body
- Jumping or lunging away
If you see any of these signs, stop what you're doing. Give them space. Try again later with a calmer approach.
The Power of Consistency
Guinea pigs are creatures of habit. If you trim nails at the same time of day, in the same room, with the same routine, they'll learn what to expect. That predictability is calming, and it makes each trim easier than the last.
Quick Reference: Nail Trimming Cheat Sheet
This is the summary section. Save it, screenshot it, print it out. It's everything you need to remember in one place.
The Tools
- Small-animal guillotine nail clippers
- Styptic powder
- Cornstarch or flour (backup)
- Bright flashlight
- Small treats
- Towel for the lap
The Steps
- Set up your space with good lighting and all supplies within reach.
- Position your pig on your lap, facing away from you.
- Press the toe pad to extend the nail.
- Identify the quick with the flashlight.
- Cut at a 45-degree angle in small slivers.
- Reward after each paw.
The Schedule
- Baseline: every 3 to 4 weeks
- Indoor pigs may need more frequent trims
- Senior pigs may need less
- Check nails weekly to assess
The Emergency Response
- Apply firm pressure with a cotton ball for 30 seconds.
- Dip in styptic powder, hold for 30 seconds.
- If bleeding doesn't stop in 5 minutes, call the vet.
- Watch for signs of infection in the following days.
Frequently Asked Questions
How often should I trim my guinea pig's nails?
Most guinea pigs need a trim every three to four weeks. Indoor pigs on soft bedding may need trims closer to three weeks. Senior pigs or those with outdoor time may stretch to five or six weeks.
Check your pig's nails weekly and adjust the schedule based on what you see.
Can I use human nail clippers on my guinea pig?
No. Human nail clippers are too thick and blunt for guinea pig nails. They crush and splinter the nail instead of making a clean cut, which can cause pain and bleeding.
Use small-animal guillotine clippers designed specifically for rodents.
What happens if I cut the quick?
Apply firm pressure with a cotton ball for 30 seconds, then dip the nail in styptic powder. The bleeding should stop almost immediately. If it continues for more than five minutes, or if you notice swelling or discharge in the following days, contact your vet.
My guinea pig hates being held. How do I trim their nails?
Start with daily handling sessions to build trust. Touch their feet regularly so they get used to the sensation. Use a second person to hold the pig while you focus on cutting.
If your pig remains too aggressive or panicked, consider a vet or professional groomer.
How do I trim dark or black nails?
Shine a bright light from behind the nail to look for a shadow or change in opacity. If you can't see anything, use the sliver method. Cut a tiny piece off the tip, examine the cross-section.
A dark dot means you're close to the quick. Stop and try again in a few days.