Tag: dog hygiene

  • Dog Beard Drip Mat Placement

    Dog Beard Drip Mat Placement

    A beard-drip mat belongs where water actually falls: under the bowl's front edge, with a towel nearby and a dry path away from the bowl.

    Quick Answer

    Place the mat where the beard actually drips, not just under the bowl shape. Keep a small towel close by for face drying, and keep the mat itself flat and stable.

    In practice, that usually means shifting the mat 4–8 inches forward of the bowl rim, toward the direction the dog walks away. Water leaves a wet beard on the lift, not on the drink, so the puddle almost always lands ahead of the bowl rather than beneath it. If you only remember one thing: mark the wet spot after a normal drink, then place the mat over that spot.

    What This Routine Is For

    This is a practical setup for owners of dogs with longer facial fur, using a "bowl, pause, towel, mat" layout: place the mat where drips actually land and keep a face towel nearby without blocking the dog.

    It is a floor-and-coat routine, not a training exercise. Nothing here asks the dog to change how it drinks — you are simply moving equipment to match behaviour that already exists. It fits alongside the rest of your at-home care, in the same way a full head-to-tail session at home covers coat, feet and ears in one predictable order.

    Which Dogs Benefit Most

    Beard drip is a coat-length problem before it is a bowl problem. The dogs that soak a floor fastest tend to be:

    • Wire-coated and bearded breeds — Schnauzers, Airedales, Scotties, wire-haired terriers, Wheatens.
    • Long-muzzled doodle crosses with soft, absorbent facial furnishings that hold water like a sponge.
    • Flat-faced dogs (Bulldogs, Pugs, Boxers) whose loose lips push water sideways over the bowl edge.
    • Giant breeds and heavy droolers — Saint Bernards, Mastiffs, Newfoundlands — where the mat is managing drool plus water.
    • Senior dogs who drink more slowly and let more water fall back out.

    Smooth-faced breeds usually need nothing more than a small tray. If your dog is on the list above, coat length is doing most of the damage, and trimming schedules matter as much as mat placement — mapping a realistic upkeep rhythm for your dog's fur type keeps beard fur from getting long enough to act as a wick.

    Step-by-Step Setup

    Find the Drip Landing Zone

    Watch one normal drink and note where the beard releases water. Many dogs drip just past the bowl, not directly under it, so place the mat for the drip path instead of the bowl shape.

    A reliable way to map it without guessing: lay a single sheet of plain paper towel around the bowl before a drink, let the dog drink normally, then look at the darkened spots. You will usually see two zones — a splash ring at the bowl rim and a second, larger patch where the dog turned away. That second patch is the one most owners miss. Repeat the check at a different time of day, because dogs often drink faster (and drip further) after a walk than they do after a nap.

    Separate Drinking From Towel Work

    Keep a small towel close enough to grab, but not sitting in spilled water. The towel is for beard fur; the mat is for the floor.

    A dedicated beard towel should be small, thin and easy to wring — a microfibre face cloth beats a bath towel, because a bulky towel drags across the chin and most dogs resent it. Hang it on a hook at hip height rather than dropping it on the floor, and swap it daily; a damp towel reused for a week is the single most common source of that sour "wet dog beard" smell. The same principle applies to the rest of the dog, and the technique in a proper post-bath blotting method transfers directly: press and lift, never scrub, so you are absorbing water rather than tangling the fur.

    Keep the Mat Safe

    Flatten curled edges and move the mat if it slides. A wet, bunched mat creates a floor problem instead of solving a beard-drip problem.

    Curled corners are a trip hazard for people and a snag hazard for dogs. A common mistake is choosing a soft, loose-weave mat that looks absorbent in the shop but rucks up the moment a paw pushes off it — the same fibre-snagging issue behind that torn claw after a rug session that so many owners discover after the fact. If a mat lifts at the corners, weight it under the bowl stand, tape the edge down, or replace it with a rubber-backed model. Check the underside weekly too: trapped moisture between mat and floor is where mildew and floor staining start.

    Choosing the Right Mat

    Mat type matters as much as position. Absorbency handles the drip; a grippy backing handles the safety half of the job. Silicone-lipped trays and rubber-backed absorbent mats are both widely available now, and the two solve different problems.

    Mat typeBest forAbsorbencyGripTrade-off
    Silicone tray with raised lipSplashers and tippers on hard floorsNone — contains water insteadVery goodWater pools; must be tipped and wiped
    Rubber-backed microfibre matClassic beard drip past the bowlHighGoodNeeds washing every few days
    Chenille / "dirt trapper" runnerLong drip trails toward a doorwayHighGood if backedBulky; slow to dry
    Thin PVC placematSmall dogs, minimal dripLowFairWater runs straight off the edge
    Layered setup (tray + mat in front)Heavy droolers and giant breedsHighVery goodTwo items to clean

    For most bearded dogs the layered setup wins: a lipped tray catches bowl splash, and an absorbent mat sits in front of it covering the walk-away path. Machine-washable is non-negotiable — if you cannot wash it weekly, it will start to smell. Look for a mat that fits your washer flat and dries fully within a day, and keep a second one in rotation so the floor is never bare while one is drying.

    Next step: measure your drip zone tonight, then buy one washable rubber-backed mat that is at least 6 inches wider than that wet patch on every side — it is the cheapest fix in the house for a permanently damp kitchen floor.

    Where the Bowl Station Should Live

    Placement is not only about the mat; it is about the room. A few layout rules that hold up in real homes:

    • Away from doorways and traffic lanes. A dog jostled mid-drink lifts its head fast and flings water further.
    • Off the main walk-through on hard floor, not at the edge of carpet. Beard water wicking into carpet backing is far harder to fix than a wiped tile.
    • Not directly beside the dog's bed or crate. Damp bedding is a skin-problem starter.
    • Corner or wall-side, so drips land in one predictable direction rather than a full circle.
    • Same spot every day. Dogs drink where the bowl has always been; moving it resets your whole drip map.

    If your floor plan forces the bowl onto a rug or a wood floor you want to protect, a waterproof under-layer beneath the mat is worth it. That is the same thinking behind a contained washing spot near the back door — pick where the mess is allowed to happen, and it stops happening everywhere else.

    Common Placement Mistakes

    • Centring the mat under the bowl. The bowl is not the drip source; the beard is, and the beard is already moving.
    • Using a mat that is too small. If the mat only just clears the bowl base, the drip trail starts on bare floor.
    • Letting the towel sit on the mat. It soaks through, stays wet, and stops being a drying tool.
    • Ignoring the walk-away line. Trace where the dog goes after drinking — that path needs coverage or a wipe.
    • Washing the mat but never the bowl. Biofilm inside the bowl is a separate hygiene issue; wash bowls daily with hot soapy water.
    • Leaving the beard damp because the mat "handled it". Floor protection is not coat care.

    That last point causes the most trouble over time. Persistently damp chin fur softens the hair shaft, holds food debris and encourages skin irritation — and the trimming and combing habits described for keeping furnishings tidy between salon visits apply just as much to a beard as they do to feet.

    Bowl-Area Setup Card

    Field What to check

    Mat position Placed at the actual drip landing zone

    Towel location Reachable but kept dry, separate from the mat

    Mat stability Flat, not curled or sliding

    Beard drying Fur dried after drinking, not left damp

    How Often to Reset the Station

    • Daily: wash the bowl, shake out or spot-wipe the mat, swap the beard towel.
    • Every 2–3 days: lift the mat, dry the floor underneath, check for mildew smell.
    • Weekly: machine-wash the mat (no fabric softener — it kills absorbency) and re-check the drip map, because it shifts as beard length changes.
    • Monthly: comb through the beard for mats near the chin and lip fold, and trim stray hairs that dip into the water.
    • Seasonally: re-evaluate after a haircut, a house move, or any change in water intake.

    Water intake naturally rises in hot weather and drops in winter, so the drip zone grows and shrinks with the season. Homes that get muddy at the same time of year often end up with a wet-floor cluster at both the door and the bowl — the evening habit behind checking pads after outdoor grit pairs well with a quick bowl-mat wipe, since you are already down there with a towel.

    Safe Limits For This Page

    Use a stable mat that does not slide or curl. Do not let damp beard fur stay wet if it smells, mats, or irritates the skin. Call a veterinarian for sores, swelling, odor, discharge, or pain. Use a groomer for long fur that mats repeatedly.

    One caution worth adding: a sudden, unexplained increase in drinking is a medical signal, not a mat problem. If you find yourself needing a bigger mat because the dog is emptying the bowl far more often than usual — especially alongside weight loss, more frequent urination or new drooling — that warrants a call rather than more absorbent flooring. General guidance from the American Veterinary Medical Association and from veterinary teaching hospitals such as Cornell's College of Veterinary Medicine is consistent on this: changes in thirst and drooling are among the more common early signs owners can notice at home, and they are worth reporting rather than managing around.

    FAQ

    Should the mat go under the whole bowl stand?

    Only if that matches the drip path. Put coverage where water lands and where paws step away.

    Do I still need to dry the beard?

    For dogs with long beard fur, yes. A mat protects the floor; it does not dry hair against the chin.

    When is beard dripping a health concern?

    Call a veterinarian for sores, odor, discharge, swelling, pain, sudden drooling changes, or trouble drinking.

    Frequently Asked Questions

    How big should a beard-drip mat be?

    Measure the wet patch after a normal drink and add at least 6 inches on every side. For a medium bearded dog, roughly 24 × 16 inches covers both the bowl base and the walk-away step. Giant breeds and heavy droolers often need a runner-length mat instead of a placemat.

    Will a raised bowl reduce drips?

    Sometimes. A raised bowl lets the dog keep its head more level, so less water runs back down the chin — helpful for tall, long-muzzled dogs. It does not help wire-coated dogs whose beard sits in the water regardless of height, and it can make splashing worse for enthusiastic drinkers. Test it for a week and re-map the drip zone before committing.

    Does a narrower or deeper bowl help?

    A narrower bowl keeps the beard out of the water on the way in, but it also traps the muzzle and can make a flat-faced dog work harder. Wide and shallow suits brachycephalic dogs; narrower and deeper suits long-bearded terriers. Whichever you use, keep the water line an inch or two below the rim so the beard dips less.

    Should I trim the beard shorter instead?

    Trimming the underside of the chin and the hairs directly around the lip line is the single most effective reduction in drip volume, and it can be done with scissors held flat against the jaw with the points angled away from the face. Keep the beard's shape if you like it — you only need to shorten the wick. Do it with a comb as a guide, and never point scissor tips toward the eyes or nose.

    Can I use a bath mat or old towel instead?

    You can, short-term, but most bath mats have no rubber backing and will slide or ruck. A folded towel absorbs well and then stays wet, which is the mildew problem in miniature. If you use a towel as a stopgap, replace it daily.

    How do I stop the mat smelling?

    Wash weekly in hot water without fabric softener, dry it fully, and rotate two mats so neither sits damp. Wash the bowl daily. If the smell persists after both, check the beard itself — sour chin fur, not the mat, is often the real source.

    What if my dog chews or drags the mat?

    Switch to a heavy rubber-backed model that is too dense to grip, or a silicone tray that offers no loose edge. Remove the mat between meals if chewing continues, and never leave a shredded mat down — swallowed fragments are a genuine blockage risk.

    Does any of this change on carpet?

    Yes. Put a waterproof layer (a plastic under-mat or boot tray) beneath the absorbent mat, and extend coverage further along the walk-away path, because carpet wicks sideways. Ideally, move the bowl station to hard flooring altogether.

    How does this fit with the rest of my grooming setup?

    Treat the bowl station as one station among several — bowl, drying spot, brushing spot, nail spot. Keeping a small towel, a comb and a wipe container within reach of each one removes the friction that makes owners skip steps; a stocked list of the basics worth owning is the easiest way to make sure the beard comb never goes missing when you need it.

    Bottom Line

    Good beard-drip placement follows the water, not the idea of the bowl. Put the mat under the drip path, keep a towel dry, and watch the beard fur for irritation.

    Get the three variables right — position matched to the real drip zone, a mat that grips and washes, and a dry towel within arm's reach — and the whole problem becomes a ten-second daily wipe instead of a permanently damp kitchen floor. Re-check the drip map after every haircut and at the start of each warm season, and the setup will keep working year-round.
  • Dog Ear Flap Towel Dry After Bath

    Dog Ear Flap Towel Dry After Bath

    After a bath, dry only the outside of your dog's ear flap with a soft towel. Press and lift the towel over the outer flap, then stop before anything goes into the ear canal.

    Quick Answer

    Dry the outside of the ear flap with a soft towel after a bath. If the ear smells bad, looks red, has discharge, hurts, or your dog keeps shaking their head, stop and call a veterinarian.

    This Card Is Surface-Only

    This routine is for routine outer-flap drying only. It is not ear cleaning, ear treatment, mite care, wound care, or infection care.

    Why the Ear Flap Gets Its Own Step

    The ear flap (the pinna) is one of the last places on a dog to dry on its own. It is thin, often covered in longer hair on the outer surface, and it sits in a spot that a general body towel-off tends to skim past. On drop-eared dogs the flap also lies flat against the side of the head, so the underside stays pressed to damp skin with almost no airflow.

    In practice, the flap is where you notice problems first: a faint sour smell, a warm patch at the base, or a dog who tips the head away when you reach for it. None of those are things you fix with a towel — they are signals to stop and get a professional opinion. Veterinary bodies such as the American Veterinary Medical Association are clear that ear discomfort, odor, and discharge are medical issues, not grooming ones. Your towel job is simply to remove surface water so the outside of the flap and the hair around it are not sitting wet for the next hour.

    Outer Ear-Flap Drying Card

    Step What to do Do not do

    1. Settle the dog Let your dog stand or sit on a dry, non-slip surface. Do not hold the head tightly or force a worried dog.

    2. Open the flap gently Lift the outer flap only enough to see the wet outside surface. Do not pull, twist, or fold the ear hard.

    3. Press and lift Press a soft towel on the outer flap, then lift away moisture. Do not scrub inside the ear.

    4. Check the edge Dry the flap edge and the hair around it. Do not push towel corners into the canal.

    5. Stop and look Check for odor, redness, discharge, pain, or head shaking. Do not keep drying if symptoms appear.

    How Long Each Step Should Take

    The whole card should take under a minute per ear on a calm dog. If it is taking much longer, something else is going on — usually tangles in the flap hair, a dog who is bracing against the handling, or a towel that is already saturated. Slow down rather than push harder.

    • Settle: 10–20 seconds of stillness before you touch the head. A dog who is still shaking water off is not ready.
    • Open and press: 15–20 seconds per flap, in three or four press-and-lift contacts rather than one long rub.
    • Edge and surrounding hair: 10 seconds along the rim, where water beads and hangs.
    • Look: 5 seconds of honest observation. This is the step most people skip, and it is the one that catches problems early.

    Keep the Towel on the Outside

    Use a clean towel section for the ear area. Work on the outside of the flap and the hair around it. Light pressure is enough; the goal is to remove surface moisture, not clean deep ear tissue.

    If the flap is long or feathered, support the ear with one hand and press the towel with the other. Move slowly so the hair does not twist.

    Towel Choice and Pressure

    Not every towel is equally kind to an ear. A thick, stiff bath towel is hard to fold small enough to control, and its loops can catch on feathered hair. Softer, thinner, high-absorbency options give you far more precision around the head.

    • Microfiber towels: absorb quickly and fold to a small pad — the easiest option for flap work. Use a smooth-weave microfiber rather than a waffle texture, which snags long ear hair.
    • Cotton flour-sack or huck towels: thin, soft, and cheap enough to keep a dedicated one for heads only.
    • Chamois-style drying cloths: excellent for pulling water off short-coated flaps, but they can drag on long hair, so keep the pressure light.
    • Avoid: anything with frayed edges, loose threads, or embroidered trim near the ear.

    Pressure should be the weight of your hand and nothing more. A common mistake is rubbing back and forth as you would on a dog's back — on a thin flap that pushes hair into knots and can irritate skin. Press, hold for two seconds, lift, and move to a fresh dry patch of towel. If you are drying more than one dog, or bathing frequently, keep two or three head-sized cloths in your grooming supply lineup so you never end up wiping with a soaked towel.

    Do Not Enter the Ear Canal

    Do not put towel corners, cotton swabs, fingers, or liquid into the ear canal. Home bath drying should stay on the outside of the ear.

    If water seems trapped inside the ear, or your dog is uncomfortable after the bath, that is a veterinary question. Do not try to dry deeper by pushing material into the ear.

    Why "Outside Only" Is the Safe Line

    The canal in a dog is L-shaped, with a vertical section that turns horizontally toward the eardrum. That shape is exactly why anything you push in tends to go further than intended and why moisture that gets in does not simply run back out. Teaching hospitals such as Cornell's veterinary college publish owner guidance on ear anatomy and care for the same reason: the visible flap and the canal are two very different jobs, and only one of them belongs in a home routine.

    The honest trade-off is that surface drying will not remove water that has already entered the canal. That is a limitation, not a failure of technique — and it is why the prevention section below matters more than any towel trick.

    Ear Shape Changes the Drying Job

    Ear type is the single biggest variable in how long a flap stays damp. Use this to set your expectations before you start.

    Ear typeExamplesNatural airflowDrying focusWatch for
    Erect / prickGerman Shepherd, Husky, CorgiHigh — dries fastestOuter surface and the hair at the baseWater running down into the base when the dog shakes
    Semi-erect / buttonCollie, many terriersGoodThe folded-over tip, which holds waterDamp crease where the tip folds
    Drop / pendulousBasset Hound, Cocker Spaniel, BeagleLow — slowest to dryOuter flap, rim, and the skin the flap rests againstWarm, damp underside; lift and check
    Long and featheredSetters, Spaniels, some DoodlesLow, plus wicking hairFeathering along the rim; support the ear while you pressTangles that trap water for hours
    Corded or heavily coatedPuli, Komondor, dense-coated crossesVery lowSqueeze along cords, never twistLong dry times; plan the bath early in the day
    Cropped or thin-hairedSome working breeds, hairless typesHighVery light contact — skin is exposedSkin irritation from friction

    For long, feathered flaps, a wide-tooth comb run gently through the outer hair after the surface water is off helps the remaining moisture evaporate instead of sitting inside a knot. If the coat is already prone to matting, matching your bathing rhythm to your dog's coat is the real fix — a coat-based grooming calendar prevents most of the tangles that make ear drying difficult in the first place.

    Prevent Water Near the Ears During the Bath

    The easiest ear to dry is the one that barely got wet. A few habits during the wash remove most of the drying problem:

    1. Wash the head last and lowest. Soap the body first, then do the head with a damp cloth rather than a sprayer.
    2. Aim the nozzle downward and behind the ears. Never spray directly at the side of the head.
    3. Tip the flap closed with your thumb while you rinse near the neck, so runoff goes down the shoulders.
    4. Use a washcloth for the face and ear folds instead of pouring water over the head.
    5. Let the dog shake once, on purpose, before you start toweling. A shake clears a surprising amount of surface water, and it is far more effective than your first towel pass.

    Skipping these is one of the most frequent wash-day errors owners make — and it is the reason so many dogs end up with a soaked head and a perfectly dry back. Cotton balls in the canal are sometimes suggested; only use them if your veterinarian has recommended it for your dog, and never push anything in.

    Where Ear Drying Fits in the Post-Bath Order

    Order matters, because water runs downhill and dogs shake without warning. A workable sequence:

    1. Squeeze water from the coat by hand while the dog is still in the tub.
    2. Allow a full shake.
    3. Towel the body and back.
    4. Towel the head and outer ear flaps (this card).
    5. Towel the legs, then the feet last.
    6. Finish with air drying or a low-heat dryer if your dog tolerates one.

    Feet go last for a reason — they touch the wet floor longest and they are the area most likely to stay damp between the toes. The same press-and-lift logic applies there, and a dedicated post-bath foot drying method keeps that step from turning into a wrestling match. If you want the whole sequence in one place, our overview of getting a soaked coat properly dry covers body, head, and feet together.

    Dryers, Heat, and the Ear Area

    If you use a dryer, treat the ears as the most sensitive zone on the dog:

    • Never aim airflow into the ear opening. Direct the stream across the flap, not at it.
    • Keep heat low or off. Room-temperature high-velocity air dries a flap fine; hot air on thin ear skin is uncomfortable and unnecessary.
    • Hold the flap flat with your free hand so it does not flap and slap against the head, which many dogs find alarming.
    • Watch the noise. Ear-shy dogs often object to the sound long before they object to the air.

    A dog who tenses, pulls away, or freezes at the sound of a dryer is telling you something useful. Noise sensitivity around the head shows up across grooming tasks — the same considerations that go into choosing low-noise trimmers for anxious dogs apply to dryer selection. Air-drying in a warm, draft-free room is always an acceptable alternative for the ears.

    Common Mistakes Around Ear-Flap Drying

    • Rubbing instead of pressing. Creates tangles at the rim and irritates thin skin.
    • Using the same soaked towel section for both ears. You are just moving water around; rotate to a dry patch.
    • Digging into the canal "just a little." There is no safe amount. Stop at the opening.
    • Drying only the outer surface of a drop ear. Gently lift the flap and dry the outer edge and the hair beneath it — still without entering the canal.
    • Powering through a dog who is pulling away. Head handling is where bites happen. End the session and rebuild the handling instead.
    • Treating odor as a drying problem. A smell after a bath is a reason to call the clinic, not a reason to towel harder.
    • Bathing right before bedtime. A damp drop ear that spends eight hours folded against the head is the least helpful thing you can do. Bathe earlier in the day.

    Building Calm Handling for Ear Touching

    Ear-shy dogs are made, not born. If your dog already dislikes having the head handled, work on it outside of bath time, when nothing is wet and nothing has to happen:

    • Touch the base of the ear for one second, then treat. Repeat over several short sessions.
    • Progress to lifting the flap for a second, then treat.
    • Add the towel as an object first — let the dog sniff it, then rest it near the shoulder before it ever touches the head.
    • Keep sessions under two minutes and end while the dog is still relaxed.

    Short, frequent, low-pressure repetitions are the same approach that makes pausing during a nail session work so well, and the payoff carries across every part of the routine. If your dog panics, growls, or snaps at head handling, that is a trainer's job, not something to solve with a faster towel.

    What "Normal" Looks Like After Drying

    A ten-second look tells you whether the routine went the way it should:

    • Skin color: pale pink or matching the dog's usual pigment — not bright red or blotchy.
    • Temperature: the same warmth as the surrounding head, not noticeably hotter at the base.
    • Smell: neutral or faintly like the dog. Yeasty, sour, or sweet smells are not normal.
    • Behavior: relaxed carriage, no repeated scratching, no head tilt, no whining when the ear is touched.
    • Hair: damp-cool at most, not dripping, with no wet clumps at the rim.

    Make a habit of noting anything different, the way you would with a snagged claw after indoor play or an evening check of the pads. A one-line note with the date makes it far easier for your veterinarian to see a pattern than trying to remember "a few weeks ago, maybe."

    Seasonal Notes

    Bath and drying conditions shift through the year, and so does how long a flap stays damp:

    • Spring and early summer: more frequent rinsing to remove allergens means more frequent ear drying. If your dog is already itchy, keep an eye on whether the ears are involved and mention it at the next visit — our notes on a high-pollen-period grooming rhythm cover the wider routine.
    • Humid weather: everything dries slower. Give the flap extra air time before letting the dog nap in a curled position.
    • Winter: cold rooms and damp ears are a poor combination. Dry indoors, keep the dog inside until fully dry, and remember that feet need attention too after treated pavement — the same care that goes into de-icer season paw care.

    Safe Limits For This Page

    Stop the home drying step and call a veterinarian for ear odor, pain, redness, swelling, discharge, bleeding, repeated head shaking, sudden sensitivity, or your dog tilting the head in a way that worries you.

    Call a professional groomer if long ear hair is tangled or matted near the ear and you cannot dry it without pulling skin. If your dog panics, growls, snaps, or cannot be handled safely, stop and get help from a qualified trainer or professional groomer.

    Same-Day vs. Next-Appointment Signs

    Not every finding is an emergency, but some should not wait:

    SignWhat to do
    Strong odor, discharge, or visible painCall the clinic the same day
    Bleeding, sudden swelling, or a hot earSame-day veterinary contact
    Head tilt, loss of balance, or circlingUrgent — call immediately
    Persistent head shaking or scratching for more than a dayBook an appointment
    Mild redness with no odor or discomfortMonitor and mention at the next visit
    Mats near the ear you cannot work throughBook a groomer; do not cut near the flap yourself

    Trimming mats out near an ear with scissors is one of the most common causes of accidental cuts in home grooming. If mats around the head and feathering are a recurring issue, a professional trim schedule — the same logic behind upkeep between salon visits — is safer and cheaper than a laceration.

    Want a bath that ends with less mess and a genuinely dry dog? Set up your tools and sequence first with our step-by-step home grooming walkthrough — it takes ten minutes to read and saves you the soaked-towel scramble every single bath.

    FAQ

    Can I use a cotton swab after a bath?

    No. This page is only for drying the outside of the ear flap. Do not put swabs into the ear canal.

    What if the ear smells after the bath?

    Stop grooming and call your veterinarian. Odor can be a sign that routine towel drying is not the right next step.

    Should I use ear cleaner?

    Only use ear products if your veterinarian has told you to use that exact product for your dog.

    Frequently Asked Questions

    How long should a dog's ear flap take to dry?

    With a press-and-lift towel routine, an erect ear is usually damp-cool within a few minutes and dry within an hour. A long, feathered drop ear can take several hours in humid conditions. If a flap is still visibly wet after a couple of hours, brush the hair out gently and improve airflow — do not add heat near the ear.

    Can I let my dog air dry the ears instead of toweling?

    You can, but surface water sitting on a flap for a long stretch is exactly what you are trying to avoid, especially on drop ears. A quick towel pass removes most of it in under a minute and shortens total drying time considerably. Air drying alone is fine for short-coated, erect-eared dogs in a warm room.

    My dog shakes their head right after the bath — is that a problem?

    One or two shakes are normal and helpful; that is how dogs clear water. Repeated shaking that continues after drying, or shaking combined with scratching, pawing at the ear, or a head tilt, is not normal and should be checked by a veterinarian.

    Is it safe to trim the hair on the ear flap so it dries faster?

    Trimming the outer flap hair is a legitimate grooming choice for heavily feathered breeds, but it is a separate task from drying and it is easy to nick thin ear skin. Have a groomer do it, or have them show you once on your own dog. Never trim inside the ear.

    What towel size works best for ears?

    Something you can fold into a pad roughly the size of your palm. Small microfiber cloths or a bath towel folded into quarters both work. The point is control — a bulky towel forces you to use more motion, and motion is what tangles hair.

    Should I dry the ears before or after the feet?

    Ears before feet. The head is higher, so water from the head runs down onto areas you have already dried, and feet stay damp longest anyway. If mud and rinsing are a regular part of your routine, a fixed home rinse setup for paws makes the final step much faster.

    Can brushing before the bath make ear drying easier?

    Yes, noticeably. Wet hair mats far more readily than dry hair, so any tangle in the ear feathering will tighten during a bath and trap water afterward. A pre-bath brush-out — using a tool suited to your dog's coat, which our roundup of shed-control brush options covers — removes loose undercoat and prevents most of the knots you would otherwise fight while drying.

    Do puppies need anything different?

    Same technique, shorter sessions. Puppies benefit enormously from having ear handling paired with treats from the start, so build the habit before the ears ever get wet. Keep the room warm, and stop while the puppy is still enjoying it rather than pushing for a perfectly dry ear.

    Bottom Line

    Ear-flap drying after a bath stays on the surface. Dry the outer flap and edge, skip the canal entirely, and route odor, pain, or discharge straight to a veterinarian.

  • How to Wash a Dog Muzzle After Meals

    How to Wash a Dog Muzzle After Meals

    After meals, remove visible food from your dog’s muzzle with a damp cloth or cotton pad, wipe away from the eyes and nostrils, rinse only if needed, and dry the beard, lips, and folds completely. Stop if you see pain, redness, sores, swelling, discharge, strong odor, vomiting, choking signs, sudden drooling, or suspected toxin exposure.

    Why the Post-Meal Wipe Is Worth 60 Seconds

    Food residue on a muzzle is not just cosmetic. Wet kibble crumbs, gravy, wet-food smears, and saliva sit against hair and skin, and warm damp hair next to skin is where odor and irritation tend to start. In practice, the dogs who develop crusty beards, sour smells, and pink-stained chin hair are almost always the ones whose faces are left to air-dry after every meal.

    Three things happen when residue is left in place:

    • It dries hard. Dried kibble paste in beard hair behaves like glue and later needs soaking, which is far more stressful for the dog than a quick wipe would have been.
    • It stays damp. Under a lip fold or deep in a beard, moisture can linger for hours and keep skin softened.
    • It attracts more mess. Sticky hair collects dirt, grass seed, and lint from bedding, which then rides along into the rest of the coat.

    A post-meal wipe is the same category of small, repeatable habit as a quick foot check after outings — thirty to sixty seconds that prevents a much bigger cleanup later.

    The After-Meal Muzzle Routine

    The goal is to remove normal food residue before it dries into the coat. This is a surface hygiene routine, not dental care, stain treatment, or treatment for irritated skin.

    • Remove visible food with a damp cloth or cotton pad.

    • Wipe the outside of the lips, beard, and lower muzzle.

    • Use a small amount of clean water only if residue will not wipe away.

    • Dry the hair and any folds completely.

    • Check whether the same spot keeps collecting food and needs a shorter cleanup interval.

    Step by Step, in Order

    The order matters more than the products. Work from the cleanest area toward the dirtiest, and from the top of the face downward, so you are not dragging food residue back across skin you already cleaned.

    1. Wait for the dog to settle. Give it a minute after the bowl is empty. Reaching for a face that is still in “food mode” is how you get a startled head-jerk or an accidental nip.
    2. Wet the cloth, then wring it out hard. It should feel damp, not dripping. Excess water runs into the nose and under the chin, which is exactly where you do not want it.
    3. Wipe the top of the muzzle and the sides first, moving away from the eyes and nostrils, never toward them.
    4. Lift the lips gently and wipe the outer lip line and chin, where sauce, oil, and crumbs collect.
    5. Work the beard in sections, supporting the hair near the skin with one hand while you draw the cloth down the length of the hair with the other. Pulling on a wet beard is uncomfortable and teaches the dog to duck away.
    6. Rinse only if needed — a second pass with a clean, barely-damp cloth clears any leftover film.
    7. Dry thoroughly with a fresh towel, pressing rather than rubbing, and check the folds with your fingertips before you finish.
    8. Reward and release. A treat or a bit of praise at the end keeps the routine from becoming something to avoid.

    A common mistake is drying only the surface. Beard hair can feel dry at the tips while the base, right against the skin, is still wet — the same principle that makes getting a coat fully dry after bathing so important.

    What to Use and What to Skip

    Use simple supplies: warm water, a soft cloth, cotton pad, and dry towel. Skip human facial cleansers, whitening products, stain-removal recipes, perfumed sprays, harsh scrubbing, or any product not meant for a dog’s face or mouth area.

    Safe vs. Avoid at a Glance

    UseWhy it worksAvoidWhy it’s a problem
    Warm water on a soft clothLoosens food without stripping skin oilsHuman face wash, shampoo, or micellar waterWrong pH for canine skin; not made to be licked
    Soft microfiber or flannel clothGrips residue with minimal frictionAbrasive sponges, scrubbing padsMicro-abrasions on thin muzzle skin
    Cotton pads (round, lint-free)Good for folds and small areasPaper towelShreds and leaves fibers in beard hair
    Unscented, dog-safe grooming wipesConvenient when travellingBaby wipes with fragrance or alcoholFragrance and preservatives can irritate; dogs ingest them
    Clean dry towelRemoves trapped moistureLeaving it to air-dryDamp hair against skin is the root of most beard odor
    Fingertips to check foldsFinds moisture you can’t seeCotton swabs pushed into foldsRisk of poking, and they can leave fibers behind

    Two practical notes. First, launder cloths after every use or two — a “muzzle cloth” that lives damp on the edge of the sink is doing more harm than good. Keep a small stack of five or six so a clean one is always within reach. Second, if you use a wipe product, read the label for alcohol, tea tree oil, or added fragrance; anything that goes near a mouth will be swallowed in small amounts. The American Veterinary Medical Association is a sound starting point for general guidance on what belongs in a home pet-care kit and when a symptom warrants a call.

    Set yourself up once and the daily habit becomes effortless: stock a small face caddy — cloths, cotton pads, a dry towel — as part of the supplies every owner should own, and keep it wherever your dog eats, not in the bathroom.

    Short Muzzles, Beards, and Heavy Lips

    • Short muzzles: check folds beside the nose and under the lower lip.

    • Long beards: separate the beard hair gently and dry near the skin.

    • Heavy lips: check the lower lip line and chin.

    • Flat-faced dogs: avoid directing water toward the nose; use controlled cloth wiping instead.

    Muzzle Type Cheat Sheet

    Different face shapes trap food in completely different places. Knowing where your dog’s “collection points” are turns a vague wipe into a targeted one.

    Muzzle / face typeTypical examplesWhere food hidesSuggested cleanupDrying priority
    Long beard, wiry coatSchnauzer, Wheaten, AiredaleFull length of beard, chin, mustacheAfter every wet or oily mealHigh — dry to the skin
    Long beard, soft coatPoodle-type mixes, HavaneseBase of beard near lips, mustache tipsAfter every mealHigh — soft hair holds water
    Short muzzle with foldsPug, Bulldog, BoxerNose rope, lower lip fold, chin creaseAfter every meal, and after waterVery high — folds stay damp
    Heavy flews / loose lipsBasset, Mastiff, St. BernardLower lip line, corners of the mouth, chinAfter every meal plus drool checksModerate to high
    Smooth short coat, normal muzzleBeagle, Lab, KelpieAround the mouth corners onlyOnly when visibly dirtyLow
    Long fine muzzle hairCollie, Setter, SheltieSides of the muzzle, under the chinAfter wet food; less after kibbleModerate

    Food type shifts this too. Dry kibble eaten neatly may need nothing more than a glance. Wet food, raw, home-cooked, toppers, and anything with oil or gravy essentially guarantee a wipe. Slow-feeder bowls and lick mats — great for pacing — spread food much wider across the muzzle, so budget an extra pass on those days. If you are unsure how face care fits alongside brushing and bathing for your particular dog, matching tasks to the demands of your dog’s coat is the simplest way to build a schedule you’ll actually keep.

    Beard-Stain Prevention Is Not Stain Treatment

    Prompt wiping and drying may help reduce the time food and moisture sit in beard hair. Do not use whitening recipes, peroxide mixes, cosmetic stain treatments, or harsh scrubbing around the mouth. If staining appears with odor, redness, sores, pain, discharge, or suddenly heavy drooling, treat it as a stop sign and ask a veterinarian.

    What Actually Discolors a Beard

    Reddish-brown staining on a light beard is not dirt, and no amount of scrubbing will lift it out. It comes from pigments present in saliva and tears that oxidize on contact with air and light — which is why the discoloration sits on the hair shaft and grows out rather than washing off. Persistent damp hair can also support surface yeast, which contributes both to color and to that distinctive sour-corn-chip smell.

    The realistic, honest position on this:

    • Prevention beats correction. Keeping the beard dry limits how long pigments and moisture sit on the hair.
    • Trimming helps. Shortening the beard slightly reduces the surface that drags through the bowl.
    • Stained hair grows out. As the coat cycles, discolored hair is eventually replaced. That is slow, and it is the only genuinely safe “fix.”
    • Anything marketed as a fast whitener near the mouth deserves suspicion. Peroxide, bleaching agents, and stain removers do not belong on a surface a dog licks.
    • A sudden change in staining matters. New heavy staining, especially with odor or drooling, points to a mouth, tooth, or skin issue rather than a grooming one — veterinary teaching hospitals such as those in the Cornell University veterinary program publish accessible owner guidance on when oral and skin signs need a professional look.

    Note that stains near the inner eye corner are a separate issue from beard stains and are handled differently — that’s managing discharge around the eyes, not a post-meal task.

    Stop Signs That Are Not Meal Mess

    Stop and contact a veterinarian if you notice red, raw, swollen, or bleeding skin; sores, discharge, crusting, or strong odor; mouth pain or refusing food; vomiting, choking, coughing, or gagging; sudden or excessive drooling; or suspected toxin exposure.

    Yellow Flags: Book, Don’t Panic

    Between “normal” and “call now” there is a middle band worth knowing. These are not emergencies, but they are worth a non-urgent veterinary appointment rather than another week of wiping:

    • A fold that stays pink or slightly moist even after careful drying
    • Hair loss or thinning along the lip line or chin
    • A smell that returns within hours of a thorough clean
    • Chin acne — small bumps or blackheads along the underside of the chin, often linked to plastic bowls
    • Increased face rubbing on carpet or furniture after meals
    • One-sided residue, which can suggest the dog is chewing on one side only because of dental discomfort
    • A dog that used to tolerate face handling and now consistently pulls away

    That last one deserves attention. A sudden change in tolerance is information, and it overlaps with the broader early signals of grooming stress worth learning to read.

    Teaching a Dog to Accept Face Handling

    The muzzle is one of the most sensitive areas on a dog, and a full stomach plus an approaching hand is not a naturally relaxing combination. Most refusal is learned, not innate — and it can be un-learned.

    Build it in small pieces:

    1. Pair the cloth with something good before it touches anything. Show cloth, give treat. Repeat for a few days until the cloth itself predicts food.
    2. Start with one touch. One brief contact on the side of the muzzle, then release and reward. End before the dog wants you to.
    3. Approach from the side or under the chin, never straight over the top of the head. Overhead reaches are intimidating to most dogs.
    4. Keep your hand steady and your grip soft. Pinning the head causes struggle; supporting the jaw lightly from underneath does not.
    5. Add duration before you add pressure. Two seconds, then four, then a full pass.
    6. Use a chin rest. Many dogs learn to place their chin in your open palm and hold it — a genuinely useful cue that makes eye, ear, and muzzle care cooperative rather than forced.

    If your dog already objects to being handled, the same desensitization logic used with dogs that resist the brush applies directly to the face. Never turn a post-meal wipe into a wrestling match; a dog that dreads the routine will hide after meals, which defeats the purpose entirely.

    Reduce the Mess Before It Happens

    The cleanest muzzle is the one that never got dirty. A few setup changes cut post-meal cleanup dramatically:

    • Switch to stainless steel or ceramic bowls. Plastic scratches, harbors bacteria, and is the classic culprit behind chin acne. Wash bowls daily with hot soapy water, not just a rinse.
    • Use a shallow, wide bowl for flat-faced dogs so they aren’t pressing the whole face into a deep well.
    • Try a raised feeder for long-eared and heavy-lipped dogs — it changes the eating angle and keeps ears and flews out of the food. (Ask your vet first if your dog is a large breed, as feeder height has been debated in relation to bloat risk.)
    • Snoods or beard bands keep long ear and beard hair out of the bowl for dogs who eat enthusiastically.
    • Trim the beard on the muzzle’s underside by a centimeter or two. It’s barely visible and hugely reduces drag through food.
    • Separate the water bowl from the food bowl. Drinking immediately after eating rinses food deep into beard hair, then leaves it wet.
    • Feed before, not after, grooming sessions so you’re not wiping a face you just finished drying.

    Small setup decisions like these are the same thinking behind an efficient wash-down space — arrange the environment once, and the daily work shrinks.

    Fitting Muzzle Care Into the Wider Routine

    A post-meal wipe is a maintenance task, not a grooming session. It should take under a minute and require no special setup. Where it connects to everything else:

    • Daily: post-meal muzzle wipe; dry the folds.
    • Weekly: a closer look at the lip line, chin, and fold interiors under good light; check for bumps, redness, or lost hair.
    • With each brush-out: comb through the beard properly so tangles don’t form at the base, where wiping can’t reach.
    • With each bath: wash the muzzle last, rinse carefully away from the nose and eyes, and dry the beard first.

    Beard hair is where matting starts on many bearded breeds, because it is repeatedly wetted and rarely combed to the skin. Learning to tell a loose tangle from a true mat will tell you whether a comb will fix it or whether it needs to be cut out. And if you keep any kind of care log, jotting a note when a fold looks pink or a smell appears makes the pattern obvious over weeks — the value of logging what you observe is that it turns vague impressions into something a vet can act on.

    Seasonal and Situational Adjustments

    • Winter: faces dry out more in heated indoor air; wipe with barely-damp cloths and dry thoroughly, since a wet muzzle in cold outdoor air is uncomfortable. Extra care matters when cold-weather coat care is already on your list.
    • Summer: more drinking, more drool, more food left out. Wipe more often and check folds daily; heat plus moisture accelerates odor.
    • After outings: food residue plus outdoor debris is the worst combination. A dog who eats a snack in the park comes home with grass seed glued into the beard.
    • Travel and boarding: routines slip when someone else is feeding. Pack a few cloths and expect to do a thorough face check on pickup.

    Frequently Asked Questions

    Can I use dog shampoo on the muzzle after meals?

    Not routinely. Shampoo is for bath time, not daily maintenance, and it needs thorough rinsing — which is difficult and unpleasant to do near the nose and mouth. Plain warm water on a soft cloth handles normal food residue. Save shampoo for the actual bath, and be aware of the errors that make bath time worse when you get there.

    How do I get dried, hardened food out of beard hair?

    Do not pick or pull it out — you will tear hair and hurt the skin. Hold a warm, damp cloth against the clump for 30 to 60 seconds to soften it, then work outward from the tips with your fingers or a fine comb, supporting the hair at the base so you aren’t tugging the skin. Repeat the soak if it resists. If a clump is genuinely cemented in, trimming it out with blunt-nosed scissors is safer than fighting it.

    Are baby wipes safe for a dog’s face?

    Generally no. Many contain fragrance, alcohol, or preservatives that are not intended to be ingested, and dogs lick their muzzles constantly. If you want the convenience of a wipe, use an unscented product made for dogs, and check the ingredient list rather than the marketing on the front of the pack.

    My dog’s beard smells even after cleaning. What now?

    A smell that returns within hours of a proper clean and dry is not a cleaning failure — it usually means moisture is being trapped, or that a yeast or bacterial issue is established. Check that you are drying to the skin, not just the surface. Try trimming the beard shorter. If the odor persists for more than a few days, or comes with redness, licking, or drooling, book a veterinary appointment; dental disease is another frequent source of persistent facial odor.

    Should I clean the muzzle before or after brushing?

    Wipe the face after meals as its own quick task, and comb the beard as part of your normal brushing session. If you’re doing both at once, comb first to remove tangles, then wipe and dry. The general question of sequence comes up all through home grooming — the case for ordering the steps deliberately applies here too.

    What about the muzzle after a swim or a muddy walk?

    That’s a different job. Salt, pond water, and mud need rinsing rather than wiping, and the whole head is usually involved, not just the mouth area. Handle it as part of a post-outing cleanup — the routine after a session in the water covers the ears and eyes as well, which a post-meal wipe deliberately does not.

    Does my puppy need this too?

    Yes, and the puppy stage is the ideal time to start — not because puppies are messier (though they are) but because handling that becomes normal before six months tends to stay normal for life. Keep sessions short, generous with treats, and never forced.

    Can I use a hair dryer to dry the beard?

    Only on a cool or low setting, held well back, and never aimed at the nose or eyes. Most dogs find a dryer near the face alarming. A towel and thirty seconds of pressing is quieter, faster, and safer for daily use.

    FAQ

    Should I wash my dog’s muzzle after every meal?

    Wash or wipe after meals when food remains on the lips, beard, folds, or chin. Dogs with short muzzles, heavy lips, or long beards may need it more often.

    Can I use just water on food stuck in dog muzzle hair?

    Yes, for normal food residue, warm water on a soft cloth is usually the safest starting point.

    How do I dry a dog’s muzzle folds?

    Use a clean towel or dry cotton pad and press into the fold gently until moisture is gone.

    Bottom Line

    Wipe, rinse only if needed, and dry the muzzle after meals, and treat odor, sores, or drooling changes as a reason to call a veterinarian rather than a cleaning problem.

    Next step: put five clean cloths and a small towel beside your dog’s bowl tonight, and give the face sixty seconds after tomorrow’s breakfast — then build outward with our walkthrough of doing the full routine yourself to keep the whole coat, not just the muzzle, easy to maintain.

  • Dog Grooming After Dog Park

    Dog Grooming After Dog Park

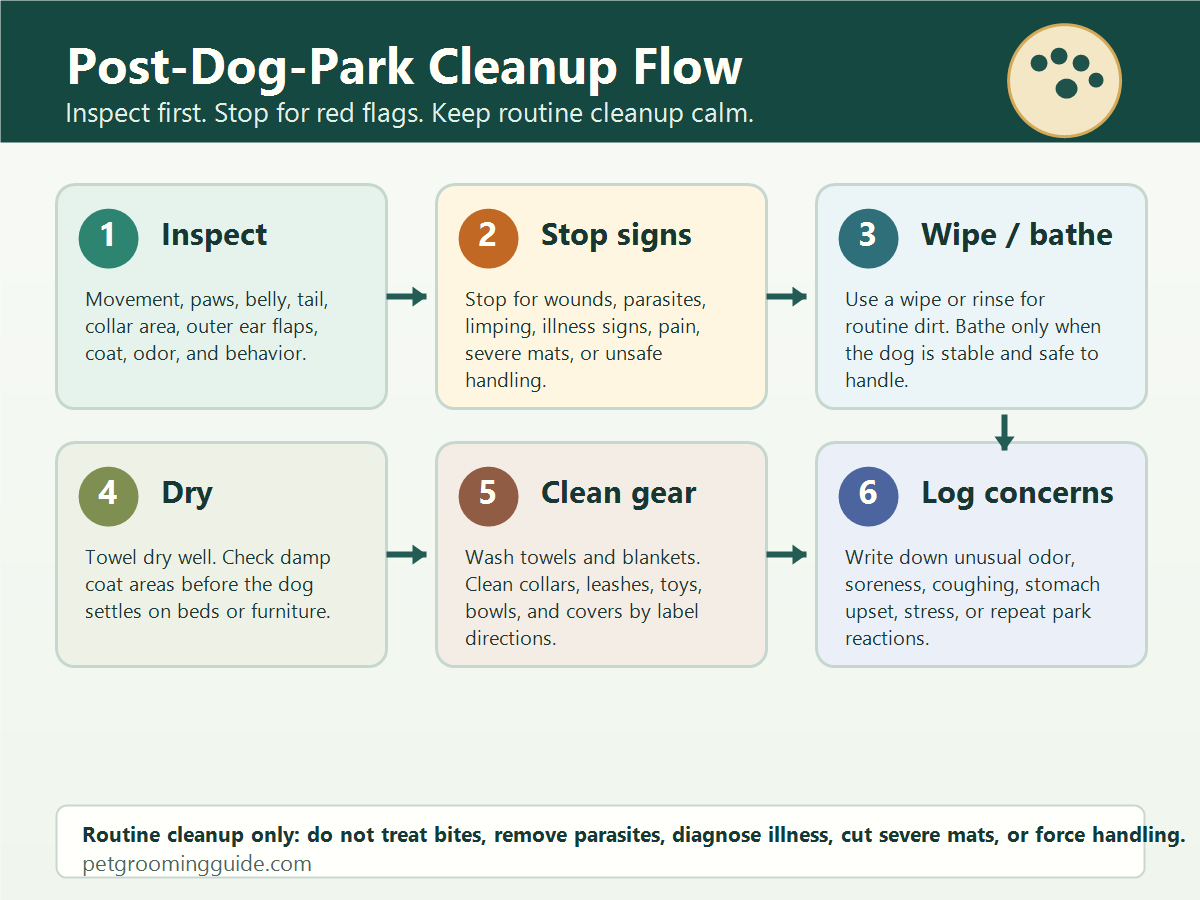
    After the dog park, check your dog before you bathe. Look at movement, paws, belly, tail, collar areas, outer ear flaps, coat, odor, and behavior. If everything looks routine, wipe or rinse dirty spots, bathe only if needed, dry well, clean the gear, and write down anything you may need to watch later.

    Stop grooming and contact a veterinarian or qualified professional if you find wounds, punctures, bleeding, swelling, parasites or suspected parasites, limping, coughing, vomiting, diarrhea, weakness, pain, severe mats, panic, aggression, or handling that is no longer safe. This guide is for routine cleanup and inspection only. It does not cover bite care, wound care, parasite removal, parasite treatment, disease diagnosis, pain management, severe-mat cutting, or forced handling.

    Quick Post-Park Cleanup Plan

    StepWhat to doWhen to stop
    Inspect firstCheck movement, paws, belly, tail, collar area, outer ear flaps, coat, odor, and behavior.Stop for pain, limping, wounds, parasites, illness signs, panic, or unsafe handling.
    Clean routine dirtWipe paws and belly, brush out loose dry debris, or bathe if dirt and odor are spread through the coat.Stop if the dog flinches, guards the area, or the coat is tightly matted.
    Dry thoroughlyTowel dry and check damp areas near the belly, armpits, tail base, collar area, and paw feathering.Stop if drying causes panic or handling risk.
    Clean gearWash towels and blankets. Clean collars, leashes, toys, bowls, and washable covers by label directions.Keep pets away from unsafe cleaners and wet surfaces.

    Check Before Water or Brushing

    A dog park visit can leave dirt, grass, shared-water odor, loose debris, and excitement behind. A short inspection helps you decide whether normal cleanup is enough or whether grooming should stop.

    Start while your dog is standing or resting calmly. Watch the walk from the car or gate to the house. Check whether your dog is bearing weight normally, breathing normally, and willing to be touched in the usual places.

    The CDC dog health guidance supports handwashing after handling dogs or their supplies and routine veterinary care. For this page, that source is used as a public-health boundary, not as disease or treatment advice.

    Where Debris Hides After the Dog Park

    Dog park dirt often collects in the same areas. Check these places before you decide on a wipe, rinse, bath, or full stop:

    • Between toes and paw pads.
    • Around nails and dewclaws.
    • Belly, armpits, and chest.
    • Tail base and hind legs.
    • Collar, harness, and leash-contact areas.
    • Outer ear flaps, especially on long-eared dogs.
    • Feathering, furnishings, and long coat edges.

    For routine paw dirt, the how to clean dog paws after walk guide gives a more detailed paw-only routine. After a dog park visit, keep the wider body check too, because paws are only one part of the cleanup.

    When a Wipe Is Enough

    A quick wipe is usually enough when dirt is limited to paws, belly, or the coat surface, the dog smells mostly like outdoors, and the dog is calm. Use a damp towel or cloth, clean the dirty areas, and dry between toes and coat folds where moisture can linger.

    Do not turn a wipe into digging, scraping, or repeated rubbing over a sore spot. If the dog pulls away, flinches, growls, snaps, freezes, or repeatedly tries to escape, stop. For more handling boundaries, see dog grooming anxiety signs.

    When a Bath Makes Sense

    A bath can make sense when mud, shared-water residue, or outdoor odor is spread through the coat and your dog has no stop signs. Keep the bath ordinary: lukewarm water, gentle handling, careful rinsing, and thorough drying.

    ASPCA dog grooming tips support routine brushing, bathing, rinsing, and drying. After the dog park, those steps should stay in the routine-grooming lane. Do not use bath time to manage wounds, parasites, pain, severe mats, or illness signs.

    Shared Water, Mud, Odor, and Gear

    If your dog played in shared water, rolled in mud, or used a high-traffic area, clean the dog and the gear. Wipe or rinse paws and belly, brush dry debris when it moves easily, and wash towels, blankets, and washable covers.

    Clean collars, leashes, toys, bowls, crates, and other supplies according to their labels. CDC cleaning guidance for pet supplies supports label-following and keeping pets away from unsafe cleaning products. Routine cleaning lowers mess and odor, but this article does not claim it prevents every infection or parasite risk.

    Bite, Parasite, and Illness Stop Signs

    Some post-park findings are not grooming tasks. Stop and contact a veterinarian if you see bite marks, punctures, bleeding, swelling, parasites or suspected parasites, limping, stiffness, coughing, vomiting, diarrhea, weakness, eye irritation, ear pain, discharge, or sudden behavior change.

    An AVMA article on dog park parasite exposure supports treating dog parks as a possible exposure setting. This page uses that point only to explain why parasite concerns should be routed to veterinary guidance rather than handled as grooming cleanup.

    Low-Stress Order of Operations

    Use the least stressful cleanup that solves the routine problem. A delayed bath is better than forcing a tired or overstimulated dog through a long session.

    1. Let the dog settle.
    2. Inspect movement, coat, paws, and behavior.
    3. Stop for red flags.
    4. Wipe paws and belly first.
    5. Brush loose dry debris only when it moves easily.
    6. Bathe only if needed and safe.
    7. Rinse and dry thoroughly.
    8. Clean gear.
    9. Log concerns to discuss with a veterinarian or professional if they repeat or worsen.
    Post-dog-park cleanup flow showing inspect, stop signs, wipe or bathe, dry, clean gear, and log concerns.
    Use the cleanup flow as a routine inspection card, not as medical, parasite, wound, mat-cutting, or handling-force advice.

    What to Write Down After Cleanup

    After the dog is clean and calm, note anything unusual: limping, soreness, odor, coughing, stomach upset, skin irritation, stress around handling, or a pattern after certain parks or playgroups. A simple note helps you decide whether the next visit needs a shorter play session, a different cleanup setup, or veterinary guidance.

    Bottom Line

    Dog grooming after dog park visits should stay simple: inspect first, stop for red flags, clean routine dirt, dry well, clean gear, and track concerns. Do not treat wounds, remove parasites, diagnose illness, manage pain, cut severe mats, or force handling as part of grooming.

    FAQ

    Should I bathe my dog after the dog park?

    Only if a wipe or brush-out is not enough and your dog has no wounds, parasites or suspected parasites, limping, illness signs, severe mats, pain, distress, or unsafe-handling concerns.

    What should I check after a dog park visit?

    Check paws, belly, tail, coat, collar area, outer ear flaps, movement, breathing, behavior, and odor. Stop for wounds, punctures, parasites, limping, coughing, vomiting, diarrhea, pain, or distress.

    How do I clean muddy paws after the dog park?

    Use a calm paw wipe or rinse for routine mud, then dry between toes. If there is bleeding, swelling, pain, puncture, limping, or embedded material, contact a veterinarian.

    What if I find a bite mark or parasite?

    Stop grooming and contact a veterinarian. This article does not provide bite care, wound care, parasite removal, parasite treatment, diagnosis, or pain management.

    Should I wash dog park gear?

    Yes. Wash or clean leashes, collars, bowls, blankets, towels, toys, and washable gear according to labels, and keep pets away from unsafe cleaners.

    Sources