Tag: paw care

  • How to Clean Dog Paws After a Walk

    How to Clean Dog Paws After a Walk

    For normal dirty paws after a walk, wipe loose debris, rinse with lukewarm water if needed, dry between the toes, and inspect the pads. Stop for pain, bleeding, burns, blisters, swelling, limping, lodged objects, parasites, infection signs, panic, aggression, or unsafe handling.

    This is routine paw hygiene. It is not wound care, parasite treatment, burn treatment, or a guide to removing embedded objects.

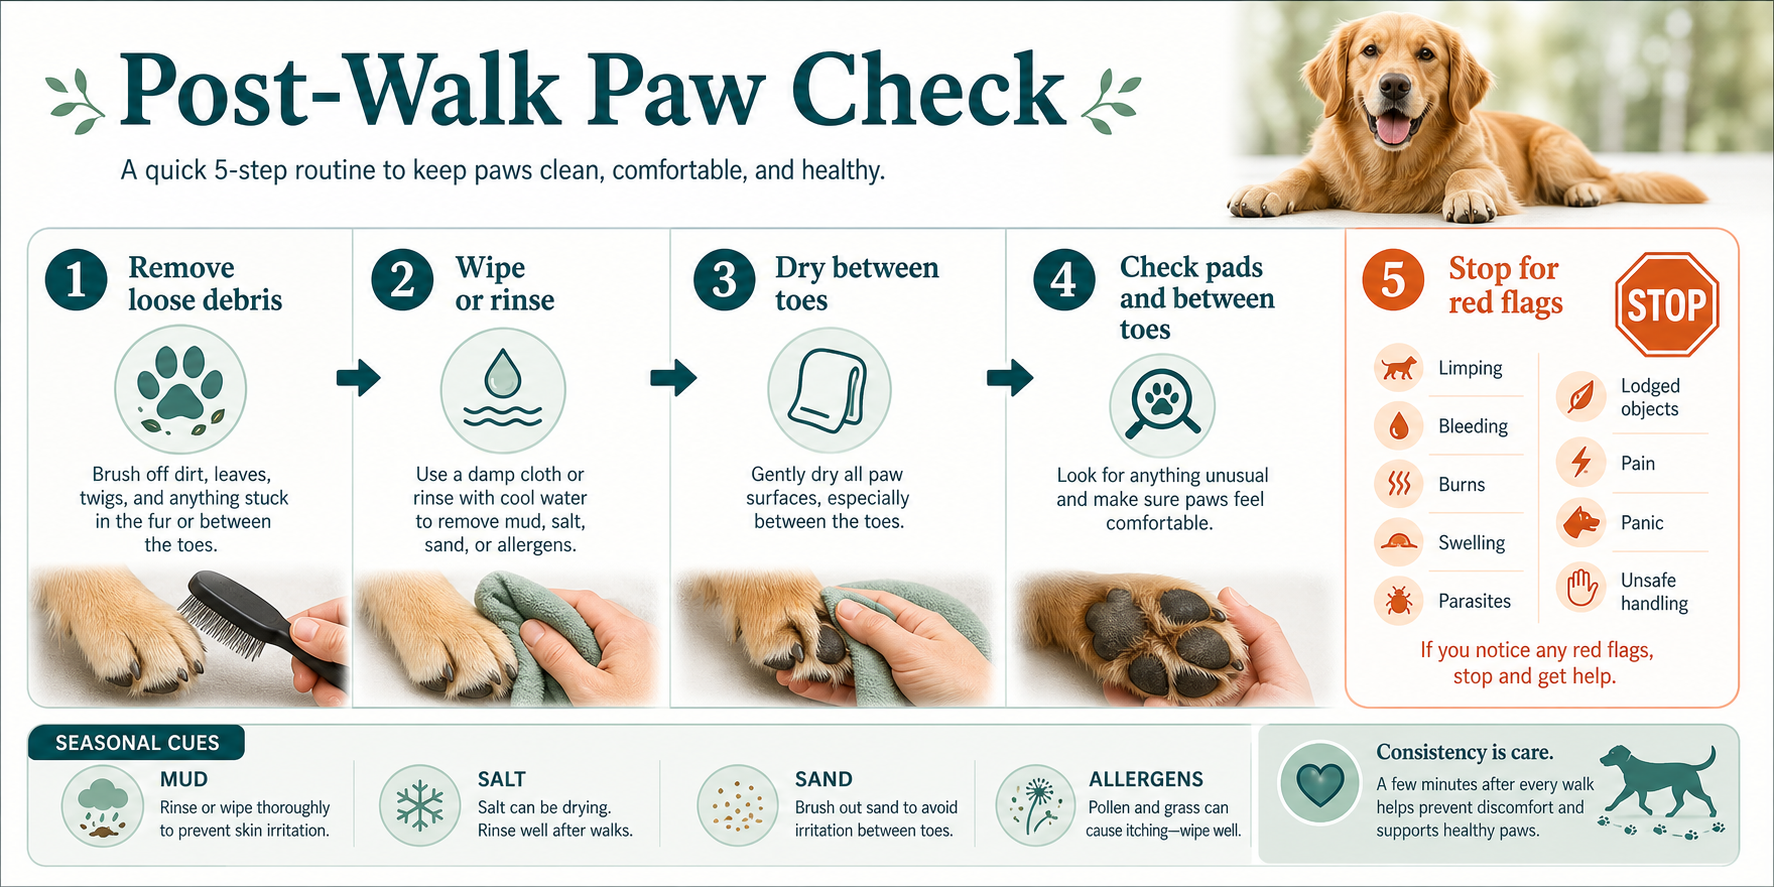
    The Quick Post-Walk Paw-Cleaning Routine

    AKC paw-cleaning guidance supports using dog-safe wipes or a warm, soapy washcloth for muddy, sandy, or salty paws, along with checking the paws. ASPCA winter paw guidance supports washing and drying feet after walks to remove salt and chemicals.

    StepRoutine actionStop point
    WipeRemove loose mud, sand, grass, or surface gritPain, bleeding, lodged object
    RinseUse lukewarm water when paws have salt, chemicals, allergens, or sticky residueBurns, blisters, panic
    InspectCheck pads, between toes, nails, and fur around the pawLimping, swelling, parasites
    DryTowel pads and between toes so moisture does not sitRedness, odor, discharge
    Post-Walk Paw Check sequence showing remove debris, wipe or rinse, dry between toes, inspect pads, and stop for red flags.
    Use this sequence to keep routine paw cleaning separate from stop-and-call-a-professional signs.

    Mud, Sand, Salt, and Allergens: What Changes?

    The basic routine stays the same, but the reason for cleaning changes the emphasis.

    Walk conditionWhat to add
    MudWipe first, then rinse if mud remains between toes
    Sand or gritCheck between toes and around pads before drying
    Salt or ice-meltRinse rather than only wiping, then dry thoroughly
    Pollen or allergensWipe or rinse paws before repeated licking starts
    Wet pavementDry between toes and check for irritation
    Post-Walk Paw Check sequence showing remove debris, wipe or rinse, dry between toes, inspect pads, and stop for red flags.
    Use this sequence to keep routine paw cleaning separate from stop-and-call-a-professional signs.

    Do not use harsh cleaning products or home chemical mixes on paws. ASPCA dog grooming tips support warm-water rinsing after winter walks to remove salt and chemicals.

    How to Inspect Paw Pads and Between Toes

    Lift one paw only as far as the dog is comfortable. Spread toes gently enough to see between them. Look for redness, cuts, swelling, lodged debris, broken nails, parasites, or the dog pulling away in pain.

    If an object is embedded or the dog is limping, do not dig. VCA limping first-aid guidance and veterinary emergency guidance on paw pad injuries support routing deeper paw injuries and embedded objects to veterinary care.

    When a Wipe Is Enough and When to Rinse

    A wipe may be enough for light dust or dry grass. Rinse when paws touched salt, ice-melt, chemicals, sticky mud, allergens, or anything the dog might lick off.

    Use lukewarm water, not hot water. Keep the session calm and short.

    Drying Paws So Moisture Does Not Sit Between Toes

    After wiping or rinsing, dry the pads, nail area, and between toes with a towel. Moisture sitting between toes can make the dog lick or chew, and it can hide redness or irritation.

    Do not rub hard over sore skin. Stop if drying reveals pain, bleeding, swelling, discharge, or a strong odor.

    Stop Signs: Cuts, Burns, Limping, Parasites, or Lodged Objects

    Stop routine paw cleaning and contact a veterinarian or qualified professional for cuts, bleeding, limping, burns, blisters, swelling, lodged foreign bodies, parasites, infection signs, panic, aggression, or unsafe handling.

    FAQ

    Should I clean my dog’s paws after every walk?

    You do not need a full rinse after every clean sidewalk walk, but a quick check is useful. Rinse after salt, chemicals, mud, allergens, or visible residue.

    Can I use wipes on my dog’s paws?

    Dog-safe wipes can be used for routine surface dirt. Rinse instead when salt, chemicals, or sticky residue may be present.

    Should I rinse salt off dog paws?

    Yes. ASPCA guidance supports washing and drying paws after winter walks to remove salt and chemicals.

    How do I dry between my dog’s toes?

    Use a towel gently between the toes and around pads. Stop if the dog shows pain or you see redness, swelling, cuts, or discharge.

    When should paw cleaning become a vet visit?

    Use a vet for limping, bleeding, burns, lodged objects, parasites, infection signs, swelling, severe pain, or unsafe handling.

    Bottom Line

    Most post-walk paw cleaning is simple: wipe, rinse when needed, dry well, and inspect. If the paw check turns up pain, limping, bleeding, burns, parasites, swelling, or an embedded object, stop cleaning and call a veterinarian.

  • Dog Nail Trimming Setup Checklist

    Dog Nail Trimming Setup Checklist

    Before trimming a dog’s nails, set up the light, footing, calm position, rewards, paw-handling warmup, and bleeding-stop supplies. If the dog is panicking, biting, guarding paws, limping, bleeding, injured, medically fragile, sedated, aggressive, or impossible to handle safely, stop before cutting and use a veterinarian or qualified professional.

    This checklist is about setup before the trim. It is not a clipping technique tutorial, product roundup, or promise that the quick will be visible.

    The Nail-Trim Setup Checklist

    Use this as a pre-trim readiness check before the clipper or grinder touches the nail.

    Setup itemWhat to checkWhy it matters
    LightNails and paws are easy to see without rushingPoor visibility increases risk
    FootingDog is on a non-slip surfaceSlipping can increase fear and movement
    PositionDog can stand, sit, or lie calmly without pinningForced restraint can break trust and raise risk
    SuppliesTool, treats, towel or mat, and styptic product are within reachQuick cuts can bleed and hurt
    Paw handlingDog accepts brief paw touches before trimmingHandling readiness helps decide whether to proceed
    Stop rulesEveryone knows when to stopPanic, pain, bleeding, or unsafe handling ends the session

    Original One-Nail Setup Framework

    Pet Grooming Guide original framework: treat the first nail as a setup test, not a job to push through.

    1. Set the room: bright light, non-slip footing, rewards, towel, tool, and styptic product within reach.
    2. Check the dog: stop before cutting for limping, pain, injury, bleeding, panic, paw guarding, or unsafe handling.
    3. Warm up the paw: touch, hold briefly, release, and reward before any clipping or grinding.
    4. Try one nail only if calm: stop after one nail if the dog needs that win to stay comfortable.
    5. Route up when needed: use a groomer or veterinarian when restraint, pain, panic, bleeding, or medical concern is part of the session.

    Lighting and Quick Visibility

    Good lighting helps you see the nail shape, paw position, and where you should avoid cutting. On light nails, the quick may be easier to notice. On dark nails, visibility can be limited, so do not rely on lighting as a guarantee.

    • Choose a bright, steady location.
    • Avoid shadows over the paw.
    • Keep the paw in a relaxed position.
    • Stop if you cannot see well enough to work safely.
    • Use a more detailed quick-visibility guide for dark nails if needed.

    Texas A&M notes natural nail and quick angle context, but this guide stays at setup level and does not teach the full trim method.

    Restraint-Free Positioning and Footing

    Set the dog up where the body feels stable and the handler can release pressure quickly. A towel or mat can help with traction. The position should be calm enough that the dog can choose stillness, not be held down into it.

    Avoid pinning the dog, forcing a paw away from the body, distracting or tricking a fearful dog, or continuing after growling, biting attempts, freezing, or panic.

    VCA stress-free nail guidance warns against forceful or trust-breaking handling for fearful dogs. If restraint feels necessary, the setup is not ready for home trimming.

    Supplies to Place Within Reach

    Place supplies before the session starts so you do not leave the dog waiting while stress builds.

    • Dog nail clipper or grinder.
    • Styptic product.
    • Treats.
    • Towel or non-slip mat.
    • Good light.
    • Waste bag or cleanup towel.

    These are category-level supplies, not product recommendations. This guide does not include affiliate links, prices, ASINs, product rankings, or product tables.

    Paw-Handling Warmup

    Before trimming, check whether the dog accepts paw handling without escalating. Touch the shoulder or leg, slide gently toward the paw, hold briefly, release, and reward calm behavior. Keep this short.

    Stop the warmup if the dog repeatedly pulls away, guards the paw, freezes, growls, snaps, bites, limps, or shows pain. Do not try to “get it over with.” Use gradual conditioning another day or ask a qualified professional for help.

    One-Nail Test and Stop Rules

    A one-nail test keeps the first session modest. If setup, paw handling, and the first nail go calmly, you can decide whether to continue. If the dog becomes worried, stop on the smallest success.

    Stop immediately for panic, biting, snapping, paw guarding, limping, bleeding, injury, pain, sedation concerns, aggression or restraint risk, or medically fragile handling.

    ASPCA guidance supports trimming when nails touch or click on the ground, but timing does not override safety. A nail can be due and still require a groomer or veterinarian.

    When to Use a Groomer or Vet Instead

    Use a qualified groomer when the dog cannot stay calm for paw handling, when the setup requires force, or when you are not confident with the tool.

    Use a veterinarian for limping, bleeding, injury, pain, torn nails, suspected infection, medically fragile dogs, or sedation questions. Texas A&M warns long nails can tear or grow into pads and cause pain or infection; those risks belong with veterinary care when injury or pain is already present.

    FAQ

    What do I need before trimming my dog’s nails?

    Set up good light, non-slip footing, calm positioning, treats, a towel or mat, the nail tool, styptic product, and clear stop rules.

    How should I position my dog for nail trimming?

    Use a calm standing, sitting, or lying position that does not require pinning. If the dog must be forced into position, stop.

    Should I restrain my dog for nail trims?

    No. This guide uses restraint-free setup. Fearful, panicked, biting, or unsafe dogs should go to a qualified professional.

    What should I do if my dog panics before a nail trim?

    Stop before cutting. Use handling practice another day or work with a groomer or veterinarian.

    Do I need styptic powder for dog nail trims?

    Keep a styptic product within reach because cutting the quick can cause bleeding and pain. Significant bleeding, injury, or pain should route to veterinary care.

    Bottom Line

    A safer nail trim starts before the tool touches the nail. Set up bright light, stable footing, calm handling, rewards, styptic product, and clear stop rules. If the dog is painful, panicked, guarding paws, bleeding, injured, medically fragile, or unsafe to handle, stop and use a veterinarian or qualified professional.

    Sources