
If you've just brought home an Airedale Terrier and are wondering how to groom an Airedale Terrier without ruining that iconic wiry coat, you're in the right place. This isn't a poodle situation where a quick brush and monthly bath cut it. The Airedale's double coat is precision engineering, and getting it wrong means a dog that looks like a shaggy mop, feels like cotton wool, and sheds more than your sofa can handle.
The good news? You don't need to be a professional groomer to nail this. But you do need to understand that this breed's grooming needs are different from almost anything else.
Hand-stripping, the breed-standard method for maintaining an Airedale's coat, is a specific skill that rewards patience and the right tools. We're here to walk you through every step, from tool selection to finishing touches, so you can keep your dog comfortable, healthy, and looking the way an Airedale should. As of 2026, the consensus from breed clubs and professional groomers remains the same: proper grooming is not a luxury, it's a cornerstone of Airedale health.
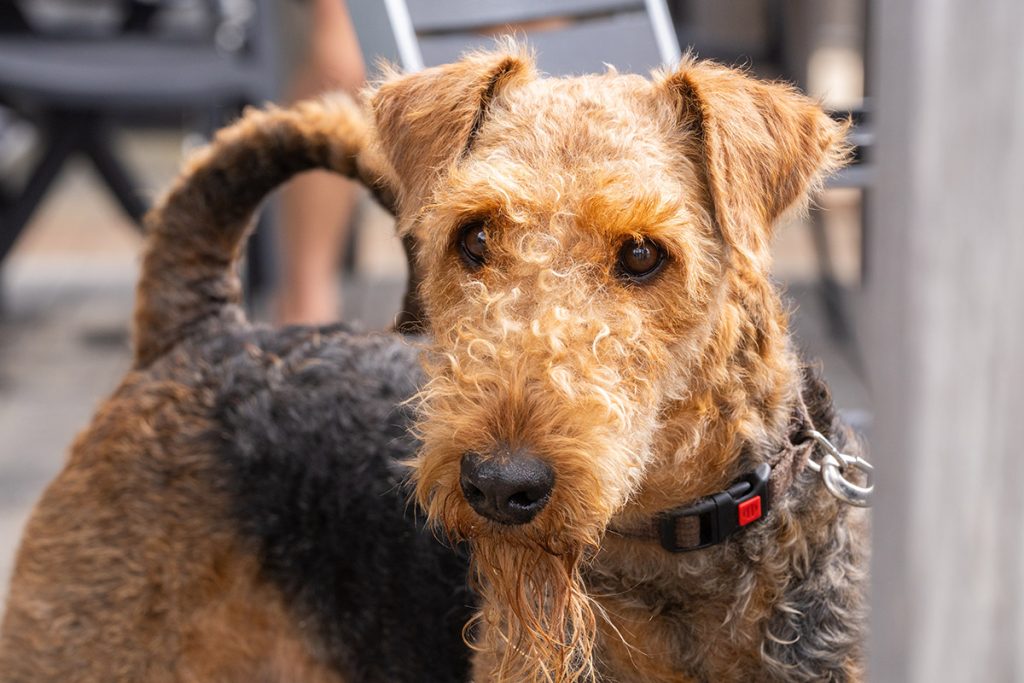
Image source: Bing (Web (fair-use with source credit))
Quick Answer
To groom an Airedale Terrier, brush thoroughly first, then either hand-strip or clip the coat. Hand-stripping preserves the wiry texture and minimizes shedding. Clipping is easier but softens the coat and increases shedding.
Clean ears, trim nails, and bathe every four to six weeks. Full grooming sessions are needed every six to eight weeks. Start grooming early and keep it consistent.
Dogs need routine, not surprises.
Why Grooming an Airedale Is Different From Every Other Dog
Walk into any dog park and you'll see a hundred dogs that all get the same treatment. A slicker brush, a bath, a quick clip with whatever blades are lying around. That works for a Lab.
A Golden Retriever, fine. But an Airedale Terrier will quietly punish you for that approach with a coat that turns into a curly, brittle mess that traps dirt and smells like wet sheep.
Airedales have a double coat. The outer layer, the topcoat, is harsh, dense, and wiry. Underneath sits a softer undercoat that acts as insulation.
This combination is designed for work in rough country, dense brush, and cold British weather. The wiry topcoat is naturally weatherproof and dirt-resistant. It sheds moisture and picks up minimal burrs.
That system only works when the coat is maintained the right way.
Here's the core problem. When you clip an Airedale, the cut hair shafts remain in the follicle. The new hair growing in gets softer, loses its wire-like texture, and often takes on a curlier appearance.
The coat gradually becomes denser and less breathable. This isn't just aesthetic. A degraded coat loses its insulating properties, making your dog less comfortable in both heat and cold.
It can also lead to skin irritation, ingrown hairs, and a higher risk of folliculitis, an inflammation of the hair follicles.
The other massive difference is the concept of "blowing coat." Terriers, including Airedales, don't shed the way other breeds do. Instead, dead hair sits in the coat until it's physically removed. If you brush alone, you'll eventually pull out the undercoat, but the dead topcoat often stays stuck.
Groomers call this a "dead coat." If not removed, it mats, creates hot spots, and becomes a haven for bacteria. Grooming an Airedale means actively pulling out that dead hair, whether by hand-stripping or by the fastest route, clipping.
It's also a temperament thing. Airedales are famously stubborn, opinionated, and theatrical about grooming. They'll squirm, grumble, and occasionally yell at you like they're being tortured.
Managing a 60-pound dog that thinks the grooming table is a stage takes patience. This breed's personality makes technique and a proper setup even more essential. You're not just grooming a coat, you're managing a personality.
Let's be clear about something else. This isn't optional. A neglected Airedale coat isn't just ugly, it's a welfare issue.
Mats pull at the skin. Dead coat traps moisture. Skin infections follow.
This is why breed-specific knowledge matters so much. The wrong grooming routine doesn't just fall short, it actively damages the dog.
Understanding the Airedale Coat: The Key to Everything
Before you pick up a single tool, you need to understand what you're working with. The Airedale Terrier's coat is often described as "hard, dense, and wiry." The Kennel Club breed standard goes further, describing it as "lying close and straight, harsh and wiry, and free from softness or curl." That's a precise anatomical description, not just a vibe.
The coat consists of two distinct layers. The topcoat has thick, stiff guard hairs that grow to about one to two inches in length. These are the hairs that give the breed its classic appearance.
They should feel crisp, almost bristle-like, when you run your hand over them. The undercoat is softer, shorter, and denser. It traps air close to the skin, providing insulation.
In a healthy Airedale, the undercoat is plush but not woolly.
Here's where things get interesting. Airedale hair goes through a growth cycle. Each hair follicle has a finite life.
The hair grows, rests, dies, and eventually, in a healthy state, is pushed out by a new hair. In many breeds, this happens constantly and gradually, which is what we call shedding. In terriers, dead hair tends to stay in the follicle, held in place by the wiry texture of surrounding hairs.
This is why hand-stripping exists. You're not pulling out live hair. You're removing dead, loose hairs that are ready to come out anyway.
The timing of this cycle matters. A new coat typically takes four to six months to fully mature after a strip. The coat goes through several stages.
First, new short hairs come in. They look spiky and feel rough. As they grow, they reach their full wiry texture.
Eventually, they die and sit in a "blown" state, ready for removal.
"Rolling the coat" is the advanced technique of managing this cycle so the dog never has a completely bald patch. Instead of stripping everything at once, you remove only the dead, mature hair section by section. This leaves a continuous supply of healthy new hair across the body.
It's the method preferred by show breeders who need to keep a dog in full condition year-round.
The undercoat grows on a faster cycle. It sheds more frequently, which is why regular brushing or a session with a high-velocity dryer is needed between full grooms. Gently raking out the undercoat prevents matting and keeps the skin breathing.
Climate also affects the coat. In humid environments, the wiry texture softens, making it harder to strip cleanly. In dry, cold environments, the coat becomes harsher and easier to work with.
Seasonal changes trigger heavier undercoat growth. In spring and fall, you'll see more dead undercoat in your brush than at any other time.
One more critical point. Heat damages a coat. Excessive blow-drying on high heat, hot baths, or sun exposure will dry out the hairs and make them brittle and prone to breaking.
The ideal coat is supple, not stiff. You want the natural oils, sometimes called "schmaltz" by terrier people, to condition the hair and give it that weatherproof quality. Over-bathing strips those oils, which is why you should never bathe an Airedale more than once every four to six weeks.
Even then, use a mild, coat-appropriate shampoo.
Hand-Stripping vs. Clipping: Which Is Right for Your Dog?
This is the big decision. It shapes everything about your grooming routine, the tools you buy, the time you spend, and the way your dog looks and feels. There's no universal right answer, but there is a clear best answer depending on your situation.
Let's break down both options honestly.
What Hand-Stripping Actually Is
Hand-stripping involves pulling out the dead topcoat by hand, typically with a tool called a stripping knife. Despite the name, a stripping knife doesn't have a blade. It's a handle with a serrated metal edge that grips the hair, allowing you to pull it out cleanly by the root.
You're not cutting the hair at all.

Image source: Bing (Web (fair-use with source credit))
The technique is straightforward in principle. You take a small section of hair between the blade and your thumb. You then pull firmly and quickly in the direction of hair growth.
The dead hair comes out easily. Live hair resists and stays in the follicle. This is the brilliant part.
Hand-stripping inherently only removes the hair that's ready to go.
The results are exceptional. The coat retains its tough, wiry texture. The color stays vivid, with the black and tan pattern remaining sharp and defined.
Shedding is minimized because dead hair is actively removed before it can drop. Skin health improves due to increased airflow and reduced moisture retention.
The drawbacks are significant too. Hand-stripping is slow. A full strip on a large Airedale can take two to four hours, even for an experienced groomer.
It requires strength and precision in your hands. It's also physically demanding, especially on a dog that won't stand still. Hand-stripping tools require an investment: stripping knives, stones, and grooming chalk for grip.
Cost is a factor. Professional hand-stripping is more expensive than clipping because it takes longer. As of 2026, you can expect to pay roughly 30 to 50 percent more for a hand-strip versus a clip at most grooming salons.
The exact price depends on your region.
This is the breed-standard method. If you plan to show your Airedale in conformation events, hand-stripping is not optional. The breed standard explicitly states that the coat should have a "hard, wiry texture," which is impossible to achieve or maintain via clipping.
What Clipping Involves
Clipping is the modern, practical alternative for pet owners. You use electric clippers with a guard comb to cut the coat down to a uniform length. The process is fast, typically 45 minutes to an hour for the body.
It's also far easier to learn and execute consistently.
Clipping has its own trade-offs. Because you're cutting the hair rather than pulling it out, the remaining hair shafts stay in the follicles. The new hair that grows in will be softer, finer, and often curlier than the previous coat.
This is not just cosmetic. The softer coat loses its weatherproofing. It'll pick up more dirt, hold onto odors, and matt more easily.
Clipping also increases shedding. The clipped coat continues through its normal growth cycle, but without the hard, wiry topcoat holding dead hair in place, the dog releases it into your home. Some owners report significantly more hair on furniture and floors after switching to clipping.
The good news is that clipping is gentler on sensitive skin than you might think. Using a blade guard, like a #10 or #7, protects the skin from direct blade contact, reducing the risk of razor burn, ingrown hairs, and folliculitis. Per manufacturer specifications, a #10 blade leaves approximately 1.5 mm of hair, while a #7 leaves 3.2 mm.
The longer length, a #7, is often recommended for Airedales with sensitive skin or those prone to clipping irritation. A dull blade is the most common cause of problems, so keep your blades sharp and properly lubricated.
The Direct Comparison
| Aspect | Hand-Stripping | Clipping |
|---|---|---|
| Coat texture | Maintains harsh, wiry topcoat | Softens coat permanently |
| Shedding | Minimal | Moderate to noticeable |
| Time per groom | 2–4 hours | 45–60 minutes |
| Frequency | Every 6–8 weeks | Every 3–4 weeks |
| Cost (professional) | Higher ($120–$200) | Lower ($80–$120) |
| Skill level | High, requires practice | Low to moderate |
| Show-ring approval | Required | Not permitted |
| Skin health | Excellent | Good, if blades are sharp |
Who Should Choose What
Choose hand-stripping if you show your dog, want to preserve the breed's natural coat function, or can commit to the time and cost. Choose clipping if you're a busy owner prioritizing convenience, your dog has a particularly soft or curly coat already, or your dog has a skin condition that makes prolonged handling painful. A clipped coat is still a healthy coat as long as you maintain a regular schedule and monitor skin health.
Many owners start with one method and switch. Some strip during cooler months and clip during summer heat. That's practical, not sacrilegious.
Neutered Airedales often develop softer coats regardless, making clipping a sensible option. Aggressive clipping of a young or intact dog can ruin the coat permanently, so breed enthusiasts often emphasize that decision. A mix approach, stripping the back and clipping the legs and belly, is common in pet grooming environments.
The Complete Step-by-Step Grooming Process
Now we get into the actual work. This is the part where you're standing at the grooming table, tools laid out, dog looking at you with deep suspicion. Let's break the entire process into phases so you can approach it one step at a time.
Phase 1: Preparation and Brushing
Before any stripping or clipping, the coat must be clean and free of tangles. This is non-negotiable. Working with a matted coat is painful for the dog and ruins your tools.
Start with a thorough brushing using a slicker brush to remove surface debris and loose undercoat. Follow with an undercoat rake to reach deeper into the coat and pull out dead undercoat. Pay special attention to the armpits, behind the ears, and the rear end.
These are the spots where mats form first.
If the coat is heavily matted, consider clipping off the mats before brushing. Detangling a severe mat by pulling at it is painful and can damage the skin underneath. Use a de-matting tool or scissors with a blunt tip, and be careful around sensitive areas.
Once the coat is tangle-free, use a high-velocity dryer to blow out any remaining dead hair and debris. This is also a good time to check for skin issues. Look for redness, bumps, hot spots, or parasites.
If you find anything concerning, stop and consult your veterinarian before proceeding.
Phase 2: Body Work (Stripping or Clipping)
This is the core of the grooming process. The approach depends on whether you're hand-stripping or clipping.
If You're Hand-Stripping
Start with a clean, dry coat. Some groomers apply a small amount of grooming chalk to their fingers to improve grip on the hair. Take a small section of hair between the stripping knife and your thumb.
Pull firmly and quickly in the direction of hair growth. Work in small sections, moving systematically across the back, sides, and flanks. Don't rush.
The process takes time, but it's therapeutic for the coat.
The back should be stripped first, followed by the sides and the rear. The neck and shoulders are sensitive areas, so work gently there. The belly and legs are less sensitive and can handle a more firm approach.
Remember, only dead hair should come out easily. If you're pulling and the hair resists, it's not ready. Move to another section.
If You're Clipping
Start with a clean, dry, thoroughly brushed coat. Select the appropriate blade. A #10 is standard for a short finish, while a #7 leaves a slightly longer, softer coat.
Attach the blade to your clippers and ensure it's sharp and properly oiled. Start at the neck and move backward along the body, following the direction of hair growth. Use smooth, even strokes and avoid pressing down hard.
Let the clippers do the work.
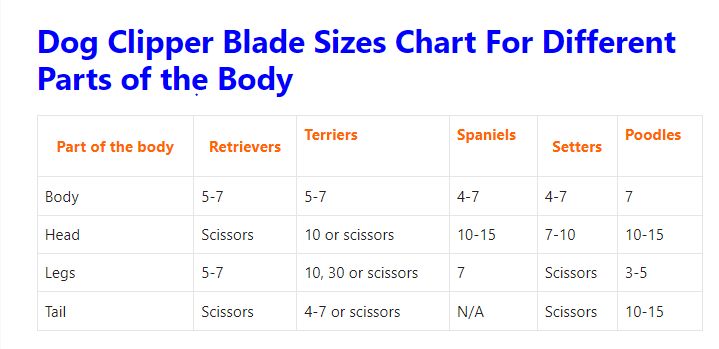
Image source: Bing (Web (fair-use with source credit))
Clip the back, sides, and rear. Leave the legs, head, and tail for later. When you reach the sensitive areas, switch to a lighter touch or reduce the blade guard length.
Watch for any signs of skin irritation, especially if your dog has a thin coat.
Phase 3: The Head, Beard, and Eyebrows
The Airedale head is what gives the breed its distinctive expression. The beard and eyebrows are longer than the body coat and require specific attention.
If you're hand-stripping, work the same technique but with a finer stripping knife or stone for the head area. The hair here is shorter and more delicate. If you're clipping, use a #10 blade to shape the head and a pair of straight scissors and thinning shears to shape the beard.
The eyebrows should be left longer and shaped to give that classic alert look. Trim any straggly hairs that hang over the eyes and obstruct vision. The beard should be combed forward and trimmed to a neat, rounded shape.
Use thinning shears to blend the edges into the rest of the coat.
Phase 4: Ears, Paws, and Nails
These are often the most neglected areas, but they're crucial for health. Airedales are prone to ear infections, especially if hair is allowed to grow unchecked inside the ear canal. If your dog has hair growing deep in the ear, pluck it gently with your fingers or a pair of hemostats.
Apply a small amount of ear cleaning powder to dry the ear and improve your grip. Never use forceps or sharp tools inside the ear canal.
The paws need attention too. Trim the hair between the toes and around the pads. This prevents the hair from matting and reduces the amount of dirt and debris the dog tracks into the house.
Use small, blunt-tipped scissors to avoid nicking the paw pads.
Nails should be trimmed every three to four weeks. Airedales have dark nails, making it difficult to see the quick. If you're unsure, trim small amounts at a time or use a nail grinder with a guard.
A nail grinder is safer for dark nails and can be less traumatic for the dog.
Phase 5: Bathing and Drying
Bathing an Airedale is not complicated, but there are a few rules to follow. Use a dog-specific shampoo formulated for wiry coats. Avoid human shampoo on dogs, as the pH levels are different.
Lather thoroughly and rinse completely. Soap residue is a common cause of skin irritation and coat dullness.
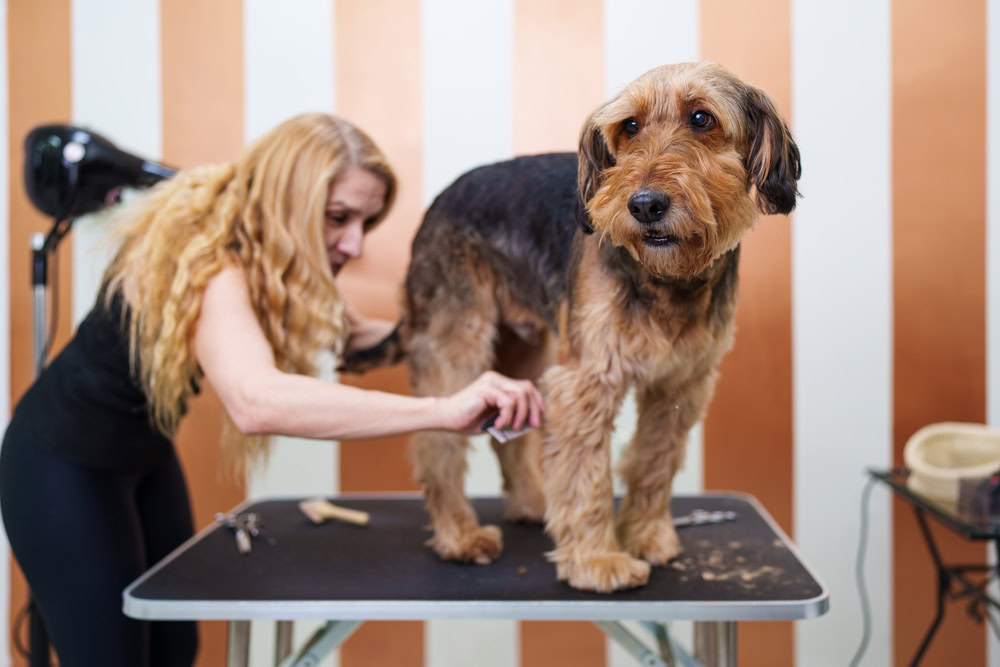
Image source: Bing (Web (fair-use with source credit))
After rinsing, apply a conditioner or coat oil recommended for harsh coats. This helps restore the natural oils that keep the coat crisp and weatherproof. Rinse again.
Drying is a crucial step. A high-velocity dryer is the best option because it blows out any remaining loose hair and fluffs the coat. Use a warm, not hot, setting to avoid damaging the hair.
Follow with a towel dry and allow the dog to air dry the rest of the way. Never brush a coat when it's wet, it will stretch and break easily.
Phase 6: Finishing Touches
Once the coat is dry, do a final check. Brush through the entire coat to remove any loose hair and ensure the styling is even. Trim any stray hairs around the feet, ears, and beard with scissors or thinning shears.
Check for any missed mats or tangles. Run a comb through the coat to ensure there are no snags.
Finally, reward your dog. A grooming session is stressful, even for the most cooperative Airedale. Finish with a treat and plenty of praise.
If you're consistent and patient, your dog will learn to tolerate, or at least accept, the process.
How to Handle a Difficult or Anxious Airedale During Grooming
Let's be honest. Some Airedales are born groomers. Most are not.
They squirm, they grumble, they try to sit down, they spin around, and sometimes they voice their displeasure with a vocalization that sounds like a cross between a howl and a complaint. This is normal, but it doesn't have to be a wrestling match. The right approach turns grooming from a battle into a manageable routine.
Start Young, Start Small
The absolute best way to prevent grooming anxiety is to start early. Puppies are more adaptable than adults. Introduce your Airedale to the grooming table, the sound of clippers, and the sensation of being handled as early as possible.
Keep early sessions short. Five minutes of positive reinforcement is worth more than thirty minutes of stress.
If you're adopting an adult Airedale with no grooming history, you'll need to be more patient. Consider using positive reinforcement training to build a positive association with the table. High-value treats work wonders, especially for a breed as food-motivated as the Airedale.
Table Manners and Restraint
A proper grooming table is non-negotiable. It should have a non-slip surface and a grooming arm with a noose or loop that gently secures the dog's head. This is not a restraint to punish, it's a safety measure.
It keeps the dog from jumping off the table mid-groom, which could cause injury. The noose should be snug but not tight. Never leave a dog unattended on a grooming table.
Position your dog so they're facing away from you. This makes it easier to work on the back and sides without the dog trying to face you. Use your body to gently block the dog from spinning around.
If they try to sit, encourage them to stand. If they try to lie down, support them with your free hand or a grooming loop around the midsection.
Recognizing Stress Signals
Airedales are expressive. Their body language tells you when they're reaching their limit. Watch for:
- Yawning, licking the lips, or suddenly panting
- Ears pulled tightly back
- Tense body posture
- Whale eye (showing the whites of the eyes)
- Trying to move backward or away from you
- Growling or snapping
If you notice these signs, take a break. Not a 30-second pause, a genuine break. Let the dog walk around, sniff, and relax.
Resume when both of you have calmed down. Pushing through stress only makes the next session worse.
Handling Specific Frustrations
Clipper noise is a common trigger. The vibration and sound of clippers can be distressing for a dog that's never experienced it. Start by turning on the clippers in a different room so the dog can hear the sound without being touched by it.
Then gradually bring the clippers closer as you offer treats. Reward calm behavior throughout. Some groomers recommend desensitizing the dog to the clipper by running it along the dog's back while it's off, then turning it on only when the dog is comfortable.
Sensitive areas like the belly and feet are harder to work on. Go slowly and use a lighter touch. Consider using a smaller blade or trimming these areas with scissors instead of clippers.
Some dogs tolerate a grinder better than clippers for nails because the vibration is different.
The Value of Professional Help
Knowing when to tap out is a skill too. If your Airedale's grooming sessions become dangerous for either of you, or if you're dreading them, it's time to find a professional. A groomer who specializes in terriers will have the experience, tools, and table setup to handle a challenging dog safely.
It costs more, but it's worth your peace of mind and your dog's well-being. This is not a failure. It's responsible ownership.
Airedale Grooming Costs: DIY vs. Professional
Cost is a real consideration for most owners. Grooming an Airedale isn't cheap, whether you're paying a professional or investing in your own tools. Let's break down the real numbers so you can budget honestly.
Professional Grooming Costs
Professional grooming prices vary by region, the salon's experience, and whether you're requesting clipping or hand-stripping. As of 2026, here's a realistic picture:
| Service | Average Cost | Frequency | Annual Cost |
|---|---|---|---|
| Full clip (pet) | $80–$120 | Every 4 weeks | $1,040–$1,560 |
| Full hand-strip | $120–$200 | Every 8 weeks | $780–$1,300 |
| Bath & brush only | $50–$70 | Every 4 weeks | $650–$910 |
| Nail trim (standalone) | $15–$25 | Every 4 weeks | $195–$325 |
Prices lean higher in urban areas and in salons with terrier specialists. Some groomers charge extra for a difficult dog or a coat in poor condition.
The DIY Cost Breakdown
| Tool | Cost Range | Notes |
|---|---|---|
| Slicker brush | $15–$30 | Essential for weekly brushing |
| Undercoat rake | $15–$25 | Helps remove dead undercoat |
| Stripping knife | $15–$40 each | Need multiple sizes |
| Stripping stone | $10–$20 | For finishing touches |
| Grooming chalk | $10–$15 | Improves grip on hair |
| Clipper kit | $80–$250 | Includes blades, guards, oil |
| Scissors and thinning shears | $20–$60 | For face and feet |
| High-velocity dryer | $60–$200 | Optional but highly recommended |
| Grooming table | $150–$400 | Safety and comfort |
| Nail grinder or clippers | $20–$50 | Necessary for maintenance |
A full DIY kit with everything you need costs $300 to $800, depending on quality. The high-velocity dryer is the most expensive item, but it's the single best investment you can make for a terrier coat. You can skip the grooming table if you have a sturdy, non-slip surface at home, but you'll need someone to help tag-team the dog.
Time Is a Cost
Grooming an Airedale takes time. A full hand-strip takes two to four hours. A clip with prep takes about an hour.
Add in coat maintenance between grooms, weekly brushing, and ear and nail care, and you're looking at perhaps 30 to 60 minutes per week. Multiply that over a year and you'll understand why some owners prefer to pay a professional.
The financial trade-off is simple. DIY costs more upfront but saves money over time. If you're committed, patient, and willing to learn, DIY is the better long-term value.
If your schedule doesn't allow for it, professional grooming is money well spent.