
Cat hair on the sofa, in the butter, woven into your black jumper. If you're looking up how to deshed a cat, you've probably tried a random brush from the pet aisle and got nowhere. Here's the thing most guides skip: deshedding isn't one method.
The right approach changes completely depending on your cat's coat type, whether mats are already present, and how long your cat will actually sit still.
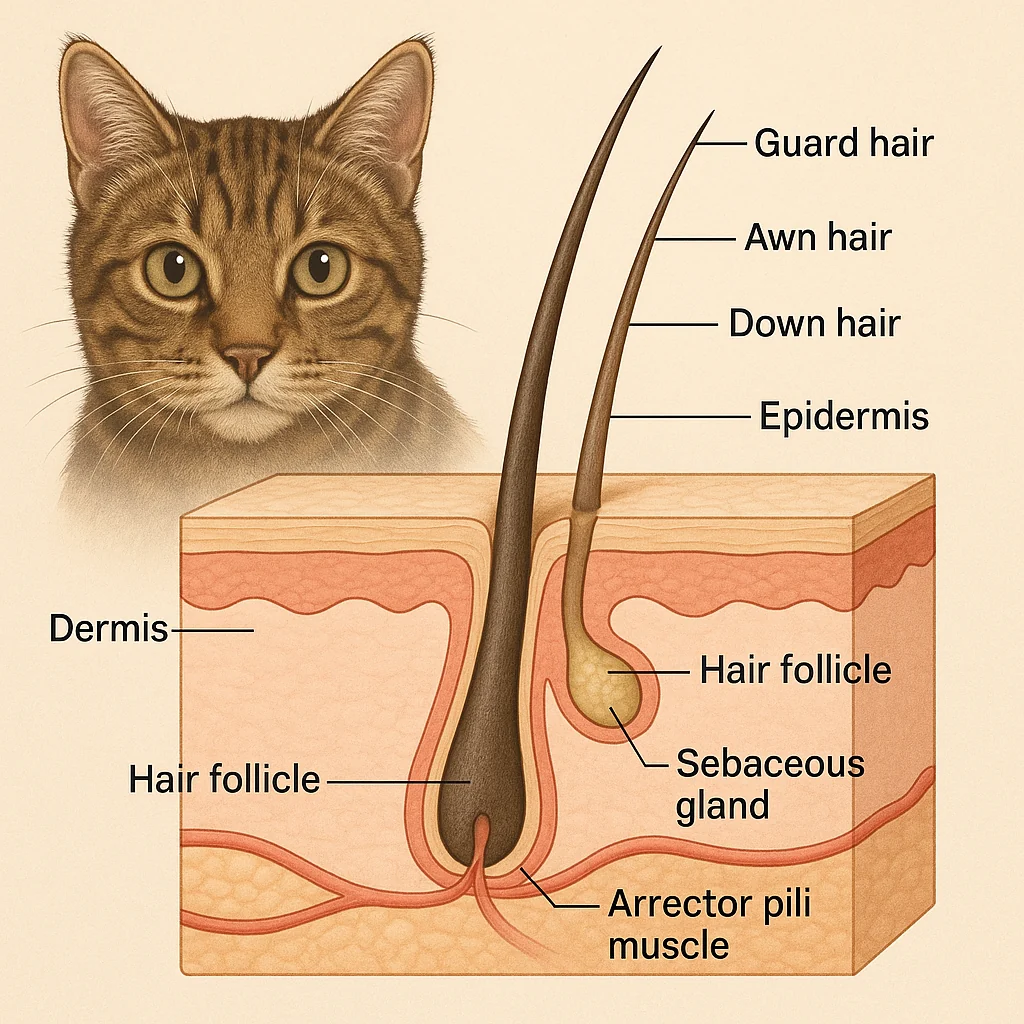
Cats aren't small dogs, and their skin proves it. Feline skin is thinner and far more mobile than canine skin, and cats grow hair from compound follicles, with a cluster of fine down hairs emerging around each guard hair. That anatomy is exactly why the wrong tool does damage instead of good.
So before you pick up anything with teeth on it, let's work out what's actually going on in that coat.

Quick Answer
Deshedding a cat means removing dead undercoat before it sheds or mats. Identify the coat type first. Double-coated cats need a steel comb plus an undercoat rake.
Single-coated shorthairs do better with a rubber curry. Work in three to five minute sessions, following the lay of the coat. Always remove mats before deshedding, never brush over them.
Why Your Cat Is Suddenly Leaving Fur Everywhere (And What "Deshedding" Actually Means)
Brushing and deshedding are not the same job. Brushing tidies the surface and spreads natural oils. Deshedding reaches down and pulls out dead undercoat that's already released from the follicle but hasn't fallen out yet.
That trapped dead coat is the whole problem. It's what your cat swallows during self-grooming and coughs back up as hairballs. It's what clumps into mats.
And it's what ends up on every soft surface you own.
Undercoat vs. Topcoat: The Difference That Changes Everything
A cat's coat can have three hair types. Guard hairs form the long, coarse outer layer that repels water. Awn hairs sit in the middle.
Down hairs are the soft, crimped, fluffy layer closest to the skin.
Down hairs are the undercoat. They're what you're trying to remove.
Here's the part that trips people up. Not every cat has a meaningful undercoat. A Siamese or a Bengal is essentially single-coated, meaning there's barely any down layer to pull.
Run a deshedding blade over that cat and you're not removing dead undercoat. You're shearing off live guard hairs.
Try this at home. Part the coat on your cat's shoulder with your fingers and look right down at the skin.
- Two clear layers, with a pale fluffy cloud under the top hair: double coat. Deshedding tools apply.
- One flat layer that lies down uniformly with no fluff underneath: single coat. Use gentle tools only.
- Curly or wavy all the way through: rexed coat. No deshedding at all.
Normal Seasonal Shed vs. A Coat Problem
Normal shedding is even. It happens all over, the skin underneath looks healthy, and it ramps up in spring and autumn. Cats shed on a photoperiod cycle, meaning changing daylight hours trigger coat turnover more than temperature does.
That's why indoor cats under artificial lighting often shed steadily year round instead of having two clean seasonal blowouts. If your indoor-only cat never seems to stop shedding, that's usually normal, not a fault.
Abnormal shedding looks different. Watch for these:
- Bald or thinning patches, especially symmetrical ones on the belly, flanks, or inner thighs
- Broken, stubbly hair rather than full-length shed hair
- Scabs, redness, scaling, black specks, or a greasy tail base
- Sudden diffuse shedding weeks after illness, surgery, or anaesthesia
- Coat that's gone dull, matted, or unkempt in a cat over eight
Those signs point to a medical cause, not a grooming gap. The Cornell Feline Health Center publishes owner-facing guidance on feline skin and coat conditions, and it's a solid place to sanity-check symptoms before you assume it's just moulting season.
The 60-Second Answer: What to Do Based on Your Cat's Coat
If you want the decision made for you, here it is. Find your cat's coat type in the left column and follow the row across.
| Coat type | Example breeds | Core tools | Frequency | Do NOT use |
|---|---|---|---|---|
| Single-coat shorthair | Siamese, Oriental, Bengal, Burmese, Abyssinian | Rubber curry, soft grooming mitt, fine comb | 1 to 2× weekly | Deshedding blades, stiff slickers |
| Dense double coat | British Shorthair, Russian Blue, Manx, Chartreux | Undercoat rake, steel comb, coated slicker | 2 to 3× weekly, daily in shed season | Aggressive repeat passes on one spot |
| Long double coat | Maine Coon, Norwegian Forest, Siberian | Steel greyhound comb, undercoat rake, slicker | Daily, or every other day minimum | Brushing a mat instead of splitting it |
| Cotton coat, no true guard layer | Persian, Himalayan, Ragdoll | Fine and coarse steel comb, pin brush | Daily, non-negotiable | Deshedding blades, matting neglect |
| Curly or rexed | Cornish Rex, Devon Rex, Selkirk Rex, LaPerm | Damp hands, soft cloth, occasional bath | Weekly wipe-down | Any brush with wire pins |
| Hairless or near-hairless | Sphynx, Peterbald, Donskoy | Bathing supplies, ear and nail care | Bath every 1 to 3 weeks | Brushes of any kind |
If your cat is a moggy of unknown parentage, ignore the breed column entirely. Use the finger-part test from the last section and go by what you find.
One rule cuts across every row. If you find mats, stop. Mats get handled first, and we cover that flow in detail further down.
Before You Touch a Brush: Three Checks That Come First
Most deshedding disasters happen because someone skipped straight to the tool. These three checks take about four minutes and save you a vet bill.
Check 1: Is This Shedding Actually a Medical Issue?
Excessive shedding is often a symptom, not a grooming problem. No brush fixes a flea allergy.
Run a flea comb through the coat at the base of the tail and along the spine. You're looking for live fleas, but mostly for flea dirt, which looks like black pepper grains. Wipe the debris onto a damp white tissue.
If it smears reddish brown, that's digested blood, and your cat has fleas.
Then scan for these red flags:
- Symmetrical hair loss on the belly or inner legs, often from overgrooming (psychogenic alopecia) or an itch you haven't spotted
- Circular scaly patches with broken hairs, which can indicate ringworm (dermatophytosis). Ringworm is zoonotic, so glove up and see a vet before grooming
- A dull, greasy, matted coat in a cat aged eight or older, a classic sign of hyperthyroidism, chronic kidney disease, or diabetes
- Flaky white specks that move on close inspection, which suggests Cheyletiella mites
- Constant scratching, head shaking, or overgrooming after meals, pointing toward atopic or food-responsive skin disease
Book the vet first in those cases. Grooming an itchy, inflamed cat makes both of you miserable and doesn't touch the cause.
Check 2: What Coat Type Are You Working With?
You've already done the finger-part test. Do it in three places, not one, because coat density varies across the body.
Check the shoulder, the mid-flank, and the britches (the fluffy trousers on the back legs). Longhairs often have a thick ruff and dense britches with a comparatively thin back. That's normal, and it tells you where the real work is.
Also feel the skin as you go. Thin, papery skin on a senior cat means you drop down to your gentlest tool regardless of coat type.
Check 3: Are There Mats Already In There?
A comb is the only honest test. A slicker brush glides over the top of a mat and makes the coat look fine while a solid knot sits underneath.
Take a stainless steel comb and try to pass it cleanly from skin to hair tip in these six spots:
- Behind and below the ears
- The ruff under the chin and chest
- The armpits (axillae)
- The groin and inner thighs
- The britches and back of the hind legs
- The tail base and around the sanitary area
Those are the friction zones where mats always form first. If the comb stops, you've found one. Don't force it.
Skip to the dematting flow and handle it properly.
Match the Tool to the Coat (Getting This Wrong Causes Real Damage)
This is where the decision tree earns its keep. The same tool that's brilliant on one cat is genuinely harmful on another.
Single-Coated Shorthairs: Siamese, Bengal, Oriental
These cats have almost no undercoat to remove. Aggregate owner reviews of deshedding blades report the same complaint on single-coated breeds: thinning coat, dulled sheen, and visible patchiness after a few weeks.
That's not a defect in the tool. It's the wrong tool for the job.
Use instead:
- A rubber curry or silicone grooming mitt, worked in small circles with the lay of the coat
- A fine-tooth steel comb for a finishing pass and flea checks
- A boar bristle brush if you want to distribute oils and add shine
Realistic outcome: you'll lift loose surface hair and dander. You won't get a bin bag of fluff, because there isn't one in there. That's fine.
Dense Double Coats: British Shorthair, Russian Blue, Manx
Short hair, huge volume. British Shorthairs in particular carry a plush undercoat that packs down and holds dead hair like a sponge.
Use instead:
- An undercoat rake with teeth long enough to reach the skin without pressing into it
- A coated-tip slicker for lifting and fluffing after the rake pass
- A coarse steel comb to check your work
Short strokes. Light pressure. Let the tool do the pulling instead of leaning on it.
Long Double Coats: Maine Coon, Norwegian Forest, Siberian
The heavyweights. These cats grow a water-resistant topcoat over a dense undercoat, plus a ruff, ear tufts, and britches that mat faster than anything else on the body.
Use instead:
- A stainless steel greyhound comb, coarse end first, fine end last. This is your primary tool, not a slicker
- An undercoat rake for the flanks and britches during shed season
- A slicker only for lifting and finishing, never as the main pass
Line combing is essential here, and we walk through the technique in the step-by-step section. Surface brushing on a Maine Coon builds a felted layer against the skin while the top looks glorious.
Cotton Coats: Persian, Himalayan, Ragdoll
These coats have a fine, cottony texture with little in the way of a protective guard layer. They mat if you look away for three days.
Use instead:
- Fine and coarse steel combs, used daily
- A pin brush for gentle finishing
- Detangling spray for slip when you hit a snag
Never use a deshedding blade on a cotton coat. There's no clear undercoat to separate out, so the blade just cuts everything shorter and leaves a chopped, uneven finish that mats worse afterwards.
Rex and Hairless: Why You Deshed These Cats With a Bath, Not a Brush
Cornish Rex, Devon Rex, and Selkirk Rex have soft, curly, fragile coats that break easily. Sphynx and Peterbald have almost none.
There is no undercoat to remove. Brushing achieves nothing except hair breakage and skin irritation.
Do this instead:
- Wipe rexed cats down weekly with a slightly damp cloth or your hands
- Bathe hairless and near-hairless cats every one to three weeks with a mild, cat-safe shampoo to manage sebum build-up
- Clean ear folds and nail beds, where oil collects in hairless breeds
The Deshedding Tool Lineup: What Each One Actually Does
Pet shop shelves are crowded, and half the products are dog tools with a cat printed on the box. As of 2026, tooth length and pin stiffness remain the two specs that actually separate a cat-safe tool from a dog tool in a cat-shaped package.
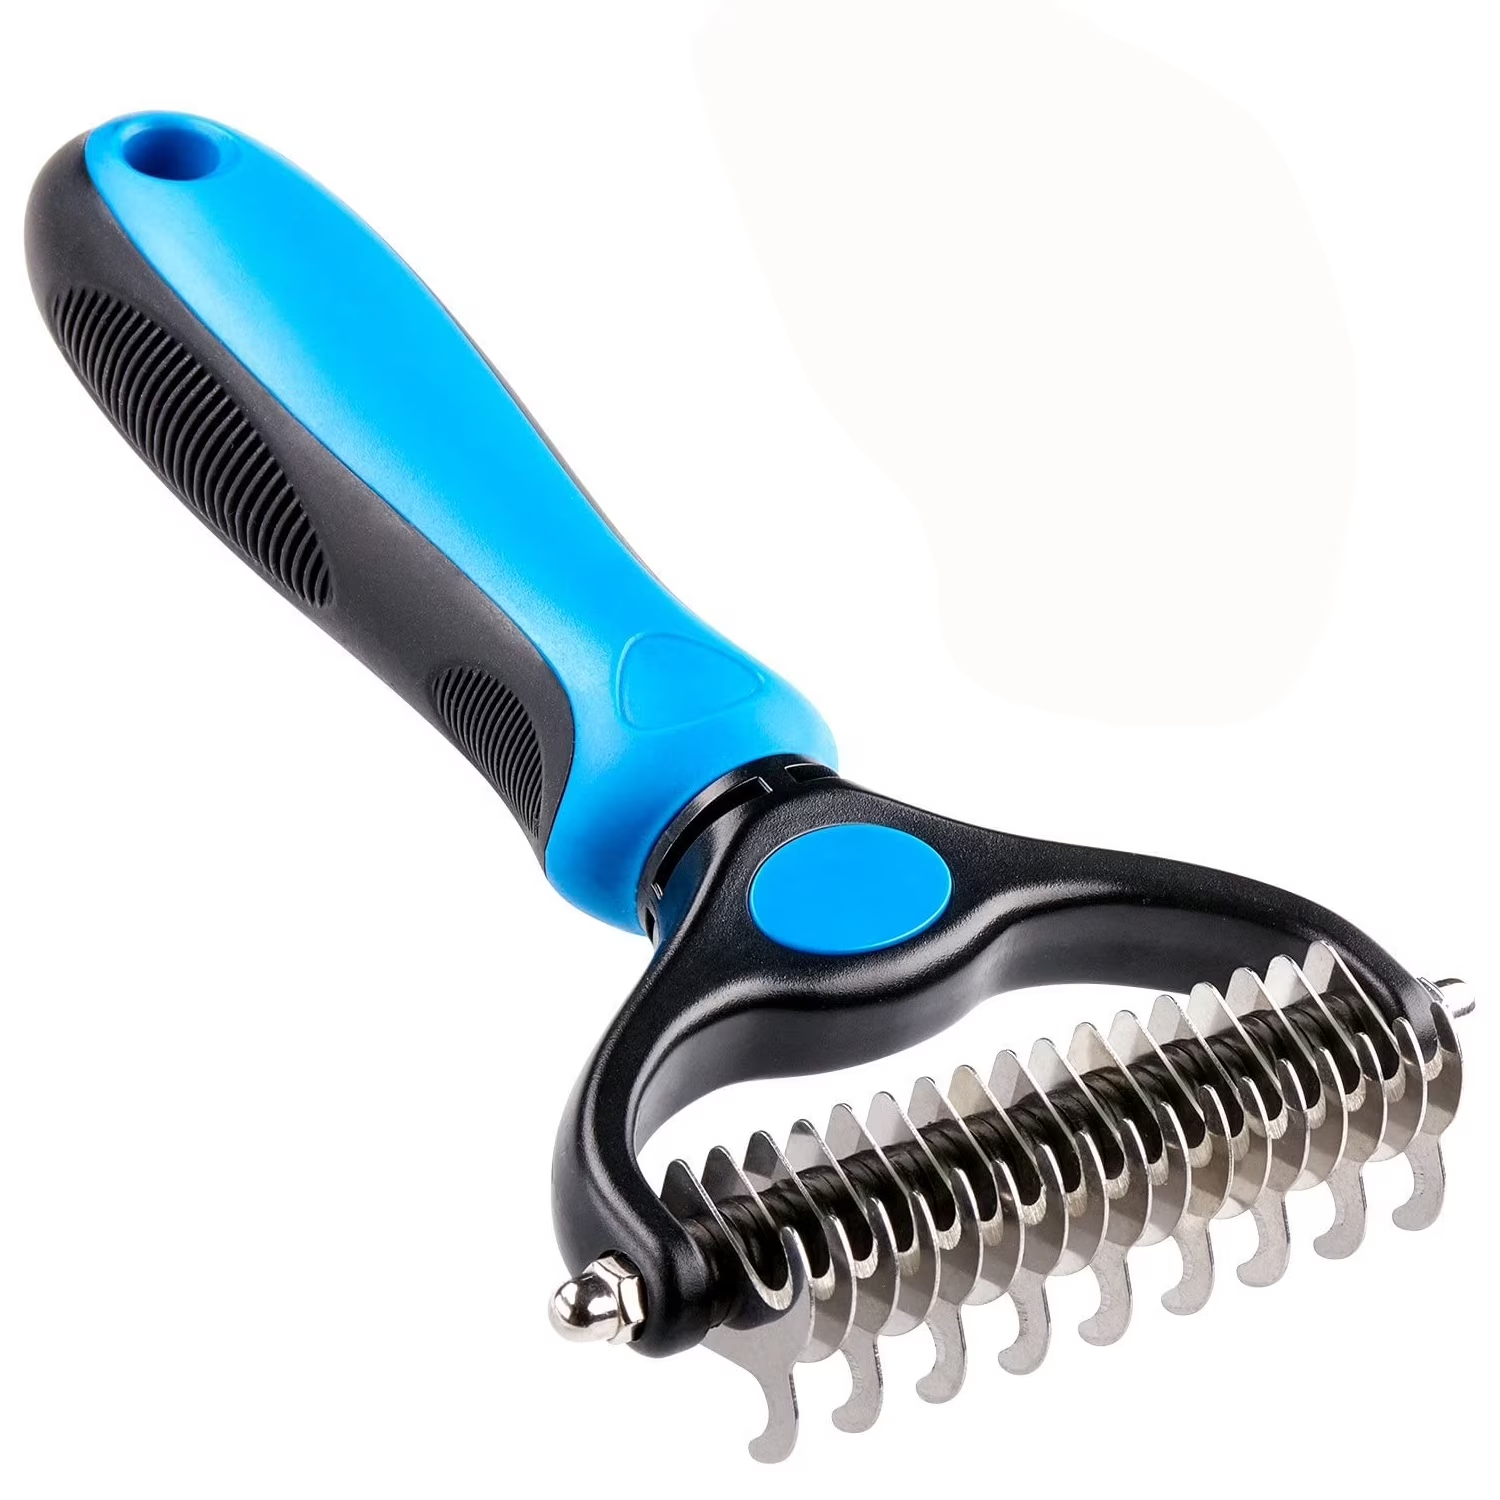
Here's what each tool genuinely does, and where it belongs in the workflow.
| Tool | What it actually does | Best for | Watch out for |
|---|---|---|---|
| Stainless steel greyhound comb | Passes through the full coat depth and finds hidden mats | Every coat type. The one tool everyone should own | Nothing, if used gently. This is the safest tool on the list |
| Undercoat rake | Pulls dead down hairs out from beneath the topcoat | Dense and long double coats | Teeth too long for the coat will scrape skin |
| Slicker brush | Lifts, fluffs, and pulls loose surface hair | Double coats and longhairs, as a finishing tool | Bare stiff wire pins score thin feline skin. Choose coated tips |
| Rubber curry or grooming mitt | Grabs loose surface hair with friction, massages skin | Single-coat shorthairs and brush-averse cats | Won't reach undercoat. Surface only |
| Deshedding blade tool | Cuts and rakes out undercoat with a fine-toothed edge | Dense double coats, used sparingly | It's a blade. Repeat passes cause razor burn and bald spots |
| Mat splitter or mat breaker | Slices a mat into smaller sections so it can be combed out | Small, loose mats only | Sharp. Always keep a comb between it and the skin |
| Fine flea comb | Diagnostic. Finds fleas, flea dirt, and skin debris | Pre-groom health check on any cat | None, though it's slow going on longhairs |
| Curved blunt-tip scissors | Careful trimming of sanitary areas and paw tufts | Longhairs needing tidy-ups | Never cut a mat off the skin with scissors. Ever |
| High-velocity cool dryer | Blasts dead coat out after a bath. Removes more than any brush | Longhairs and heavy shedders | Loud. Noise-sensitive cats will not tolerate it |
The Two Tools Most Cats Actually Need
If you buy nothing else, buy a stainless steel greyhound comb and one tool matched to your coat type. That's it.
The comb is your diagnostic instrument and your quality check. It tells you where mats are hiding and whether you've genuinely cleared the undercoat or just fluffed the top.
What About Grooming Gloves?
Gloves are useful, just not for what they're sold for. They pick up surface hair and feel like petting, which makes them excellent for building tolerance in a cat who hates being handled.
They don't reach the undercoat. Treat a glove as a warm-up or a bonding tool, not as your deshedding solution.
A Note on Deshedding Blades
They work. On the right coat, used correctly, a fine-toothed deshedding blade pulls out an impressive amount of dead undercoat.
The problem is that most people use them like a hairbrush. Manufacturer instructions for these tools specify short strokes in the direction of hair growth, no repeat passes over the same area, and no use on cats without a real undercoat. Ignore that and you get "brush burn": red, irritated skin and a patchy coat that takes months to grow back in properly.
Use it for one or two passes per zone during shed season. Then put it down and finish with a comb.
How to Deshed a Cat, Step by Step
The mechanics matter less than the sequencing. Get the order right and most cats sit through it. Get it wrong and you'll be chasing a cat under the bed by minute two.
Setting Up: Timing, Surface, and the Three-Minute Rule
Timing beats technique. A cat who's just eaten and is halfway into a nap will tolerate three times more handling than a cat who's alert and bored.
Your best windows:
- After a meal, when they're settled and drowsy
- After a play session, once the energy has burned off
- During an existing lap session, if your cat already sits with you
Avoid grooming right before feeding, straight after a vet trip, or when the household is loud.
Surface matters more than people expect. Cats brace against slipping, and a sliding surface puts them on edge before you've started. Lay a towel or a rubber-backed bath mat on a table, a washer lid, or the sofa arm.
Something stable, slightly elevated, and familiar.
Now the rule that decides everything: work in three to five minute blocks. That's the realistic tolerance window for most cats. Feline handling guidance from veterinary bodies points the same way, which is that short, positive sessions build cooperation while long ones build resistance.
Stop before your cat asks you to stop. That's the whole trick. If you always end while they're still relaxed, the tool stops being a threat.
Before you start, have these within reach:
| Item | Why it's there |
|---|---|
| Steel comb | Your primary tool and your quality check |
| Coat-matched deshedding tool | Rake, curry, or slicker depending on coat type |
| Lickable treat tube or churu | Occupies the mouth, builds positive association |
| Towel | Non-slip surface, and a wrap if you need gentle restraint |
| Bin bag or bowl | For the hair, so you're not chasing clumps across the floor |
| Blunt-tip scissors | Only for tidying, never for mats |
Zone Order: Where to Start and Why the Belly Goes Last
Cats have a tolerance map on their bodies. Head and shoulders are welcome territory. Belly and back legs are defended.
Work in this order every time:
- Cheeks, chin, and forehead. Start where the cat already enjoys being touched. This reframes the tool as petting.
- Behind the ears and the ruff. Mat-prone, and still in the friendly zone.
- Neck and shoulders. Easy volume, good confidence-builder.
- Along the spine to the tail base. The classic shed zone. Follow the lay of the coat.
- Flanks and sides. Lighter pressure here. Skin is thinner over the ribs.
- Britches and back of the hind legs. Dense, mat-prone, and the spot most owners skip entirely.
- Armpits, groin, and belly. Last. Always last.
That last zone is where cats bite, so approach it differently. Don't loom over the cat. Work from the side, use short strokes, and stop at the first tail twitch.
If your cat won't allow the belly at all, that's a separate project. Build tolerance by touching the area during ordinary petting for a few weeks before you bring a tool near it.
Line Combing: The Technique That Reaches the Undercoat
Line combing is how professional groomers get through a longhair, and it's the single biggest upgrade most owners can make. Surface brushing leaves a felted layer against the skin. Line combing doesn't.
Here's the method:
- Start at the bottom of a section, near the belly line or the lowest part of the flank.
- Use one hand to push the coat upward against the grain, creating a clean horizontal parting where you can see skin.
- Release a thin horizontal line of coat, roughly 1 to 2 cm.
- Comb that line from the skin outward, all the way to the tip.
- Move up. Repeat. Work your way to the spine.
You're clearing the coat in stripes, from skin to tip, one layer at a time. It's slower. It's also the difference between a coat that looks groomed and a coat that actually is.
For a Maine Coon or a Persian, line combing one flank might take a full five-minute session. That's normal. Split the cat into zones across several sessions rather than trying to do it all at once.
The Comb-Check Pass That Tells You When You're Done
You're done when a steel comb passes cleanly from skin to hair tip anywhere on the body. Not when the tool stops producing hair, because on a double coat it never really stops.
Run the coarse end of the comb through each zone you've worked. If it glides, that zone is clear. If it catches or stalls, there's undercoat or a tangle still sitting there.
This check also stops the most common form of overwork. People keep raking the same patch because hair keeps coming out, and that's how you end up with brush burn and a bald stripe along the spine. The comb tells you the truth.
Rule of thumb: one or two passes per zone with a deshedding tool, then switch to the comb. If the comb glides, move on.
When You Hit a Mat: The Dematting Decision Flow
A mat is not a tangle you can brush harder at. It's felted hair, locked together, sitting against skin that's often already sore underneath.

The image above shows what neglected coat looks like at the extreme end. That's rescue territory, and it goes straight to a professional. But the same physics apply to a 2 cm knot behind an ear.
Tangle, Mat, or Pelt: How to Tell Them Apart
Three categories, three completely different responses. Feel the knot with your fingers before you decide.
| What you've got | How it feels | What to do |
|---|---|---|
| Tangle | Loose, springy, you can pull it apart with fingers. Comb catches but pushes through | Work it out with fingers and a comb, tip to root, holding the base of the hair |
| Mat | Firm, dense, moves as one lump. Comb won't pass. You can lift it slightly off the skin | Split it, or clip it out with skin protected. Small ones only |
| Pelt | The mats have joined into a sheet. Skin moves when you tug the coat. Often warm or smelly underneath | Do not touch it. Groomer or vet, clipper work only |
The lift test decides it. Can you slide a comb underneath the mat so there's a clear gap between the mat and the skin? If yes, you can probably handle it.
If it's flat against the body with no gap, leave it to someone with clippers.
Splitting a Mat Safely
Small, liftable mats can come out at home. Take your time and work with the mat, not against it.
- Isolate it. Separate the mat from the surrounding coat so you can see what you're working with.
- Anchor the base. Grip the hair between the mat and the skin with your fingers. This takes all the pull off the skin. Non-negotiable.
- Add slip. A light mist of detangling spray, or a pinch of cornflour worked in, reduces friction. Let it sit 30 seconds.
- Split it. Use a mat splitter or the end tooth of a comb to slice the mat into two or three narrow strips, working from the outer edge inward, in the direction of hair growth.
- Comb from the tip. Never from the root. Hold the base, comb the very end of the strip, then work back a few millimetres at a time.
- Check the skin. If it's red or the cat flinches, stop. That mat has been pulling for a while and the skin underneath is sore.
Never bathe a matted cat first. Water shrinks and tightens mats, turning a workable knot into a solid pad. Dematting comes before any bath, always.
One warning worth repeating: never cut a mat off with straight scissors. Feline skin is loose and tents upward when you pull the coat. It lifts right into the blade, and the resulting laceration is a common emergency vet presentation.
If you must cut, use blunt-tip curved scissors, slide a comb between the mat and the skin as a shield, and cut above the comb.
When to Stop and Call a Groomer or Vet
Escalate immediately if any of these apply:
- The mat sits flat against the skin with no gap to slide a comb under
- Mats have joined into a sheet, or the skin moves when you tug the coat
- There's heat, odour, moisture, or discharge coming from under the mat
- The cat cries, hisses, or bites when you touch the area
- The coat is matted across more than a quarter of the body
- The cat is elderly, arthritic, or has thin, fragile skin
- You've already found a small wound or sore beneath a mat
Underneath a large mat, groomers routinely find hot spots and sores. Pulling that mat off tears the compromised skin with it. That's a veterinary job, often under sedation, and it's the humane call rather than a failure on your part.
Reading Your Cat: Stop Signals Most Owners Miss
Most grooming bites are preventable. The cat gave three or four warnings first, and they were quiet ones.
Cats escalate in a predictable order. Learn the early stages and you'll never reach the late ones.
Stage 1: Early discomfort (stop soon)
- Tail tip flicking or thumping
- Skin rippling along the back
- Ears rotating sideways or flattening slightly
- Turning the head to watch the tool
- Stiffening, or a subtle shift of weight away from you
Stage 2: Clear warning (stop now)
- Pupils dilating
- Tail lashing side to side
- Ears flat back
- Low growl or a sharp huff
- Mouth turning toward your hand
- A sudden burst of self-grooming at the spot you just touched
Stage 3: Escalation (you missed the signs)
- Hissing or spitting
- Swatting with claws out
- Biting
- Freezing completely still with a rigid body
That last one gets misread constantly. A cat who goes rigid and silent isn't cooperating. That's a shutdown response, and pushing through it damages trust for months.
What About Petting-Induced Overstimulation?
Some cats love grooming for 90 seconds, then suddenly bite. That's overstimulation, not aggression, and it has a predictable trigger point.
Track it. If your cat consistently turns at the two-minute mark, stop at 90 seconds. Every time.
Ending on a good note reliably extends the window over a few weeks, while pushing past it shortens it.
The flanks and the base of the tail are the classic trigger zones. Go lighter there and check in more often.
Handling Cats Who Won't Sit Still
Scruffing is out. Current cat-friendly handling guidance from feline veterinary bodies has moved away from it, because it increases fear responses without improving control.
Use these instead:
- Towel support. Lay a towel over the cat's body, exposing only the area you're working on. Reduces visual stimulation and gives them a stable feel.
- Two-person grooming. One person feeds a lickable treat and offers gentle chin scratches. The other works the coat. This alone doubles most cats' tolerance.
- Lickable treat tube on a wall mat. Keeps the mouth occupied and the head pointed away from your hands.
- Grooming where they already are. A cat asleep in a sunbeam will often accept a comb without moving. Take the free session.
- Micro-sessions. Sixty seconds, three times a day, beats one fifteen-minute battle.
If a cat has become genuinely defensive about grooming, back off to just touching them with the tool, no combing at all, paired with treats. Two weeks of that resets more than you'd think.
The Bath-and-Blow Method: How Groomers Remove Ten Times More Coat
Here's the thing groomers know and owners don't: brushing is a slow way to remove undercoat. A bath followed by a high-velocity dry does in twenty minutes what a brush does in a month.
Water and shampoo loosen hairs that have already released from the follicle. The dryer then blasts them out of the coat before they can settle back in. Longhaired cats can produce an alarming volume of hair from a single session.
Is It Right for Your Cat?
Bath-and-blow suits some cats and terrifies others. Use this to decide.
| Good fit if | Skip it if |
|---|---|
| Heavy double coat, seasonal blowout | Cat panics at loud noise |
| Cat already tolerates being handled | Cat has never been bathed and is over five |
| Longhair with recurring undercoat build-up | Any mats are present (bathe after dematting only) |
| Sphynx or hairless (bath only, no dryer needed) | Cat has heart or respiratory issues |
| You've got a second pair of hands | Cat has open skin, wounds, or active infection |
If your cat fails that test, book a professional feline groomer instead. Cat-only salons and groomers with feline certification handle this daily and have proper restraint and quieter equipment.
The Sequence That Actually Works
Order matters enormously here. Skip a step and you'll create the problem you were trying to solve.
- Comb out fully first. Any tangle left in becomes a mat the second it gets wet. This step is not optional.
- Trim nails. Do this a day or two beforehand, not on the same day.
- Wet the coat thoroughly. Lukewarm water, and take longer than you think. Double coats repel water for the first minute.
- Shampoo twice. First wash lifts surface grease. Second wash actually cleans the coat and loosens dead hair. Use a cat-formulated shampoo only.
- Rinse until it squeaks. Residue causes itching and dulls the finish. Rinse past the point you think you're done.
- Condition if longhaired. Improves comb-through afterwards. Rinse fully.
- Towel gently. Blot, don't rub. Rubbing creates tangles in longhairs.
- Dry on cool or ambient. Cats overheat fast, and their skin is thin. Never use a heated setting.
- Comb while you dry. This is where the volume comes out. Direct airflow at the skin, comb through the lifted coat, work section by section.
- Final comb-through. Fine comb everywhere once the coat is bone dry.
Half-dried longhaired cats mat within hours. If you start this, you finish it.
Dryer Safety Points Worth Taking Seriously
- Never point the airflow at the face. Ears, eyes, and nose get shielded with a hand.
- Cool or ambient only. Heat plus a cat's thin skin is a burn risk.
- Introduce the noise separately. Run the dryer in another room on other days first, paired with treats.
- Never leave a cat unattended in a dryer cage or crate dryer. It's a known cause of fatal overheating.
- Watch for open-mouth breathing. Cats rarely pant. If yours does, stop and let them recover somewhere quiet.
Home hair dryers aren't a substitute. They're too hot and don't move enough air, so you get heat without the coat-clearing effect that makes the method worthwhile.
Mistakes That Damage the Coat or Get You Bitten
Most of these are honest mistakes made by people trying to do the right thing. They're also the ones that show up repeatedly in groomer and veterinary reports of home-grooming injuries.
Tool and Technique Errors
Using a deshedding blade on a single-coated cat. Covered earlier, but it bears repeating because it's the most common mistake by a wide margin. No undercoat means the blade cuts guard hairs. The coat goes dull and patchy, and it takes months to recover.
Repeat passes over the same spot. The hair keeps coming, so people keep going. That's brush burn: red, tender skin and a thinned stripe, usually along the spine or the flanks. One or two passes, then comb-check.
Pressing down. Deshedding tools work by depth of tooth, not by force. Pressing pushes the teeth into the skin. Let the tool sit at coat level and pull through lightly.
Brushing against the lay of the coat. Fine for a moment when you're line combing, but not as your main direction. Working against the grain irritates skin and breaks hair, particularly on longhairs.
Using dog tools without checking the specs. Dog undercoat rakes often have teeth designed for a Husky's coat depth. On a cat, those teeth reach skin. Check tooth length against your cat's coat depth before the first stroke.
Bare-wire slicker pins. Uncoated stiff pins score feline skin. Coated or ball-tipped pins with genuine flex cost the same and don't.
Sequencing Errors
Bathing before dematting. Water tightens mats. Always demat first.
Skipping the comb check. A slicker glides over a mat and makes everything look fine. Then two weeks later there's a pelt. Comb, don't assume.
Doing the belly first. You'll lose the cat in the first thirty seconds, and the rest of the session with it.
Grooming only during shed season. Cats who've never been handled won't suddenly cooperate in April. Maintenance grooming through winter is what makes spring possible.
Dangerous Errors
These carry real injury risk. Treat them as hard rules.
- Scissors on a mat. Skin tents into the blade. Common cause of vet-treated lacerations at home.
- Human hair clippers on a cat. Wrong blade geometry, and they run hot enough to burn. Use animal clippers with proper blades.
- Not checking clipper blade temperature. Blades heat fast. Touch the blade to your inner forearm every 30 seconds. If it's uncomfortable for you, it burns the cat.
- Dog flea products on cats. Permethrin and other pyrethroids are highly toxic to cats and cause tremors, seizures, and death. The EPA's pet product safety guidance is explicit on species labelling. Never use a dog product on a cat, and keep treated dogs separate from cats afterwards.
- Essential oils in grooming products. Tea tree, pennyroyal, citrus, pine, eucalyptus, and wintergreen are all toxic to cats. Check the ingredient list on anything "natural".
- Shaving to skin without a medical reason. Removes thermoregulation and sun protection. Pale and white cats are at real sunburn risk afterwards.
- Grooming through a suspected ringworm case. It's zoonotic and spreads on tools. Vet first, gloves on, disinfect everything.
The Mistake Nobody Talks About
Treating shedding as a grooming failure when it's a health signal. If your cat's shedding has genuinely changed, in volume, in pattern, or in coat quality, the brush is the wrong first response.
Sudden coat change in a cat over eight deserves a thyroid check. Symmetrical hair loss deserves a skin workup. Constant hairballs beyond one or two a month deserve a conversation about gut motility, not just more brushing.
Grooming is maintenance. It isn't medicine.
Safety Rules You Don't Get to Bend
Some of what follows overlaps with the mistakes above. That's deliberate. These are the ones where the consequence is a vet visit rather than a bad haircut.
Product Toxicity: The Cat-Specific Danger
Cats metabolise things differently to dogs. Their livers lack certain glucuronidation pathways, so compounds a dog clears easily can build up to toxic levels in a cat.
That's why species labelling on grooming and parasite products isn't a marketing detail. It's a safety boundary.
Never put these near a cat:
- Permethrin and other pyrethroids. Found in many dog spot-ons and shampoos. Even contact with a recently treated dog can poison a cat in the same house.
- Tea tree (melaleuca) oil. Toxic even in diluted "natural" grooming sprays.
- Pennyroyal, pine, citrus, eucalyptus, wintergreen oils. All on the toxic list.
- Human shampoos. Wrong pH for feline skin, which sits more alkaline than ours.
Read the label on anything you're about to put on your cat. If it doesn't say "for cats", it isn't. The ASPCA Animal Poison Control Center maintains detailed toxicity information and a 24-hour emergency line if exposure has already happened.
Heat, Burns, and Thermoregulation
Clipper blades heat up faster than people expect. Manufacturer guidance for animal clippers, including brands like Andis and Wahl, instructs users to check blade temperature frequently and to use blade coolant or swap to a second blade during longer jobs.
Touch the blade to your inner forearm every 30 seconds. If it's too warm for you, it's burning your cat.
Same principle with dryers. Cool or ambient airflow only, and never a heated setting. Cats have thin skin and limited ability to shed heat, so the margin for error is smaller than with dogs.
And on shaving: don't do it for convenience. A shaved cat loses insulation in both directions, and pale or white-coated cats sunburn readily on exposed skin. Coat also grows back differently after a shave in some longhairs, coming in patchy or with an altered texture for a full cycle.
Ringworm and Other Zoonotic Risks
Dermatophytosis (ringworm) is a fungal infection, not a worm, and it spreads from cats to humans easily. It's most common in kittens, longhairs, and cats from multi-cat rescue environments.
Suspect it if you find circular scaly patches with stubbly broken hairs, especially on the face, ears, or paws.
If you suspect ringworm:
- Stop grooming. Brushing spreads spores around the house and onto the tools.
- See a vet for a proper diagnosis. Wood's lamp fluorescence is suggestive, not conclusive. Fungal culture or PCR confirms it.
- Wear gloves when handling the cat.
- Isolate the tools you've used. Spores survive on brushes for months.
- Disinfect tools with a product proven effective against dermatophytes, and wash bedding hot.
Households with young children, pregnant women, or anyone immunocompromised should be especially careful. Fleas, Cheyletiella mites, and Bartonella (cat scratch disease) also travel between species during close handling.
Bleeding and Skin Injury
Cat skin tears more readily than most owners realise, particularly in seniors and cats on long-term steroids.
If you nick the skin:
- Apply gentle pressure with clean gauze for two to three minutes
- Don't apply human antiseptic creams or ointments, which cats lick off
- Any cut longer than about 1 cm, any wound that keeps bleeding, or any puncture gets a vet call
- Watch the site for 48 hours. Cat wounds abscess quickly
If your cat bites you and breaks the skin, that's a doctor's visit, not a plaster. Cat bites drive bacteria deep and have a high infection rate. Puncture wounds on the hand are especially serious.
Sedation Is a Veterinary Decision
Never sedate a cat at home for grooming. Not with leftover medication, not with a supplement, not with gabapentin prescribed for something else at a guessed dose.
Sedation for heavily matted cats is a legitimate and often kinder option, but it requires a veterinary exam first. Many badly matted cats are matted because they're unwell, and an unassessed anaesthetic in a cat with undiagnosed kidney or heart disease is a genuine risk.
Some vets prescribe pre-visit gabapentin to reduce stress before a groom. That's a conversation with your vet, at a dose matched to your cat's weight and health status.
Tool Hygiene
Simple, and skipped by nearly everyone.
- Pull hair out of brushes and rakes after every session
- Wash tools with warm soapy water weekly, and dry them fully
- Check slicker pins for bent or exposed tips. Replace the brush if the coating has worn off
- Don't share tools between cats if one has any skin condition
- Keep clipper blades oiled per manufacturer instructions. Dry blades pull hair and run hot
Deshedding Schedule and Long-Term Coat Maintenance
Consistency beats intensity every single time. Ten minutes a week, all year, prevents more mats than a two-hour emergency session in May.
How Often by Coat Type
| Coat type | Off-season | Shed season (spring, autumn) | Session length |
|---|---|---|---|
| Single-coat shorthair | 1× weekly | 2× weekly | 3 to 5 minutes |
| Dense double coat | 2× weekly | Every other day | 5 minutes |
| Long double coat | Every other day | Daily | 5 to 10 minutes, split into zones |
| Cotton coat (Persian, Ragdoll) | Daily | Daily | 5 to 10 minutes |
| Rexed coat | Weekly wipe-down | Weekly wipe-down | 2 minutes |
| Hairless | Bath every 1 to 3 weeks | Same | 15 minutes bath |
Add a session for these cats regardless of coat type:
- Overweight cats. They physically can't reach the lower back and tail base.
- Cats over 10. Arthritis limits the grooming twist long before you notice a limp.
- Cats with dental disease. Grooming hurts when the mouth hurts.
- Post-surgical or cone-restricted cats. Two weeks in a cone builds a real coat backlog.
Do Indoor Cats Shed Differently?
Yes. Indoor cats live under stable artificial light and central heating, which flattens the natural photoperiod signal. Instead of two sharp seasonal moults, you get steady shedding all year.
That doesn't mean more total hair. It means it's spread out, so you never get the dramatic spring blowout that outdoor cats have.
Practical upshot: keep the schedule constant year-round rather than ramping up in spring. Indoor cats in centrally heated homes also get drier skin and more static in winter, which makes coats tangle more easily.
What Actually Reduces Shedding (And What Doesn't)
Nothing stops a healthy cat shedding. Hair turnover is normal biology. But a few things genuinely improve coat quality and reduce how much hair ends up loose in the house.
Does help:
- Good quality protein in the diet. Hair is largely protein. Cheap diets show up in the coat within a couple of months.
- Omega-3 fatty acids (EPA and DHA). Veterinary dermatology guidance supports supplementation for coat and skin quality. Expect to see a difference in 8 to 12 weeks, not 8 to 12 days.
- Consistent flea control. Year-round, cat-specific product, prescribed by your vet.
- Adequate hydration. Wet food, water fountains, multiple bowls.
- Treating the underlying condition. Thyroid, kidney, allergy, dental. Fix the cause and the coat follows.
- Indoor humidity in winter. A humidifier reduces static and dry, brittle coat.
Doesn't help much:
- Deshedding shampoos on their own. The dryer does the work, not the formula.
- Shine sprays. Cosmetic, and they wear off in a day.
- Shaving. Doesn't reduce shedding, just shortens the hairs you're picking up.
- Coconut oil in the food. No solid evidence for feline coat benefit, and it adds calories.
Managing Hairballs
Regular deshedding reduces hairballs because your cat swallows less loose hair. That's the practical benefit most owners actually feel first.
If your cat still brings up more than one or two hairballs a month, don't just brush harder. Frequent hairballs can point to gastrointestinal motility problems, inflammatory bowel disease, or overgrooming driven by itch or stress. Worth a vet conversation.
Petroleum-based hairball pastes work by lubricating passage rather than by breaking hair down. They're a management tool, not a fix.
Keeping the House Under Control
The hair you don't remove ends up somewhere. A few things that make a measurable difference:
- Washable throws on the sofa and bed, changed weekly
- A rubber squeegee or damp rubber glove dragged across upholstery pulls out more hair than most vacuums
- Vacuum with a brush-roll head on carpets, twice weekly during shed season
- A HEPA air purifier in the room where your cat sleeps, if anyone in the house has allergies
- Bathe or wipe down more often if a household member reacts to Fel d 1, the primary cat allergen found in saliva and skin secretions
What It Costs: Home Tools vs. Professional Grooming
Deshedding is cheap to do at home and expensive to fix once it's gone wrong. That's the whole economic argument.
Home Tool Costs
Prices below reflect typical retail ranges as of 2026. Cat-specific tools generally cost the same as dog equivalents, so there's no penalty for buying the right one.
| Item | Typical UK price | Typical US price |
|---|---|---|
| Stainless steel greyhound comb | £10 to £30 | $12 to $35 |
| Undercoat rake | £8 to £20 | $10 to $25 |
| Coated-tip slicker brush | £8 to £18 | $10 to $22 |
| Rubber curry or grooming mitt | £5 to £12 | $6 to $15 |
| Deshedding blade tool | £25 to £45 | $30 to $55 |
| Mat splitter | £8 to £15 | $10 to $18 |
| Blunt-tip curved scissors | £8 to £20 | $10 to $25 |
| Detangling spray | £6 to £14 | $8 to $16 |
| Cat-formulated shampoo | £8 to £18 | $10 to $22 |
| Animal clippers (Andis, Wahl, Oster) | £70 to £180 | $85 to $220 |
| High-velocity cool dryer | £70 to £250 | $90 to $300 |
A workable kit for most cats comes to £20 to £45, or roughly $25 to $55. That's a comb, one coat-matched tool, and a detangler.
Professional Grooming Costs
| Service | Typical UK price | Typical US price | When you'd book it |
|---|---|---|---|
| Bath, dry, and comb-out | £40 to £80 | $50 to $100 | Seasonal shed-out for a longhair |
| Deshedding treatment | £35 to £70 | $45 to $90 | Heavy double coat, twice a year |
| Full de-matting | £60 to £120 | $75 to $150 | Multiple mats, cooperative cat |
| Lion cut or full body clip | £60 to £120 | $75 to $150 | Chronic matting, senior cats |
| Sanitary trim only | £15 to £30 | $20 to $40 | Longhair hygiene maintenance |
| Sedated veterinary groom | £120 to £300+ | $150 to $400+ | Pelted, aggressive, or unwell cats |
Prices vary widely by region. Cat-only salons and groomers with feline certification usually sit at the upper end, and they're worth it for a difficult cat.
The Honest Cost Comparison
Here's the maths that matters. A £25 comb used weekly for a year costs about 48p a week.
One sedated de-matting session costs the equivalent of several years of that comb. And it's not a one-off if the underlying routine doesn't change, because a shaved cat still needs combing as the coat grows back.
For a Maine Coon or Persian, the realistic annual pattern looks like this:
- Home maintenance only: £30 to £50 for tools in year one, then near zero
- Home maintenance plus two professional grooms a year: £110 to £210
- No maintenance, then crisis grooming: £120 to £400 per incident, repeating
Neither professional option is a failure. Some cats simply won't accept home grooming, and some coats genuinely need equipment most people don't own. Budgeting two salon visits a year for a heavy-coated longhair is a sensible plan, not a cop-out.
Is a Home Dryer Setup Worth It?
Only if you have a heavy-coated longhair or multiple cats. A cool-air high-velocity dryer at £70 to £250 pays for itself against two or three professional visits.
For a single shorthair, it isn't worth the outlay or the noise stress. Skip it.
Real Scenarios: Obese Cats, Seniors, Biters, and Rescue Pelts
Textbook advice assumes a cooperative cat with a normal body condition. Most cats who need deshedding help aren't that cat.
The Overweight Cat Who Can't Reach
The situation: hair on the lower back, tail base, and hind end is greasy, clumped, or dandruffy. The front half of the cat looks perfect.
That's a mobility problem, not a grooming preference. A cat carrying extra weight physically can't twist far enough to groom the back half of its body. A body condition score of 7 or higher on the 9-point scale usually means the cat has stopped reaching the tail base entirely.
What to do:
- Prioritise the lower back, rump, tail base, and britches every session
- Use a rake or comb rather than a mitt, because that area builds real undercoat depth
- Expect scurf and greasiness there. Wipe with a damp cloth or use a waterless foam if it's oily
- Talk to your vet about a weight plan. Coat improves noticeably as mobility returns
- Watch for skin fold irritation in very heavy cats, especially around the groin
The Senior Cat With Thin Skin
The situation: a cat aged 12 or more with a coat that's gone dull, slightly matted, and unkempt. Skin feels papery.
Cats stop self-grooming for two main reasons: pain and illness. Arthritis in the spine and hips limits the twist. Dental disease makes licking painful.
Hyperthyroidism and chronic kidney disease both show up in coat quality.
What to do:
- Get a vet check first. This coat change is a clinical sign, not a grooming lapse
- Drop to your gentlest tool, usually a soft comb or a rubber mitt
- Keep sessions to two or three minutes, more often
- Groom where the cat is lying, rather than moving them onto a table
- Support the body with a hand under the chest. Don't ask an arthritic cat to hold a pose
- Watch for skin tears. Senior skin is fragile and heals slowly
The Cat Who Bites
The situation: grooming goes well for a minute, then the cat turns and bites. Or the tool appears and the cat leaves the room.
Nearly always one of three causes: overstimulation, pain somewhere you're touching, or a bad association from a previous rough session.
What to do:
- Rule out pain. A cat who bites specifically over the lower back or hips may have arthritis or a sore spot. Vet check.
- Halve the session. If they turn at two minutes, stop at one. Consistently.
- Reset the association. Two weeks of just touching the cat with the tool, no combing, paired with a lickable treat.
- Change the tool. Some cats hate pins but accept a rubber curry. Some hate the sound of a rake on the coat.
- Add a second person. Treat-giver and groomer. This alone transforms many cats.
- Try a towel wrap exposing only the working area.
If none of that helps after a month, book a groomer with feline experience. Fighting your cat weekly damages the relationship for no gain.
The Rescue Cat With Pelting
The situation: a newly adopted cat with matted sheets of coat, often across the back, sides, and britches. The coat moves as one piece.
Do not attempt this at home. Not with scissors, not with a mat splitter, not with patience.
Under a pelt, groomers routinely find sores, hot spots, and skin that has been under constant tension for weeks. Removing it requires clippers run flat underneath the pelt, usually with a #10 blade, and often with sedation.
What to do:
- Book a vet appointment, not a groomer, if the pelting is extensive or the cat is unwell
- Ask for a full skin check as the coat comes off
- Expect the cat to look shocking afterwards. Skin will be pink, thin, and possibly sore
- Keep the cat warm indoors while the coat regrows, typically 3 to 6 months
- Start a gentle maintenance routine at week two, before the new coat gets long enough to tangle
- Many rescue cats have never been handled. Build tolerance slowly with short, treat-paired sessions
The Cat Who's Never Been Groomed
The situation: an adult cat, no skin problems, but zero experience with brushes.
Go slower than feels necessary. The introduction phase should take weeks, not one session.
Week one, leave the tool out where the cat can sniff it. Week two, touch them with the back of the tool during normal petting. Week three, one or two strokes on the cheek.
Week four, extend to the shoulders.
Rushing this is how you create the biter from the previous scenario.
Frequently Asked Questions
How often should I deshed my cat?
It depends on coat type. Single-coated shorthairs need one to two sessions a week. Dense double coats need two to three, rising to every other day during spring and autumn moults.
Longhairs like Persians and Maine Coons need daily combing year-round. Keep every session to three to five minutes rather than one long weekly battle.
Is a deshedding tool bad for cats?
Not inherently, but it's wrong for many cats. Deshedding blades have a cutting edge, so they only suit cats with a genuine undercoat. On single-coated breeds, Rex breeds, and cotton-coated cats like Persians, they cut guard hairs and cause patchiness.
Even on suitable coats, limit yourself to one or two passes per area to avoid brush burn.
Can I shave my cat to stop shedding?
Shaving doesn't stop shedding. The cat sheds the same number of hairs, just shorter ones. Shaving also removes insulation and sun protection, and pale cats sunburn easily afterwards.
Coat can regrow patchy or with a changed texture in some longhairs. Shave only for medical reasons or severe matting, and always with animal clippers.
Why is my cat shedding so much all of a sudden?
Sudden shedding changes usually have a medical cause. Common culprits include fleas, flea allergy dermatitis, ringworm, food or environmental allergies, hyperthyroidism in cats over eight, chronic kidney disease, and stress-driven overgrooming. Telogen effluvium after illness, surgery, or anaesthesia also causes a delayed diffuse shed.
Book a vet check rather than brushing harder.
What's the best brush for a cat that hates being brushed?
Start with a rubber curry or a grooming mitt. Both feel like petting rather than pulling, which makes them the easiest entry point for a resistant cat. Once tolerance improves, move to a fine steel comb, which glides better than a slicker.
Pair every session with a lickable treat and stop after 60 to 90 seconds.
Should I bathe my cat before or after deshedding?
Comb the coat out fully first, then bathe. Water shrinks and tightens any tangle or mat left in the coat, turning a workable knot into a solid pad. After bathing, dry the cat completely on a cool setting while combing through.
A half-dried longhaired cat will mat within hours.
Your Deshedding Decision Guide, All in One Place
Everything above, compressed into the order you'd actually work through it. Start at step one and follow the branch that matches your cat.
Step 1: Is This a Grooming Job or a Vet Job?
Answer this before you touch a tool.
Go to the vet first if you see:
- Bald or thinning patches, especially symmetrical ones
- Broken, stubbly hair rather than full-length shed hair
- Scabs, redness, scaling, or a greasy tail base
- Flea dirt on a damp white tissue that smears reddish brown
- A dull, unkempt coat in a cat aged eight or over
- Mats with heat, odour, moisture, or the cat crying when touched
- Constant scratching, overgrooming, or more than two hairballs a month
Carry on to step two if: shedding is even across the body, the skin underneath looks clean and healthy, and your cat is behaving normally.
Step 2: What Coat Are You Working With?
Part the coat at the shoulder, flank, and britches. Then pick your row.
| What you find | Coat type | Primary tool | Secondary tool | Never use |
|---|---|---|---|---|
| One flat layer, no fluff | Single-coat shorthair | Rubber curry | Fine steel comb | Deshedding blade |
| Short hair, thick pale fluff underneath | Dense double coat | Undercoat rake | Coated slicker, steel comb | Repeat passes on one spot |
| Long hair, two clear layers, big ruff | Long double coat | Steel greyhound comb | Undercoat rake, slicker | Surface-only brushing |
| Long, soft, cottony, no coarse outer hair | Cotton coat | Fine and coarse steel comb | Pin brush | Deshedding blade |
| Curly or wavy throughout | Rexed coat | Damp hands or soft cloth | Nothing else | Any wire-pin brush |
| Little or no hair | Hairless | Bath supplies | Ear and nail care | Brushes entirely |
Step 3: Mat Check Before Anything Else
Run a steel comb from skin to tip in the six friction zones: behind the ears, the ruff, both armpits, the groin, the britches, and the tail base.
- Comb glides everywhere: go to step four.
- Comb catches on something springy you can pull apart: it's a tangle. Anchor the hair base, work from the tip, comb it out.
- Comb won't pass, but you can slide it under the knot: it's a mat. Anchor, add slip, split with a mat breaker, comb from the tip backwards.
- Knot sits flat against the skin with no gap, or skin moves when you tug: stop. That's a pelt. Groomer or vet.
Step 4: The Session Itself
Same sequence regardless of coat type.
- Pick your moment. After a meal, after play, or during an existing lap session.
- Set up a towel on a stable surface. Have treats and a bin bag ready.
- Start at the cheeks and forehead. Work back: ears, neck, shoulders, spine, flanks, britches, then belly last.
- Follow the lay of the coat. Short strokes, light pressure.
- Longhairs and dense coats: line comb. Part the coat, clear one 1 to 2 cm stripe at a time from skin to tip, then move up.
- One or two passes per zone with a deshedding tool. Then stop and comb-check.
- Finish when the comb glides cleanly, or at five minutes, whichever comes first.
- End while the cat is still relaxed. Always.
Step 5: Watch the Signals
Stop at stage one. Don't wait for stage two.
- Stage 1 (wind it up): tail tip flicking, skin rippling, ears rotating, head turning toward the tool.
- Stage 2 (stop now): dilated pupils, lashing tail, flat ears, low growl, mouth turning toward your hand.
- Stage 3 (you went too far): hissing, swatting, biting, or freezing rigid and silent.
If you're consistently reaching stage two, halve your session length and rebuild from there.
Step 6: Escalate When You Should
Book a professional groomer if the cat is heavily coated and you can't keep on top of it, if you've got multiple mats you can't lift off the skin, or if grooming has become a weekly fight.
Book a vet if the cat is pelted, painful, unwell, elderly with fragile skin, or if the coat problem came with any of the red flags in step one.
Neither one is a failure. A Maine Coon or Persian on two salon visits a year plus daily home combing has a better life than one being wrestled with every Sunday.
The Five Rules Worth Memorising
If you remember nothing else from all of this, remember these.
- Coat type decides the tool. A deshedding blade on a Siamese, a Devon Rex, or a Persian does damage, not good.
- Mats come out before anything else. Never brush over one, and never bathe a matted cat.
- Scissors never touch a mat. Cat skin tents into the blade. Use a comb as a shield, or clippers, or a professional.
- Three to five minutes, then stop. Consistency beats intensity every time.
- The comb tells the truth. If it glides from skin to tip, you're done. If it catches, you're not.
Get those five right and the rest sorts itself out. The hair on your jumper won't disappear entirely, because healthy cats shed. But the hairballs drop off, the mats stop forming, and your cat starts leaning into the comb instead of leaving the room.