
Grooming a horse isn't just about keeping them looking good. It's one of the most important daily health checks you'll ever perform. If you've ever wondered how to groom a horse properly, the short answer is: it's a systematic process that prioritizes safety, reads the horse's body language, and uses specific tools in a specific order to protect their skin and coat.
Think of grooming as a full-body physical exam disguised as a bonding session. As of 2026, equine veterinarians consistently emphasize that daily grooming is the single most effective way for owners to catch early signs of injury, skin infections, or systemic illness before they become serious problems. Done correctly, a full session takes 15 to 30 minutes and requires nothing more than a few essential brushes, a hoof pick, and a calm, patient approach.
Quick Answer
Groom your horse in a safe, cross-tied area. Start with a rubber curry comb in circular motions over the neck and body. Follow with a stiff dandy brush to flick away loosened dirt.
Finish with a soft body brush for shine and oil distribution. Clean the hooves with a hoof pick from heel to toe. Detangle the mane and tail from the bottom up.
Always check for heat, swelling, or cuts as you go.
Why Proper Grooming Matters More Than You Think
Most new horse owners think grooming is about aesthetics. It's not. It's a health screening, a bonding ritual, and a safety measure all rolled into one.
Every time you run a curry comb over your horse's body, you're doing more than removing dirt. You're stimulating blood flow to the skin surface, distributing natural oils across the coat, and checking for anything abnormal beneath your fingers. Heat in a leg, a swollen joint, a fresh cut, a tick buried in the chest.
All of these are far easier to spot during a daily groom than they are when you're tacking up in a hurry.
Grooming is also a form of communication. Horses are prey animals. They instinctively read touch as either a threat or a comfort signal. When you groom methodically and calmly, you're telling your horse that you're a safe, predictable presence.
Veterinarians and professional trainers widely agree that horses groomed regularly by the same person become easier to handle, less reactive to vet exams, and significantly more trusting under saddle.
The physical benefits are measurable too. Regular brushing removes sweat, dead hair, and debris that can trap bacteria against the skin. That matters because conditions like rain rot and dermatophilosis thrive in dirty, damp coats.
Per the American Association of Equine Practitioners, consistent grooming and skin inspection are foundational to preventing common equine dermatological issues.
There's also a practical angle. A clean horse is easier to tack up. Dirt and grit under a saddle pad causes friction, and friction leads to saddle sores, galls, and behavioral resistance.
Horses that buck or flatten their ears when being saddled are often reacting to an uncomfortable, dirty saddle area rather than being "difficult."
Finally, grooming builds your eye. The more often you handle your horse, the faster you'll notice subtle changes. A slight limp you catch today becomes a lesson in early intervention.
A small lump you find now might save you a major vet bill later.
The Essential Grooming Kit: Tools You Actually Need
You don't need a wall full of expensive equipment to groom a horse properly. You need a handful of well-chosen tools, each serving a specific purpose. Here's exactly what belongs in your basic kit.
| Tool | Primary Purpose | Material Notes |
|---|---|---|
| Curry Comb | Loosens dirt, stimulates oil production, promotes circulation | Rubber or silicone; avoid hard plastic on sensitive horses |
| Dandy Brush | Flicks away loosened dirt and loose hair | Stiff bristles; use with a flicking motion, not scrubbing |
| Body Brush | Final shine, removes fine dust, distributes oils | Soft bristles; use gently over the entire body |
| Mane & Tail Brush | Detangles without breaking hair | Wide-spaced plastic or natural bristles |
| Hoof Pick | Cleans hooves, prevents thrush and abscesses | Metal hook with a sturdy handle; some include a small brush |
| Grooming Cloth | Final polish, wiping eyes and muzzle | Soft cotton or microfiber |
The curry comb is your workhorse tool. It breaks up caked-on mud and loosens dead hair at the roots. Choose a rubber or silicone version with medium firmness. Hard plastic curries with pointed teeth can scratch sensitive skin, especially on Thoroughbreds and other thin-skinned breeds.
The dandy brush comes next. It's stiffer than a body brush, designed to whisk away everything the curry loosened. Use it with short, flicking motions in the direction of hair growth. Never press hard, especially over bony areas like the spine, hips, or ribs.
The body brush is your finishing tool. It's soft, gentle, and works through the coat to bring up natural shine. This is the brush you'll also use on the face and legs, where skin is more sensitive.
The hoof pick is non-negotiable. Every grooming session ends with cleaning all four feet. Skipping this step is how thrush, abscesses, and stone bruises develop.
Beyond the basics, a few optional tools earn their keep:
- Shedding blade: A metal tool with serrated teeth that removes winter coat hair by the handful during spring shedding season. Use it gently over the body, never on the legs or face.
- Mane detangler spray: Helps work through knots without pulling or breaking hair.
- Fly spray: Essential in warmer months, especially for pasture-kept horses.
- Waterless shampoo or grooming wipes: Great for spot-cleaning sensitive areas between full baths.
Keep your tools organized in a grooming tote. Dedicate one set to each horse if you own multiple animals. Disinfect brushes regularly if you share them between horses to prevent spreading skin conditions.

Image source: Bing (Web (fair-use with source credit))
Before You Start: Safety Rules That Could Save You From Injury
Grooming is one of the most dangerous routine activities in horse care. Not because grooming itself is risky, but because it puts you in close physical proximity to a 1,200-pound flight animal. Horses kick, bite, and spook.
The right precautions keep both of you safe.
Tie your horse securely and safely. The standard method is a quick-release knot tied to a sturdy wall ring or post. The knot must be loose enough to pull apart instantly if the horse panics. Use a lead rope with a panic snap, a release clip that breaks under pressure.
Cross-ties are the gold standard for grooming. They keep the horse centered in an aisle and prevent them from swinging around to bite or kick. Each side attaches to a wall or post at chest height, with a breakaway snap or leather strap that releases under extreme pressure. Never tie a horse in cross-ties by their halter alone unless both sides are breakaway rated.

Image source: Bing (Web (fair-use with source credit))
Know where to stand. The danger zone is directly behind the horse. Always groom from the side, staying close to the shoulder where the horse can see you. Never crouch under the neck or between the front legs unless the horse is exceptionally well-trained and you have a clear reason.
Read the body language before you touch. A relaxed horse has soft eyes, a lowered head, and a loose tail. Warning signs include:
- Ears pinned flat back
- Tail swishing aggressively
- A raised hind leg
- Teeth bared
- Tense, stiff posture
If you see any of these, stop grooming and reassess. The horse might be in pain, frightened, or simply not in the mood. Pushing through is how people get hurt.
Use the right halter and lead. A well-fitting leather or nylon halter without worn hardware is essential. Check all buckles and snaps before you tie up.
Wear appropriate footwear. Closed-toe boots with a small heel are standard in barns. They protect your feet if a horse steps on you and prevent your foot from slipping through a stirrup or under a hoof.
Never wrap a lead rope around your hand. A spooked horse can drag you dangerously. Hold the rope in a coil, never a loop around your wrist or fingers.
Groom in a safe, familiar environment. A quiet barn aisle with good lighting is ideal. Avoid grooming in a turnout paddock with other horses, loose dogs, or distractions that could startle your horse.
If you're new to horses, work with an experienced mentor. There's no substitute for hands-on guidance when learning safe horse handling. A few lessons from a professional can prevent years of bad habits and potential injury.
The bottom line on safety: Every rule here exists because someone, somewhere, got hurt ignoring it. Horses aren't malicious, but they are reactive. Your job is to remove as much unpredictable risk as possible before you pick up a brush.
Step-by-Step Grooming Routine: From Neck to Tail
Now that you're properly set up and safely positioned, it's time to groom. The order matters. It's designed to move from loosening dirt to removing it to finishing with shine.
Here's the sequence professional grooms use, and you should too.
Step 1: Start with the Curry Comb
Begin on the neck, just behind the ear, and work in small circular motions down toward the shoulder. Move systematically across the body, covering the chest, sides, back, and hindquarters. Think of the curry as a massage tool, not a scrub brush.
Apply firm but even pressure, adjusting for sensitive areas.
- Over the spine and hips: Use lighter pressure. The bone sits close to the surface.
- Over the belly and flank: Be gentle. The skin is thin and ticklish here.
- On the neck and chest: Apply more pressure. These muscular areas tolerate and benefit from deeper stimulation.
The curry loosens dirt, stimulates oil glands, and brings dead hair to the surface. You'll see it working. The coat will look dustier, and that's exactly what you want.
Step 2: Flick Away Dirt with the Dandy Brush
Switch to the dandy brush and use short, sharp flicking motions in the direction of hair growth. The bristles catch the loosened dirt and flick it away from the coat. Work in the same systematic pattern you used with the curry.
- Flick, don't scrub. Scrubbing sets dirt deeper into the coat and can be uncomfortable.
- Keep the wrist loose. The motion comes from the wrist, not the shoulder.
- Skip bony areas. The hips, spine, and ribs can be sensitive. Use less pressure or skip these spots with the dandy brush entirely.
The dandy brush is also your go-to for removing mud that's dried and caked on. If the mud is wet, let it dry before brushing. Brushing wet mud just pushes it into the coat.
Step 3: Finish with the Body Brush
The soft body brush is your finishing touch. Use it with long, sweeping strokes in the direction of hair growth. This brings up the natural oils, spreads them evenly, and creates that healthy shine everyone's after.
Pay special attention to areas the dandy brush missed:
- The face, using a very soft touch
- The legs, working around the joints
- The belly, where the skin is most sensitive
For the face, you can use the body brush directly, but be cautious around the eyes and nostrils. Many horses enjoy having their face brushed gently. If yours doesn't, use a soft grooming cloth instead.
Step 4: Detangle the Mane and Tail
Approach the mane and tail with patience. Never rip a brush through a knot.
- Work from the bottom up. Start at the tips and gradually work your way to the roots.
- Use your fingers first. Gently separate large tangles with your hands.
- Apply a detangler spray for stubborn knots. Let it sit for a minute before brushing.
For the tail, stand to the side rather than directly behind the horse. Hold the tail near the base to give you control, then brush down through the length.
The mane can be brushed in sections. Some handlers prefer a wide-toothed comb for the mane and a softer brush for the tail. Use what works for your horse's hair type.
Step 5: Clean Sensitive Areas
The eyes, nostrils, and dock area need extra care.
- Eyes: Use a damp, soft cloth to wipe away discharge from the corner of each eye. Use a fresh section of cloth for each eye to prevent spreading infection.
- Nostrils: Gently wipe the outside of each nostril.
- Dock area: Lift the tail and wipe the area beneath it with a damp cloth. This is a sensitive zone for most horses. Go slowly and let them get used to it over time.
Step 6: Apply Finishing Products
If you're using fly spray, apply it now. Spray onto a cloth and wipe on the face rather than spraying directly at the eyes. For the body, spray the product and then use a brush or cloth to distribute it evenly.

Image source: Bing (Web (fair-use with source credit))
A note on order: The full sequence takes about 15 to 20 minutes once you're practiced. If you're short on time, prioritize the curry, dandy, and body brush, then do the feet. Those are non-negotiable.
Skip the mane detangling and finishing products until next time.
Hoof Care 101: Cleaning and Checking Your Horse's Feet
Hoof care is the part of grooming that most directly prevents lameness. Thrush, abscesses, and stone bruises all start in neglected feet. A daily hoof pick routine takes five minutes and can save you thousands in vet bills.
How to Clean a Hoof Properly
Pick up each hoof using the proper technique. Stand facing the rear of the horse, run your hand down the leg, and squeeze the tendon just above the fetlock. The horse should lift its foot.
Support the hoof with your hand and hold it firmly.
Use the hoof pick to remove debris from the sole and grooves. Always work from the heel toward the toe. This direction prevents you from accidentally jabbing the sensitive frog or the heel bulbs.
| Hoof Zone | What to Look For |
|---|---|
| Frog | Soft, pliable, no foul odor, no black discharge |
| Sole | Clean, no dark spots, no embedded stones |
| Heel bulbs | No cracks, no swelling, no tenderness |
| Hoof wall | No cracks, no white line separation, no heat |
Routine cleaning steps:
- Run the hook along the grooves on each side of the frog.
- Scrape the sole from heel to toe.
- Check the frog for thrush, a black, foul-smelling discharge.
- Inspect the hoof wall for cracks or chips.
- Run your hand down the leg to check for heat or swelling.
If you find embedded stones, use the pointed end of the hoof pick to gently work them out. Caution: never pry deeply into the sole. The sensitive structures beneath are easily damaged.
Red Flags You Should Never Ignore
- Foul odor: A strong, rotten smell from the hoof usually signals thrush.
- Black discharge: Along with odor, this is a classic thrush symptom.
- Heat in the hoof: Warmth in the hoof wall or sole can indicate laminitis or an abscess brewing.
- Swelling in the leg: Swelling above the hoof often points to infection or injury.
- A pulse in the digital artery: Detectable at the back of the fetlock, a strong pulse is a serious red flag.
If you notice any of these, call your farrier or veterinarian. The earlier you address hoof issues, the better the outcome.
How Often Should You Clean Hooves?
Pick hooves daily if your horse is stalled. Pasture-kept horses need checks at least every other day. Before and after riding, always do a quick hoof check.
That's non-negotiable.
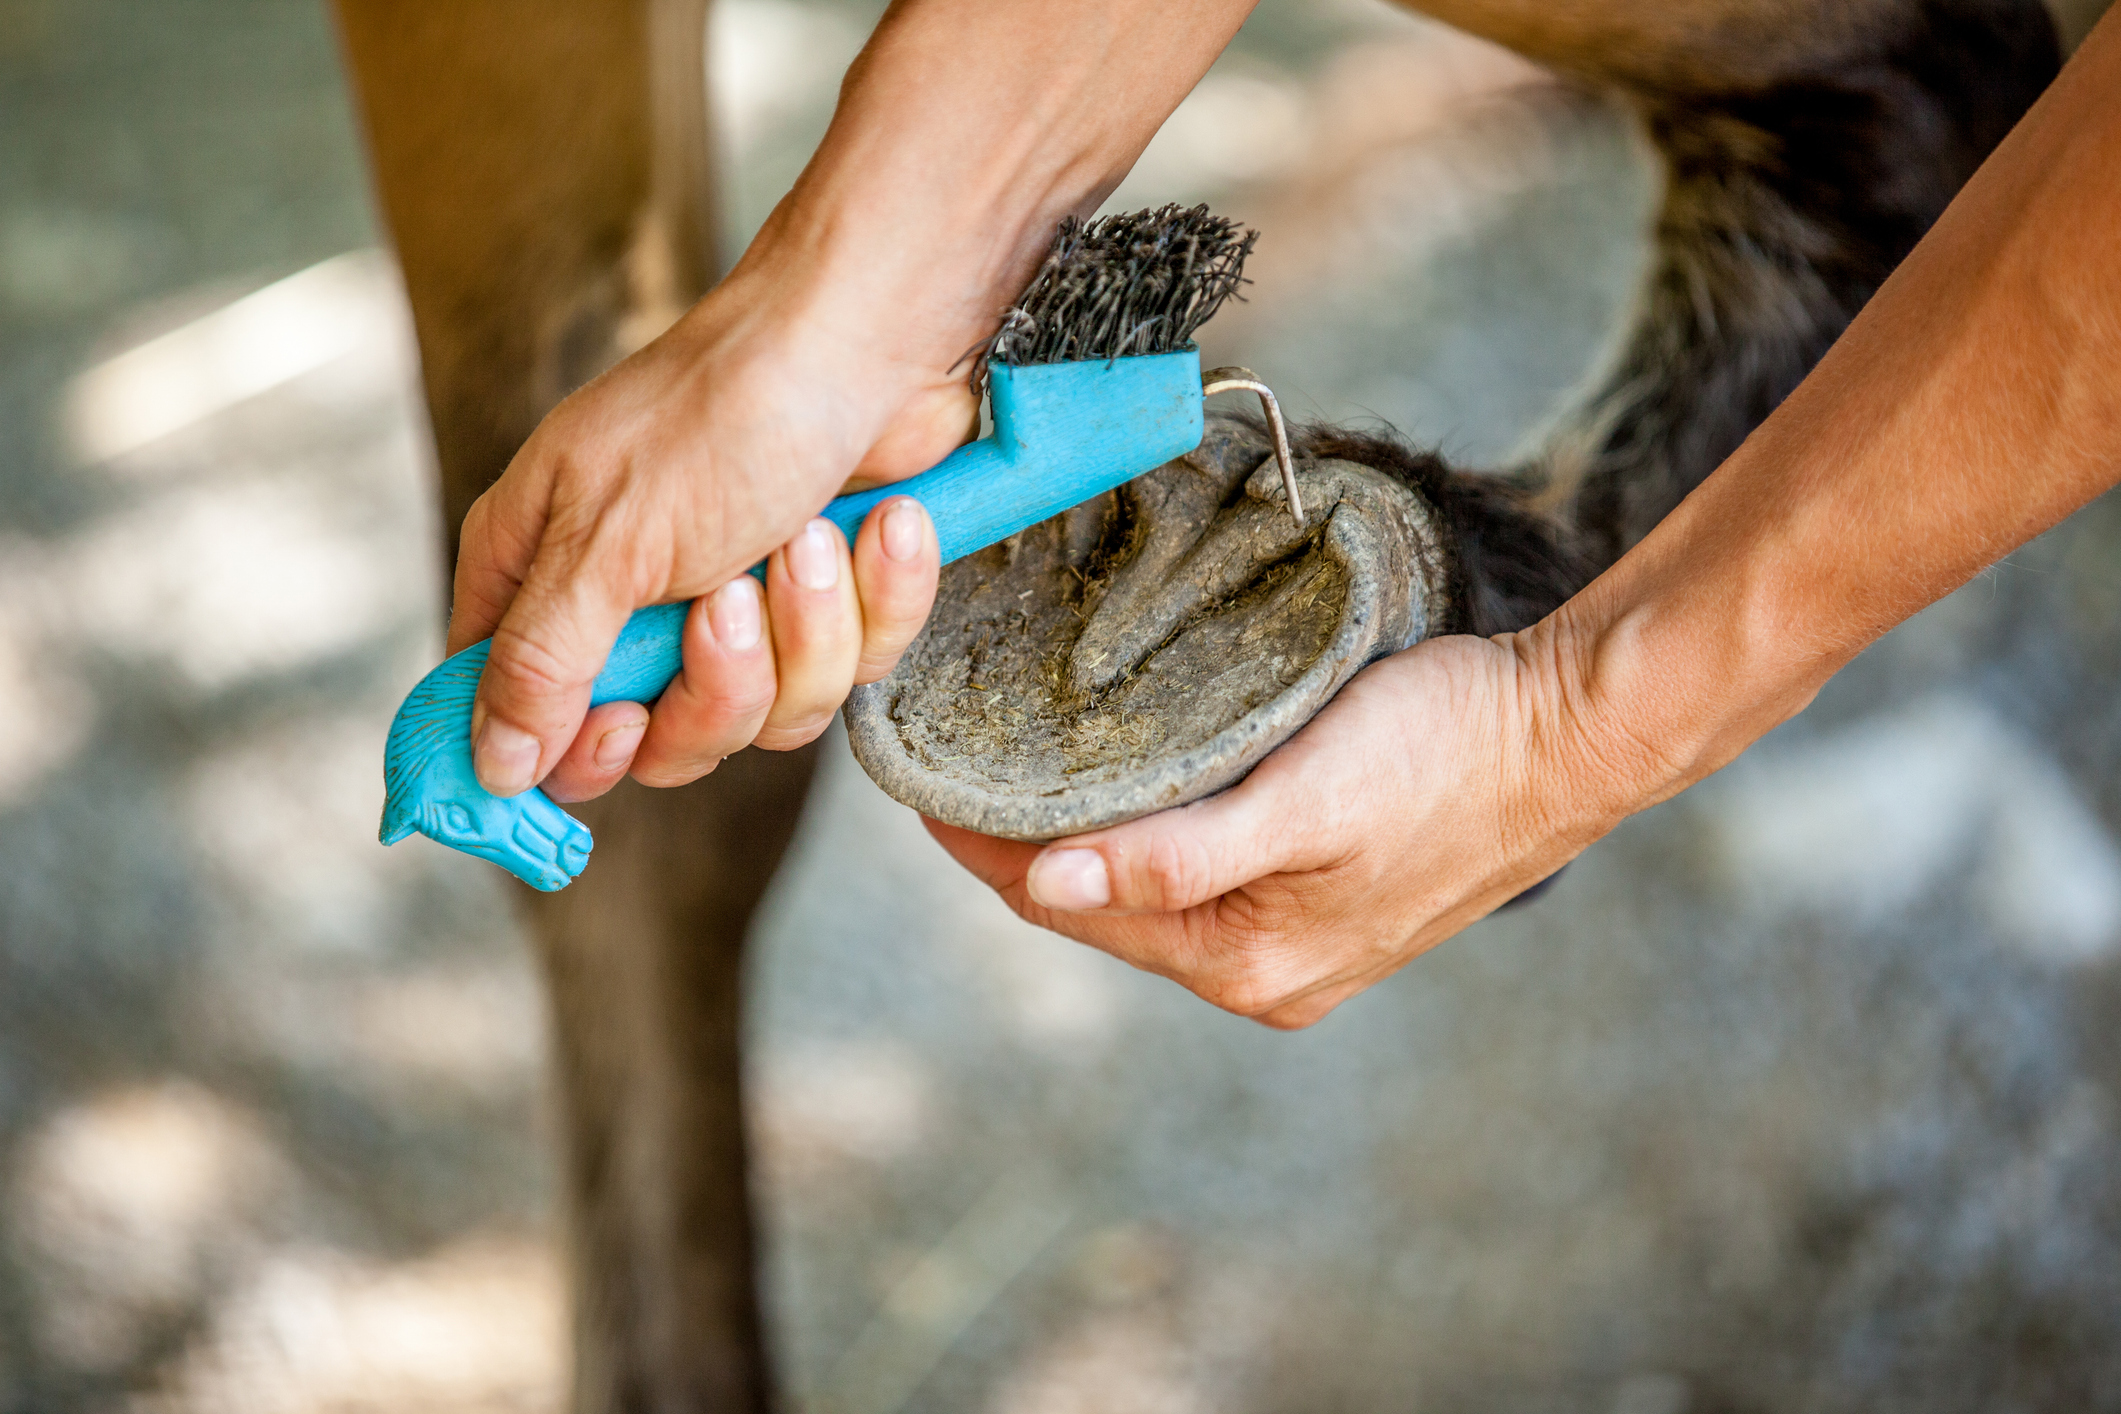
Image source: Bing (Web (fair-use with source credit))
Common Grooming Mistakes That Hurt or Frustrate Your Horse
Everyone makes mistakes when they're learning. The key is knowing what those mistakes are so you can avoid them. Here are the most common ones we see, along with the correct approach.
Using the Wrong Brush on the Wrong Area
The dandy brush is too stiff for the face and belly. The body brush is too soft for removing caked-on mud. Match the tool to the job.
Scrubbing Instead of Flicking
The dandy brush is designed for a flicking motion, not scrubbing. Scrubbing drives dirt deeper into the coat and irritates the skin. It also breaks the bristles over time.
Grooming Over Wounds or Skin Irritations
If you find a cut, scrape, or suspicious bump while grooming, don't brush over it. Brush around it and assess the injury. If it's fresh, clean it with an antiseptic solution.
If it looks infected, call the vet.
Pulling Mane and Tail Tangles
Ripping a brush through a knot is painful. Horses remember that pain and become head-shy or tail-shy over time. Always work from the bottom up with patience and detangler.
Bathing Too Often
Bathing strips the coat of natural oils. Over-bathing leads to dry, brittle hair and flaky skin. As a rule, full baths once every one to two weeks is plenty, and only when the horse is genuinely dirty or sweaty.
Between baths, use waterless shampoo for spot cleaning.
Forgetting the Face
The face is the most sensitive part of the horse. Some owners skip it entirely because their horse resists. That's a mistake.
Gentle, consistent face grooming builds trust and makes vet visits easier.
Skipping the Hooves
Hoof cleaning is the least glamorous part of grooming, which is why it gets skipped. It's also the most important. Never end a grooming session without checking all four feet.
Using Dirty Tools
Brushes accumulate dirt, hair, oil, and bacteria. Clean your tools weekly with warm soapy water. Let them dry fully before the next use.
Sharing brushes between horses without washing them can spread skin infections like ringworm.
Rushing the Process
Grooming isn't a chore to finish quickly. It's a health check and a bonding session. Rushing makes the horse nervous and causes you to miss subtle issues.
Give yourself 20 minutes and enjoy the time with your horse.
Seasonal Grooming Adjustments
Your grooming routine should change with the seasons. Horses' coats, skin, and needs shift dramatically from summer to winter.
Spring: Managing the Shed
Spring is shedding season. The winter coat comes off in clumps, and your horse will look like a fuzzy mess for weeks.
- Use a shedding blade to remove loose hair aggressively.
- Groom more frequently, ideally daily, to keep the hair from matting.
- Expect more dust and hair in the air. Groom outside if possible.
- Check for skin issues hidden under the thick winter coat. As the hair comes off, you may discover rain rot or other conditions.
Summer: Sweat and Flies
Summer grooming focuses on managing sweat and keeping flies at bay.
- Rinse off sweat after intense exercise. Sweat left on the skin causes irritation and attracts flies.
- Use fly spray and reapply it frequently, especially after washing.
- Brush more gently. Summer coats are thin and the skin is more exposed.
- Watch for sunburn on light-skinned areas like the muzzle and around the eyes.
Winter: Preserving Warmth
In cold weather, the coat is your horse's natural insulation. Grooming mistakes can compromise that insulation.
- Don't over-brush. Removing too much dust and natural oil can flatten the coat and reduce its insulating properties.
- Use a curry comb to loosen mud, but skip the aggressive shedding blade.
- Keep the horse dry. If you need to bathe in winter, do it in a heated indoor wash rack and dry thoroughly.
Transitional Seasons: Mud Season
Spring and fall are mud season in most climates. Mud caked on the legs is a fact of life.
- Let mud dry before brushing. Brushing wet mud is pointless and irritating.
- Use a stiff dandy brush on dried mud.
- Check for mud fever (scratches) on the heels and pasterns. It appears as scabs and swelling.
When to Bathe Your Horse (and When Not To)
Bathing is not the same as grooming. A full bath is a heavier intervention, and it's not something you should do every day.
When Bathing Makes Sense
- After a hard workout when the horse is lathered in sweat.
- Before a show when cleanliness matters for presentation.
- When the coat is genuinely filthy and brushing won't cut it.
When to Skip the Bath
- In cold weather unless you can dry the horse completely indoors.
- If the horse has skin irritation or open wounds. Water can worsen some conditions.
- More than once or twice a week. Over-bathing strips oils and causes dryness.
Proper Bathing Technique
| Step | Details |
|---|---|
| Wet the horse thoroughly | Use warm water and a hose with a gentle spray |
| Apply equine shampoo | Use a product designed for horses, not human shampoo |
| Scrub gently | Work the shampoo into a lather with a sponge or curry |
| Rinse completely | Leftover shampoo causes skin irritation |
| Squeegee off excess water | Use a sweat scraper to remove water from the coat |
| Dry thoroughly | Towel dry and allow to finish drying in a warm, sheltered area |
Water temperature matters. Lukewarm water is ideal. Cold water can cause muscle tension and shock, especially in cold weather.
Waterless Options
For spot cleaning between baths, waterless shampoo works well. Spray it on the dirty area, work it in with a cloth, and wipe away. It's perfect for touch-ups on the face, tail, and legs.
Recognizing Health Issues During Grooming
Grooming is your best early-warning system for health problems. Here's what to look for as you work your hands across your horse's body.
Heat and Swelling
Run your hands over the legs, joints, and body. Any area that feels warmer than the surrounding tissue deserves attention. Heat often signals inflammation.
Swelling, whether hard or soft, can indicate an injury or infection.
Cuts and Scrapes
Small cuts are easy to miss under a dirty coat. Every grooming session should include a visual check of the skin. Pay extra attention to the legs, chest, and girth area.
Skin Conditions
| Condition | Appearance | Action |
|---|---|---|
| Rain rot | Crusty scabs, especially along the back and neck | Contact your vet for a treatment plan |
| Ringworm | Circular, hairless patches with flaky skin | Isolate the horse and wash your tools thoroughly |
| Sweet itch | Itchy, sore skin, often on the mane and tail | Talk to your vet about management options |
| Ticks | Small, dark bumps, often in the chest or under the tail | Remove carefully with tweezers or a tick removal tool |
Lumps and Bumps
Any new lump or bump should be assessed. Some are harmless fatty deposits. Others can be abscesses, sarcoids, or other growths.
If a lump is growing, painful, or discharging, call your vet.
Behavioral Changes
If your horse suddenly flinches, pins its ears, or tries to bite during grooming, something might be wrong. Pain is the most common cause. They might have a sore back, an ulcer, or a dental issue.
Don't punish the behavior. Investigate the cause.
Eyes and Nostrils
- Discharge: Clear or slightly cloudy discharge is often normal. Yellow or green discharge is a red flag.
- Swelling: Swollen eyelids or nostrils can indicate an allergic reaction or infection.
- Cloudiness: A cloudy eye is a veterinary emergency.
When to Call the Vet
Grooming is not a substitute for veterinary care. If you find anything concerning, make the call. Early intervention is always cheaper and less stressful than waiting.
Frequently Asked Questions
How long should a full grooming session take?
A thorough grooming session takes 15 to 30 minutes once you're practiced. If you're doing a full bath, add another 20 to 30 minutes. The exact time depends on your horse's coat condition, how dirty they are, and whether you're doing a full health check.
Can I share brushes between horses?
You can, but you shouldn't without cleaning them first. Skin conditions like ringworm and rain rot spread through contaminated tools. Wash brushes in warm soapy water between horses, or better yet, maintain a separate set for each horse.
What do I do if my horse bites or kicks during grooming?
Stop grooming immediately and assess the situation. The horse might be in pain, frightened, or reacting to something in their environment. Work with a professional trainer to address behavioral issues.
Never punish a horse for reacting; it usually makes things worse.
How do I handle a horse that's afraid of grooming?
Start slowly. Introduce each brush while talking calmly. Let the horse sniff the tool first.
Touch briefly, then remove the pressure. Reward calm behavior. Build up duration gradually over multiple sessions.
Patience is the key.
How often should I clean my grooming tools?
Clean brushes weekly with warm, soapy water. Rinse thoroughly and let them dry completely. Hoof picks need minimal cleaning, just remove debris after each use.
Wash grooming cloths and mitts after every few uses.
Is it okay to groom a horse every day?
Yes, daily grooming is ideal for most horses. It maintains coat condition, builds trust, and serves as a daily health check. The only exception is during extreme winter weather when you want to preserve the coat's natural insulation.
Final Safety Reminders
Grooming is a skill. It takes practice, patience, and a willingness to learn from your horse. Keep these final reminders in mind:
- Always tie safely or use breakaway cross-ties
- Stand close to the shoulder, never directly behind
- Watch the body language and respect it
- Use the right tool for the job and the right pressure for the area
- Check hooves at every session
- Call the vet if you find something concerning
- Enjoy the time with your horse
The bond you build through proper grooming will pay dividends in every other aspect of your horse's care. Horses that trust their handler are easier to ride, safer to handle, and happier overall. Start today, stay consistent, and you'll see the difference in your horse's coat, attitude, and overall wellbeing.