
If you've ever watched your horse break into a sweat after ten minutes of light work on a chilly November morning, you already know the problem. That thick winter coat that keeps him warm in the field becomes a liability the moment you start riding. Learning how to remove a horse's winter coat isn't just about looks.
It's about keeping your horse comfortable, healthy, and safe throughout the colder months.
The right approach depends on your horse's workload, living situation, and local climate. As of 2026, clipping techniques have improved with better blade technology and a deeper understanding of equine thermoregulation. But the fundamentals stay the same.
You're helping your horse manage heat when he works, then protecting him from cold when he rests. This guide walks you through every step, from deciding whether to clip at all to caring for your horse after the hair comes off.
Quick Answer
To remove a horse's winter coat, clip it with electric clippers using a #10 or #7 blade. A trace clip removes hair from the neck, chest, and belly, leaving the back covered. A full body clip removes everything.
Clip only a clean, dry horse. Avoid clipping in freezing weather unless you can blanket immediately. Shedding blades work only for spring shedding, not winter clipping.
Why Removing a Winter Coat Isn't Just About Looks
Let's be clear about one thing right away. A horse's winter coat is remarkable engineering. Each hair follicle produces a thicker, longer hair that traps warm air close to the skin, while a fine undercoat adds extra insulation.
Research from equine physiology studies shows that a full winter coat can raise a horse's lower critical temperature, the point where he starts burning energy to stay warm, to somewhere between 30°F and 40°F depending on coat density.
Here's the problem. That same insulation works against you during exercise. A horse generates massive amounts of body heat when he works, and a thick winter coat traps that heat like a down jacket.
His sweat glands kick in, but the moisture gets trapped against the skin under all that hair. A galloping horse in full winter coat can push his core temperature past dangerous levels in a matter of minutes.
That's why clipping exists. By removing part or all of the winter coat, you help your horse shed heat more efficiently during work. He sweats less, cools down faster, and avoids the energy drain that comes from trying to cool a body wrapped in fur.
For horses in regular work through winter, clipping is one of the kindest things you can do.
But here's the flip side. Once you pull that insulation off, your horse loses his natural protection against cold. A clipped horse needs blankets, shelter, and a thoughtful management plan.
So the question isn't just "should I clip?" It's "what kind of clip fits my horse's life?"
Before You Clip: 4 Questions That Determine Everything
You need a decision framework before you touch a pair of clippers. These four questions will tell you whether to clip, what style to use, and when to skip the idea entirely.
Question 1: How Much Does Your Horse Work?
This is the biggest variable. A horse in full, regular work five or six days a week needs a more aggressive clip than a horse that gets hacked out twice a week. Heavy exercise means heavy sweating.
If your horse is working hard enough to sweat through his entire coat, you're looking at a full body clip or a hunter clip at minimum.
An easy keeper that only does light trail riding might barely need a trace clip. Some horses in very light work don't need clipping at all. The key is honestly assessing whether your horse's coat is causing him to overheat during exercise or taking too long to cool down afterward.
Question 2: Where Does Your Horse Live?
Indoor stabled horses need more aggressive clipping because they're already protected from the elements. A horse living out on grass 24/7 needs more coat left on, especially on his back and hindquarters, since those areas bear the brunt of rain, wind, and cold.
Your management plan also matters. Can you blanket a clipped horse effectively? Do you have the budget for a wardrobe of blankets in different weights?
If the answer is no, a lighter clip style is the smarter choice.
Question 3: What's Your Climate Like?
- Wet, mild winters (UK, Ireland, Pacific Northwest): Trace and blanket clips dominate because rain and mud are the main enemies, not deep cold.
- Cold, dry winters (Northern US, Canada, Scandinavia): Full body clips work well for indoor horses, but outdoor horses need more coat coverage.
- Mild winters (Southern US, Australia): Many horses barely need clipping. A light trace clip might be plenty.
Question 4: What's Your Horse's Body Condition?
A horse living off his own body fat has a built-in insulation layer. A poor doer who needs every calorie to stay warm cannot afford to lose his coat. Clipping a skinny horse is asking for trouble.
Your horse's body condition score should be at least a 5 out of 9 before you consider removing his coat. If he's borderline, talk to your vet before clipping. The last thing you want is a horse shivering through January because you took away his warmth too early.
If-Then Decision Branches
- IF your horse works hard, lives in a heated barn, and is in good condition, THEN a full body clip is defensible.
- IF your horse works moderately and lives inside part-time, THEN a blanket clip or hunter clip keeps warmth where he needs it.
- IF your horse works lightly and lives out, THEN a trace clip or no clip at all is the safe choice.
- IF your horse is old, thin, or sick, THEN do not clip. Find other ways to manage sweating, like clipping only the neck and chest or using a lighter workout regimen.
The Clipping Styles: Full Body, Trace, Blanket, Hunter, and Irish
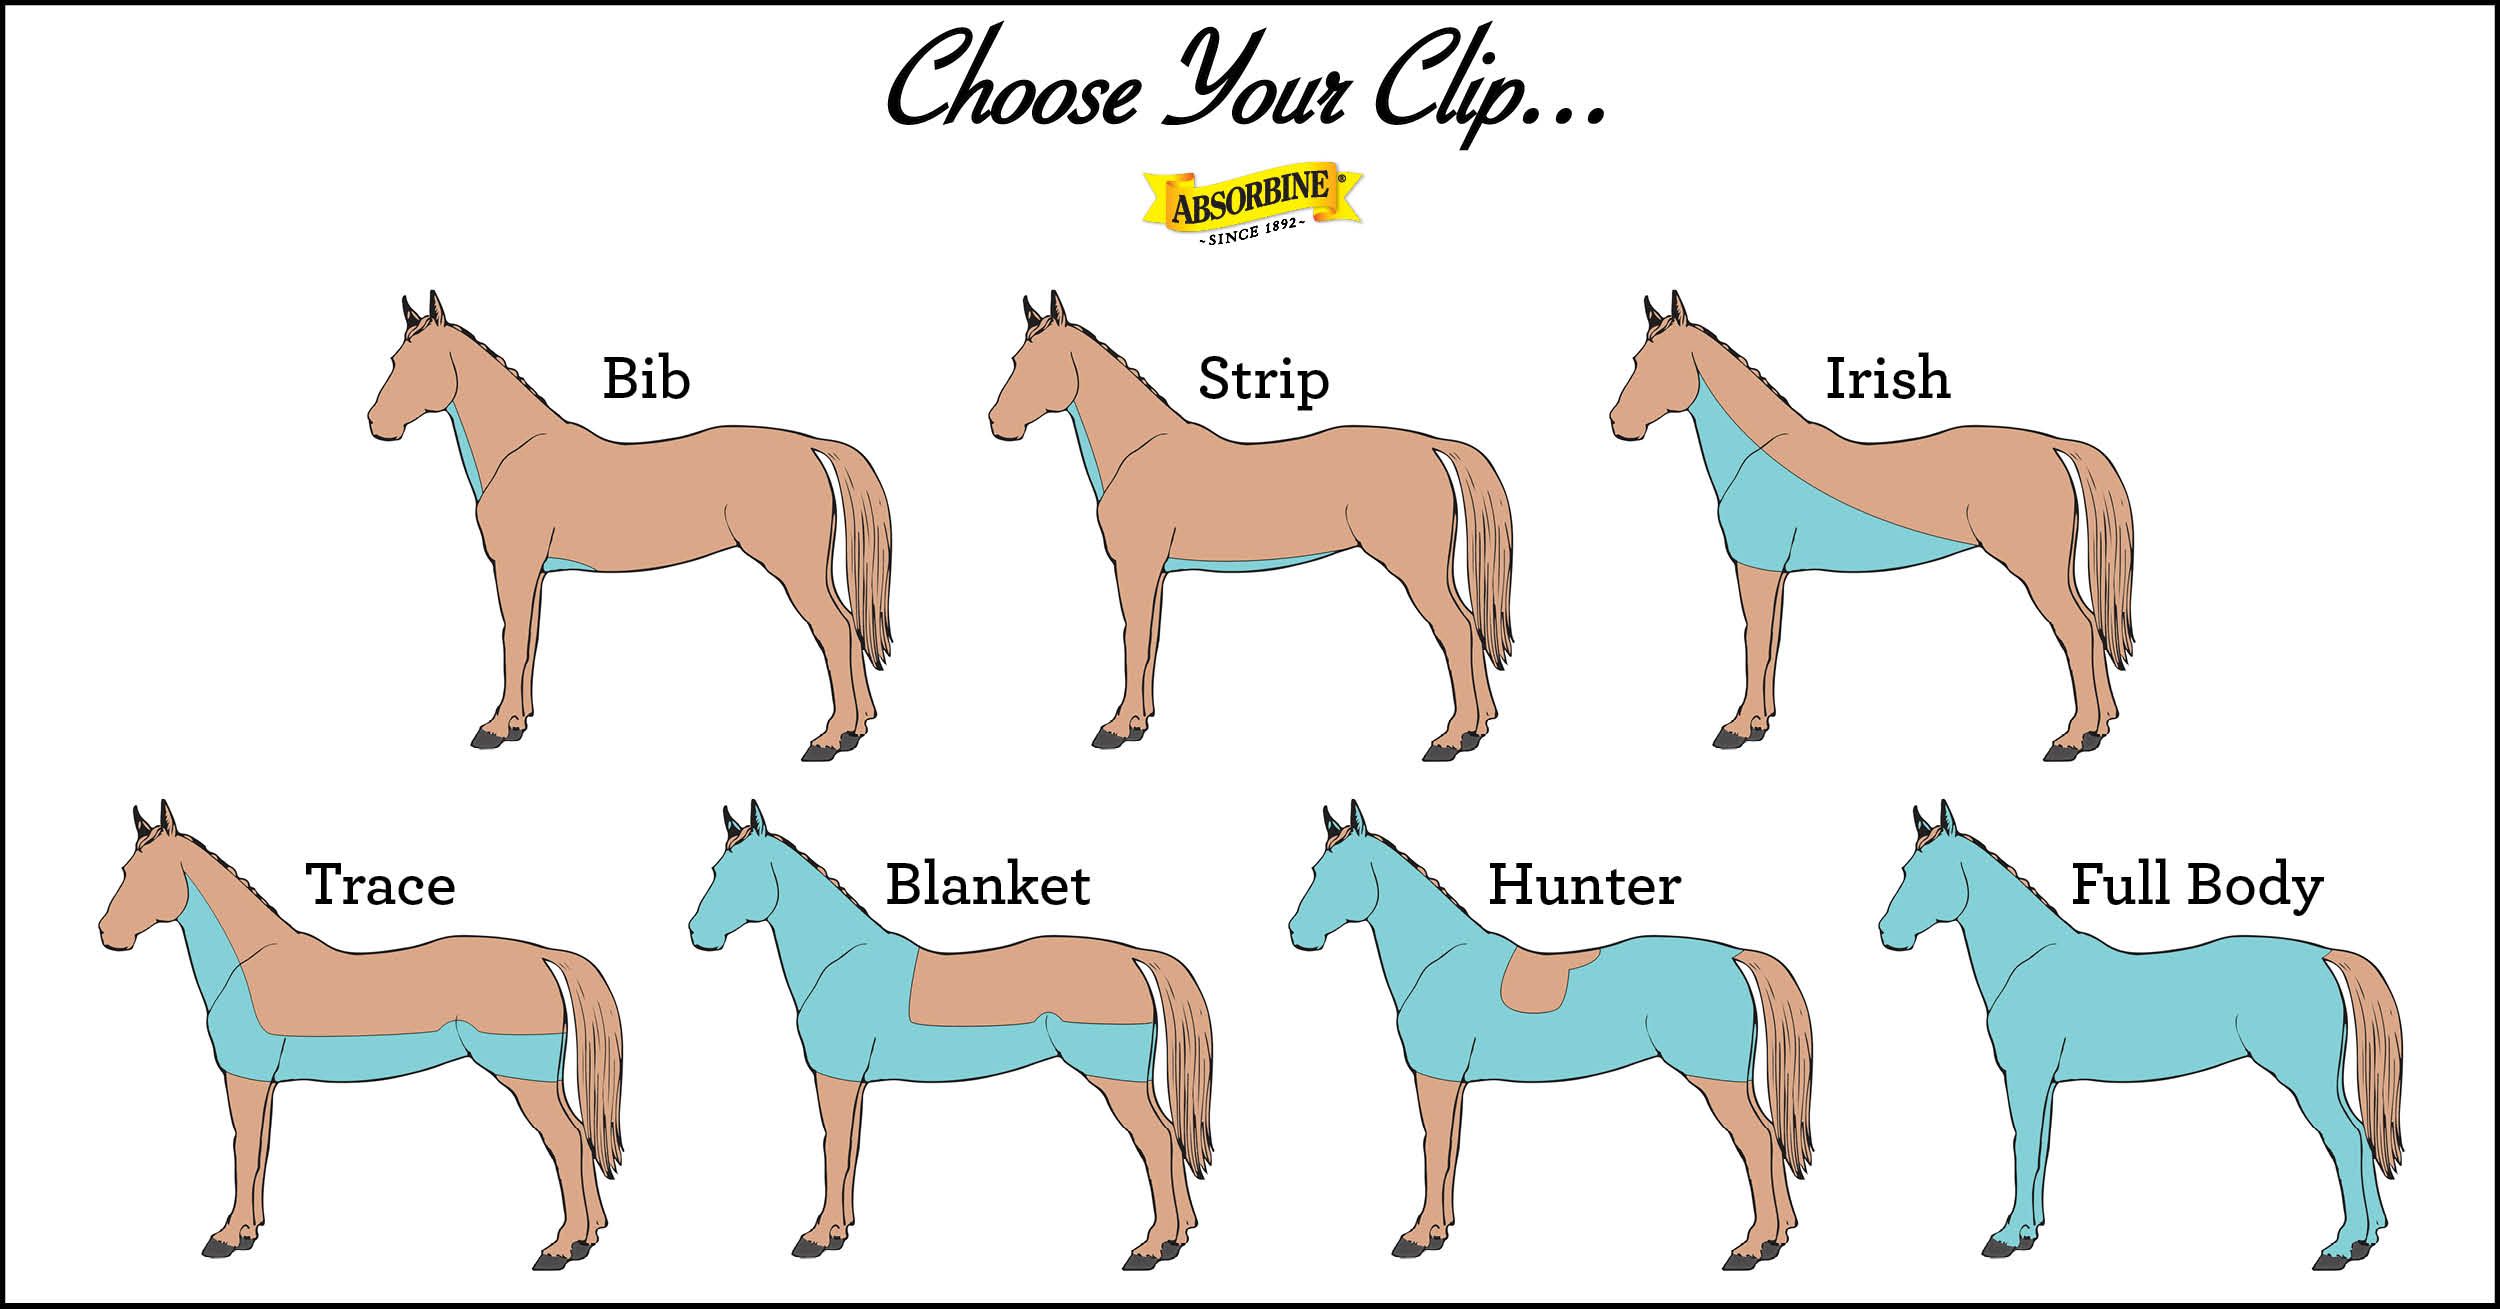
Image source: Bing (Web (fair-use with source credit))
Once you've decided that clipping is right for your horse, you need to pick a pattern. Here's a breakdown of the main styles and who they work best for.
Full Body Clip
The entire coat is removed except for the legs and usually the head. This leaves the horse with no natural insulation anywhere on his body.
Best for: Show horses, hard-working competition horses, and horses that live inside with heavy blanketing. This is the gold standard for making sure a horse cools down fast after intense work.
Watch out for: This horse will need heavy blankets in cold weather. He also loses his protection against flies, sun, and scrapes. That makes it a poor choice for spring or summer clipping.
Trace Clip
Removes hair from the neck, chest, belly, and sometimes the flanks. The back and hindquarters stay covered, keeping the horse warm where it matters most.
Best for: Light to moderate work, horses that live mostly outdoors, and riders who want a balanced compromise. This is the most popular clip for recreational riders.
Variations: A "half trace clip" removes less from the flanks. A "full trace clip" goes higher up the neck and deeper down the sides.
Blanket Clip
Leaves a "blanket" of hair over the saddle area and back. Everything else gets clipped, including the legs sometimes.
Best for: Athletic horses that sweat a lot but still need some back protection under the saddle. The saddle area retains hair, which prevents rubs and keeps the back warm.
Hunter Clip
Removes almost everything, leaving hair only on the legs and a saddle patch. This is essentially a full body clip with built-in protection for the areas most prone to rubbing and mud.
Best for: Horses that jump or work hard enough to sweat heavily but still go out in muddy conditions. The leg hair protects against mud fever and scratches.
Irish Clip
A variation that leaves a larger saddle patch and keeps hair on the legs. Some owners also leave a V-shape of hair over the shoulders.
Best for: Horses that need extra warmth on the back while still shedding heat from the neck and belly. A good compromise for a horse that works a few days a week and lives out.
Clip Style Comparison Table
| Clip Style | Hair Left On | Best For | Sweat Control | Warmth Retention |
|---|---|---|---|---|
| Full Body | Legs, sometimes head | Show horses, hard training | Excellent | Poor, needs blanketing |
| Trace | Back, hindquarters | Light to moderate work | Good | Good |
| Blanket | Saddle area, back | Athletic horses | Very good | Moderate |
| Hunter | Legs, saddle patch | Jumpers, muddy conditions | Very good | Moderate |
| Irish | Larger saddle patch, legs | Compromise situations | Good | Good |
Tools of the Trade: Clippers, Blades, and Prep Supplies
You can't clip a horse with kitchen scissors and hope for the best. The right tools make the difference between a smooth, comfortable experience and a miserable, patchy mess for both of you.
The Clippers
Your two main options are corded and cordless.
- Corded clippers give you constant power and unlimited runtime. They're heavier, but for big clipping jobs they never let you down halfway through a leg.
- Cordless clippers offer freedom of movement and quieter operation. Battery life ranges from 60 to 120 minutes depending on the brand and the load. For a single horse, that's usually enough. For multiple horses, you'll want a spare battery or a corded model.
Look for clippers designed specifically for horses. Small animal clippers will overheat and struggle with thick winter coats. Heavy-duty models with proper air vents can handle hours of continuous work.
The Blades
This is where most beginners go wrong. Blade size determines how much hair stays behind.
- #7 blade: Leaves about 1/4 inch of hair. Good for sensitive horses or horses that need a little insulation left.
- #10 blade: Leaves about 1/8 inch of hair. The most common choice for body clipping. Close enough to look neat, but not so close that the horse gets chilly too quickly.
- #15 blade: Leaves about 1/16 inch of hair. Very close, used mostly for sensitive areas like the face, ears, and around the dock. Can be too close for a winter clip on most horses.
- #30 blade: Leaves almost no hair. Used for surgical prep, not for everyday clipping.
Other Supplies
- Clipper oil: Lubricates the blades and keeps them cool. You'll apply it every 10 to 15 minutes during a clip.
- Blade wash or spray coolant: Cleans the blades and helps prevent overheating.
- A grooming brush and curry comb: You must remove all dirt and loose hair before clipping.
- A sweat scraper: Useful for drying a wet or sweaty horse before you start.
- Cross-ties or a lunge line: For keeping your horse still and safe.
- A bucket of warm water and towels: For cleaning sensitive areas before clipping.
Blade Care Basics
Dull blades are dangerous. They pull hair instead of cutting it, causing pain and skin irritation. They also overheat quickly, which can burn the horse's skin.
Check your blades for sharpness before each use. If they tug or pull, it's time to sharpen or replace them. Most blades need sharpening after two to three full body clips, depending on coat condition.

Step-by-Step: How to Clip a Horse Safely and Cleanly
Now we get to the actual work. Clipping a horse isn't rocket science, but it does require patience, preparation, and a methodical approach. Follow these steps in order and you'll get a clean, even clip without turning your horse into a nervous wreck.
Step 1: Assess the Horse Before You Start
Take a good look at your horse before you even turn on the clippers. Check his body condition score. Confirm he's healthy, eating well, and showing no signs of illness.
A horse that's off his feed, coughing, or running a temperature should not be clipped.
Also check his coat condition. A clean, dry coat clips beautifully. A dirty, greasy coat will dull your blades in minutes and leave a patchy result.
If your horse has been rolling in mud, you need to wash him first.
Step 2: Wash and Dry Thoroughly
A bath before clipping is non-negotiable for most horses. Use warm water and a mild horse shampoo to remove dirt, sweat, and natural oils. These oils and debris clog blade teeth and cause overheating.
Rinse thoroughly. Soap residue left on the skin will irritate the horse and cause the blades to drag. After rinsing, use a sweat scraper to remove excess water, then towel dry or use a cooler to finish the job.
Here's the critical part. Your horse must be completely dry before you clip. Even slightly damp hair will clog the blades, cause uneven cuts, and increase the risk of skin irritation.
A damp horse also risks getting chilled during the clipping process. Wait until he's fully dry, even if that means clipping the next day.
Step 3: Tie the Horse Safely
Use cross-ties in a well-lit, quiet area. Make sure there's enough room for the horse to move his head but not so much that he can swing around and kick. If your horse is nervous about clippers, a lunge line looped through a ring can give you more control.
Some horses settle better when they're tied with a quick-release knot. Always have a pair of scissors or a knife within reach in case the horse panics and you need to release him fast.
Step 4: Prepare the Clippers
Clean and oil your blades before you start. Check that they're sharp enough to cut through the coat without pulling. Test the clippers on your own forearm first.
The blades should feel cool to the touch after a minute of running. If they heat up quickly, you may need to adjust the tension or swap for a different blade.
Plug in corded clippers and make sure the cord is out of the way. For cordless models, confirm the battery is at 100%. There's nothing worse than running out of power halfway down a horse's shoulder.
Step 5: Start with the Body
Begin clipping on the shoulder or the neck, whichever your horse tolerates better. Move the clippers steadily against the grain of the hair for the closest cut. With the grain gives a smoother look but leaves slightly more hair.
Keep the clippers flat against the skin. Tipping the blades at an angle creates lines and ridges in the coat. Overlap each stroke by about half an inch to avoid missing patches.
Let the clippers do the work. Pressing down harder doesn't get a closer cut. It just irritates the skin and slows you down.
A light, even pressure gives the best results.
Step 6: Work in a Logical Pattern
Don't jump around the horse's body. Work in a consistent, methodical pattern. Start at the neck, move to the shoulder, then the chest, and work your way down the sides.
Leave the sensitive areas like the belly and legs until the end when both you and the horse are more comfortable with the process.
For a full body clip, clip the back last. The back is tricky because you're reaching over the horse, and the blades can dig in if the horse moves suddenly. Take it slow and watch for signs of tension.
Step 7: Handle Sensitive Areas with Care
The head, ears, legs, and belly are the hardest places to clip. These areas have thin skin and sensitive nerve endings. Use a quieter blade if you have one, or switch to a smaller trimmer.
- Face and ears: Clip against the grain using short, gentle strokes. Keep your hand steady and support the horse's head with your other hand.
- Legs: Clip downward with the hair growth to avoid irritating the skin. Be careful around the fetlocks and pasterns.
- Belly: This area is ticklish on most horses. Approach it slowly from the side and stop if the horse starts to cow-kick or tense up.

Step 8: Monitor Blade Temperature Constantly
Dull or hot blades are the number one cause of clipper burns and skin irritation. Stop every 10 to 15 minutes and touch the blade to your own cheek or neck. If it feels more than just warm, it's too hot for the horse.
Spray the blades with coolant, allow them to cool, and apply a fresh drop of oil. Rotating between two sets of blades can help, since one set cools while the other is in use.
Step 9: Finish and Inspect
Once the clip is done, brush off any loose hair from the horse's coat. Run your hands over the entire clipped area to feel for rough spots, missed patches, or skin irritation. Check especially around the elbows, girth area, and under the jaw.
Apply a mild antiseptic or soothing cream to any nicks or scratches you find. These are common on sensitive areas even with careful handling.
Step 10: Clean Up Your Equipment
Proper equipment care extends the life of your clippers and blades. Remove the blades and brush out hair from between the teeth. Clean them with blade wash, dry them thoroughly, and apply a light coat of oil before storing.
Wipe down the clipper body and check the air vents for hair buildup. Store everything in a dry place where the clippers won't get knocked around.
The Common Mistakes That Ruin a Clip (and Sometimes a Horse)
Everyone makes mistakes when they first start clipping. Some are cosmetic and fixable. Others can cause real harm or turn your horse off clippers for life.
Here are the ones we see most often.
Clipping a Dirty Horse
This is the number one mistake. A dirty coat is full of grit and oils that dull blades almost instantly. You'll end up with a patchy clip, overheated clippers, and a horse that's getting more irritated by the minute.
Always wash and dry your horse before clipping.
Clipping in Poor Light
You need to see what you're doing. Poor lighting hides missed patches, shadow lines, and skin irritation. Clip in a well-lit area or use a headlamp to illuminate the work.
This also keeps you safe by helping you see exactly where the blades are relative to delicate structures.
Using Blunt or Incorrect Blades
A blunt blade pulls and tugs, causing the horse pain and leading to clipper shame. It's also dangerous for you, since a blade that catches on hair can drag the skin and cause cuts. Check blade sharpness before every clip and replace blades that feel dull.
Also make sure you're using the right blade for the job. A #30 blade on a winter coat will clog instantly. A #10 is the sweet spot for most body clipping.
Pulling or Stretching the Skin Too Hard
Some tension helps keep the skin flat and gives a smoother clip. Over-stretching causes discomfort and can change the angle of the skin, leading to nicks and cuts. Use gentle tension, especially around the flank, groin, and neck.
Clipping Over Irritated or Damaged Skin
If your horse has skin issues like rain scald, mud fever, or any kind of dermatitis, don't clip over those areas. Clipping removes the protective barrier of hair and exposes irritated skin to further damage. Let the skin heal first and clip around the problem area.
Clipping When the Horse Is Cold
If your horse is shivering, he's cold. Clipping will only make things worse by removing his insulation. Wait for a warmer day, or at least make sure he's had a workout that warmed him up thoroughly before you start.
Forgetting to Blanket Afterward
This sounds obvious, but it's surprisingly easy to forget. You spend hours clipping, put the horse away, and realize you haven't arranged for a blanket. That's a recipe for a chilled horse, especially if the temperature drops overnight.
Always have the right blanket ready before you start clipping. Match the blanket weight to the temperature and clip style.
Rushing the Sensitive Areas
The head, legs, and belly are where horses get nervous. Rushing these areas creates anxiety, resistance, and potential injury. Go slow, use a quiet blade, and stop if the horse is getting too upset.
You can always finish the job another day.
After the Clip: Blanketing, Skin Care, and Recovery
The moment the hair hits the floor, your horse's needs change completely. What you do in the next 24 to 48 hours affects his comfort, his skin health, and how well the coat grows back.
Immediate Aftercare
Once the clip is finished, brush away loose hair and check for any skin nicks or cuts. Apply a mild antiseptic or a soothing cream to any raw areas. These are common around the elbows, chest, and girth area.
Monitor the skin over the next few hours for signs of irritation. Redness, raised welts, or excessive itching could indicate a reaction to the clipper blades, a dirty coat, or a dull blade burn.
Blanketing Strategy
Your clipping job changes your horse's thermal insulation. He now relies on you to keep him warm. Start with a stable rug or blanket that matches the weather.
- Temperature above 50°F: No blanket needed in most cases, provided the horse is dry.
- Temperature 40°F to 50°F: Light sheet or medium-weight blanket.
- Temperature 30°F to 40°F: Medium to heavy blanket, depending on whether the horse is inside or out.
- Below 30°F: Heavy blanket with a liner or neck cover, especially for full body clips.
A good rule of thumb is to add one blanket weight for every 10°F drop below 50°F, beyond what you'd give an unclipped horse. Monitor your horse's behavior. If he's shivering, he needs more.
If he's sweating, he needs less.
Skin Health in the Days After
Clipped skin is exposed to the elements and to friction from rugs, saddles, and grooming. Watch for signs of rubs, especially where the blanket sits across the withers. Check daily for any hot spots, swelling, or discharge.
You may also notice your horse rubbing or rolling more than usual after a clip. This is normal as the skin adjusts to being exposed. Increase grooming to stimulate circulation and keep the skin clean.
Nutrition and Coat Regrowth
The coat that grows back needs nutrients and daylight cues. A balanced diet with adequate protein, biotin, and omega-3 fatty acids supports healthy hair regrowth. Most horses on good forage and a supplemented diet will grow back a decent coat within four to six weeks.
Some owners choose not to re-clip, letting the coat grow back naturally for the rest of winter. Others clip again if the regrowth becomes too heavy for the horse's workload.
When NOT to Clip: Risks, Red Flags, and Vet-Worthy Situations
Clipping is a management tool, not a requirement. There are times when the smartest decision is to put the clippers away and manage your horse differently.
Sick or Recovering Horses
A horse fighting a respiratory infection, a fever, or any systemic illness should not be clipped. His immune system is already under stress. Removing his natural insulation makes him more vulnerable to chill and secondary infection.
Wait until your horse has been fully recovered for at least a week before considering any clip.
Underweight Horses
Body condition score matters. A horse with a score below 5 out of 9 is already using calories to stay warm. Removing his coat forces him to burn even more energy, potentially leading to weight loss and a weakened condition.
Address the weight issue first. Work with your vet or nutritionist to improve body condition before you even think about clipping.
Active Skin Conditions
Clip with extreme caution if your horse has any active skin condition. Rain scald, mud fever, ringworm, and other dermatological issues are exacerbated by clipping. The blades can spread infection, and the exposed skin becomes more vulnerable.
If you must clip for health reasons, do it under veterinary guidance. Otherwise, wait until the skin has completely healed.
Extreme Cold Weather
If daytime temperatures are consistently below freezing, clipping is risky for any horse, regardless of his workload. The horse will need a very heavy blanketing strategy to compensate. If you're not set up for that, skip clipping until conditions moderate.
Older Horses
Senior horses often have a harder time regulating their body temperature. They've lost muscle mass and may have underlying health issues. The metabolic cost of staying warm is higher for them.
For harder-keeping older horses, a light trace clip may be all they can handle. Full body clips are usually too much.
When to Call the Veterinarian
Contact your vet if you notice:
- Bleeding or deep cuts from clipping
- Signs of infection like swelling, heat, or discharge
- Unusual behavior like colic, fever, or loss of appetite after clipping
- Skin reactions that worsen instead of improving with time
Most horses tolerate clipping well. Those that don't are telling you something, and it's worth listening.
Spring Coat Shedding vs. Winter Clipping: Two Different Games
This is where a lot of horse owners get confused. As daylight increases in spring, your horse naturally sheds his winter coat. That's a completely different process from winter clipping.
The Natural Shedding Process
Hair growth in horses is regulated by photoperiod, or the length of daylight. As days lengthen in late winter and early spring, the body releases hormones that trigger the old coat to loosen and fall out.
Spring shedding typically begins in late March or April, depending on your latitude. It can take several weeks to complete, with the heaviest shedding happening on the neck, flanks, and shoulders first.
During this time, the coat comes out in clumps and tufts. Your horse looks rough, dull, and generally disheveled. This is normal.
How to Manage Spring Shedding
The best tools for this job are a shedding blade, curry comb, or shedding mitt. These tools pull out loose hairs without cutting them. Use them in circular motions all over the body, especially over the thickest areas.
A good grooming routine can speed up the shedding process. Aggregate reports from equestrian sources suggest a daily 15-minute grooming session reduces shedding time by two to three weeks. It also distributes natural oils through the new summer coat, giving it a healthy shine.
Why You Shouldn't Clip a Spring Coat
Clipping a spring coat is asking for trouble. Cutting off the new, shorter summer hairs that are coming in underneath will leave your horse patchy, sunburned, and itchy. It also ruins the natural coat quality for the rest of the season.
The exception is for show horses that need a clean appearance for spring competitions. Even then, a careful, minimal clip is better than a full body clip that removes actively growing hair.
When Shedding Blades Are the Right Choice
Spring is the time to use a shedding blade. Unlike winter clipping, this isn't about thermoregulation. It's about helping your horse shed dead hair efficiently and keeping his skin healthy.
Use a shedding blade when:
- The coat is visibly "lifting" or coming loose
- You can pull out tufts of hair with your hands
- The weather is warming and your horse no longer relies on his winter coat
Winter Clipping Is a Management Decision
Winter clipping is an intervention. You're actively removing hair to manage heat and sweat during exercise. Spring shedding is a natural process you simply support.
Mixing the two up leads to mistakes. Clipping in spring can actually delay cooling, since the shorter summer coat doesn't provide the same insulation or heat dissipation as a full, healthy winter coat. Wait for the natural shed cycle to do its work, and use your clippers only when the winter coat is at its peak.

Real Scenarios: What Riders Actually Choose (and Why)
Sometimes the best way to understand clipping is to look at real situations. These three scenarios represent the most common combinations of horse, workload, and living arrangements. See which one sounds like you.
Scenario 1: The Weekend Trail Rider
The horse: A 12-year-old Quarter Horse gelding, good condition, lives out on 10 acres with a run-in shed.
The work: Trail rides on Saturdays and Sundays, about two hours each, mostly walk and trot with a few hills. He's not a heavy sweater, but by the time they get back to the trailer, he's damp under the saddle and on his neck.
The decision: A trace clip. This removes hair from the neck, chest, and belly where the sweat gathers, while leaving the back and hindquarters covered for warmth and weather protection.
The blanketing: After a clip, this horse gets a medium-weight blanket when the temperature drops below 40°F. On warmer days, he stays naked and relies on his run-in shed.
Why it works: The trace clip keeps the horse from overheating during weekend rides without stripping his protection for the other five days he lives outside. It's the perfect balance for light to moderate work.
Scenario 2: The Competitive Eventer
The horse: A 9-year-old Thoroughbred cross, thin-skinned, moderate condition, stabled at night with daily turnout.
The work: Eventing at the lower levels, which means dressage, show jumping, and cross-country on the same weekend. This horse sweats hard, especially during cross-country. He needs to cool down quickly between phases to perform at his best.
The decision: A full body clip. This removes all body hair except his legs and head. During competition, he cools down fast and doesn't carry excess heat into the next phase.
The blanketing: This horse has a full wardrobe of blankets. He wears a heavyweight stable rug in winter, a medium-weight during the day, and a waterproof turnout if it rains. His legs retain hair, so he avoids mud fever and scratches in the field.
Why it works: A full body clip is the only way to manage the heat load of a hard-working competition horse. The extra blanketing effort is worth it for the performance benefits.
Scenario 3: The Easy-Keeping Pony
The horse: A 14.2hh Welsh Cob pony, overweight if anything, living out 24/7 on sparse pasture with a field shelter.
The work: Light hacking twice a week, mostly walking with short bursts of trotting. The pony genuinely struggles to stay cool in the summer, but in winter he barely breaks a sweat.
The decision: No clip. This pony works so lightly that his winter coat never causes him to overheat. Instead, his owner manages his weight through diet and daily hand-walking.
The blanketing: None. The pony keeps his full coat and relies on his natural insulation plus the field shelter for protection.
Why it works: Clipping would remove protection this pony doesn't need to lose. He's warm, comfortable, and his coat does its job. Forcing a clip on a light-work horse is unnecessary stress.
Which Scenario Are You?
The common thread in all three is honest assessment. Each owner looked at their horse's actual workload, living situation, and body condition, then chose a clip style that matched.
Most horses fall somewhere between Scenario 1 and Scenario 2. If you're doing more than weekend hacking but less than full eventing, a hunter clip or blanket clip might be your sweet spot. The key is to start conservative.
You can always clip more hair off later, but you can't put it back.
FAQs: Quick Answers on Timing, Repeat Clips, and Blade Care
How long does a winter coat clip last?
A clip lasts roughly four to six weeks. The regrowth rate depends on the individual horse, his breed, genetics, and the amount of daylight. In deep winter, hair grows more slowly.
By late winter and early spring, as daylight increases, regrowth picks up speed.
When is it too late to clip a winter coat?
Generally, you shouldn't clip after early spring, once the natural shedding process has begun. Clipping during active shedding cuts off the new summer hair coming in underneath, leaving a patchy, sunburned mess. If your horse is already losing hair naturally, skip the clippers entirely.
Can you clip a horse twice in one winter?
Yes, absolutely. Many competition horses need a second clip in late January or February to maintain their clipped look and cooling benefits. Just check the coat regrowth.
If there's enough hair to interfere with cooling or sweat management, a second clip is reasonable.
How do I know when my clipper blades need replacing?
If your blades are pulling, tugging, leaving lines, or running hot despite proper oiling, they need attention. Dull blades also make a higher-pitched noise and vibrate more. Most blades last two to three full body clips before needing sharpening, though thick, dirty coats wear them faster.
How do I clean and store clipper blades?
After each use, remove the blades and brush away all hair between the teeth. Clean them with a blade wash or a safe solvent, dry thoroughly, then apply a thin layer of oil. Store blades in a dry place to prevent rust.
Never store them with hair still packed in the teeth.
What's the best blade for a horse with sensitive skin?
A #15 blade leaves less hair and requires more passes, which can irritate sensitive skin. A better choice is a #10 blade used with light pressure and frequent cooling. You can also try a "skip-tooth" blade, which has wider teeth and causes less friction.
The Bottom Line: Clip for the Horse, Not the Calendar
Here's the thing about clipping a horse's winter coat. There's no single right answer, no magic date, and no universal pattern that works for every horse. The right choice depends on your horse's workload, his living arrangements, his body condition, and your local climate.
What we do know is this. A horse that overheats during work is at risk for dehydration, heat stress, and even tying up. A horse that's clipped and left unprotected is at risk for chilling, respiratory infections, and a host of other problems.
The middle ground requires attention, planning, and honesty about your horse's needs.
Start with these questions before you pick up the clippers.
- How hard does my horse work?
- Where does he live?
- What's his body condition?
- What's the weather doing?
- Can I manage blanketing after the clip?
Your answers will guide you to the right pattern. Whether that's a full body clip for a performance horse or a simple trace clip for a weekend trail partner, you'll make a decision based on your horse's actual needs.
And remember, clipping is a reversible management tool. If you clip too much, you can add blankets. If you clip too little, you can clip again in a few weeks.
The goal is always the same: keeping your horse comfortable, healthy, and working well through the cold months.
A Final Checklist for Every Clip
- Check body condition score (5 or higher before clipping)
- Assess workload honestly
- Decide on clip style based on work, living situation, and climate
- Wash and thoroughly dry the horse
- Check blades for sharpness and oil them properly
- Tie safely or use a lunge line for control
- Test clippers on your own arm for heat and vibration
- Clip in a logical pattern, working slowly
- Monitor blade temperature every 10 to 15 minutes
- Handle sensitive areas last and with a quieter blade
- Inspect skin for nicks, cuts, or irritation after finishing
- Apply antiseptic to any raw spots
- Have the correct blanket ready before the clip begins
- Monitor the horse for the next 48 hours for skin reactions
- Clean and oil blades before storing
That's the complete picture, from the first decision to the final cleanup. Clipping a winter coat might feel like a big task the first time, but it's a skill you'll build quickly. Your horse will thank you the first time you finish a ride and he's not dripping sweat and breathing hard just trying to cool down.
If you're ever unsure, lean on your veterinarian or an experienced equine professional. They've seen every coat type, every clip pattern, and every sizing mistake you can imagine. A quick consultation is cheap insurance compared to a botched clip and an uncomfortable horse.