
You notice it one evening while your cat is curled up on your lap. You go to scratch behind their ear, and there it is. Black stuff in cat ears.
Dark, crumbly, and definitely not normal. Your mind starts racing. Is it dirt?
Ear mites? An infection? Should you call the vet tonight or can this wait until morning?
Here's the honest truth: that dark debris is almost always a sign that something is irritating your cat's ear canal. It could be as simple as excess wax, or it could point to ear mites or a bacterial or yeast infection. As of 2026, veterinary research indicates that ear mites alone account for roughly 50% of all feline ear conditions presented in clinical practice.
The good news? Most causes are highly treatable once you know what you're dealing with. Let's walk through what you're seeing, what it means, and exactly what to do next.
Quick Answer
Black stuff in cat ears is usually dried blood, wax, and mite feces. Ear mites are the most common culprit. Yeast and bacterial infections also cause dark discharge.
Clean ears gently, but see a vet for an accurate diagnosis. Over-the-counter treatments often fail because they target the wrong cause.
Why That Dark Debris in Your Cat's Ear Needs a Closer Look
The color alone won't tell you everything. That's the first thing to understand. Black or dark brown debris in a cat's ear is a symptom, not a disease.
It's the end result of inflammation, excess wax production, or tiny parasites leaving behind their droppings.
Think of it like a smoke alarm. The alarm going off doesn't tell you where the fire is. It just tells you something is wrong.
The same logic applies here. The black gunk is the alarm. The underlying cause is the fire.
The Difference Between a Quick Fix and a Vet Visit
Here's where many cat owners go wrong. They see the dark debris, assume it's ear mites, and grab an over-the-counter treatment from the pet store. Two weeks later, the problem is still there.
Or worse, it's gotten worse.
Why? Because not all dark ear debris is ear mites.
- Ear mites produce dry, crumbly, coffee-ground-like material.
- Yeast infections create thick, dark, waxy buildup that smells sweet or musty.
- Bacterial infections can produce pus-like discharge that darkens as it dries.
- Excess wax alone can turn dark brown when exposed to air and oxidized.
The only way to know which one you're dealing with is a microscopic examination. That requires a vet visit. A quick cytology test involves swabbing the ear, staining the sample, and looking under a microscope.
It takes minutes and costs very little compared to repeated failed treatments at home.
If you're seeing black stuff, the safest move is to schedule a vet appointment. Most ear conditions won't resolve on their own. Delaying treatment means more discomfort for your cat and potentially a more complicated recovery.
Image source: Bing (Web (fair-use with source credit))
What Is That Black Stuff? Breaking Down the Usual Suspects
Let's get specific about what you might be seeing. Each culprit has a slightly different look, smell, and texture. Learning to tell them apart helps you describe the problem accurately to your vet.
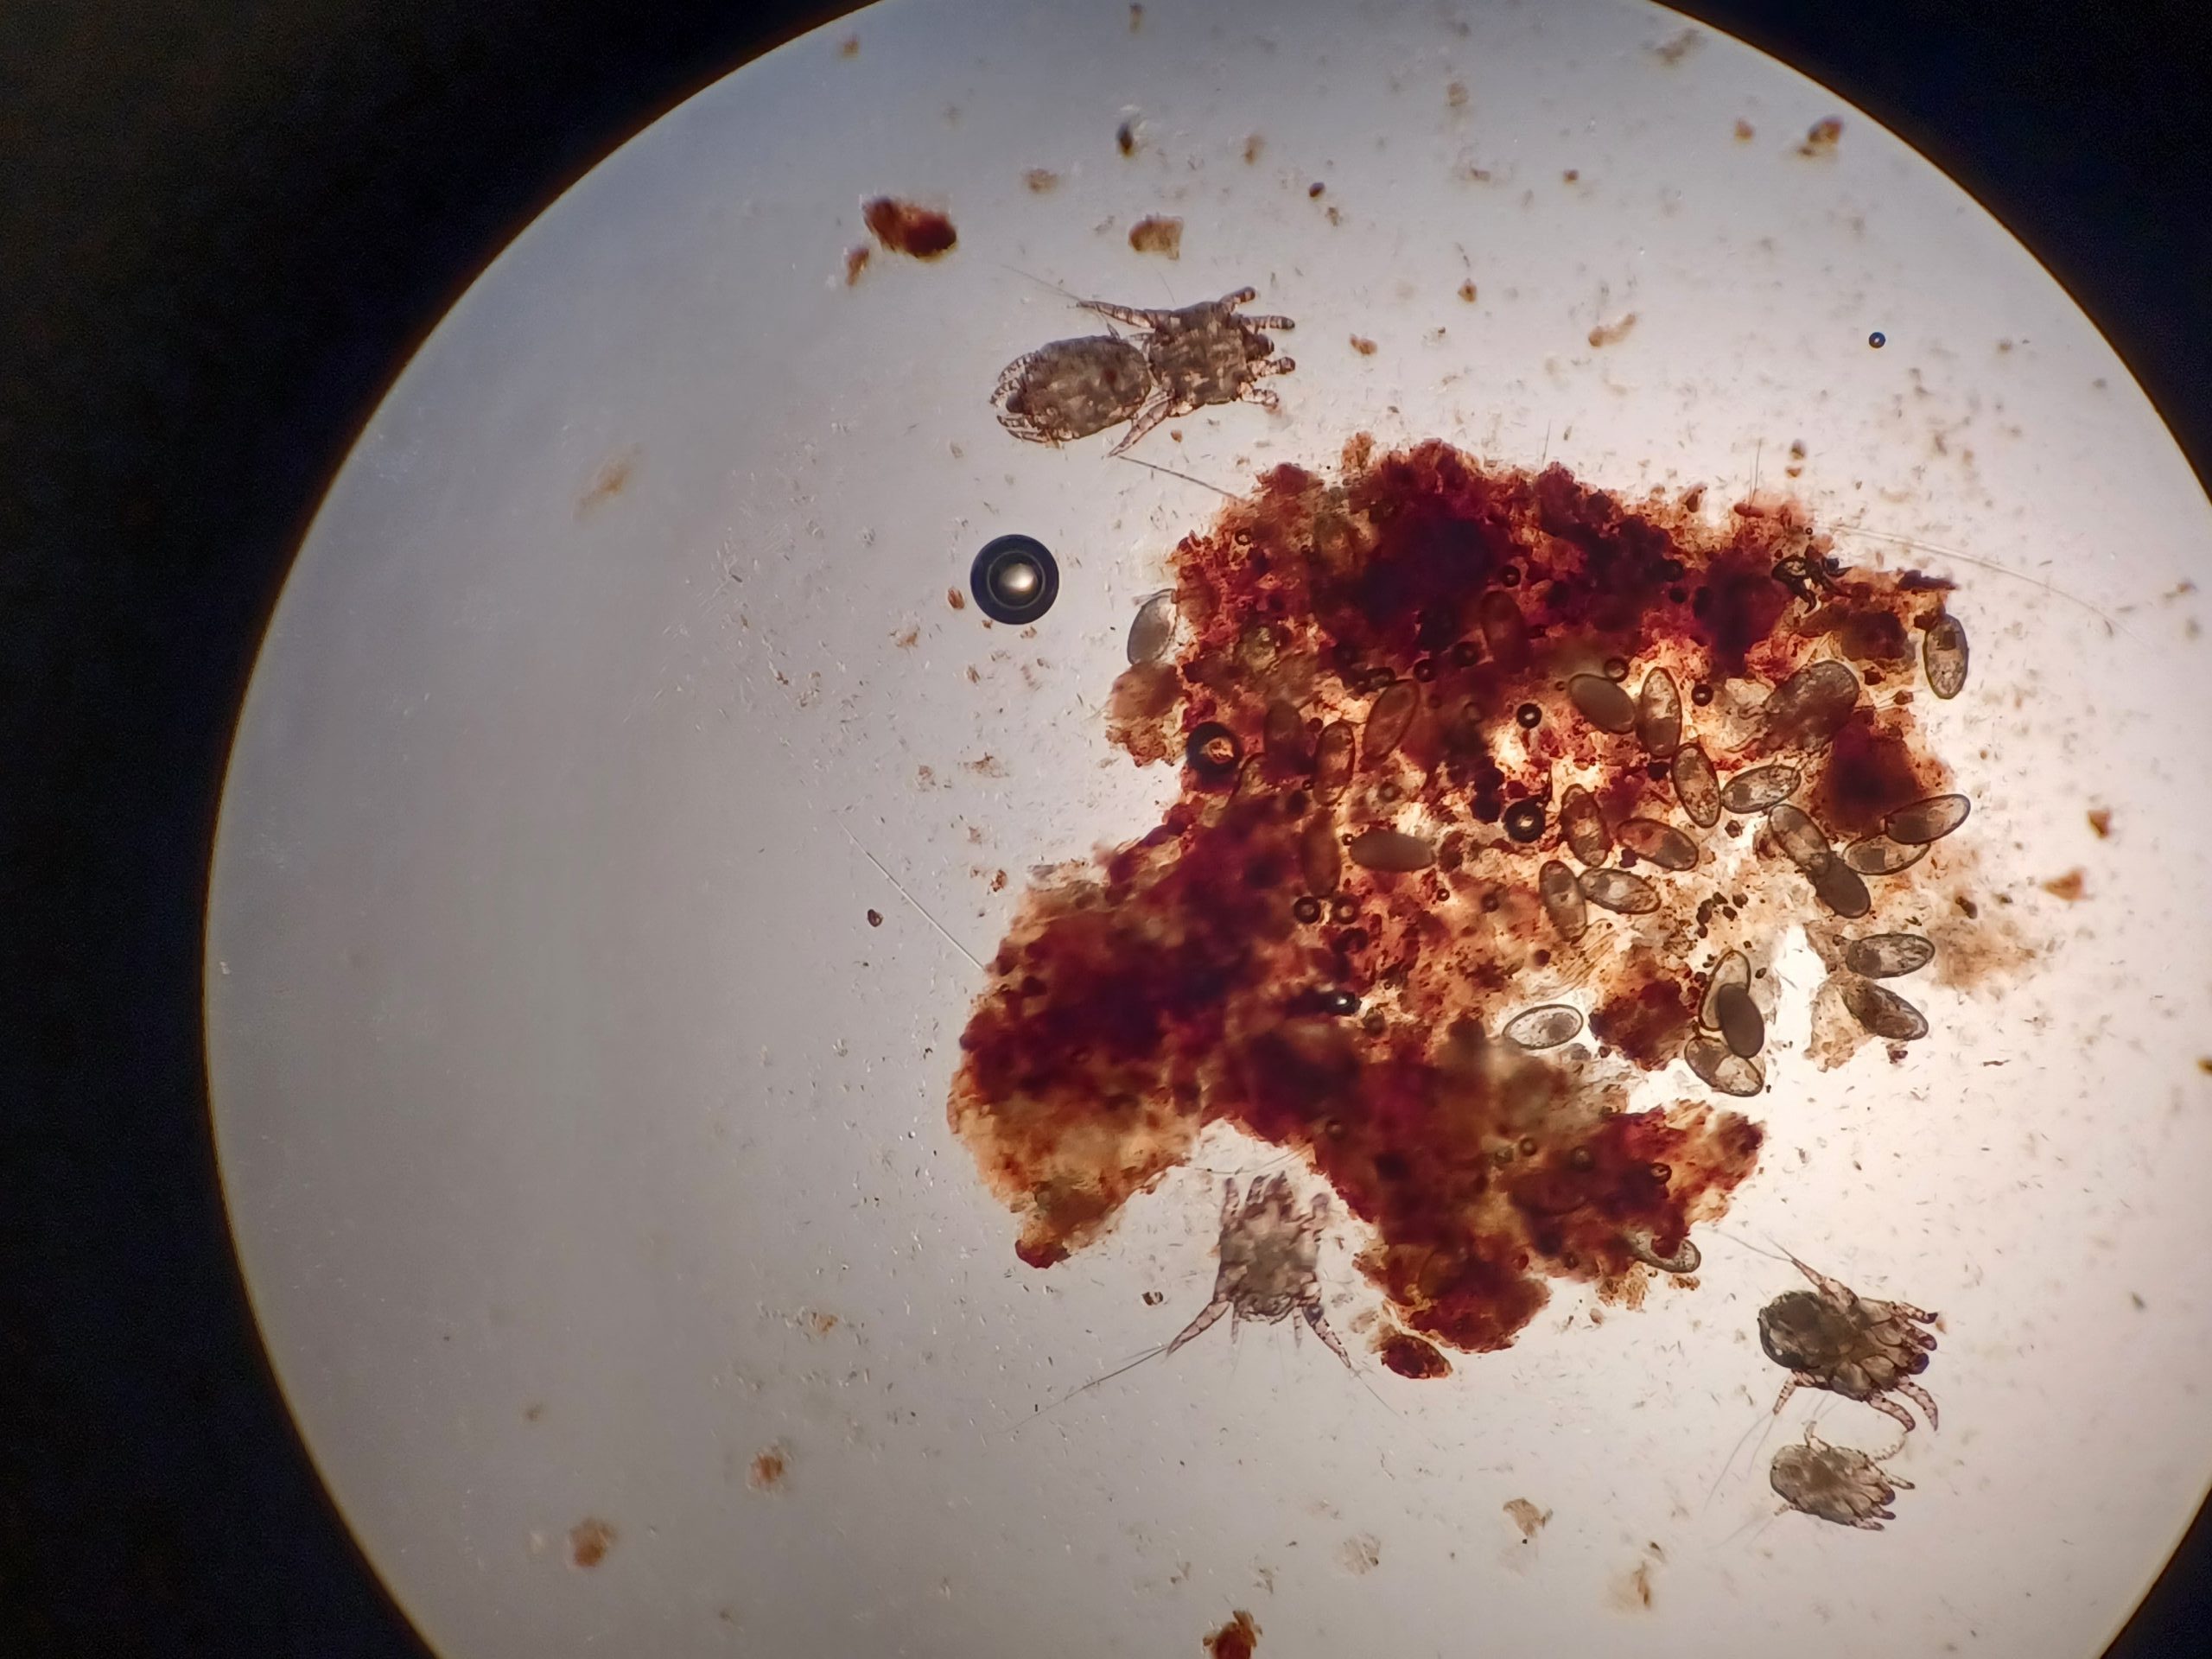
Image source: Bing (Web (fair-use with source credit))
Ear Mites: The Infamous "Coffee Grounds"
Ear mites, scientifically known as Otodectes cynotis, are tiny parasites that live in the ear canal. They feed on ear wax and skin oils. Their lifecycle is about three weeks long.
During that time, they lay eggs, hatch, and multiply rapidly.
The debris they leave behind is distinctive. It looks like dark coffee grounds or black pepper. It's dry and crumbly, not sticky.
Under a microscope, you can see the mites themselves, along with their eggs and feces.
Ear mites are highly contagious. They spread easily between cats in the same household. Kittens are especially vulnerable because their immune systems aren't fully developed.
If you have multiple cats and one has mites, assume the others have them too.
Yeast and Bacterial Infections: When Wax Turns Dark
Yeast infections, usually caused by Malassezia pachydermatis, produce a different kind of dark material. It's thicker, stickier, and more paste-like. The color ranges from dark brown to almost black.
The odor is often described as sweet, musty, or resembling corn chips.
Bacterial infections can also cause dark discharge. Staphylococcus and Pseudomonas are common culprits. These infections often develop as secondary issues. Something else irritates the ear first.
Then bacteria move in and take advantage.
Both yeast and bacterial infections require prescription treatments. Antifungal drops for yeast. Antibiotic drops for bacteria.
Sometimes both are needed, along with a steroid to reduce inflammation.
Plain Old Dirt vs. Something Worse
Sometimes, the black stuff is just dirt. If your cat spends time outdoors, dust and debris can accumulate in the ear folds. But here's the distinction: simple dirt is usually light brown or gray.
It's not black. It also doesn't come with other symptoms.
Red flags that suggest something more serious include:
- Head shaking that's frequent or violent
- Scratching at the ears with intent
- Redness or swelling inside the ear flap
- A foul odor coming from the ear
- Pain when you touch the ear
- Hair loss around the ears
- A head tilt
If any of these accompany the black debris, don't wait. Book a vet appointment.
The 60-Second At-Home Check You Can Do Right Now
Before you panic, do a quick, safe inspection. This helps you gather information for your vet. It also helps you determine whether this is an emergency or something that can wait for a regular appointment.
What to Look For Without Poking Around
Start with your cat in a calm state. Wait until they're relaxed or sleepy. Approach slowly and speak softly.
Give them a treat if that helps.
Gently fold back the ear flap. Look inside. You're checking for:
- Color of the debris (dark brown, black, yellow)
- Texture (crumbly, sticky, wet)
- Amount (a little or a lot)
- Odor (none, yeasty, foul)
- Redness or swelling of the ear canal
- Any visible sores or scabs
Don't poke inside the ear canal. You can't see deeply enough to help, and you risk pushing debris farther in.
The Smell Test That Tells You a Lot
Your nose is a surprisingly good diagnostic tool. Cup your hand near your cat's ear and gently waft the air toward you. Don't stick your nose directly into the ear.
- No smell with dry, crumbly debris suggests ear mites.
- A sweet or musty smell with sticky, dark wax suggests yeast.
- A foul, pungent, or rotten smell suggests a bacterial infection.
This isn't a replacement for a vet diagnosis. But it helps you communicate what's happening.
How to Safely Inspect a Reluctant Cat
Some cats will not sit still for an ear exam. That's normal. Don't force it.
If your cat squirms, hisses, or pulls away, stop.
You can try wrapping them in a towel. This is called a "purrito" technique. It keeps their claws contained while you look.
If that still doesn't work, just observe what you can from a distance and note other symptoms like head shaking or scratching.
Never scruff a cat to hold them still. It's painful and increases stress. If you can't inspect safely, let the vet do it.
Ear Mites vs. Ear Wax: A Side-by-Side Comparison
This is the most common confusion among cat owners. Let's break it down clearly.
| Feature | Ear Mites | Normal Ear Wax |
|---|---|---|
| Color | Dark brown to black | Light brown to tan |
| Texture | Dry, crumbly, gritty | Waxy, slightly sticky |
| Smell | None or mild | None |
| Amount | Can be significant, clumping | Minimal |
| Accompanied by | Intense scratching, head shaking | Nothing |
| Contagious | Highly contagious to other pets | Not contagious |
| Cause | Parasitic infestation | Normal bodily production |
Texture, Color, and Odor Differences
Normal ear wax in a healthy cat is light brown and waxy. You might see a small amount, especially on the inner surface of the ear flap. It shouldn't be black, and it shouldn't have a strong odor.
Ear mite debris is distinctly different. It looks like someone sprinkled instant coffee grounds inside your cat's ear. It's dry and crumbly.
When you look closely, you might see tiny dark specks that don't easily wipe away.
If you're unsure what you're looking at, take a photo. Vets are used to receiving photos from concerned owners. A clear picture can help them determine how urgent the situation is.
Behavioral Clues: Scratching, Shaking, and Tilting
Behavior tells you a lot. Cats with ear mites scratch their ears constantly. They may also shake their heads vigorously, sometimes several times a minute.
The itch is intense because mites are actively moving around and feeding.
Cats with simple wax buildup rarely show these signs. They might occasionally scratch an ear, but not obsessively. Head tilting is a bigger concern.
It can indicate a deep infection, a foreign body, or even a polyp.
Watch your cat for a full day. Note how often they scratch, shake, or tilt their head. Share this information with your vet.
It helps them narrow down the diagnosis.
Why You Shouldn't Just Grab Over-the-Counter Drops
The pet store aisle is tempting. You see ear mite treatments, cleaning solutions, and combination products. They promise quick results.
They cost less than a vet visit. Many cat owners grab one and hope for the best.
Here's the problem: you don't know what you're treating. Using the wrong product wastes time and money. It also delays proper treatment, allowing the underlying issue to worsen.
The Risk of Treating the Wrong Thing
Most over-the-counter ear products are formulated to treat ear mites. They contain insecticides like pyrethrins or piperonyl butoxide. These kill mites on contact.
But if your cat has a yeast infection, these products do nothing. The yeast keeps multiplying. The debris keeps building up.
Your cat keeps scratching. A week later, you're exactly where you started, minus the money you spent.
Worse, some products contain ingredients that can irritate an already inflamed ear. You might actually make things worse by applying a treatment the ear doesn't need.
Why Dog Ear Products Are Off-Limits
This one is important. Never use dog ear medications on a cat. The formulations are different.
Some dog ear drops contain ingredients that are toxic to cats. Even products that seem gentle can cause adverse reactions.
Cats have sensitive systems. They metabolize medications differently than dogs. What's safe for a 70-pound Labrador can be dangerous for a 9-pound cat.
If a product doesn't explicitly say it's for cats, don't use it. Period.
The Hidden Danger of Q-Tips and Cotton Swabs
You might be tempted to clean out the black debris with a cotton swab. Resist that urge. Q-tips push debris deeper into the ear canal.
They can also cause trauma to the delicate lining of the ear, increasing inflammation.
If your cat jerks their head while you're cleaning, a Q-tip can easily damage the ear canal or even rupture the eardrum. A ruptured eardrum is painful. It can also cause permanent hearing loss.
Instead, let the vet handle deep cleaning. They have the tools and the training to do it safely. If you want to clean at home, use a cotton ball dampened with veterinary ear cleaner.
Wipe only the inner surface of the ear flap. Never insert anything into the ear canal.
What the Vet Will Actually Do
You've made the appointment. Your cat is in the carrier. Now what?
Understanding what happens at the clinic helps you prepare for the visit and know what questions to ask.
The Cytology Test: A Quick Look Under the Microscope
The first thing your vet will do is look inside the ear with an otoscope. This tool magnifies the ear canal and lets them see how deep the debris goes. It also reveals any redness, swelling, or foreign objects.
Next comes the cytology test. This is the gold standard for diagnosing ear issues. Here's how it works:
- The vet takes a cotton swab and gently collects a sample of the debris.
- The sample is rolled onto a glass microscope slide.
- A stain is applied to make organisms visible.
- The slide goes under a microscope for examination.
The entire process takes about ten minutes. It reveals whether mites, yeast, bacteria, or a combination of organisms are present. That information determines which medication your cat needs.

Image source: Web (Bing) / babesource.com (Web image (fair-use with source credit))
Prescription Drops and Systemic Medications
Treatment depends on what the cytology reveals. There's no one-size-fits-all approach.
| Diagnosis | Typical Treatment | Duration |
|---|---|---|
| Ear mites | Topical miticide (selamectin, ivermectin, or moxidectin) | 2 to 4 weeks |
| Yeast infection | Antifungal drops (clotrimazole, miconazole) | 1 to 2 weeks |
| Bacterial infection | Antibiotic drops (neomycin, gentamicin, or fluoroquinolones) | 1 to 3 weeks |
| Mixed infection | Combination drops with steroid | 2 to 3 weeks |
Some mite treatments are applied to the skin at the back of the neck rather than directly into the ear. These systemic products, like selamectin (Revolution) or moxidectin (Advantage Multi), kill mites as they feed on the cat. They're often easier to administer than ear drops, especially for cats that hate having their ears touched.
When Cleaning Requires Sedation
Severe cases might need a professional ear flush. This happens when the ear canal is packed with debris, inflamed, or painful. Trying to clean it while the cat is awake would be stressful and potentially dangerous.
Your vet will sedate the cat, then use warm saline or a specialized cleaning solution to flush out the ear canal. This removes debris, pus, and dead cells. It also allows the vet to see the eardrum clearly and check for polyps or foreign bodies.
Most cats go home the same day. The sedation wears off within a few hours. You'll usually see an improvement almost immediately after a flush because the source of irritation is gone.
The Real Cost of Treating Black Ear Debris
Let's talk money. It's uncomfortable, but it's practical. Understanding the costs helps you plan and avoids sticker shock at the front desk.
Vet Visit, Meds, and Follow-Up: What to Budget
The total cost varies by region, clinic type, and severity. Here's a realistic breakdown based on national averages as of 2026:
| Service | Typical Cost Range |
|---|---|
| Office visit / consultation | $50 to $120 |
| Ear cytology (microscope exam) | $30 to $60 |
| Ear flush (with sedation, if needed) | $150 to $350 |
| Prescription ear drops | $30 to $80 |
| Systemic mite treatment | $40 to $100 |
| Follow-up recheck exam | $40 to $80 |
For a straightforward ear mite case, expect to spend between $150 and $300 total. A more complex case requiring sedation and a flush can run $400 to $600.
How Skipping the Vet Ends Up Costing More
Here's the thing about avoiding the vet. You save money in the short term. Over-the-counter drops cost $15 to $30.
But they often don't work because you're guessing at the cause.
Two weeks later, your cat is still scratching. The debris is still there. Maybe now the ear is more inflamed.
You've spent money on useless drops, and you still need the vet.
Let's say you also tried a home remedy you read about online. Olive oil, vinegar, or tea tree oil. Some of these can make inflammation significantly worse.
Now you're looking at a more expensive treatment plan.
The most cost-effective approach is to see the vet first. Get an accurate diagnosis. Buy the right medication.
Treat the problem correctly the first time. It saves money, and it saves your cat unnecessary suffering.
Mistakes That Make Ear Problems Worse
You're trying your best. But there are some common errors that are easy to make and hard to undo. Let's go through them so you can avoid them.
Stopping Treatment Too Soon
Prescription ear drops often come with a 7 to 14 day course. The debris clears up after a few days. Your cat seems fine.
You stop applying the drops.
This is a huge mistake. Symptoms can disappear before the underlying infection or infestation is fully gone. Stopping early allows surviving organisms to multiply.
Within a week, you're back to square one, possibly with a more resistant strain.
Always complete the full course of treatment. Even if the ear looks clean. Even if your cat is no longer scratching.
The vet prescribed that duration for a reason.
Cleaning Before Medication (or Not Cleaning at All)
Some ear medications require a clean ear to work effectively. Thick debris can block the medication from reaching the skin lining the ear canal. Your vet will tell you if cleaning is required before each dose.
If they do, use a veterinary ear cleaning solution. Apply it to a cotton ball, wipe the inner ear flap, and let it dry. Then apply the medication.
On the flip side, don't clean excessively. Over-cleaning strips the ear of protective oils and can cause dryness and irritation. Follow your vet's instructions precisely.
Ignoring the Problem for "Just a Few More Days"
Cats are masters at hiding pain. Instinct tells them to mask weakness. By the time you notice significant scratching or head shaking, the problem has likely been bothering them for a while.
Those few extra days before you call the vet matter. Ear infections can progress from the outer ear to the middle ear. Once that happens, treatment becomes more complicated and more expensive.
In severe cases, it can lead to hearing loss or chronic issues that require surgery.
When This Is an Emergency
Most instances of black ear debris are not emergencies. But some situations demand immediate attention. Knowing the difference could save your cat's health.
Signs of a Ruptured Eardrum
The eardrum, also called the tympanic membrane, is a thin layer separating the outer and middle ear. Severe infections can cause it to rupture.
Symptoms include:
- Sudden head tilt
- Loss of balance or coordination
- Disorientation
- Pain when opening the mouth
- Discharge that's yellow, green, or bloody
- Deafness or reduced hearing
If you notice any of these, contact your vet immediately. Ruptured eardrums require aggressive treatment. Ear drops that are safe for an intact eardrum can be dangerous if delivered to the middle ear.
Head Tilt, Loss of Balance, and Neurological Symptoms
A head tilt that comes on suddenly is a red flag. It can indicate middle or inner ear disease, which is serious. Inner ear infections can affect your cat's sense of balance.
Watch for these neurological signs:
- Walking in circles
- Falling or stumbling
- Nystagmus (eyes darting side to side)
- Nausea or vomiting
- Lethargy or unresponsiveness
These symptoms warrant an emergency vet visit. Don't wait for a regular appointment.
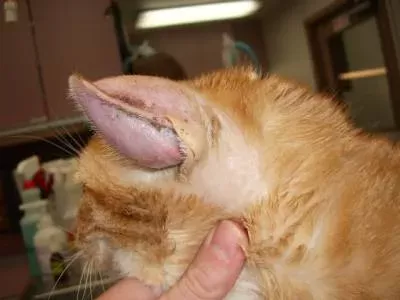
Image source: Bing (Web (fair-use with source credit))
When Scratching Causes a Swollen Ear Flap (Hematoma)
An aural hematoma is a blood-filled swelling on the ear flap. It happens when a cat shakes their head violently or scratches aggressively, causing a blood vessel to rupture.
You'll notice the ear flap looks swollen, puffy, and warm to the touch. It may feel like a water balloon. This condition is painful and won't resolve on its own.
Hematomas require veterinary treatment. The vet will drain the fluid and address the underlying ear problem. Without treatment, the hematoma can cause permanent scarring and a thickened, deformed ear flap (often called "cauliflower ear").
Surgery or drainage is almost always necessary to prevent recurrence.
If you notice a swollen ear flap, call your vet right away. This is not something to monitor overnight. Cats in pain may also refuse to eat, hide, or become unusually aggressive when approached.
The sooner you get help, the better the outcome for both the ear and your cat's comfort level.
Beyond the visible swelling, hematomas indicate that the underlying ear issue is severe. The forceful head shaking that caused the blood vessel to rupture is a sign of intense irritation. Simply draining the hematoma without treating the root cause means it will likely fill back up.
That's why vets typically address both problems together.
If you're ever unsure whether a symptom is urgent, call your vet's office. They can ask questions, assess the situation, and advise whether you should come in immediately or wait for a regular appointment. It's always better to ask than to second-guess yourself.
What Happens After Treatment: Keeping Ears Clean Long-Term
The infection is cleared. The mites are gone. Your cat is finally comfortable again.
Now the goal is keeping it that way. Ear problems have a frustrating habit of coming back if you don't address the conditions that allowed them to develop in the first place.
How Often to Clean a Healthy Ear
Here's a rule of thumb that most vets agree on: if the ears look clean and your cat isn't scratching, don't clean them. Healthy cat ears are self-maintaining. The natural wax production and the shape of the ear canal work together to push out debris and dead skin cells.
Over-cleaning can actually cause problems. It strips away protective oils and disrupts the natural microbiome of the ear. That opens the door for yeast and bacteria to overgrow.
In our research, we found that excessive cleaning is a common trigger for recurrent ear issues in cats.
That said, some cats need more help than others. Certain breeds with narrow ear canals, like Persians and Himalayans, are prone to wax buildup. If your vet recommends routine cleaning, they'll tell you how often.
Usually it's every two to four weeks, not every day.
The Right Way to Use Cleaning Solutions at Home
When cleaning is necessary, technique matters. Here's the safe method:
- Warm the bottle of veterinary ear cleaner in your hands for a minute.
- Fill the ear canal with the solution using the applicator tip.
- Gently massage the base of the ear for 20 to 30 seconds.
- Let your cat shake their head. This helps loosen debris.
- Wipe away any excess with a cotton ball or soft cloth.
- Never insert anything into the ear canal.
You don't need to see the debris come out. The shaking and wiping will handle it. If your cat's ears are packed with wax, you might need to repeat the process for a few days until the ears look clean.
Avoid using cotton swabs. They push debris deeper and can cause micro-tears in the delicate ear lining. If the cleaning solution doesn't seem to be helping, that's a sign to check in with your vet.
Monitoring Multi-Cat Households for Recurrence
Ear mites are highly contagious. If one cat had them, others are at risk. Even after treatment, you should monitor all the cats in your home for several weeks.
Watch for signs like head shaking, scratching, or visible debris in the ears. If you notice anything, don't treat on your own. Take the cat to the vet for a proper check.
Mites can develop resistance to repeated treatments, so accurate diagnosis matters.
Keeping your cats' environment clean also helps. Vacuum bedding, perches, and carpeted areas where mites might have fallen off your cat's fur. Wash bedding in hot water.
Mites don't survive long off a host, but eggs can linger in the environment for weeks.
Why Some Cats Get Recurrent Ear Problems
You've treated the mites. You've finished the antibiotics. Your cat's ears look perfectly clean.
Then three weeks later, the black stuff is back. Sound familiar? You're not alone.
Recurrent ear issues are one of the most common reasons cats end up back at the vet. Understanding the root causes can help you break the cycle.
Allergies: The Hidden Trigger
Food allergies and environmental allergies are frequent culprits behind chronic ear problems. When a cat is allergic to something in their diet or environment, their body responds with inflammation. That inflammation often shows up in the skin and ears.
Common food allergens for cats include:
- Chicken (the most common protein allergy)
- Beef
- Dairy
- Fish
- Wheat or corn (less common)
Environmental allergies can come from pollen, dust mites, or mold. These are harder to pin down because the triggers change seasonally.
If your cat's ear problems keep coming back, your vet might recommend a food trial. This involves feeding a novel protein diet for 8 to 12 weeks. No treats.
No flavored medications. If the ear issues resolve during the trial, you've found your trigger.
Ear Canal Anatomy: Some Cats Are Just Built Differently
Some breeds are genetically predisposed to ear problems. Persian cats, Himalayans, and exotic shorthairs have narrowed ear canals due to their facial structure. The narrower the canal, the harder it is for debris to work its way out naturally.
Other cats develop narrowing over time. Chronic inflammation thickens the tissue lining the ear canal. This condition, called stenosis, makes it easier for wax and debris to accumulate.
If your cat has anatomical predisposition, routine maintenance becomes essential. Regular gentle cleaning with a veterinary solution can help. So can periodic checkups to catch problems before they progress.
Immune System Issues and Endocrine Disorders
Less common but worth mentioning, some underlying conditions make cats more susceptible to ear infections.
- Feline immunodeficiency virus (FIV) weakens the immune system.
- Feline leukemia virus (FeLV) has similar effects.
- Hypothyroidism is rare in cats but can cause skin changes.
- Diabetes mellitus increases the risk of secondary infections.
If your cat has recurrent ear problems alongside other symptoms like weight loss, increased thirst, or poor coat condition, your vet may recommend blood work to check for these conditions.
How to Administer Ear Medication Without a Fight
You've got the prescription drops. Now comes the hard part: getting them into a resistant cat. Anyone who's tried knows this can feel like wrestling a small tiger.
The Towel Wrap Technique
The most reliable method is the towel wrap, often called the purrito. It keeps your cat's claws contained while you handle their ears.
- Place a large towel on a flat surface.
- Set your cat in the center of the towel.
- Fold one side over their body, then the other.
- Tuck the towel snugly but not too tight.
- Your cat should look like a burrito with their head peeking out.
With your cat secured, you have access to their head without risking scratches. Have the medication pre-measured and the bottle cap open before you start wrapping.
Applying the Drops Correctly
The key to effective ear medication is getting it where it needs to go without causing additional irritation.
Gently fold back the ear flap. Hold the bottle close to the ear opening and squeeze the recommended number of drops into the ear canal. Don't touch the dropper tip to the ear itself.
That can introduce bacteria and cause further issues.
After applying the drops, massage the base of the ear for 30 seconds. You'll hear a squishing sound. That means the medication is spreading down into the canal.
Let your cat shake their head afterward. They will, and that's fine. Some medication may fly out, but enough stays behind to do the job.
Calming Techniques That Actually Work
Timing matters more than technique. Choose a moment when your cat is already relaxed. After a meal is ideal because cats tend to be sleepy and content.
Speak in a calm, low voice. Offer a high-value treat immediately after the medication. This builds a positive association over time.
If your cat becomes aggressive, don't fight them. Take a break, try again later, or ask your vet about alternative medication forms. Oral medications and spot-on treatments exist for cats that absolutely refuse ear drops.
Understanding the Different Types of Ear Medications
Not all ear drops are the same. Each one targets different organisms and has different properties. Knowing what your vet prescribed and why helps you understand the treatment plan.
Miticides for Ear Mites
These products kill mites on contact. Common active ingredients include:
- Ivermectin
- Milbemycin oxime
- Selamectin (applied topically to the skin)
- Moxidectin
Miticides typically need to be applied for 2 to 4 weeks to cover the full mite lifecycle. Missing doses allows surviving mites to reproduce.
Antifungal Agents for Yeast
Yeast infections require antifungal treatment. These medications work by disrupting the cell wall of the yeast organism. Common options include:
- Clotrimazole
- Miconazole
- Ketoconazole
- Griseofulvin
Yeast infections often require longer treatment courses than bacterial infections. It's common to see a 2 to 3 week therapy even after symptoms improve.
Antibiotics for Bacterial Infections
Bacterial ear infections need targeted antibiotics. The specific medication depends on the bacteria present and whether it's gram-positive or gram-negative. Common options include:
- Neomycin
- Gentamicin
- Enrofloxacin
- Marbofloxacin
Some bacterial infections are resistant to common antibiotics. This is more likely in cats that have had multiple ear infections treated previously.
Combination Products with Steroids
Many prescription ear drops combine an antifungal, an antibiotic, and a corticosteroid. The steroid reduces inflammation and provides rapid relief from itching. This combination is often the first-line treatment for complicated infections.
Products like Tresaderm (thiabendazole, dexamethasone, neomycin) and Otomax (clotrimazole, gentamicin, betamethasone) are commonly prescribed. The steroid component helps calm the inflammation quickly, but it also means you need to complete the full course to avoid rebound inflammation.
| Medication Type | Targets | Typical Duration | Example Ingredients |
|---|---|---|---|
| Miticide | Ear mites | 2 to 4 weeks | Ivermectin, selamectin |
| Antifungal | Yeast | 2 to 3 weeks | Clotrimazole, miconazole |
| Antibiotic | Bacteria | 1 to 3 weeks | Neomycin, gentamicin |
| Combination | Multiple + inflammation | 1 to 3 weeks | Thiabendazole + dexamethasone |
Working With Your Vet for the Best Outcome
Your vet is your partner in this process. The more information you provide, the better they can diagnose and treat your cat's ear issues.
What to Tell Your Vet Before the Exam
Before your appointment, gather details that help your vet understand the situation:
- When you first noticed the debris
- How often your cat scratches or shakes their head
- Whether the problem is in one ear or both
- Any previous ear issues your cat has had
- Recent changes in diet, environment, or routine
- Whether other pets in the home have symptoms
This information helps the vet decide which tests to run and which treatments to prioritize.
Ask These Questions at the Appointment
Don't be afraid to ask questions. An informed owner is a better advocate for their cat. Good questions to ask include:
- What did the cytology show?
- Is this contagious to my other pets?
- How long will treatment last?
- When should I see improvement?
- What side effects should I watch for?
- When should I schedule a recheck?
Write down the answers. It's easy to forget details in the moment, especially when you're also trying to hold a wriggling cat.
When a Recheck Exam Is Necessary
Some ear conditions resolve after one round of treatment. Others need verification to ensure the infection is fully cleared.
Your vet may recommend a recheck exam 2 to 4 weeks after starting treatment. During this visit, they'll look in the ears again and possibly repeat the cytology. This confirms the mites or infection are gone.
Skipping the recheck is a gamble. Some infections appear better on the surface but persist deep in the ear canal. Without confirmation, you risk a recurrence that might be harder to treat the second time around.
Long-Term Prevention: Making Ear Problems a Thing of the Past
You've been through the vet visits, the treatments, and the wrestling matches. Now you want to know how to keep this from happening again. Here's a practical prevention plan.
Build Ear Checks Into Your Routine
Once a week, take two minutes to inspect your cat's ears. Make it part of your regular grooming routine. Your cat will learn to tolerate it, especially if you pair it with a treat.
Look for changes in color, texture, or odor. Catch problems early and you avoid the full treatment cycle.
Maintain a Consistent Grooming Schedule
Regular grooming helps overall skin health, which directly impacts ear health. Brushing distributes natural oils and reduces irritation from mats and tangles. Cats with good grooming habits tend to have healthier ears.
For hairless breeds like Sphynx cats, ear cleaning is more important because they lack the hair that normally traps debris. Check their ears more frequently.
Control Environmental Allergens
If allergies are contributing to your cat's ear issues, reducing allergen exposure helps. Steps include:
- Using air purifiers with HEPA filters
- Washing bedding regularly in hot water
- Vacuuming carpets and upholstery weekly
- Keeping windows closed during high pollen seasons
For food allergies, strict adherence to the prescribed diet is essential. That means no treats, no table scraps, and no flavored supplements.
Keep Stress Low in Multi-Cat Households
Stress suppresses the immune system. Cats in stressful environments are more prone to infections and flare-ups. Provide separate food bowls, water sources, and litter boxes for each cat.
Vertical space like cat trees and shelves also helps reduce conflict.
Frequently Asked Questions About Black Stuff in Cat Ears
Can I use olive oil or home remedies to clean the black stuff?
No. Olive oil, vinegar, alcohol, and essential oils are not safe for cat ears. They can irritate inflamed tissue and make the problem worse.
Even diluted solutions can sting and cause your cat to shake more aggressively. Stick to veterinary-approved ear cleaners and prescription treatments.
Is the black stuff in my cat's ear contagious to other pets or people?
Ear mites can spread to other cats and dogs in the household. They're species-specific when it comes to long-term infestation, but mites can briefly bite humans and cause mild itching. Yeast and bacterial infections are typically secondary issues and not directly contagious.
Wash your hands after handling an affected cat.
How long before my cat feels better after starting treatment?
Most cats show significant improvement within 48 to 72 hours. The itching subsides, and the debris begins to clear. However, related to ear mites, the full lifecycle takes about three weeks.
Complete the entire course of medication even if your cat seems fine before it's finished.
Can ear problems cause permanent hearing loss in cats?
Yes, in severe cases. Chronic inflammation can thicken the ear canal and damage the structures of the middle and inner ear. Untreated ear infections can also rupture the eardrum.
That's why early treatment matters. Most routine cases resolve without lasting effects, but delay increases risk.
What if my cat's ears get dirty again immediately after treatment?
Recurrence happens for a few reasons. The original cause wasn't fully treated, the environment wasn't cleaned, or an underlying condition like allergies is still present. Food allergies and environmental allergies are common triggers for chronic ear issues in cats.
Your vet may recommend dietary changes or allergy testing if ear problems keep coming back.
Can I prevent ear problems with regular grooming?
Regular check-ins help. Spend time each week looking at your cat's ears, especially if they go outdoors or live with other cats. Catching a problem early makes treatment faster and less stressful.
For cats with narrow ear canals, routine veterinary cleanings every few months can prevent wax buildup from becoming a full-blown infection.
The Bottom Line: What to Do Depending on What You See
You've done the research. Now you need clear guidance. Here's a straightforward decision guide based on what you might find when you check your cat's ears.
| What You See | What It Likely Means | What to Do |
|---|---|---|
| Light brown wax, no odor | Normal ear wax | No action needed |
| Dark crumbly debris, no smell | Ear mites | Schedule a vet visit |
| Dark sticky wax, sweet smell | Yeast infection | Schedule a vet visit |
| Thick discharge, foul odor | Bacterial infection | Vet visit within 24 hours |
| Blood, swelling, head tilt | Injury or severe infection | Emergency vet visit |
If the ears look clean and your cat is comfortable, you're done. No cleaning needed.
If you see any abnormal debris, don't try to fix it yourself. Book a vet appointment. The cytology test gives you a definitive answer in minutes.
If there's swelling, blood, or neurological symptoms, skip the regular appointment and head to an emergency clinic. These situations won't improve on their own and waiting can cause permanent damage.
The black stuff in your cat's ears is almost always treatable. The key is identifying the cause quickly and using the right medication. With a proper diagnosis and a full course of treatment, your cat will be back to their comfortable, happy self before you know it.