
Most owners learn how to groom a Maine Coon the hard way. You brush the top of the coat, it looks glorious, and three weeks later there's a mat the size of a walnut tucked behind an ear. The problem usually isn't effort.
It's that the fur you can see isn't the fur that mats.
A Maine Coon carries a double coat: coarse guard hairs sitting over a dense, downy undercoat. Adult males commonly hit 6 to 11 kg, so there's a lot of coat to work through, and the undercoat is where trouble starts. Veterinary guidance for long-coated cats puts routine brushing at several sessions a week, and Coons sit at the demanding end of that scale.
Here's what's actually happening under those guard hairs.

Image source: Bing (Web, fair-use with source credit)
Quick Answer
Groom a Maine Coon by combing to the skin twice weekly, minimum. Use a long-tine steel comb, not just a slicker brush. Check the armpits, ruff, britches and tail base each time.
Separate small mats by hand using detangling spray. Bathe only after the coat is completely mat-free. Trim nails every two to four weeks.
Why a Maine Coon Coat Mats Faster Than You'd Expect
Maine Coons aren't the worst-matting breed going. Persians hold that title comfortably. But Coons have a specific structural quirk that catches people out, and it explains almost every "she was fine last week" panic message that lands in a groomer's inbox.
The double coat problem: guard hairs, undercoat, and what's hiding underneath
The topcoat is made of guard hairs. They're coarse, slightly oily, water-resistant, and they lie flat and smooth. That's the coat you stroke.
That's the coat that photographs beautifully.
Underneath sits the undercoat: soft, fine, crimped hairs packed in tight for insulation. This is the layer that sheds, clumps, and felts together. Because the guard hairs stay glossy on top, a coat can be badly matted underneath while still looking healthy from a metre away.
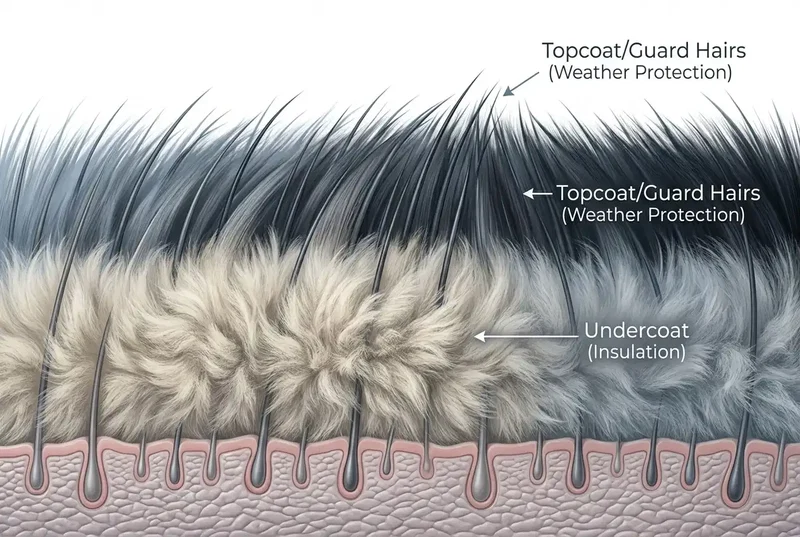
Image source: Bing (Web, fair-use with source credit)
Coat length on a Maine Coon is deliberately uneven. The breed standard describes shorter fur over the shoulders that lengthens down the flanks and belly. The Cat Fanciers' Association standard also calls for a full ruff, a heavily furnished britch, and a long flowing tail.
Every one of those show-ring features is a mat magnet.
Texture matters too, and it varies cat to cat. A silky coat with plenty of guard hair slides against itself and resists tangling. A cottony or woolly coat, more common in some lines and in cats neutered young, grabs and felts within days.
If your Coon's coat feels slightly dry and cling-y rather than slippery, assume you're on the higher-maintenance end. Two other factors quietly speed things up:
- Neutering. Breeder and groomer reports consistently note softer, denser coats after neutering, which mat more readily than an intact cat's coat.
- Indoor living. Central heating and artificial light disrupt the natural shedding cycle. Plenty of indoor Coons shed steadily all year instead of blowing coat twice.
The seven zones where mats always start
Mats form where fur rubs against fur, where the cat can't easily reach, or where moisture sits. Learn these seven spots and you'll catch most problems early.
| Zone | Why it mats | How often to check |
|---|---|---|
| Armpits and inner elbows | Constant friction with every step | Every session |
| Behind and below the ears | Fine fur, cat scratches it, saliva sets it | Every session |
| Ruff and chest | Longest fur on the body, dense underneath | Every session |
| Britches and inner thighs | Long fur plus friction plus sitting | Every session |
| Base of tail and lower back | Cats over 6 kg often can't reach it | Weekly |
| Sanitary area | Litter, faeces, urine set the fur solid | Weekly |
| Between the toes | Litter and grit compact into the tufts | Weekly |
Collars deserve a mention. If your Coon wears one, the fur underneath will felt into a solid band unless you slide the collar and comb beneath it every single time.
The 60-Second Coat Check That Decides Everything
Before you pick up a single tool, check the coat. This one habit separates owners who never deal with mats from owners who pay for a de-matting appointment twice a year.
The comb test: does it reach skin?
Take a metal comb with tines at least 4.5 cm long. Pick a spot on the flank. Push the comb in until you feel it touch skin, then draw it straight out.
If it glides through and exits cleanly, that patch is fine. If it stops, snags, or lifts a wad of undercoat with it, you've found undercoat build-up or an early mat. Repeat across all seven zones above.
Now do the same with your fingers. Run your fingertips against the skin through the ruff, armpits and britches. Fingers find flat, fused sheets that a comb sometimes skates over.
What you're feeling for:
- Loose fluff that pulls apart easily between two fingers
- A firm lump that moves independently of the skin
- A flat, board-like sheet that won't lift away from the body at all
Then lift the fur and look at the skin underneath any suspect area. Healthy cat skin is pale pink or pigmented, dry, and odourless. Red, damp, sticky, scabbed or foul-smelling skin changes the plan entirely, and that's a vet visit, not a grooming session.
Tangle, mat, matted patch, or pelt
These four words describe four completely different situations. Getting the label right tells you exactly what to do next.
| What you've found | How it feels | Can you fix it at home? |
|---|---|---|
| Tangle | Loose knot, pulls apart with fingers | Yes, easily |
| Mat | Firm clump under 2.5 cm, lifts off skin | Usually yes, with patience |
| Matted patch | Several mats fused, 2.5 cm or larger, tight to skin | Sometimes. Assess honestly |
| Pelt | Continuous sheet, skin moves when you tug it | No. Professional clip only |
The mobility test settles most arguments. Slide a fingertip flat between the mat and the skin. If there's a clear gap and the mat lifts, you have working room.
If the skin comes with it, stop.
That's not a technique problem you can push through. Feline skin runs roughly 0.4 to 2 mm thick in most body areas. It tents up into a mat and sits directly under whatever tool you're about to use.
Your Grooming Decision Tree: Which Path Are You On?
Grooming a Maine Coon isn't one routine. It's four, and which one you're on today depends entirely on what the coat check just told you.
| Path | You found | Action |
|---|---|---|
| A | Clean comb-through, no snags | Routine brush-out, 10 to 15 min |
| B | 1 to 5 isolated mats, all mobile | Demat by hand, then brush out |
| C | Widespread matting, large fused patches | Book a cat-specialist groomer |
| D | Pelted, sore skin, cat in pain | Vet appointment first |
Path A: healthy coat, routine maintenance
If the comb reaches skin everywhere and exits clean, you're maintaining. This is the goal. Comb through two to three times a week, add an undercoat rake during shedding season, and finish with a slicker or bristle brush.
Ten to fifteen minutes, two or three times a week, keeps a Maine Coon out of trouble almost indefinitely.
Path B: a few isolated mats you can work out
If you found a handful of firm mats that lift cleanly off the skin, you can handle these at home. Work them out first, then do the full brush-out. Never brush the rest of the coat and leave the mats for later, because every stroke tightens them.
Budget one session per mat if the cat is patient, and stop the moment the cat says stop. A mat that's been there a fortnight will still be there tomorrow.
Path C: widespread matting or early pelting
If mats have joined into patches, or you're finding new ones faster than you're removing them, hand dematting has stopped being realistic. Pushing on causes real pain and teaches the cat to hate grooming for years.
Call a groomer who works with cats specifically. Expect a clip rather than a rescue brush-out, and expect it to be the kinder option by a wide margin.
Path D: pelted, painful, or damaged skin underneath
If the coat moves as one sheet, or the skin under a mat is red, weeping, hot, or smells sour, the vet comes first. Long-standing pelts cause bruising, moist dermatitis, and in bad cases skin necrosis. There's often infection under there.
Signs that push you straight to veterinary care:
- The cat cries, hisses or bites when you touch the area
- Visible sores, open skin, or discharge
- A strong sour or yeasty smell
- Sudden coat deterioration in a cat who used to groom itself
- Weight loss, lethargy, or reduced mobility alongside the coat change
A cat who stops self-grooming is usually telling you something medical. Arthritis, dental pain, obesity and kidney disease all show up first as a scruffy coat. Guidance from International Cat Care is clear on this: sudden coat neglect in an adult cat warrants a health check, not just a brush.
The Tools That Actually Reach a Maine Coon's Undercoat
Most grooming kits sold for cats are built for a domestic shorthair. They're useless on a Coon. The tines are too short, they never touch skin, and you end up polishing the top of a matting coat.

Image source: Bing (Web, fair-use with source credit)
The three tools you genuinely need
Everything else is optional. These three do the actual work.
| Tool | What to look for | Job |
|---|---|---|
| Greyhound-style steel comb | Dual spacing, tines 4.5 to 6.5 cm | Finds mats, reaches skin, does the real grooming |
| Soft-pin slicker brush | Flexible head, coated or rounded pin tips | Lifts loose undercoat, finishes the topcoat |
| Scissor-style nail clippers | Sharp, small jaw, good leverage | Thick Coon nails every 2 to 4 weeks |
The comb is the non-negotiable one. As of 2026, quality steel greyhound combs sit at roughly £10 to £35 or $15 to $45, and a decent one lasts a decade. Use the wide side first to break through, then the fine side to confirm you've got everything.
Here's the rule worth tattooing somewhere: the comb tells the truth, the brush tells you what you want to hear. A slicker brush can pass over a solid mat and leave the surface looking immaculate. A comb stops dead.
Tools worth adding for shedding season
During spring moult and autumn coat change, three extras earn their place.
- Undercoat rake. Single or double row, blunt-ended teeth. Pulls dead undercoat out of the ruff, flanks and britches without cutting guard hairs. Roughly £8 to £25.
- Detangling or leave-in conditioning spray. Cat-formulated only. Softens a mat before you touch it and cuts friction on the comb.
- Mat splitter. A single curved blade for slicing a mat into strips. Useful, but read the safety rules first.
A blunt-nose curved grooming scissor is handy for paw pad tufts and nothing else. Never use it near the body.
Tools that do more harm than good
Some popular products actively damage a Maine Coon coat.
- De-shedding blades (the toothed-blade style). These cut. Used weekly on a Coon, they shear guard hairs and leave the coat dull, thin and prone to matting. Limited seasonal use at most, light pressure, and never on the ruff or tail.
- Stiff wire slickers with bare pin tips. They score the skin on the belly and inner thighs. Groomers call the result slicker burn, and it's a genuine welfare issue.
- Human hairbrushes and cheap plastic brushes. They don't reach past the guard hairs. Pure theatre.
- Household scissors. They cause most home-grooming injuries vets treat.
- Dog shampoo. Wrong pH, and some contain permethrin, which is severely toxic to cats.
If you can only afford one thing, buy the comb. A £15 comb used properly beats a £150 kit used on the surface.
Path A: The Weekly Brush-Out, Step by Step
This is the routine that keeps everything else from happening. Done properly it takes 10 to 15 minutes and most Coons genuinely enjoy it.
Set up first. Quiet room, door shut, non-slip surface, tools laid out within reach. A lick mat loaded with a paste treat buys you three or four minutes of cooperation and turns the whole thing into something the cat looks forward to.
Line combing, the technique most owners skip
Line combing is how professionals get through a double coat. Instead of dragging a comb over the surface, you part the coat and work one thin horizontal line at a time.
- Lay the cat on their side, or work them standing if they prefer.
- Start low, near the belly line, and part the fur horizontally with your free hand.
- Comb only the fur below the parting, from skin outwards.
- Move the parting up about 2 cm and repeat.
- Work your way up the flank until you reach the spine.
Each pass is small and quick. You're never fighting the whole coat at once, and you'll feel every snag the moment it appears. You should see a clear horizontal line of exposed skin with combed fur falling away below it.
Working from tolerant areas to sensitive ones
Order matters more than most people realise. Start where the cat likes being touched and finish where they don't.
- Shoulders and back. Almost every cat tolerates this. Warms them up.
- Sides and flanks. Line comb properly here.
- Chest and ruff. Longest fur, needs the most time.
- Neck and behind the ears. Switch to the fine comb, go gently.
- Britches and hind legs. Support the leg, don't stretch the hip.
- Belly. Short session, light pressure, wide-tooth comb only.
- Tail. Hold the base, comb outwards toward the tip.
Finish with a slicker brush over the topcoat to smooth everything down, then one final pass with the fine comb side. If the fine comb runs clean everywhere, you're done.
Ruff, britches and belly: the slow zones
These three areas take longer than the rest of the cat combined. Rushing them is how mats get missed.
The ruff is dense and deep. Comb upwards and outwards, against the lie of the coat, then smooth it back down. Lift the chin and get underneath, where saliva from self-grooming sets fur into a felted plate.
The britches need the leg supported. Hold above the hock and comb downward in small sections. Pay attention to the inner thigh where it meets the body, because that crease mats faster than anywhere else on the back end.
The belly is the sensitivity minefield. Most Coons tolerate about 60 to 90 seconds before the tail starts thrashing. Use a wide-tooth comb, no slicker, minimal pressure, and quit early.
Watch the tail throughout. A slow swish is fine. A hard thump against the surface means you have seconds left.
Stop on a good note, give the treat, and come back tomorrow.
Path B: Safe Mat Removal at Home
You've found three or four firm mats, they all lift off the skin, and the cat is reasonably relaxed. This is the one situation where home dematting makes sense.
Work on one mat per session. Trying to clear four in a single sitting is how a cooperative cat becomes a cat who runs when they see the comb.
Fingers first, detangler second, tools last
The order here is deliberate, and skipping steps is what causes pain.
- Spray the mat. Use a cat-safe detangling or leave-in conditioner. Saturate it properly, not a light mist. Let it soak for two or three minutes.
- Isolate the mat. Slide two fingers between the mat and the skin. Keep them there. That's your safety barrier for the rest of the process.
- Pull it apart with your fingers. Grip the base of the mat close to the skin with one hand. Tease the outer edge apart with the other. Most small mats loosen at this stage alone.
- Work the tip, never the base. Comb the loose ends first, a few hairs at a time. Then move slightly deeper.
- Support the skin constantly. Your holding hand takes all the tension, not the cat's skin.
- Comb through when it's free. Confirm with the fine comb side.
A cornstarch trick helps on greasy mats. Rub a small pinch into the mat with your fingers. It absorbs oil, reduces friction, and lets the hairs slide apart.
Brush the residue out afterwards.
Never yank. If a mat resists after three or four minutes of finger work, leave it. Come back tomorrow with fresh detangler, or reclassify it as a Path C job.
Splitting a mat instead of pulling it
If finger work isn't enough, a mat splitter is the next step up. It's a single curved blade in a handle, designed to slice a mat into narrow strips so you can comb each one out separately.
- Insert two fingers under the mat, flat against the skin. Every single time.
- Position the blade vertically, running the same direction as the hair growth.
- Cut from the outside of the mat inward, in one controlled pass.
- Make three or four vertical slices, turning one thick mat into several thin strips.
- Comb each strip out with the wide comb, tip first.
You're never cutting across the base of the mat. You're only splitting it lengthways so it stops behaving as a solid block.
A de-matting rake works the same way but with multiple blades. It's faster and removes more coat. Groomer feedback flags these as easy to overuse, and they leave a visible thin patch if you go too far.
The skin-tenting rule and why scissors are off the table
Household scissors near a mat are the single most dangerous thing an owner can do. Mats pull the skin up with them. When you slide scissors under a mat, you cannot see that the skin has tented into the space you're cutting.
Veterinary clinics treat these injuries regularly. The wounds are typically long, clean-edged lacerations in the armpit, groin or flank, and they usually need sutures. The owner almost always says the same thing: they were being careful and felt nothing until the cat screamed.
The rule is absolute:
- No scissors flush to the skin, ever
- No cutting a mat off at its base
- No blind cuts under a mat you can't see through
- Blunt-nose scissors are for paw pad tufts only, on a flat surface, with the pad visible
If a mat genuinely needs cutting off, it needs clippers with a #10 blade laid flat against the skin. A #10 leaves roughly 1.6 mm of coat and can't close on skin the way scissors can. That's a groomer's job unless you already own clippers and know how to use them.
Stop for the day if any of these happen:
- The mat won't loosen after several minutes of finger work
- You find more mats than you started with
- The cat has escalated from tolerating to struggling
- The skin under the mat looks pink, shiny or sore
- You're tempted to reach for scissors
Path C and D: When to Stop and Call Someone Else
There's no prize for doing this yourself. A professional clip on a badly matted Coon takes 45 minutes and costs less than a vet bill for a skin laceration.
The escalation thresholds, in plain terms
Use these as hard cutoffs rather than judgement calls.
| Threshold | What it means | Who to call |
|---|---|---|
| Mat larger than 2.5 cm, fused to skin | Beyond hand dematting | Cat-specialist groomer |
| More than 5 or 6 mats | Coat maintenance has failed | Cat-specialist groomer |
| Coat moves as one sheet | Pelted | Groomer, possibly under vet supervision |
| Cat screams, bites, or panics | Pain response | Vet |
| Red, weeping, or smelly skin | Likely infection | Vet first, groom after |
| Cat has stopped self-grooming | Possible illness | Vet |
| Faecal matting at the rear | Hygiene and infection risk | Vet or groomer, urgently |
That last one moves faster than people expect. Matted fur around the anus can obstruct defecation entirely. If your Coon is straining or you're finding faeces stuck in the britches, book something the same week.
Cat-specialist groomer vs sedated vet groom
Not every groomer should touch a Maine Coon, and that's not snobbery. Most high-street groomers are dog groomers who take cats as a sideline. Cats need different handling, different restraint, and different blade work.
Look for a cat-specialist groomer when:
- The cat is matted but not in obvious pain
- They tolerate handling reasonably well
- The coat needs a clip or a serious de-matting session
- You want the option of a partial trim rather than a full shave
Go to the vet for sedation when:
- The coat is fully pelted
- The cat has bitten or scratched during previous grooming attempts
- There's suspected skin damage underneath
- The cat is elderly, arthritic, or has a heart condition
- A groomer has already refused the job
Credentials worth asking about: Certified Feline Master Groomer through the National Cat Groomers Institute, or Fear Free certification. Grooming is unregulated in most of the UK and US, so certification is one of the few real signals you have.
Ask three questions when you ring round:
- How many cats do you groom per week?
- Do you groom cats separately from dogs?
- What's your policy if my cat becomes distressed?
A good answer to the third one is "we stop and rebook." A bad answer involves the word "restrain."
Sedation gets a bad reputation it doesn't deserve. For a pelted cat, sedation means the whole thing is done in one calm session with no fear memory attached. The alternative is multiple traumatic sessions and a cat who fights grooming for life.
Your vet will run bloods first on an older cat.
What a lion cut really costs your cat's coat
A lion cut removes the body coat entirely with a #10 or #7F blade, leaving the mane, lower legs and tail tip. It looks striking. It also has real downsides that get glossed over.
When a lion cut is genuinely the right call:
- The cat is pelted and there's no other humane option
- Chronic matting despite consistent brushing, usually in seniors
- Obesity or arthritis preventing self-grooming
- Recurrent faecal matting
What you're trading away:
- Regrowth is slow. Cat hair sits mostly in the telogen (resting) phase, unlike dogs. Full regrowth typically takes 3 to 6 months, sometimes longer in Coons.
- Post-clipping alopecia is real. A minority of cats regrow patchily, or the texture comes back cottony and mats worse than before.
- The coat insulates both ways. It keeps heat out as well as in. Shaving for summer comfort backfires.
- Sunburn risk. Pale skin under a removed coat burns, particularly on cats with outdoor access.
- Clipper nicks. Even skilled groomers occasionally catch loose skin on a pelted cat, because the pelt distorts the body outline.
A comb cut is the gentler middle option. The groomer uses a snap-on comb attachment over the blade, leaving 6 to 13 mm of coat. It keeps some insulation and looks far less severe.
For most Coons, a sanitary trim plus a belly clip solves the bulk of the problem without touching the visible coat. Ask about that before you agree to a full shave.
Bathing a Double Coat Without Making Things Worse
Maine Coons don't need frequent baths. A well-maintained coat stays clean on its own. Most owners bathe every 6 to 12 weeks at most, and plenty never bathe at all.
Bathing is worth doing when the coat is greasy, when there's stud tail at the base of the spine, after a flea treatment, or before a show. Otherwise, combing does more good.

Image source: Bing (Web, fair-use with source credit)
Why you never bathe a matted Maine Coon
Water shrinks a mat. It's the most common bathing mistake, and it's irreversible.
When a mat gets wet, the fine undercoat hairs swell, then contract as they dry. The mat tightens by roughly a third. What was a workable Path B mat before the bath becomes a Path C clip job after it.
The sequence is non-negotiable:
- Trim nails first
- Comb the entire coat to the skin
- Confirm with the fine comb, everywhere
- Only then, bath
If you're not confident the coat is completely mat-free, don't get it wet. Use a waterless foam shampoo or grooming wipes on the specific dirty area instead.
Wet to skin, degrease, rinse until squeaky
The water-resistant topcoat fights you at the start. Expect the first 30 seconds of wetting to feel like the water is beading off, because it is.
Setup:
- Non-slip mat in the sink or bath, which matters more than anything else
- Water at roughly 37 to 38°C, which is body temperature
- Water depth no more than 5 to 8 cm
- Handheld sprayer or jug, held close to the coat
- Everything within arm's reach before the cat goes in
The process:
- Wet thoroughly. Work the water in with your hand, section by section. Keep the sprayer head touching the coat to cut noise and splash. Avoid the face entirely.
- Degrease first if needed. A clarifying shampoo on the tail base, ruff and rear. Leave it on for 3 to 5 minutes.
- Shampoo the body. Cat-formulated only. Squeeze it through rather than scrubbing in circles, because circular motion tangles a double coat.
- Rinse completely. This takes longer than you think. Rinse until the coat squeaks between your fingers. Leftover shampoo causes itching, dandruff and dull coat.
- Conditioner. Optional but helpful on long coats. Rinse it out just as thoroughly.
- Final rinse. One more pass, especially the belly and armpits where product collects.
Never use dog shampoo. Cat skin sits at roughly pH 6.0 to 7.5, and some dog products contain permethrin, which causes severe neurological toxicity in cats. The ASPCA Animal Poison Control Center lists permethrin exposure among the more serious feline poisoning cases they handle.
Skip anything containing tea tree oil, eucalyptus, citrus, pine or pennyroyal. Cats metabolise phenolic compounds poorly, and essential oils that are harmless on a dog can cause liver damage in a cat.
For the face: never pour water over it. Use a damp cloth on the chin and around the eyes. That's it.
Drying is the hard part, not the wash
Washing takes 15 minutes. Drying takes 45.
A wet double coat cannot air dry safely. The undercoat traps moisture against the skin for hours. The result is a musty smell, felted undercoat, and in a cold house, a genuinely chilled cat.
Towel stage:
- Press and squeeze. Never rub, because rubbing tangles.
- Work through three or four towels if needed.
- Microfibre absorbs far more than terry.
Dryer stage:
- Use a low, ambient or barely warm setting. Never hot.
- Keep the nozzle moving constantly, roughly 20 to 30 cm from the coat.
- Comb as you dry, following the airflow with a wide comb.
- Work in sections: body first, then legs, ruff last.
- Point the airflow away from the ears and face at all times.
A human hairdryer on cool works if you don't own a force dryer, but it takes considerably longer. Cat body temperature runs 38.1 to 39.2°C, so overheating happens faster than people expect. If the cat starts panting, stop immediately.
Check the undercoat before you let them go. Push your fingers to the skin at the ruff, armpits and britches. If it's damp anywhere, keep drying.
Some cats will not tolerate a dryer, and that's a legitimate reason to skip bathing altogether. Waterless shampoo and consistent combing keep a Coon perfectly clean.
Nails, Paw Tufts, Ears, and the Sanitary Trim
These four jobs take ten minutes combined and prevent problems that are genuinely painful to fix later.
Trimming thick Maine Coon nails without hitting the quick
Maine Coon nails are noticeably thicker than the average cat's, which is why scissor-style clippers outperform guillotine models. Guillotine clippers can crush rather than cut a heavy nail.
- Hold the paw, press gently on the top of the toe to extend the nail.
- Find the quick: the pink triangle of blood vessel and nerve inside the nail.
- Cut 2 to 3 mm beyond the quick, taking the sharp hook only.
- Cut top to bottom, not side to side, to avoid splitting.
- Do a few nails at a time if the cat is impatient.
On dark nails you can't see the quick. Take small slivers off the tip until you see a chalky white circle appear in the cut face. Stop there, because the next slice hits blood.
Keep styptic powder or plain cornstarch within reach. If you nick the quick, press the powder onto the nail tip with firm pressure for 30 seconds. It bleeds a lot and looks worse than it is.
Two things people miss:
- Dewclaws. Front legs, up on the inside. They never touch the ground, so they never wear down. Left long, they curl into the pad.
- Polydactyl toes. Many Coons carry the polydactyl trait. Count the nails on every paw so you don't skip an extra one tucked between toes.
Trim every 2 to 4 weeks. Indoor and senior cats need it more often, because they're not wearing the nails down.
Paw pad tufts and floor traction
Maine Coons grow thick tufts between the toes and pads. They're part of the breed's cold-weather design, and indoors they cause two problems.
They collect litter, which compacts into hard pellets between the toes. And on laminate or tile, long tufts act like little skis. Older Coons with arthritis genuinely struggle for grip.
Trimming them:
- Blunt-nose, curved-tip grooming scissors only
- Press the pad to spread the toes apart
- Trim the fur level with the pads, not shorter
- Keep the blade parallel to the pad, never pointing into the webbing
- Two or three snips per paw is usually enough
Leave the tufts alone if your cat goes outdoors in a cold climate. They serve a purpose out there.
Sanitary trims for britches that stay clean
A sanitary trim is a small clipped area around the anus and under the tail. It's the highest-value trim you can do on a Maine Coon, and it's invisible when the tail is down.
Long britch fur catches faeces, especially in cats with soft stools, in seniors, and in anyone over about 7 kg who can't fully reach back there. That fur mats solid within days.
What's involved:
- Clippers with a #10 blade, held flat
- A patch roughly 3 to 5 cm around the anus, clipped short
- Optionally, tidy the length of the britch fur so nothing hangs below the anus
- Never scissors in this area, for obvious reasons
Most owners have a groomer do this. It takes two minutes and costs very little as an add-on. If your Coon has recurring hygiene issues, ask for a sanitary trim plus a belly clip at every appointment.
The belly clip removes the matting hotspot the cat can't reach, and it doesn't change how they look.
Ears and eyes
Maine Coon ears carry heavy furnishings, which is exactly what the breed standard asks for. Those tufts trap wax and debris.
Clean only the visible part of the ear flap. Put a vet-approved ear cleaner on a cotton pad, wipe the folds, and stop at the ear canal opening.
Never put a cotton bud into the canal. You'll push wax deeper and risk damaging the eardrum. Brown, crumbly, coffee-ground debris usually means ear mites.
Dark waxy discharge with a smell means a vet visit.
For eyes, wipe any crust away with a damp cotton pad, using a fresh pad per eye. Cream and white Coons show tear staining more visibly. Persistent staining or watery discharge is worth mentioning to your vet, since it can point to a blocked tear duct or chronic conjunctivitis.
Grooming a Cat Who Hates Being Groomed
Most Coons who hate grooming weren't born that way. They learned it, usually from one bad session involving a mat, a rushed owner, and no escape route.
The good news is that it's fixable. The bad news is that it takes weeks, not one determined afternoon.
Reading the stop signals before you get bitten
Cats give clear warnings. Owners miss the early ones and only notice the last one.
| Stage | What you'll see | What to do |
|---|---|---|
| Relaxed | Soft eyes, slow blink, purring, kneading | Carry on |
| Early warning | Skin twitching, tail tip flicking, ears rotating back | Change area or wrap up |
| Clear warning | Tail thumping, flat ears, dilated pupils, low growl | Stop now |
| Final warning | Hiss, swat, body tensing, turning to face your hand | Already too late |
| Shutdown | Completely still, frozen, staring, not resisting | Stop immediately |
That last row catches people out. A frozen cat looks cooperative. It isn't.
Freezing is a fear response, and pushing through it does more long-term damage than a cat who swipes and leaves.
Petting-induced overstimulation is a separate thing worth knowing about. Some cats enjoy grooming right up until a switch flips and they bite. The tail is your tell.
Watch it constantly.
Short sessions, lick mats and cooperative care
The fix is boring and it works: make every session end before the cat wants it to.
- Cap sessions at 5 to 10 minutes at first
- End on a good moment, never on a struggle
- One body area per session if that's all they'll give you
- Always finish with food or play
Cooperative care is the technique professionals use. You give the cat a way to say no, and you respect it. In practice:
- Show the comb. Treat. Put it away.
- Next day: touch the comb to the shoulder. Treat. Stop.
- Next: one stroke. Treat. Stop.
- Build to three strokes, then ten, then a full area.
Progress at the cat's pace, not the calendar's. Most cats show meaningful change within two to four weeks of daily short sessions.
Practical additions that help:
- Lick mat with a paste treat. Occupies the mouth and creates a positive association. The single most effective tool for a difficult cat.
- Pheromone diffuser. Plug in 20 to 30 minutes before you start.
- Time it after a meal. A full, sleepy cat is a compliant cat.
- Groom where they already relax. Their favourite chair beats a table.
- Two people. One feeds and talks, one combs. Works remarkably well.
- The towel wrap. For essential jobs only, wrap the body loosely and expose one area at a time.
Things that make it permanently worse: scruffing as restraint, holding the cat down, shouting, and chasing a cat who's walked away. Never punish a cat for resisting grooming. They don't connect the punishment to the behaviour, only to you and the comb.
If your Coon truly can't be groomed at home, that's a valid outcome. Book a Fear Free certified groomer every 6 to 8 weeks and keep up short handling sessions in between.
Building kitten tolerance that lasts fifteen years
If you've got a Maine Coon kitten, this is the highest-return work you'll ever do. Kittens don't need much grooming, since the full adult coat doesn't come in until 3 to 5 years. Groom them anyway.
The point isn't the coat. It's the habit.
A simple programme from 8 weeks:
- Week 1 to 2: Handle paws, ears, tail and belly daily. Ten seconds each. Treat after.
- Week 3 to 4: Add a soft brush. Two or three strokes. Treat.
- Week 5 to 8: Introduce the metal comb. Short passes over the back and sides.
- Month 3 onward: Add nail trims, one or two nails at a time.
- Month 4 onward: Run a hairdryer on cool nearby, not on the kitten, to normalise the noise.
Ten minutes a week for a few months buys you fifteen years of a cat who lies down when the comb comes out. Owners who skip this and start at three years old, when the coat suddenly needs real work, end up in a much harder position.
Adjusting Your Routine for Age, Weight, Season, and Climate
The twice-weekly comb-through is a baseline, not a fixed rule. Four variables move it, and most owners only adjust for one.
Kittens, adults at full coat, and seniors who can't reach
Grooming needs change dramatically across a Maine Coon's life, and the hardest years are at the end.
| Life stage | Coat state | Comb frequency | Watch for |
|---|---|---|---|
| Kitten, 8 weeks to 1 year | Soft, short, low mat risk | 1 to 2 times weekly | Building tolerance, not coat care |
| Young adult, 1 to 3 years | Coat thickening year on year | 2 to 3 times weekly | First real mats appearing |
| Adult, 3 to 8 years | Full coat, peak volume | 2 to 4 times weekly | Ruff, britches, armpits |
| Senior, 9 to 12 years | Greasier, clumpier | 3 to 4 times weekly | Lower back and tail base |
| Geriatric, 13+ | Self-grooming often stops | Daily short sessions | Dandruff, mats, nail overgrowth |
Seniors are where things go wrong quietly. A cat with arthritis in the spine or hips physically cannot twist to reach the lower back, tail base and rear end. Those exact areas start matting, and the owner doesn't notice because the cat looks fine from the front.
Signs your Coon has stopped grooming themselves properly:
- Dandruff along the spine and tail base
- A greasy, clumped, spiky-looking coat
- Mats appearing in a cat who never had them
- Overgrown, thickened nails that click on hard floors
- Fur staining or debris around the rear
The Cornell Feline Health Center flags reduced self-grooming as one of the earliest visible signs of chronic pain in older cats. Treat it as a symptom, not just a grooming job. A senior with a suddenly scruffy coat needs a vet check for arthritis, dental disease, hyperthyroidism or kidney disease.
Adjust your handling too. Don't lift the hind leg high, don't stretch the hip, and let them stay lying down. Short daily sessions beat one long weekly one for a stiff, sore cat.
Spring moult and autumn coat change
Maine Coons shed twice a year in the classic pattern, though indoor life muddies it.
- Spring, roughly March to June. The heavy one. The dense winter undercoat comes out in sheets. Some Coons drop their entire ruff and look temporarily scrawny around the neck.
- Autumn, roughly September to November. Lighter. The summer coat drops and the winter undercoat comes in underneath.
During spring moult, step up to daily combing and add the undercoat rake. Loose undercoat left in the coat is exactly what felts into mats, and it's also what the cat swallows.
Hairballs spike in moulting season for that reason. Cats ingest a large share of the hair they shed during self-grooming. More combing means less hair in the stomach and fewer 6am retching episodes.
If your indoor Coon sheds constantly with no obvious seasons, that's normal. Central heating and artificial light disrupt the photoperiod cues that trigger a proper moult. Maintain a steady three times weekly routine year-round instead of ramping up and down.
Overweight cats, indoor heating, and hot climates
An overweight Maine Coon cannot groom their own back end. That's not laziness, it's mechanics.
Once a cat carries enough body fat to lose spinal flexibility, the belly, inner thighs, lower back and rear become unreachable. Mats form there first, and they keep forming until the weight comes off. A sanitary trim and belly clip are close to essential for these cats.
Climate changes the picture too:
- Cold climates (northern UK, Scandinavia, Canada, New England). Heavier undercoat, more dramatic seasonal moult, higher mat risk in winter. Comb more from November to March.
- Hot and humid climates (Florida, Gulf states, southern Europe, Australia). Thinner undercoat, but more grease and higher yeast and skin infection risk. Bathe more often. Watch skin folds and the chin.
- Heavily heated homes. Dry air means more static, more dandruff, and a coat that tangles more readily. A humidifier genuinely helps.
Never shave a Maine Coon for summer heat alone. The coat reflects heat and insulates against it. Removing it exposes pale skin to sunburn and, for outdoor cats, raises heatstroke risk rather than lowering it.
Provide shade, cool floors and water instead.
Outdoor Coons need a different check routine. Look for burrs, seed heads, tree sap, road tar and grit in the paw tufts after every outing. Sap and tar need a cat-safe solvent or a groomer, not scissors.
Mistakes That Cost Maine Coon Owners the Most
Groomer intake notes and owner-reported problems show the same handful of errors, over and over. Fixing these three alone prevents most matting emergencies.
Brushing only the topcoat
This is the number one mistake by a distance. It's also the most understandable, because the coat looks perfect afterwards.
A slicker brush glides across the guard hairs and pulls out surface fluff. It feels productive. Meanwhile the undercoat six millimetres down is quietly compacting into felt.
Three months of surface brushing produces a cat who looks magnificent and needs a full clip. The owner is always genuinely shocked.
The fix: end every single session with the comb, not the brush. If the fine comb side passes to the skin cleanly across the whole body, you're done. If it doesn't, you're not finished, regardless of how good the coat looks.
Over-using de-shedding blades
De-shedding tools with a toothed metal blade are cutting tools, not combing tools. That's the part the packaging doesn't emphasise.
Used weekly on a Maine Coon, they shear the guard hairs. You lose the smooth, water-resistant topcoat that stops the undercoat tangling in the first place. The coat ends up dull, fluffy, and far more prone to matting.
The damage is slow and cumulative, so owners rarely connect the tool to the problem. They just notice the coat isn't what it was.
The fix: use an undercoat rake with blunt teeth instead. If you already own a de-shedding blade, limit it to two or three short passes during peak moult, on the flanks only. Never the ruff, never the tail, never weekly.
Letting a wet double coat air dry
A Maine Coon's undercoat holds water like a sponge and releases it grudgingly. Left to air dry, the coat can stay damp underneath for six hours or more.
What happens next is predictable. The damp undercoat felts as it dries and shrinks. You get a musty smell, a wave of new mats within 48 hours, and a cat who's been cold for half a day.
The fix: if you can't dry the coat properly, don't bathe it. Towel press thoroughly, then dry with airflow and a comb until the undercoat is bone dry at the skin.
The other mistakes worth naming
These come up less often but cost just as much.
- Working a mat from the base. Always start at the tip and work inward. Base-first pulls directly on the skin.
- One long marathon session. Forty minutes of forced grooming teaches a cat to fear the comb. Three ten-minute sessions achieve more.
- Combing dry, matted fur. Detangler first, always. Dry combing through a mat is genuinely painful.
- Ignoring the collar line. Slide the collar and comb underneath every time, or you'll find a felted band.
- Scruffing to restrain. Current low-stress handling guidance advises against it. It escalates fear and does nothing for cooperation.
- Cotton buds in the ear canal. Wipe the visible flap only.
- Skipping the dewclaws. They curl into the pad. This is a preventable vet visit.
- Waiting for "when I have time." A mat that takes two minutes today takes twenty next week and a clipper in a fortnight.
Safety Rules Worth Taking Seriously
Grooming injuries are more common than most owners realise, and nearly all are preventable. These are the ones that actually put cats in a vet's consulting room.
Skin lacerations, blade heat, and grooming arms
Feline skin is thin. In most body areas it measures roughly 0.4 to 2 mm, and it's loose enough to tent up several centimetres when pulled.
Scissor lacerations account for the majority of home-grooming injuries. The mechanism is always the same: skin lifts into the mat, the blade goes underneath, and the cut goes through skin instead of hair. These wounds usually need suturing and sometimes antibiotics.
There is no safe way to cut a mat off with scissors. Not with care, not with good light, not with a second person holding the cat.
Clipper blade burn is the second injury type. Blades heat fast, particularly a #10 working through dense coat. Clipper manufacturers advise checking blade temperature frequently and using a cooling spray.
If you own clippers, touch the blade to your own forearm every 30 to 60 seconds. If it's uncomfortable on you, it will burn the cat. Have a second blade to swap in.
Grooming arms and nooses carry a strangulation risk. Never leave a cat unattended in one, not even for ten seconds to fetch a towel. Many cat-specialist groomers avoid them entirely and use towel wraps or a second handler instead.
Other physical risks worth knowing:
- Slicker burn on the belly and inner thighs from stiff, bare-tipped pins
- Hip and spine strain from over-extending a senior's back leg
- Falls from a raised surface, which is why a non-slip mat matters
- Nail bed bleeding from cutting into the quick
Shampoos, essential oils, and flea product toxicity
Cats process chemicals differently from dogs, and grooming products are a real poisoning route.
Permethrin is the serious one. It's a common insecticide in dog flea treatments, and it causes severe neurological toxicity in cats: tremors, seizures, and death without treatment. Never apply a dog flea product to a cat.
Keep newly treated dogs separate from cats until the product has dried.
Essential oils are the second problem. Cats lack sufficient glucuronyl transferase enzyme activity to metabolise phenolic compounds efficiently. Oils that are fine on a dog accumulate and damage the liver.
Avoid any grooming product containing:
- Tea tree (melaleuca)
- Eucalyptus
- Pennyroyal
- Citrus oils (d-limonene, linalool)
- Pine and wintergreen
- Peppermint and cinnamon
pH mismatch is less dramatic but still worth avoiding. Human skin sits around pH 5.5. Cat skin runs roughly pH 6.0 to 7.5.
Human shampoo strips the coat's natural oils and causes flaking and itching.
Read the label properly. "Natural" and "pet-safe" mean nothing legally. "Formulated for cats" is the phrase you want, and even then check the ingredient list for oils.
If your cat licks a product they shouldn't have, ring your vet or a poison control service. Don't wait for symptoms.
When it's a vet problem, not a grooming problem
Some coat changes are medical. Combing harder won't touch them.
Book a vet appointment if you see:
- Bald patches or thinning, particularly symmetrical patches on the flanks or belly
- Overgrooming or barbering, where the cat licks fur off in strips
- Circular scaly lesions with broken hairs, which can indicate ringworm
- Black gritty specks at the tail base, which is flea dirt
- Scabs along the spine and neck, often a flea allergy
- A greasy, waxy, swollen area at the base of the tail, which is stud tail
- Blackheads and swelling on the chin, which is feline acne
- Skin that's red, hot, weeping or smells sour under a mat
- Sudden coat deterioration in a previously well-groomed cat
Ringworm deserves a special note. It's a fungal infection, it's contagious to humans, and grooming spreads it. If you suspect it, stop grooming, isolate the cat, and disinfect every tool.
Don't move a brush from an affected cat to another pet.
One more: never attempt to sedate a cat at home. Sedation is a veterinary procedure requiring assessment, monitoring and reversal drugs. Over-the-counter calming products are not sedatives, and human medications are dangerous to cats.
What Grooming Costs: Tools, Sessions, and De-Matting Surcharges
Grooming a Maine Coon at home is cheap. Not grooming one gets expensive fast. Here's what the numbers look like as of 2026.
Tool costs, one-off
| Item | Typical UK price | Typical US price | Replace every |
|---|---|---|---|
| Greyhound steel comb | £10 to £35 | $15 to $45 | 10+ years |
| Soft-pin slicker brush | £15 to £40 | $18 to $50 | 3 to 5 years |
| Undercoat rake | £8 to £25 | $10 to $30 | 5+ years |
| Scissor-style nail clippers | £8 to £20 | $10 to $25 | 3 to 5 years |
| Mat splitter | £8 to £18 | $10 to $22 | 5+ years |
| Detangling spray | £8 to £15 | $10 to $18 | Per bottle |
| Cat shampoo | £8 to £18 | $10 to $20 | Per bottle |
| Styptic powder | £5 to £10 | $7 to $12 | Per pot |
| Clipper kit (optional) | £60 to £250 | $75 to $300 | 5 to 8 years |
| Force dryer (optional) | £80 to £300 | $100 to $350 | 5 to 10 years |
A functional starter kit is a comb, a slicker, nail clippers and detangler. That's roughly £45 to £110 or $55 to $140 total, and it covers everything a well-maintained Coon needs.
Professional grooming costs
| Service | Typical UK | Typical US | How long |
|---|---|---|---|
| Full groom, well-maintained coat | £45 to £90 | $60 to $120 | 60 to 90 min |
| De-matting surcharge | £20 to £60 extra | $25 to $80 extra | Per 15 min |
| Lion cut or full clip | £60 to £120 | $80 to $150 | 45 to 90 min |
| Sanitary trim only | £15 to £30 | $20 to $40 | 10 min |
| Nail trim only | £10 to £20 | $12 to $25 | 5 to 10 min |
| Mobile cat groomer, at home | £60 to £120 | $80 to $150 | 60 to 120 min |
| Sedated groom at a vet practice | £150 to £400 | $200 to $500 | Half day |
Prices vary by region. Expect the higher end in London, the South East, and major US metros. Feline-only groomers charge a premium and are worth it.
The real cost comparison
Here's the arithmetic that makes the case for home combing.
Owner A combs twice weekly and books a professional groom twice a year. Annual cost: roughly £120 to £180 in grooming, plus a one-off £60 tool kit.
Owner B brushes the surface occasionally, notices matting at six months, and needs a de-matting groom. Annual cost: two clips at £90 plus de-matting surcharges, so £220 to £300. And the cat loses its coat twice.
Owner C lets the coat pelt. Sedated veterinary groom at £250 to £400, plus a possible skin infection consult and antibiotics at £60 to £150. The cat spends three to six months regrowing coat.
The gap between Owner A and Owner C is well over £300 a year, and that ignores the welfare difference entirely.
Where it's worth paying a professional
Even diligent owners benefit from an appointment two or three times a year. Groomers do things that are genuinely difficult at home:
- Sanitary trims with clippers
- Belly clips on a cat who won't lie still
- Proper degreasing baths with a force dryer
- Nail trims on a cat who fights you
- Spotting coat and skin issues early
Think of it as maintenance support rather than a replacement for the routine. The combing is still your job.
Grooming Schedule and Escalation Cheat Sheet
Everything above, condensed into something you can act on this week.
The baseline routine
| Task | Frequency | Time |
|---|---|---|
| Comb-through to the skin | 2 to 3 times weekly | 10 to 15 min |
| Seven-zone mat check | Every session | 60 seconds |
| Undercoat rake, moulting season | Daily to every other day | Add 5 min |
| Nail trim | Every 2 to 4 weeks | 5 min |
| Ear flap wipe | Monthly, or as needed | 2 min |
| Paw tuft trim | Every 6 to 8 weeks | 3 min |
| Sanitary trim | Every 6 to 8 weeks | Groomer, 10 min |
| Bath | Every 6 to 12 weeks, if needed | 60 min including drying |
| Professional groom | Every 3 to 6 months | Booked |
Adjust upward for seniors, overweight cats, cottony coats and cold climates. Adjust downward only for kittens.
Escalation at a glance
Run this in order every time you groom.
- Comb reaches skin everywhere, clean pass. Continue the routine.
- Snags or loose fluff building up. Increase frequency. Add the undercoat rake.
- One to five mobile mats. Detangler, fingers, mat splitter if needed. One mat per session.
- Mats over 2.5 cm, or fused to skin. Book a cat-specialist groomer this week.
- Coat moves as one sheet. Groomer for a clip. Don't attempt anything at home.
- Sore, red, weeping or smelly skin. Vet first. Grooming after treatment.
- Cat in pain, screaming, or biting on contact. Vet. Assume pain until proven otherwise.
- Cat has stopped self-grooming entirely. Vet health check, not just a groom.
The three rules that matter most
- Comb to the skin, or you haven't groomed. The brush is for finish. The comb does the work.
- Never put scissors near a mat. Skin tents into it. Every time.
- Stop before the cat wants you to. Short and frequent beats long and forced, permanently.
Get those three right and a Maine Coon coat is genuinely easy to maintain.
Frequently Asked Questions
How often should you brush a Maine Coon?
Two to three times a week is the minimum for a healthy adult coat. Move to daily during spring moult, and daily for seniors or overweight cats who can't reach their back end. Each session takes 10 to 15 minutes.
Frequency matters far less than whether your comb actually reaches the skin.
Do Maine Coons need baths?
No, not routinely. A well-combed Maine Coon stays clean without bathing, and many never have one. Bathe only when the coat is genuinely greasy, after flea treatment, for stud tail, or before a show.
That's roughly every 6 to 12 weeks at most. Always demat completely first, because water shrinks mats permanently.
Can you shave a Maine Coon in summer?
You shouldn't, unless there's a medical or matting reason. The double coat insulates against heat as well as cold, and shaving exposes pale skin to sunburn. Regrowth takes 3 to 6 months, and some cats regrow patchy or cottony fur that mats worse.
Offer shade, cool floors and water instead.
What's the best brush for a Maine Coon?
The most important tool isn't a brush at all. It's a greyhound-style steel comb with tines 4.5 to 6.5 cm long, which is the only thing that reliably reaches the undercoat. Pair it with a soft-pin slicker brush for finishing.
Add an undercoat rake during shedding season.
How do you get mats out of a Maine Coon without cutting?
Saturate the mat with cat-safe detangling spray and wait three minutes. Slide two fingers between the mat and the skin as a barrier. Tease the outer edge apart with your fingers, working the tip first.
Comb through when it loosens. If it resists after four minutes, stop and book a groomer.
Why does my Maine Coon suddenly hate being brushed?
Sudden resistance usually means pain, not stubbornness. Check for hidden mats pulling the skin, sore or scabbed areas, and overgrown nails. Arthritis makes handling the hips and back legs genuinely uncomfortable for older cats.
If the coat and skin look fine, book a vet check before assuming it's a behaviour problem.