Tag: coat care

  • Slicker Brush vs Pin Brush: Which One Does Your Dog Need?

    Slicker Brush vs Pin Brush: Which One Does Your Dog Need?

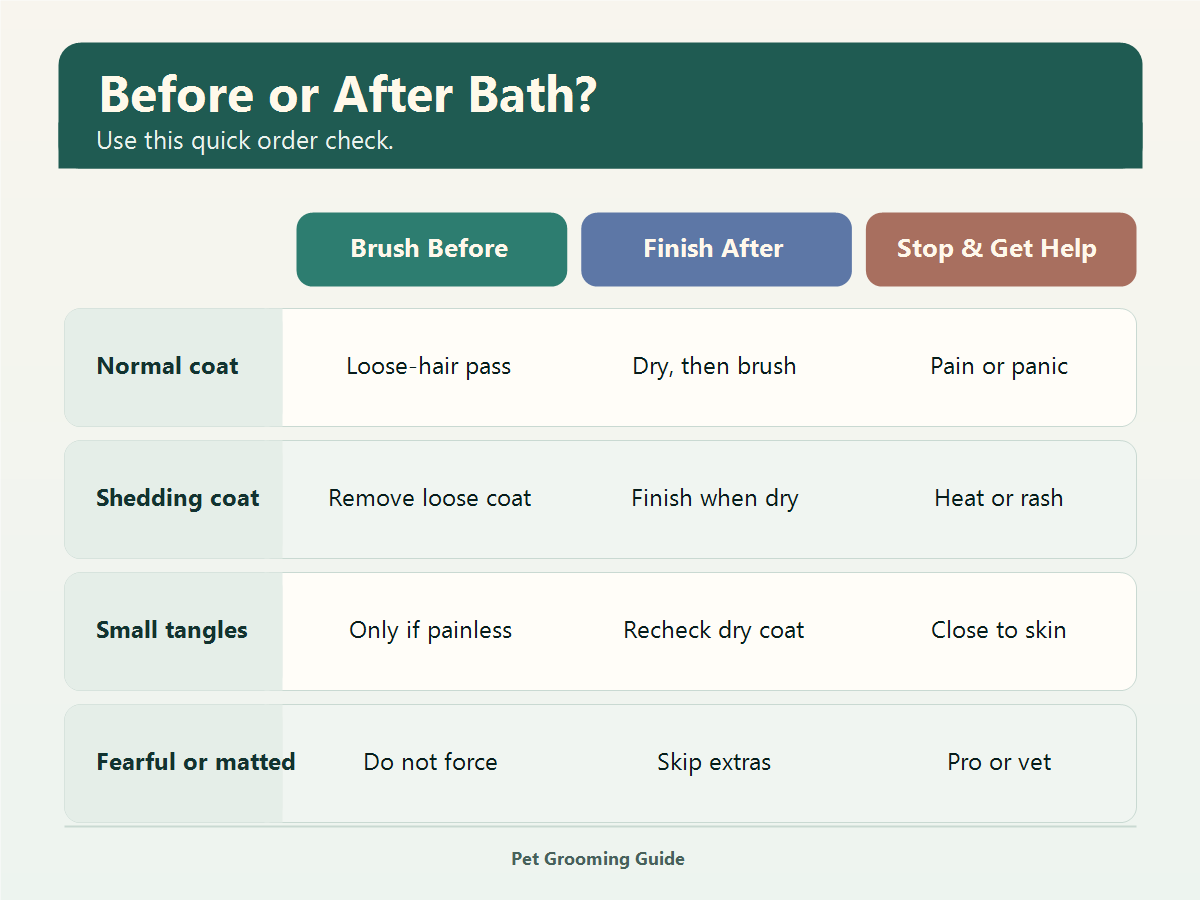
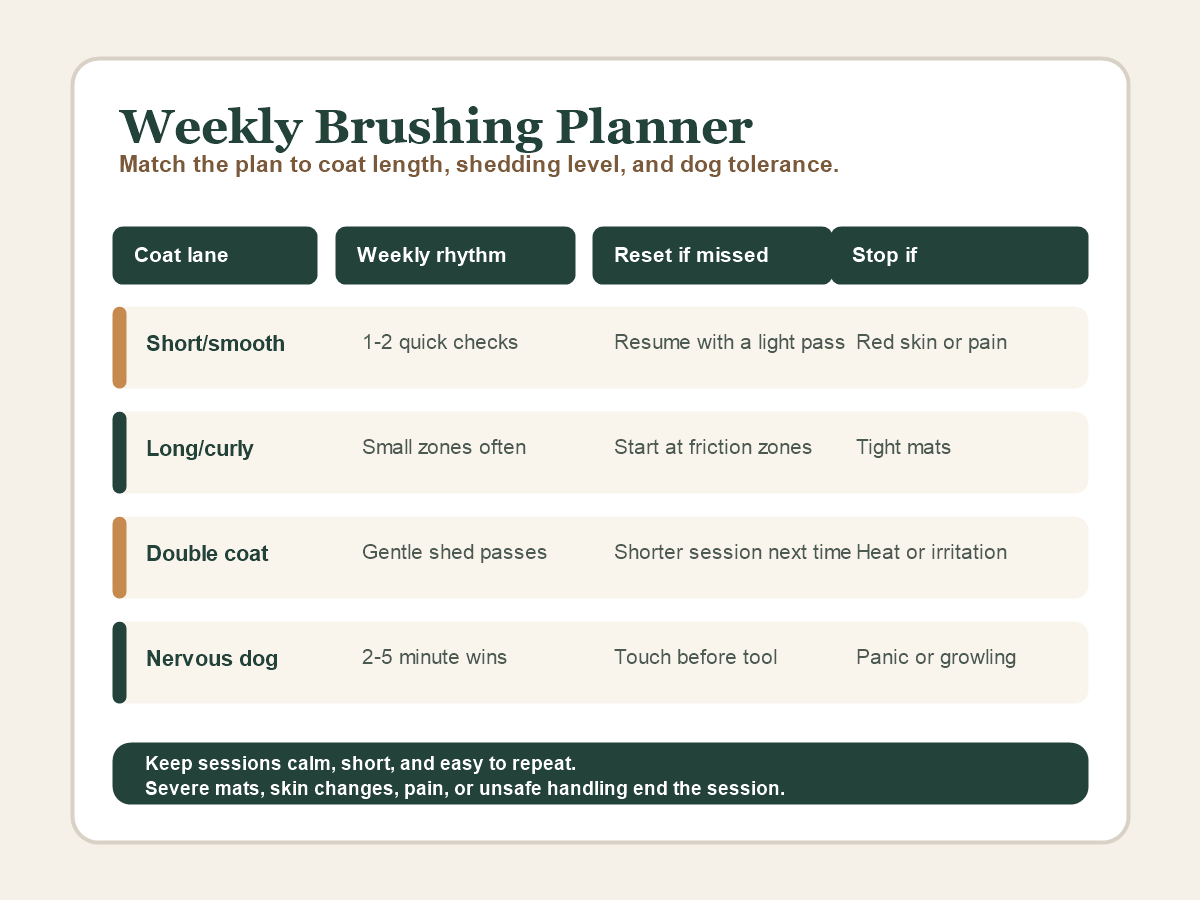
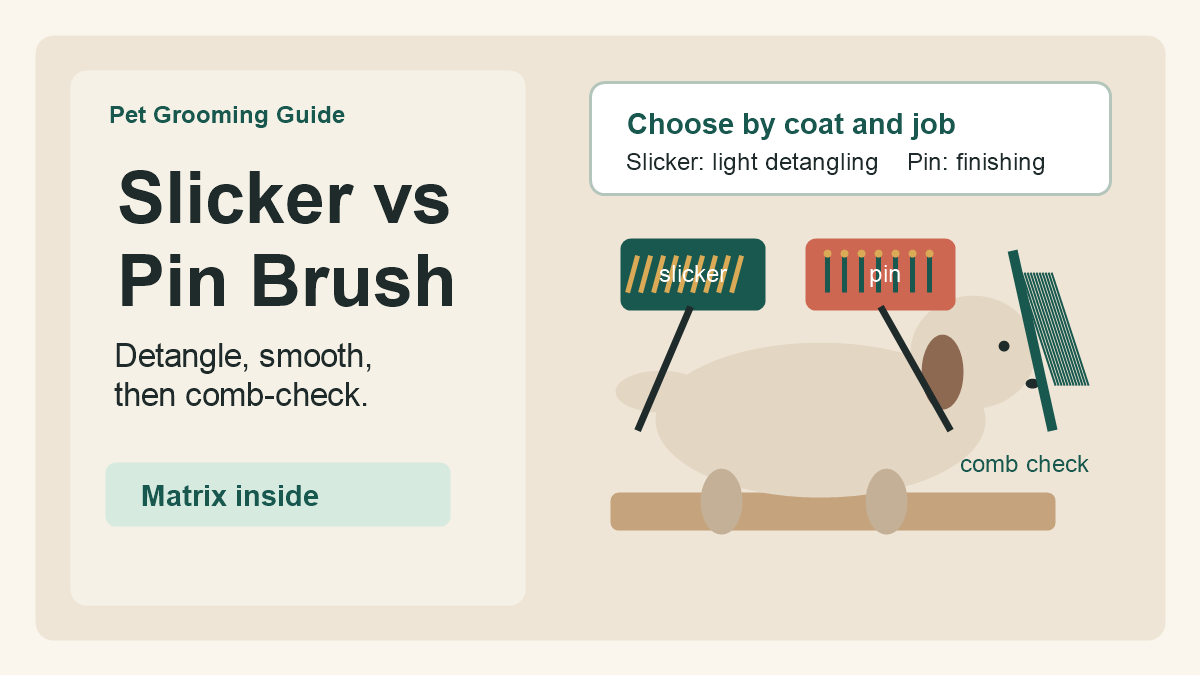
    A slicker brush is usually the better starting tool for light detangling and lifting loose hair from many medium, long, wire, curly, and wavy coats. A pin brush is usually better for smoothing and finishing longer coat after tangles are already under control. Many dogs need both, plus a metal comb to check whether the brush reached below the surface.

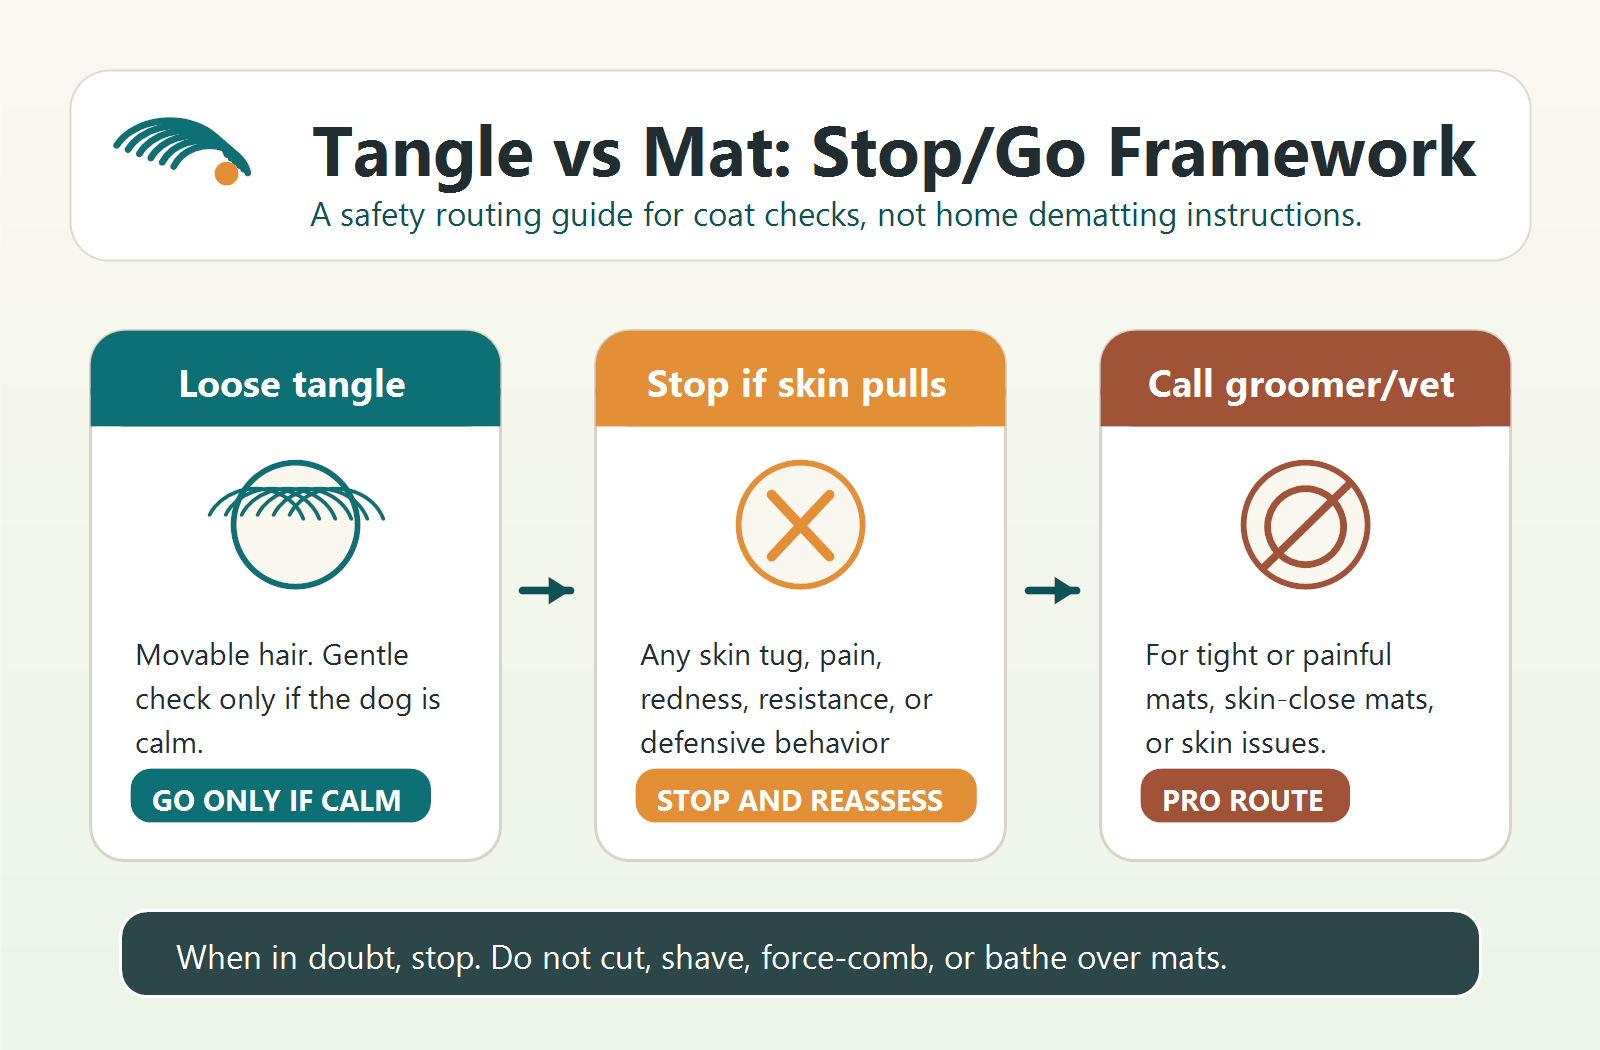
    The main safety rule is simple: neither brush is a force tool. Do not press a slicker hard into the skin, yank through snags, or keep brushing if your dog shows pain, panic, skin irritation, sores, or tight mats close to the skin. Severe mats, painful tangles, wounds, or skin problems need a professional groomer or veterinarian.

    Quick Answer: Slicker Brush vs Pin Brush

    Dog coat situationBetter starting pointWhy
    Medium or long coat with loose hairSlicker brush, then comb checkHelps lift loose coat and find light tangles before they tighten.
    Long flowing coat after detanglingPin brushSmooths and arranges coat with less grab than a slicker.
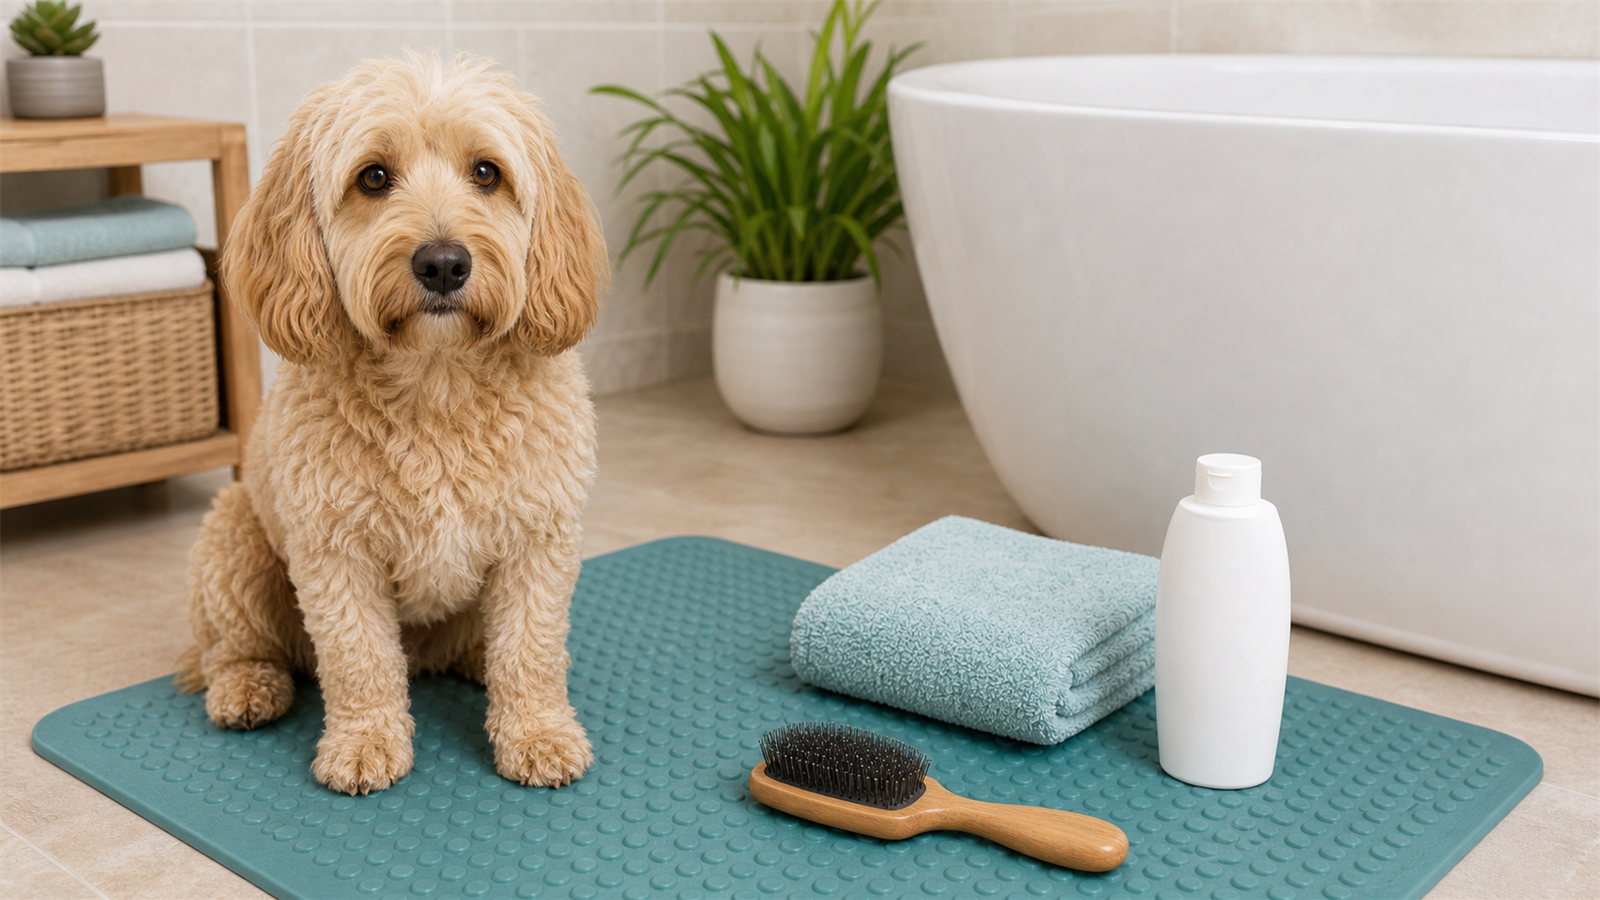
    Curly or wavy coatSlicker plus combWorks in sections so the coat does not look brushed only on top.
    Wire coat with light tanglesSlicker or pin brush by areaBoth may help, but pressure and a comb check matter.
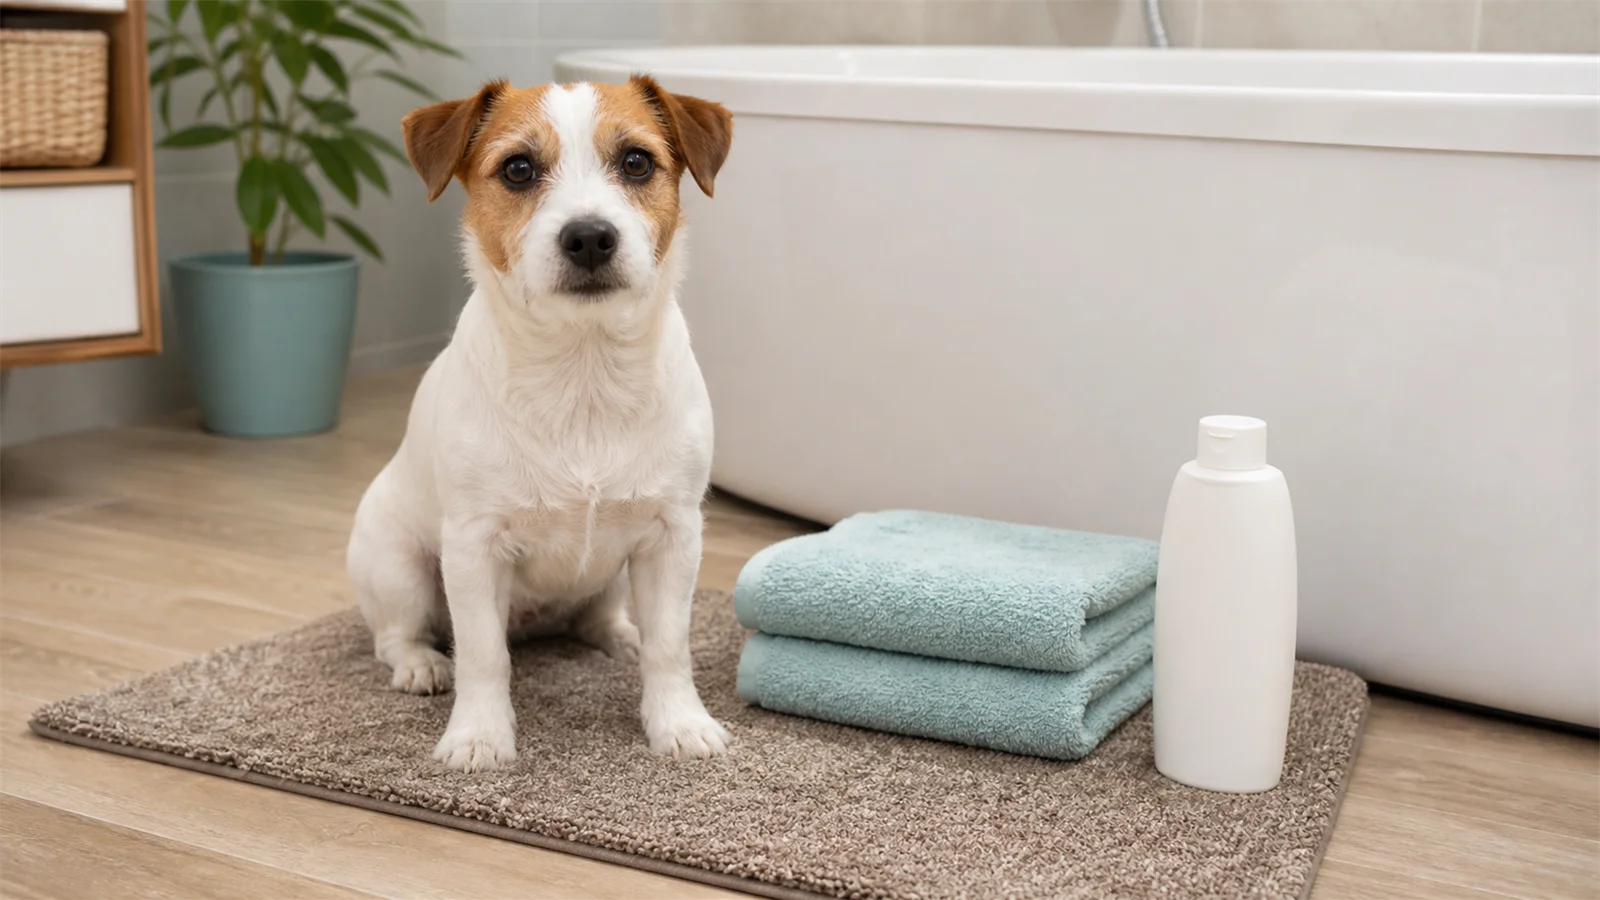
    Short smooth coatOften neither as the main toolA rubber curry or soft bristle brush may fit the job better.
    Severe mats, pain, sores, or skin irritationProfessional helpDo not brush through pain or skin-level matting.

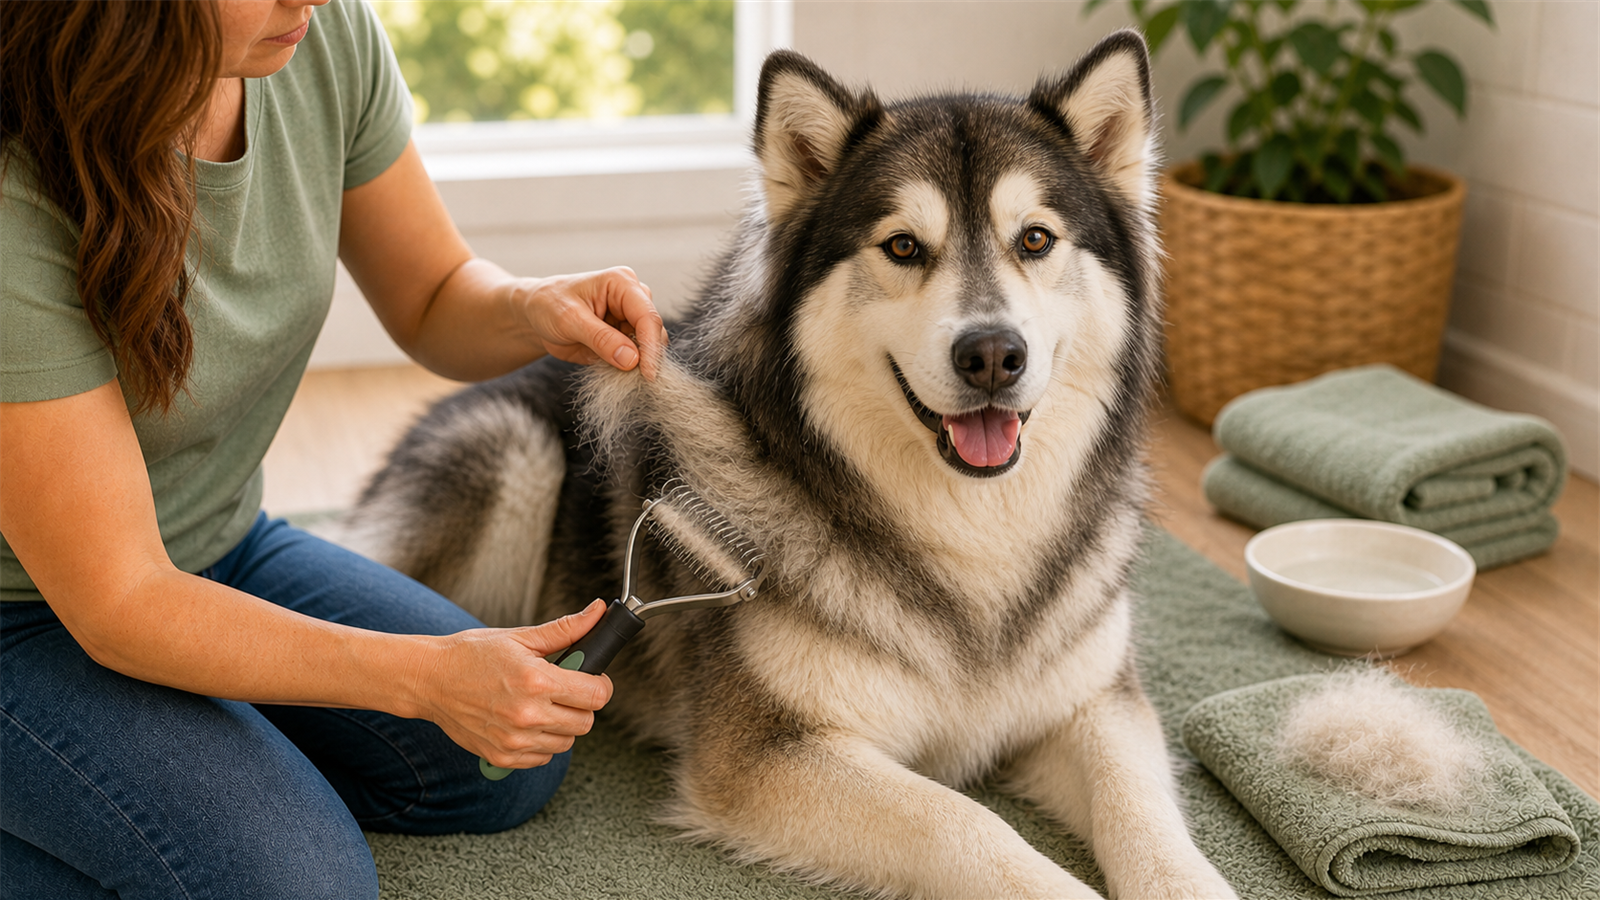
    What A Slicker Brush Does Well

    The AKC dog brush types guide describes slicker brushes as short, tightly packed, angled wire pins used on medium, long, wire, and curly coats, and notes that they should be used with a light touch. In everyday grooming, that means a slicker is a working brush, not a skin scraper.

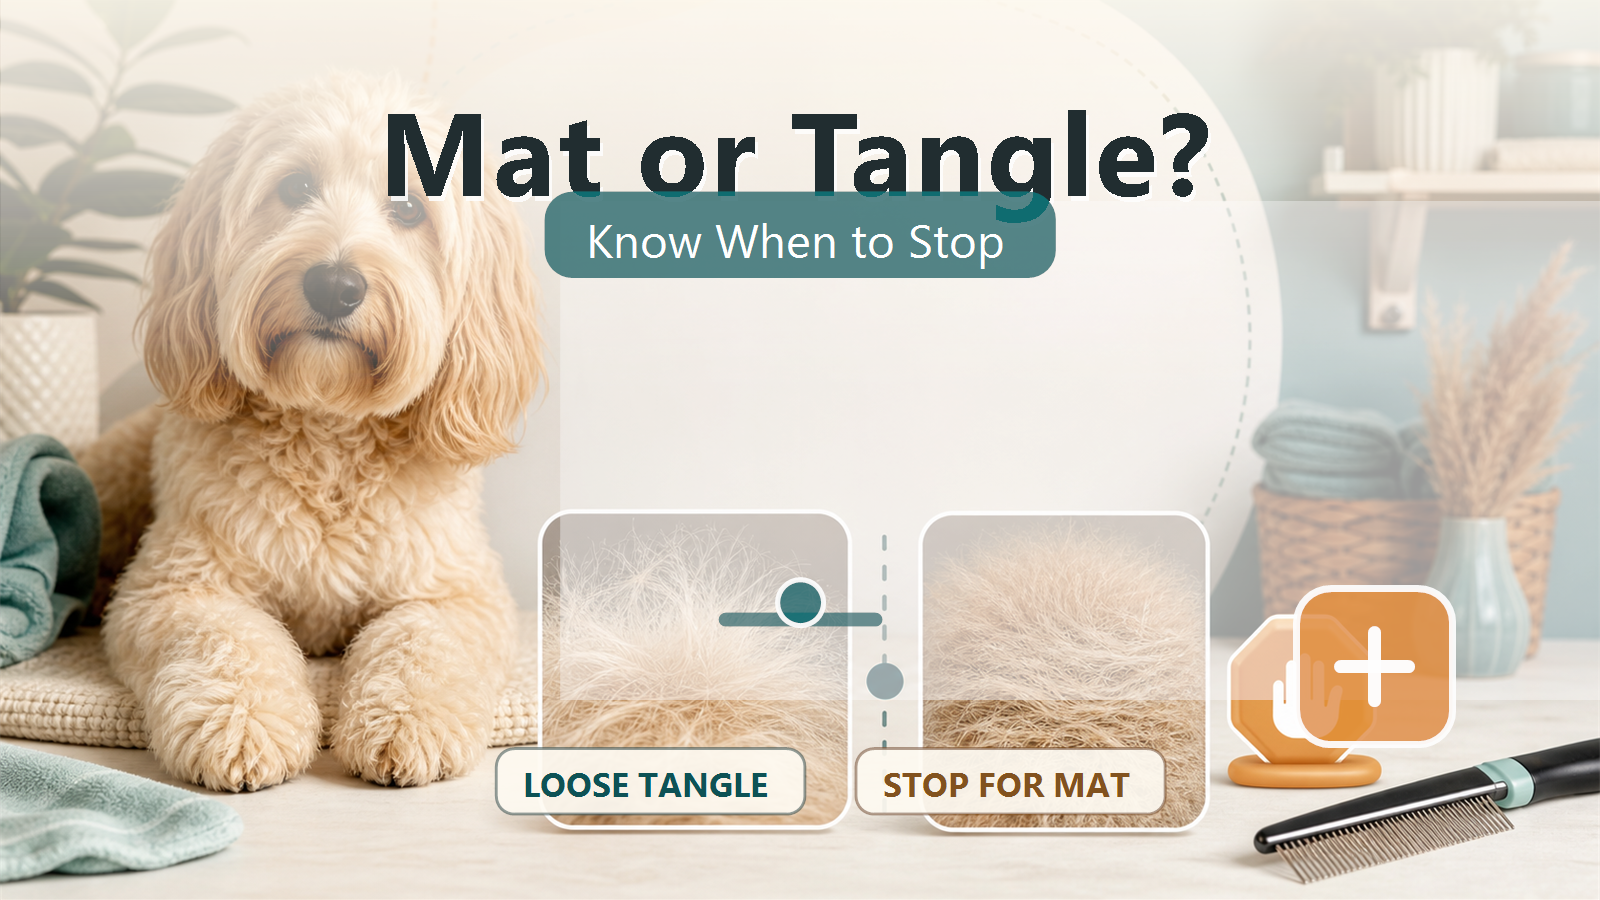
    A slicker brush can help with light tangles, loose hair, and section brushing on coats that need more than surface smoothing. It is often useful before a comb check on curly, wavy, medium, and long coats.

    Use short, controlled strokes. Keep pressure light enough that the brush would feel comfortable on your own forearm. If the dog flinches, turns away, tenses, mouths at the brush, or the skin looks pink, reduce pressure or stop.

    What A Pin Brush Does Well

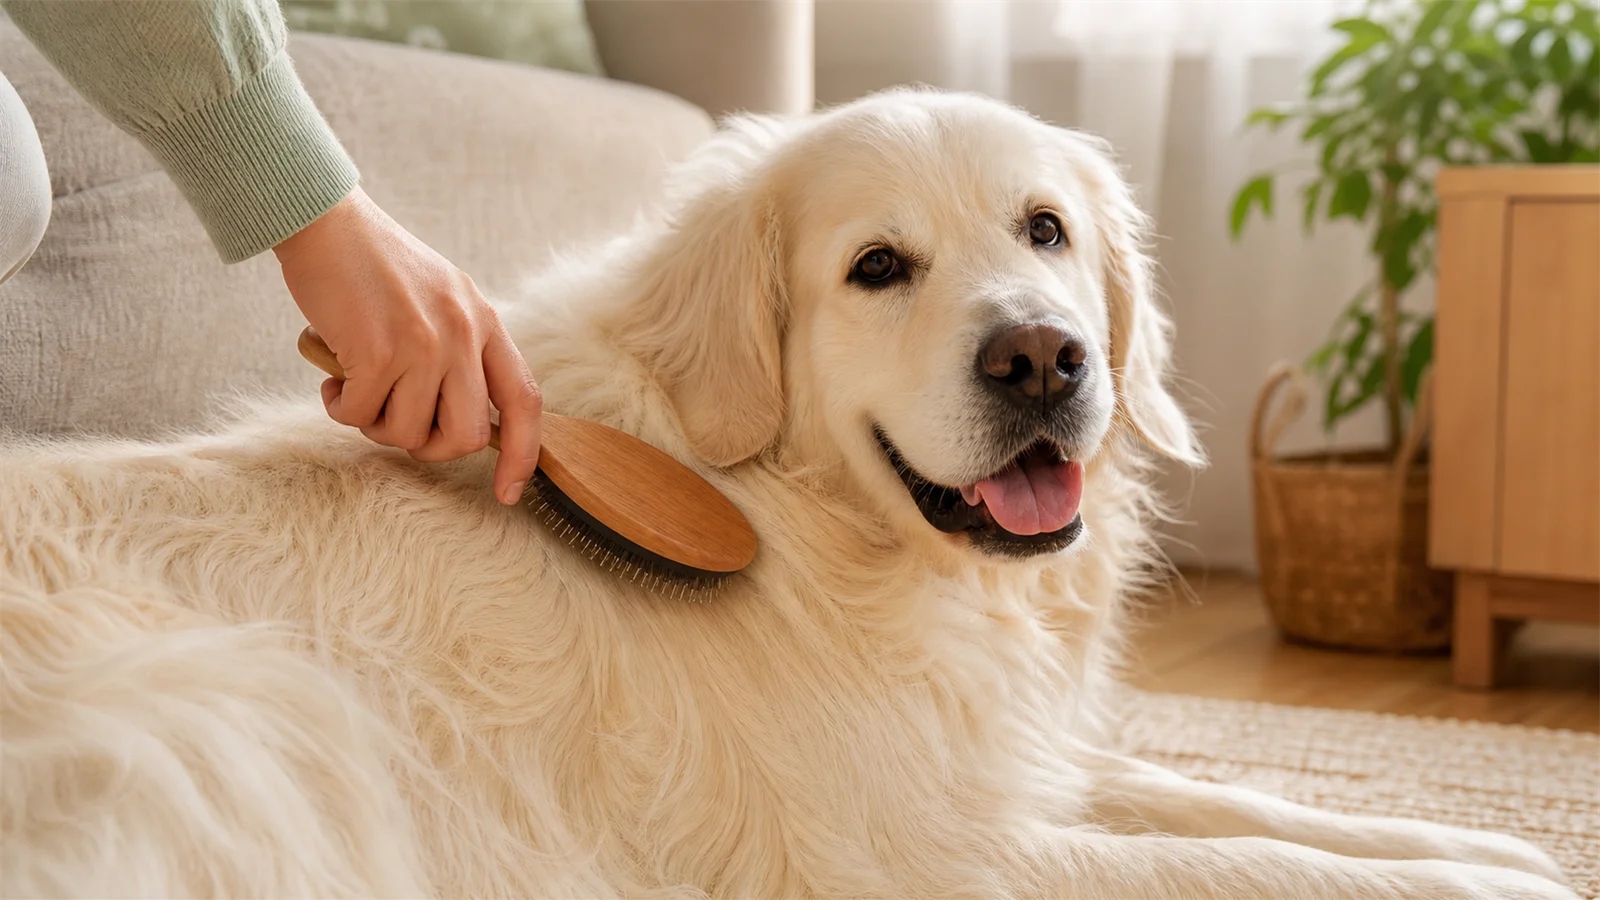
    A pin brush looks more like a human hairbrush. The AKC describes pinhead brushes as finishing brushes for long-coated dogs and as useful on some wire coats. A pin brush is usually better for smoothing, arranging feathering, and finishing a coat that is already free of painful tangles.

    The limit is depth. On dense, curly, wavy, or long coats, a pin brush may make the outside look tidy while tangles remain near the skin. That is why a pin brush should not be treated as proof that the coat is clear.

    When You Need Both Plus A Comb

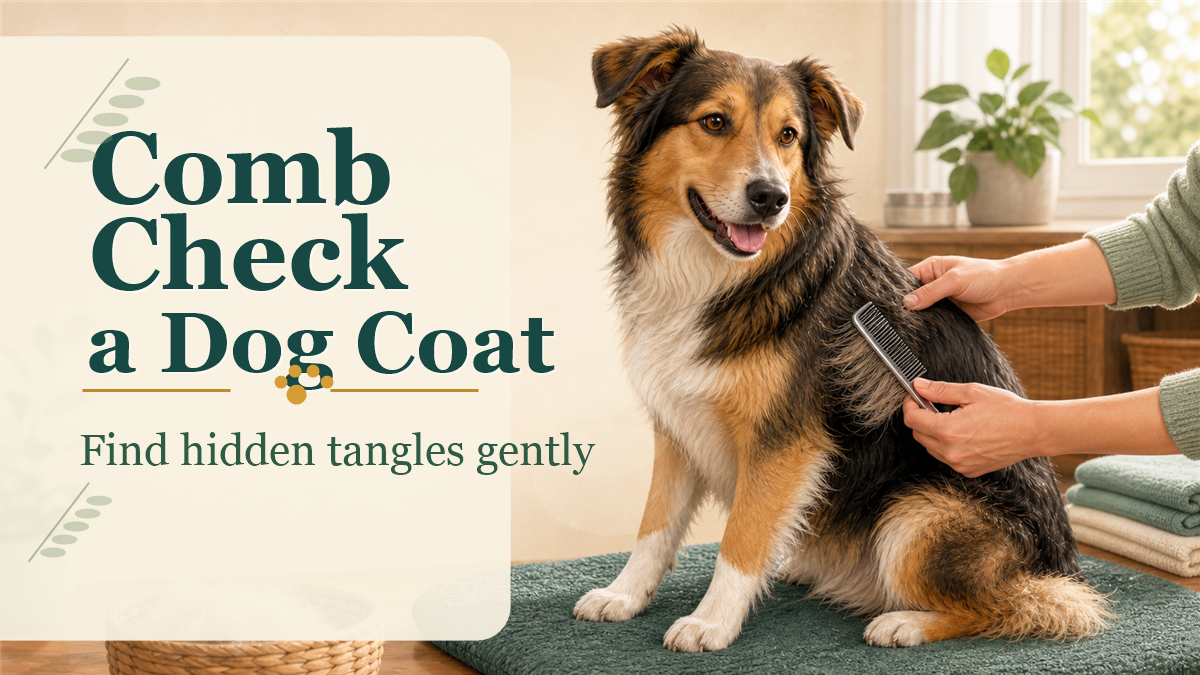
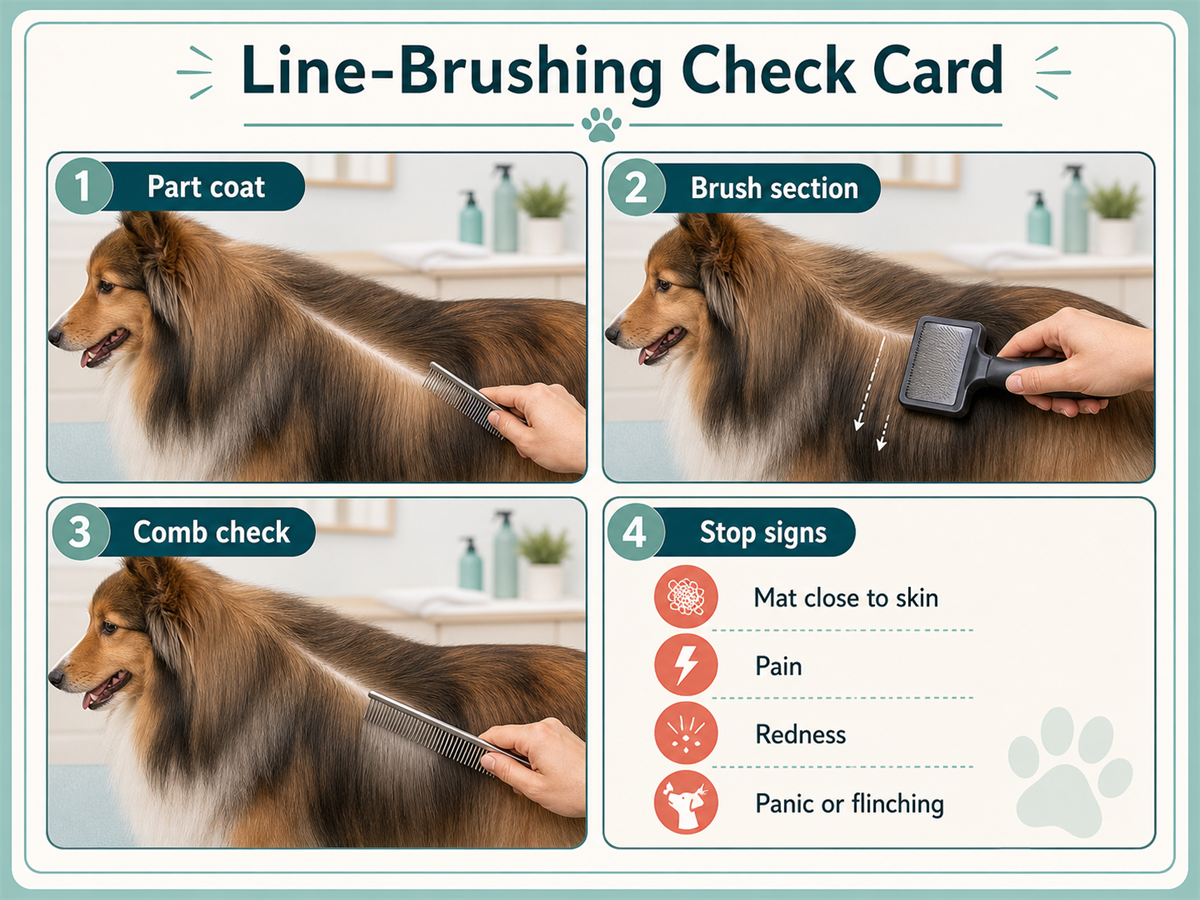
    For many home groomers, the answer is not slicker or pin brush. It is slicker, comb, then pin brush.

    1. Use a slicker lightly in small sections to open the coat and lift loose hair.
    2. Use a metal comb to check whether the coat is clear below the surface.
    3. Use a pin brush to smooth and finish longer coat once the comb passes comfortably.

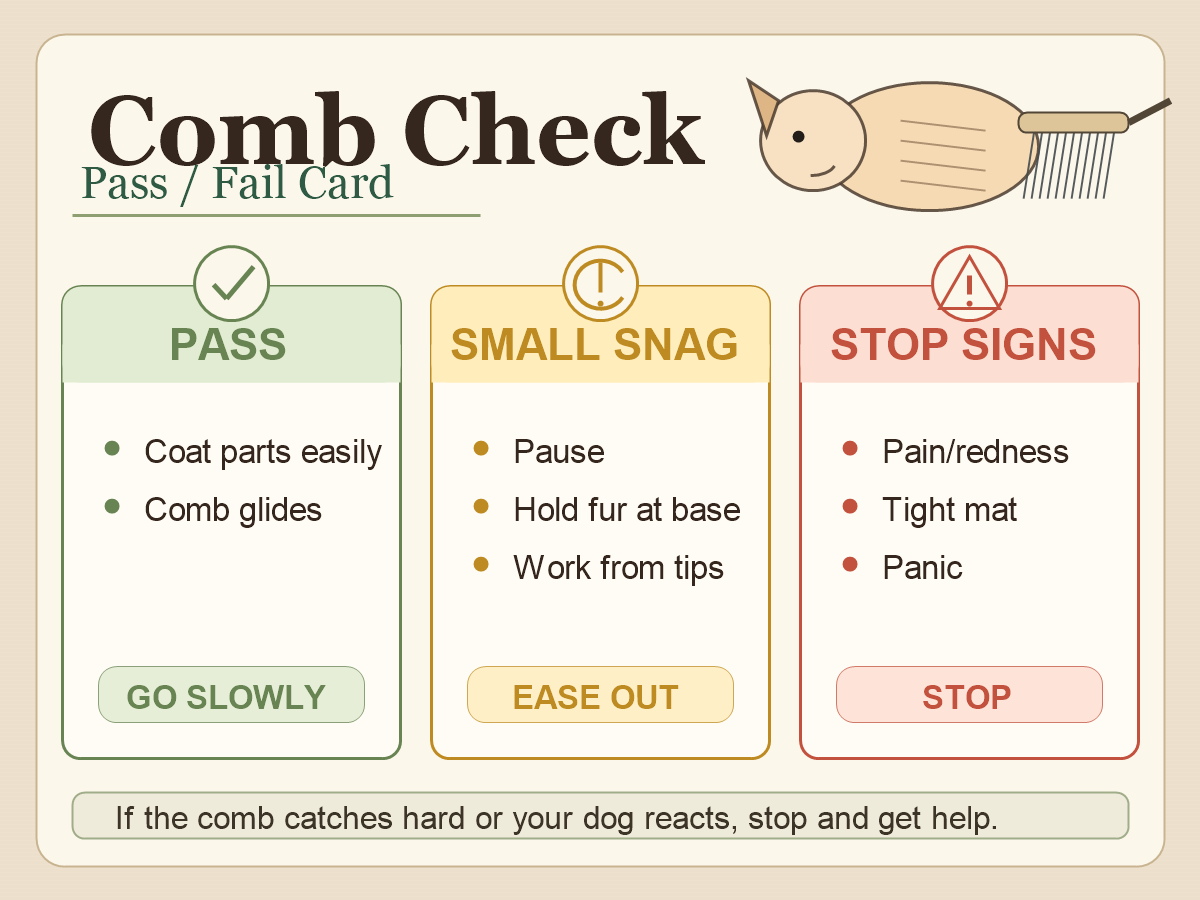
    The comb is the check step. If it catches, do not yank through the snag. Work a smaller section with gentle strokes, or stop if the tangle is tight, painful, close to the skin, or attached to irritated skin. For more on the check step, see how to remove loose dog hair and the coat-routine notes in dog grooming schedule by coat type.

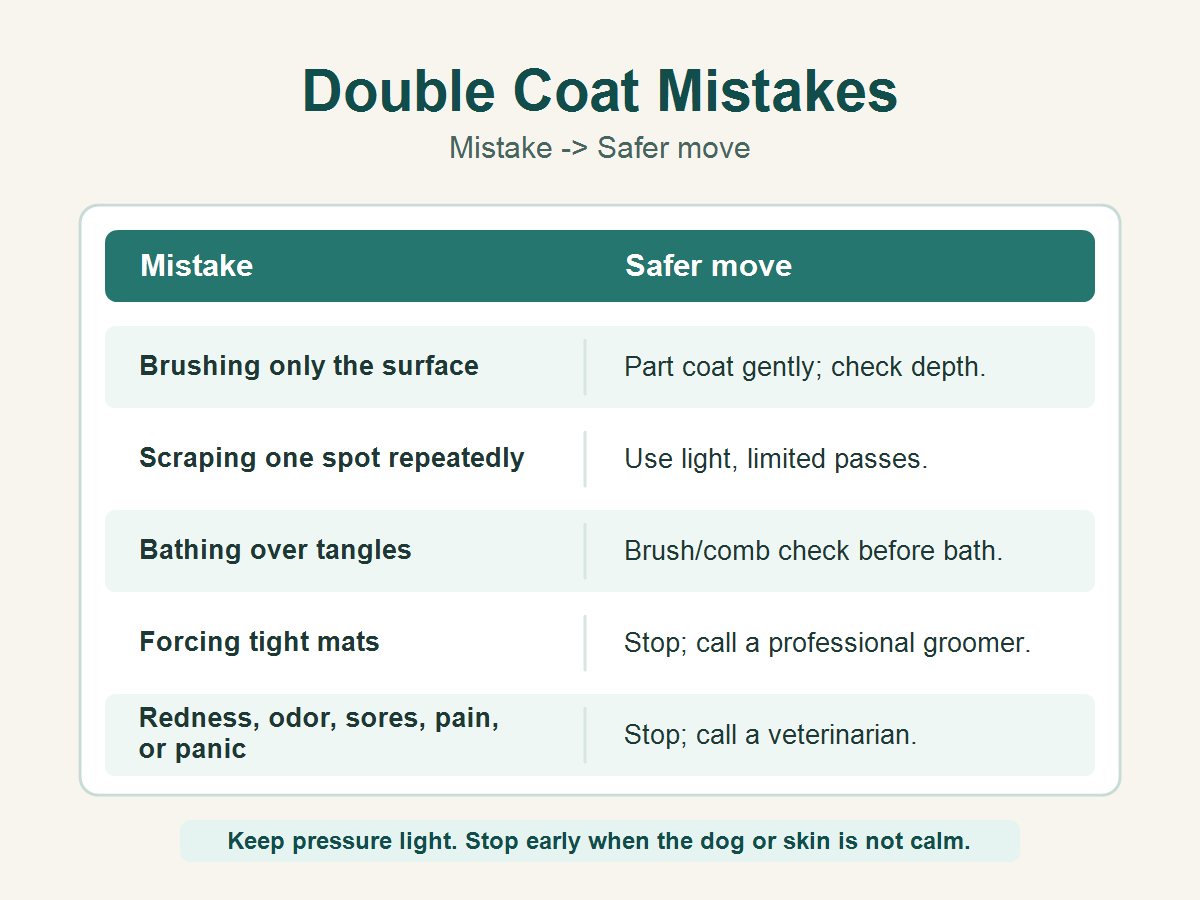
    Pressure, Skin, And Mat Safety

    The ASPCA dog grooming tips note that brushing can remove dirt, spread natural oils, prevent tangles, and help you inspect your dog. Those benefits depend on brushing that stays comfortable.

    • Part long or dense coat so you can see the section you are brushing.
    • Brush small sections instead of sweeping over the whole dog.
    • Keep slicker pressure light and avoid repeated strokes over one sensitive spot.
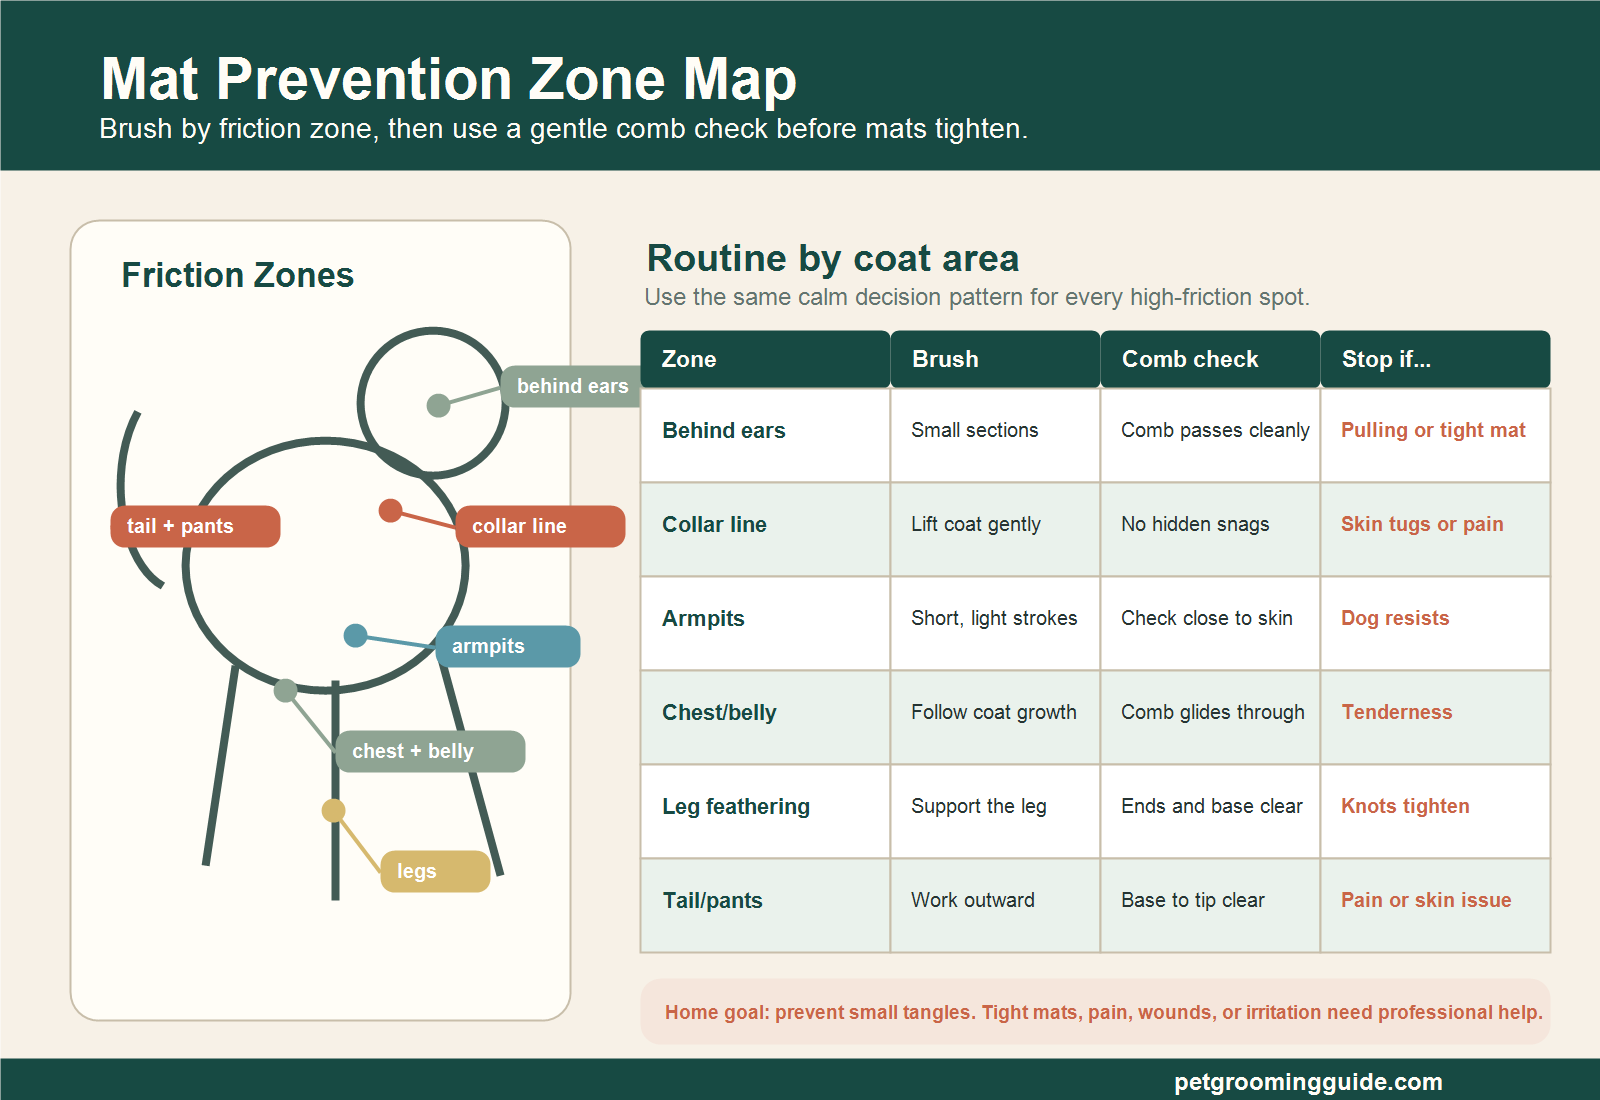
    • Check behind ears, armpits, collar areas, belly, pants, tail base, and friction zones.
    • Stop for redness, sores, scabs, swelling, heat, pain, panic, or skin irritation.
    • Use a groomer or veterinarian for severe, widespread, painful, or skin-level mats.

    The ASPCA matting guidance says mats that cannot be easily brushed out should be handled by a groomer or veterinarian, and warns against cutting mats with scissors. Do not cut, shave, scrape, or force-brush mats at home.
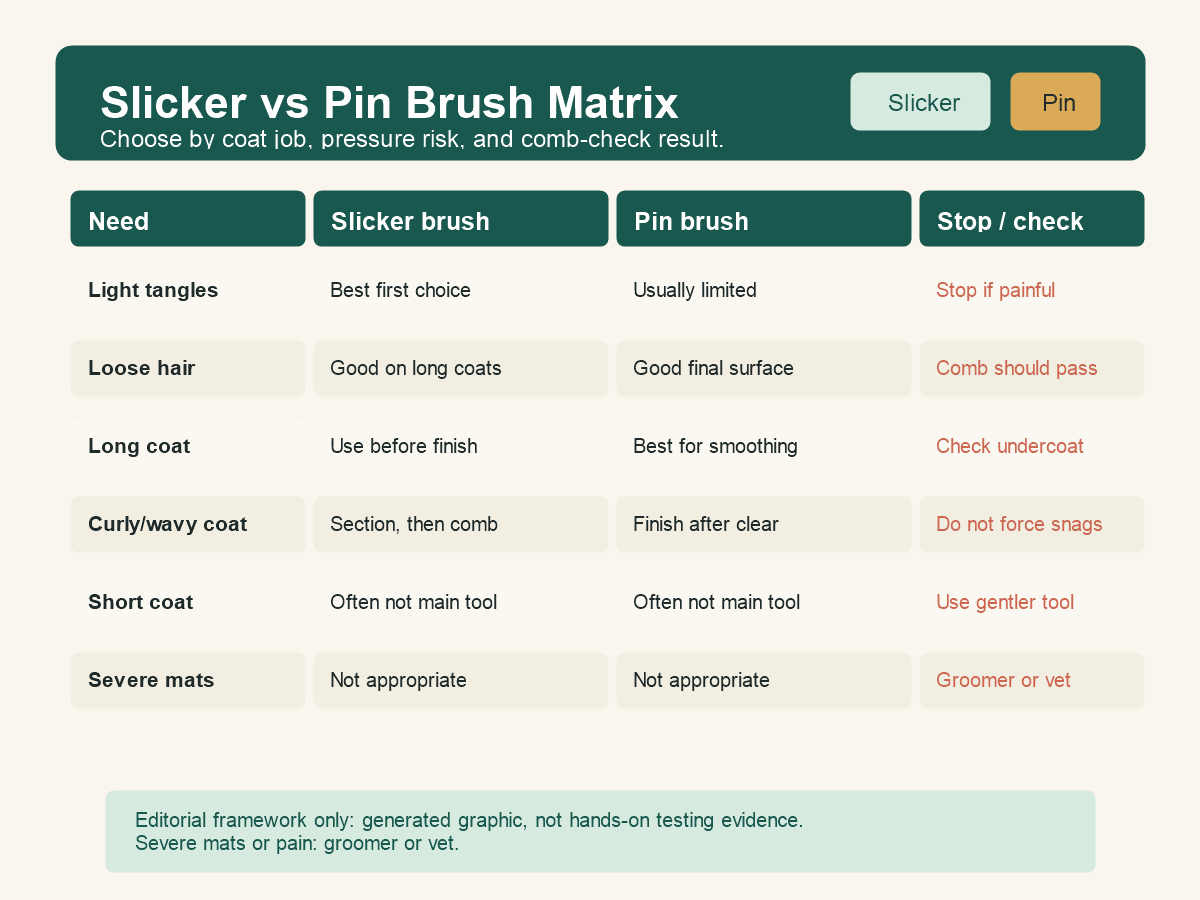
    Decision matrix comparing slicker brush and pin brush use by coat job, pressure risk, comb check, and severe mat stop points.
    Use this matrix as a quick check: match the brush to the coat job, keep pressure light, and stop for severe mats or pain.
    NeedSlicker brushPin brush
    Light tanglesUsually the stronger choice when used gently in sections.Limited; may glide over tangles instead of opening them.
    Loose hair on medium or long coatOften useful before the comb check.Useful for final surface smoothing.
    Dense coat penetrationBetter with sectioning and light pressure.Often too shallow alone.
    Long-coat finishingUseful before finishing if the coat needs detangling.Usually the better finishing brush.
    Beginner pressure riskHigher because wire pins can irritate skin if pressed hard.Lower, but still not a tool for yanking snags.
    Severe mat removalNot appropriate.Not appropriate.

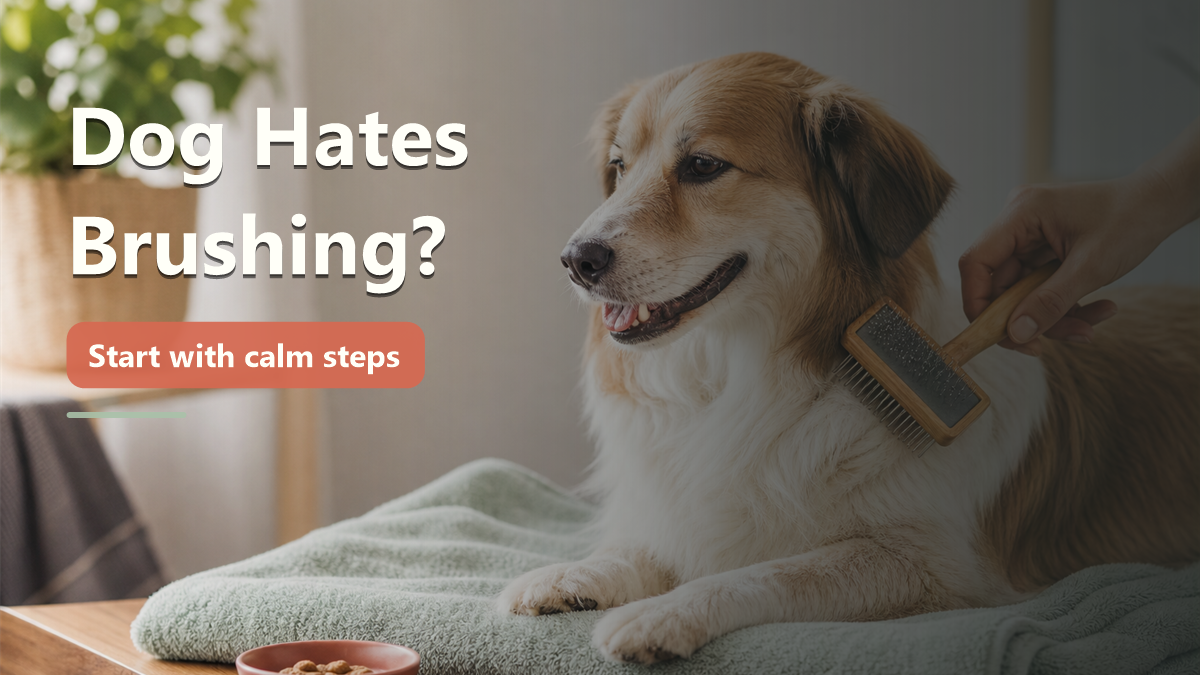
    For dogs that tense, dodge, snap, or panic around brushing, shorten the session and work on handling separately instead of pushing through. The next step is a behavior-safe plan, such as how to brush a dog that hates being brushed, or help from a qualified groomer.

    Bottom Line

    Choose a slicker brush when the coat needs gentle section work for light tangles or loose hair. Choose a pin brush when a long coat is already clear and needs smoothing. Use a comb to confirm the brush reached below the surface, and stop for pain, panic, skin irritation, or serious mats.

    FAQ

    Is a slicker brush better than a pin brush?

    Not always. A slicker brush is usually better for light detangling and lifting loose hair. A pin brush is usually better for smoothing and finishing longer coat after tangles are removed.

    Can a slicker brush hurt a dog?

    Yes. A slicker brush can irritate skin if it is pressed too hard, used repeatedly over one spot, or used on sore skin. Use a light touch and stop if the dog shows pain or the skin looks irritated.

    What coats need a pin brush?

    Pin brushes are often useful on long, flowing, or feathered coat after tangles have been removed. They help smooth and arrange hair rather than dig out dense tangles.

    Do I still need a comb after brushing?

    For medium, long, curly, wavy, or dense coats, yes. A comb helps check whether the brush reached below the top coat. If the comb catches, work gently in smaller sections or stop if the snag is painful or close to the skin.

    Should I brush out mats at home?

    Only small, loose tangles that do not hurt the dog are reasonable home work. Severe, tight, painful, widespread, or skin-level mats should be handled by a professional groomer or veterinarian.

    Sources

  • How to Comb Check a Dog Coat

    How to Comb Check a Dog Coat

    A comb check is a gentle pass/fail test after brushing. You slide a comb through one small brushed section to see whether the coat is truly open, not just smooth on top. Pass means the comb glides through without catching, tugging, skin pull, or a worried reaction from your dog. Fail means stop that section and do not force the comb.

    Comb check before a bath, before drying a long or dense coat, or before ending a brushing session. Stop for pain, redness, tight mats, panic, defensiveness, or skin irritation. Use a groomer for coat work you cannot do gently, and call a veterinarian for painful skin, wounds, parasites, bleeding, infection signs, or any medical concern.

    What a Comb Check Is

    A comb check verifies brushing. It is not a detangling shortcut, a mat-removal method, or a reason to pull harder. The point is to learn whether the brush reached through the coat.

    This matters because a coat can look neat on the surface while tangles stay hidden underneath. The ASPCA notes that brushing helps remove loose hair and dirt, spread natural oils, and check for fleas and flea dirt. A comb check makes that brushing result easier to confirm, section by section.

    When to Comb Check

    Use a comb check after brushing a small area, not before. If you start with the comb and it hits resistance, you may drag through a tangle before you know what is there.

    Comb checking is especially useful before a bath. If the coat still has hidden tangles or mats, water and drying can make the session harder on your dog. For bath order, see dog grooming before or after bath.

    The Pass/Fail Comb-Check Framework

    Think of each section as pass, pause, or fail. That keeps the check simple and prevents the common mistake of treating resistance like something to push through.

    ResultWhat you feelWhat to do next
    PassThe comb glides from the skin-side coat outward without snagging, tugging, or upsetting the dog.Move to the next small section.
    PauseThe comb meets a light snag, but the dog is calm and the skin is normal.Stop combing that spot. Go back to gentle brushing only if the hair separates easily.
    FailThe comb stops, pulls skin, hits a tight mat, or the dog flinches, panics, growls, snaps, or turns defensively.End work on that area. Use a groomer or veterinarian as appropriate.

    A failed section is useful information. It tells you the coat is not ready for bath, not ready for a harder comb pass, and not safe to rush.

    Comb-check pass fail card showing pass signs, small snag steps, and stop signs for pain, redness, tight mats, or panic.
    Use the comb check as a pass, pause, or stop signal instead of forcing the comb through resistance.

    Zones to Check

    Comb check the areas that rub, bend, collect loose coat, or hide tangles. Work slowly around thin or sensitive skin.

    • Behind the ears.
    • Collar and harness line.
    • Armpits.
    • Chest and belly.
    • Inner legs and feet.
    • Tail base, pants, and feathering.
    • Any spot where the coat looks packed, flat, damp, or clumped.

    If you find repeated catching in these friction zones, use dog matting vs tangles before deciding whether the area is safe for home brushing.

    How to Hold the Comb

    Use a clean metal comb category that suits the coat. Hold it lightly, close enough that you can feel resistance before it becomes a pull. Keep your other hand near the coat section so you can notice skin movement.

    1. Brush a small section first.
    2. Part or lift the coat so you can see the area you are checking.
    3. Start with a light comb pass through the brushed section.
    4. Watch the dog and the skin, not just the comb.
    5. Stop as soon as the comb catches, the skin moves, or the dog reacts.

    Do not saw the comb back and forth, brace the dog to finish, or pull harder because the section is almost done. If the comb cannot pass gently, the section fails the check.

    What to Do If the Comb Catches

    If the comb catches once, stop the comb pass and look at the area. A loose tangle may separate with gentle brushing if the dog stays calm and the skin looks normal. A tight mat, repeated catching, pain, redness, or skin pull needs a different plan.

    Use how to line brush a dog if the coat is safe to brush but you need smaller sections. Use how to prevent dog mats for a routine that reduces future catching.

    Call a groomer when the coat is tight, packed, skin-close, widespread, or beyond what you can brush without pulling. Call a veterinarian when there is pain, red or irritated skin, wounds, parasites, bleeding, swelling, infection signs, sudden coat loss, or a dog who seems medically fragile.

    Comb Check by Coat Type

    Coat typeHow to checkExtra caution
    Smooth coatUsually limited checks in thicker areas or shedding spots.Do not scrape thin skin for loose hair.
    Long silky coatCheck in small sections after brushing ends, ears, legs, belly, and tail.Stop if feathering pulls or twists around the comb.
    Curly or wavy coatUse very small sections and check close to the skin only after brushing opens the coat.Hidden mats may sit close to the skin; do not force the comb.
    Dense double coatCheck packed areas after light section brushing.Stop if undercoat is packed tight or the skin gets irritated.
    Feathered coatCheck behind ears, legs, tail, chest, and pants in short passes.These areas can be sensitive and mat from friction.

    The ASPCA’s at-home grooming tips describe different brush and comb categories by coat type. This guide stays category-level and does not recommend specific products.

    Stop Signs

    End the session if the check is no longer calm, gentle, and clear. A comb check should never turn into a struggle.

    • Pain, yelping, flinching, or repeated turning toward the comb.
    • Redness, raw skin, hot skin, swelling, scabs, wounds, bleeding, or skin irritation.
    • Tight mats, skin-close mats, packed coat, or coat that pulls the skin.
    • Panic, freezing, growling, snapping, biting, or defensive behavior.
    • Fleas, ticks, parasite dirt, sudden hair loss, or unusual skin changes.
    • Any situation where restraint or sedation seems necessary.

    For broader brushing safety mistakes, see dog brushing mistakes.

    FAQ

    What is a comb check on a dog?

    A comb check is a gentle pass through a brushed coat section to confirm that hidden tangles are not left under the surface.

    Should you comb check before bathing?

    Yes, when it is safe. Comb check after brushing and before bathing so hidden tangles or mats are not missed before water is added.

    What does it mean if the comb catches?

    It means that section does not pass. Stop the comb pass, check the skin and coat, and do not pull through resistance.

    Can I comb through a mat?

    No. Do not force a comb through tight, painful, skin-close, or repeated matting. Use a groomer or veterinarian as appropriate.

    Which coat zones should I comb check?

    Focus on behind the ears, collar line, armpits, chest, belly, legs, feet, tail, pants, feathering, and any packed or clumped area.

    Sources

  • How to Line Brush a Dog at Home

    How to Line Brush a Dog at Home

    Line brushing means lifting a dog’s coat and brushing one small section at a time so the brush reaches more than the surface coat. It can help on long, double, curly, wavy, and feathered coats, but it is not a way to remove tight mats. If the brush catches, the skin pulls, or the dog reacts in pain or fear, stop and get help from a groomer or veterinarian.

    Use light pressure, good light, and sections small enough that you can see the skin-side coat without scraping the skin. Do not force a brush or comb through mats, red skin, wounds, parasites, or a dog that is panicking, growling, snapping, or too hard to handle safely.

    What Line Brushing Is

    Line brushing is a section-by-section brushing method. You lift or part a narrow layer of coat, brush that visible section gently, move to the next nearby section, and check whether the coat is opening without tugging.

    The goal is to prevent surface brushing, where the top looks smooth while tangles stay hidden underneath. This matters most on coats that hold hair in layers, such as long coats, double coats, curly or wavy coats, and feathering behind the ears, legs, tail, and chest.

    The ASPCA’s dog grooming guidance notes that brushing helps remove dirt, spread natural oils, and check for fleas and flea dirt. Line brushing applies that same idea in smaller visible sections.

    When Line Brushing Helps

    Line brushing helps when the coat is healthy enough to brush and the problem is reach, not pain or tight matting. It is useful when the brush is only smoothing the surface, when feathering tangles between sessions, or when a thick coat needs smaller sections before a comb check.

    Coat areaLine-brushing fitStop point
    Long coatSmall rows from lower coat upwardStop if the coat pulls skin or forms tight clumps.
    Double coatSmall sections where undercoat packs behind the topcoatStop for packed coat you cannot open with light brushing.
    Curly or wavy coatVery small sections with careful comb checksStop for skin-close mats or curls that will not separate gently.
    FeatheringShort sections behind ears, legs, tail, and chestStop for pain, redness, or mats near thin skin.
    Smooth coatUsually not neededUse a simpler gentle brushing routine instead.

    If you are unsure whether a spot is a loose tangle or a mat, check dog matting vs tangles before brushing through resistance.

    Set Up Before You Start

    Choose a calm time, a steady surface, and enough light to see the coat part clearly. Keep the session short if your dog is young, tired, worried, sore, or new to brushing.

    • Use a brush or comb category that fits the coat, such as a slicker brush, pin brush, or metal comb.
    • Keep one hand close to the section so you can feel skin movement.
    • Brush with light pressure instead of pressing down toward the skin.
    • Clear hair from the brush often.
    • Reward calm pauses and stop before the dog becomes overwhelmed.

    If your dog already dislikes brushing, start with handling and tolerance work first. The guide on how to brush a dog that hates being brushed can help you keep the session safer and shorter.

    Step-by-Step Line Brushing

    Work slowly and keep each section small. If you cannot see what the brush is doing, the section is probably too large.

    1. Run your hands over the coat first. Check for mats, sore skin, wounds, parasites, swelling, heat, or painful spots.
    2. Lift a narrow layer of coat so you can see the section underneath.
    3. Hold the loose coat gently, without pulling the skin tight.
    4. Brush the exposed section with light strokes in the direction the coat grows.
    5. Move to the next small section beside or above it.
    6. Pause often to check skin color, dog comfort, and whether the brush is catching.
    7. When safe, finish the area with a gentle comb check. If the comb catches, do not force it.
    Line-brushing check card showing part coat, brush section, comb check, and stop signs.
    Use this quick sequence while line brushing: part the coat, brush a small section, comb-check only when safe, and stop for pain, redness, panic, flinching, or mats close to the skin.

    How Small Should Each Section Be?

    Each section should be small enough that you can see the coat you are brushing and feel whether the skin is being pulled. Thicker, longer, curlier, or more packed coats need smaller sections than open, easy coats.

    Use smaller sections around ears, armpits, legs, tail, collar areas, and other friction spots. These areas can mat faster and may have thinner, more sensitive skin.

    For routine spacing and prevention, see how to prevent dog mats. For a broader brushing rhythm, the dog grooming schedule by coat type can help you choose a realistic cadence.

    Follow With a Comb Check

    A comb check tells you whether the brush reached through the section. Use it only when the dog is comfortable and the coat has already opened with gentle brushing.

    The comb should move through without tugging, skin pull, or a pain response. If it catches, stop. The answer is not more force. You may need a smaller section, a calmer session, or a groomer if the coat is tight or close to the skin.

    Stop Signs

    Stop line brushing if the dog or coat shows signs that the job is no longer safe for home brushing. These signs mean the session needs to end, not intensify.

    • Pain, flinching, yelping, or repeated turning toward the brush
    • Red, raw, swollen, hot, scabbed, wounded, or bleeding skin
    • Fleas, ticks, parasite dirt, or sudden skin changes
    • Tight mats, mats close to the skin, packed coat, or coat that pulls the skin
    • Panic, freezing, growling, snapping, biting, or unsafe handling
    • Any situation where sedation or restraint seems necessary

    Use a professional groomer for tight mats, packed coat, sensitive-area matting, or coat work you cannot do gently. Use a veterinarian for wounds, parasites, painful skin, infection signs, sudden coat loss, or any medical concern.

    Common Line-Brushing Mistakes

    • Brushing only the top layer and missing the coat underneath.
    • Taking sections so large that you cannot see the brush contact.
    • Pressing the brush down into the skin.
    • Using line brushing as a mat-removal method.
    • Dragging a comb through resistance after brushing.
    • Continuing after the dog shows pain, fear, or defensive behavior.
    • Bathing a coat that still has tight tangles or mats.

    For more brushing errors to avoid, see dog brushing mistakes. If you are brushing before a bath, review dog grooming before or after bath so mats and tangles are handled before water can tighten them.

    How Line Brushing Fits With Shedding

    Line brushing can help collect loose hair from deeper coat layers, but it should still feel gentle. On shedding coats, work in small sections, clear the brush often, and stop before the skin gets irritated.

    If your main goal is normal shedding control rather than sectioning a long or curly coat, start with how to remove loose dog hair.

    FAQ

    What is line brushing a dog?

    Line brushing is brushing a dog’s coat in small lifted sections so you can reach through the coat instead of smoothing only the surface.

    Which dogs need line brushing?

    Long, double, curly, wavy, and feathered coats may benefit from line brushing. Smooth coats usually need a simpler brushing routine.

    Should line brushing hurt?

    No. Stop for pain, redness, skin pull, tight mats, panic, growling, snapping, or any sign that the dog cannot be handled safely.

    Can line brushing remove mats?

    No. Line brushing is not a severe mat-removal method. Do not force brushes or combs through mats. Use a groomer or veterinarian for tight, painful, skin-close, or widespread mats.

    Do you comb after line brushing?

    Yes, when it is safe. A comb check can confirm whether the section is open. If the comb catches or pulls skin, stop instead of forcing it.

    Sources

  • Should You Groom a Dog Before or After a Bath?

    Should You Groom a Dog Before or After a Bath?

    Most dogs should be checked and lightly brushed before a bath, then dried fully and brushed again afterward. The before-bath pass finds loose hair, dirt, small tangles, skin problems, ear or eye concerns, paw issues, and stress signs before water makes the session harder. The after-bath pass finishes the clean, dry coat. For a broader routine, use the dog grooming checklist for beginners.

    If the coat is tightly matted, painful, skin-close, or hiding sores, do not bathe over it and do not cut it out at home. Stop and use a professional groomer or veterinarian.

    Quick Answer: What Happens Before vs After the Bath?

    Decision card showing when to brush before a dog bath, finish after drying, or stop and get help.
    Use this quick card to choose what happens before the bath, what waits until the coat is dry, and when to stop.

    The Safe Beginner Order

    For a normal home grooming session, use this order:

    1. Check the coat, skin, ears, eyes, paws, nails, and behavior.
    2. Brush or comb loose hair and small surface tangles only if they move without pain.
    3. Bathe if the dog needs it and can stay safe and calm.
    4. Rinse thoroughly, especially through dense, long, curly, or double coats.
    5. Towel dry, then keep drying until the coat is dry down near the skin.
    6. Brush again once the coat is dry.
    7. Move nails, ears, paws, or trimming to another short session if the dog is tired.

    ASPCA dog grooming guidance recommends brushing before bathing to remove dead hair and mats, and it also notes careful water control around the ears, eyes, and nose.

    What to Do Before the Bath

    Start with your hands and eyes before you reach for a tool. Look for redness, sores, scabs, fleas or flea dirt, ticks, swelling, odor from skin folds, ear discharge, eye squinting, limping, cracked paw pads, bleeding nails, or behavior that says the dog cannot handle more.

    Then do a light brush or comb check. For a short coat, this may be a quick loose-hair pass. For a long, curly, silky, or shedding coat, work in small sections and check the places that tangle first: behind the ears, under the collar, armpits, chest, belly, tail base, rear legs, and paw feathering.

    Keep the brush pass gentle. If the hair does not move, the dog flinches, or the coat feels packed close to the skin, stop. That information is the point of the pre-bath check.

    Mats and Tangles: The Bath Decision

    Small loose tangles may be handled before the bath only when the dog is calm and the hair separates without skin pulling. Do not keep brushing harder to make the bath happen.

    Tight mats, widespread mats, painful mats, skin-close mats, and mats over red or wounded skin should stop the home bath. Water can make tangled coat tighter and can hide problems underneath. Do not use scissors near the skin to remove mats. The same safety idea applies during the bath itself; the dog bathing mistakes guide covers bath-specific errors to avoid.

    When Bathing First Can Make Sense

    Some professional groomers bathe certain dirty or heavily shedding coats before the final brush-out. That is usually done with grooming equipment, coat knowledge, and drying control that many beginners do not have at home. Groomer to Groomer discusses this professional disagreement for double-coated dogs, which is useful context for exceptions, but it is not universal beginner advice. The safer home rule is still: inspect first, remove only loose and painless coat problems, bathe only when the coat is safe to wet, then finish after full drying.

    Bathing first is not a good shortcut for mats, sores, unknown skin problems, ear problems, eye problems, panic, or unsafe handling.

    Dry Fully Before the Final Brush

    The final brush should wait until the dog is fully dry. A coat can feel dry on top while the undercoat, armpits, belly, collar area, tail base, or paw feathering still holds moisture. For more drying detail, see how to dry a dog after a bath.

    Drying does not have to mean high heat. Use towels, a warm but not hot room, calm breaks, and airflow the dog can tolerate. Be extra cautious with puppies, seniors, heavy-coated dogs, flat-faced dogs, and dogs that become stressed by noise or air movement.

    Nails, Ears, and Eyes Do Not Need to Fit the Same Session

    Many home grooming sessions go badly because the owner tries to do everything at once. Nails can be trimmed before the bath, after the bath, or on a different day. If the dog is already tired from bathing and drying, move nails to another calm session.

    Ear cleaning should be need-based and gentle, not an automatic deep-cleaning step after every bath. Do not treat painful, red, swollen, smelly, or discharging ears as a normal bath task. Ask a veterinarian.

    For eyes, keep shampoo and rinse water controlled. Wipe the face gently with a damp cloth if needed, but stop for squinting, injury, heavy discharge, swelling, or pain.

    Coat-Type Notes

    Short coats

    Do a quick pre-bath loose-hair pass, check skin and paws, bathe if needed, dry well, and finish with a short brush or cloth pass.

    Double coats and shedding coats

    Remove loose coat gently before the bath, but avoid scraping or overworking the skin. After the bath, dry thoroughly before the final brush. Dense coats can trap moisture even when the top layer looks finished. The dog grooming schedule by coat type can help plan routine timing without turning one bath day into too much work.

    Long, silky, curly, or mat-prone coats

    Check friction zones before the bath. Do not wet tight tangles. After the bath, dry fully and use a careful final comb check only if the dog is comfortable.

    Fearful Dogs and Puppies

    A fearful dog or puppy does not need a full grooming day. Split the job into tiny sessions: one day for a brush check, another for bath setup practice, another for a short bath, and another for nails or ears if needed.

    Stop for panic, growling, snapping, repeated escape attempts, freezing, heavy panting that does not settle, or handling that no longer feels safe. A shorter session that ends calmly is better than forcing the whole list.

    When to Use a Groomer or Vet

    Use a professional groomer for tight or widespread mats, coat work beyond your skill, trimming close to skin, heavy undercoat removal that you cannot do calmly, or a dog that needs safer handling than you can provide at home.

    Use a veterinarian for wounds, hot spots, red or raw skin, parasites, bad odor from skin or ears, ear discharge, eye injury, eye discharge, bleeding nails, limping, pain, breathing distress, heat stress, sudden behavior change, or a medically fragile dog.

    Bottom Line

    For most dogs, the safest home order is simple: check and lightly brush before the bath, skip the bath if mats or medical concerns appear, bathe and rinse only when the dog can stay safe, dry completely, then do the final brush. Nails, ears, eyes, and trimming can wait for another session if the dog is stressed.

    FAQ

    Should you brush a dog before or after a bath?

    Usually both. Brush lightly before the bath to remove loose hair and find small tangles, then brush again after the coat is fully dry.

    What if my dog has mats before a bath?

    Do not bathe over tight, painful, widespread, or skin-close mats. Stop and use a professional groomer or veterinarian.

    Should nails be done before or after the bath?

    Either can work. If the dog is tired or stressed after bathing, trim nails another day.

    Should ears be cleaned before or after bathing?

    Check ears during grooming, but clean only when needed and safe. Pain, odor, redness, swelling, or discharge should go to a veterinarian.

    Should double-coated dogs be brushed before bathing?

    For home grooming, yes: do a gentle pre-bath brush and coat check, then dry fully before the final brush. Heavy or difficult coat work may need a groomer.

    Should you cut a dog’s hair before or after a bath?

    Basic finishing is usually cleaner after the dog is bathed, rinsed, and fully dry. Do not clip over mats, cut close to skin, or attempt major coat work without the right skill and setup.

    Sources

  • Double Coat Dog Grooming Mistakes to Avoid

    Double Coat Dog Grooming Mistakes to Avoid

    The biggest double coat dog grooming mistakes are shaving or clipping without coat-specific guidance, brushing only the surface, overusing deshedding tools, bathing over tangles, drying only the top layer, forcing mats, ignoring skin changes, and trying to remove every loose hair. A safer routine protects the skin, works gently through the coat, and stops early when the dog is uncomfortable.

    This guide is about mistake prevention. It does not teach shaving, clipping, mat removal, skin treatment, parasite treatment, or breed-specific trimming.

    Double coat dog grooming mistakes table showing safer moves for brushing, deshedding, bathing, mats, and skin warning signs.
    Use this as a quick mistake-prevention card. Stop for tight mats, skin changes, pain, panic, or unsafe handling.
  • Grooming stepBest timing for most dogsWhy
    Coat and skin checkBefore the bathFind tangles, mats, sore skin, parasites, lumps, wounds, and stress before the coat is wet.
    Brush or comb checkBefore and afterBrush lightly before water; finish only after the coat is fully dry.
    Small loose tanglesBefore the bath, only if painlessWater can tighten tangles. Stop if the hair pulls skin or the dog flinches.
    Tight matsNeither at homeDo not bathe, cut, or force-comb tight mats. Use a groomer or vet.
    NailsSeparate session if neededNails can happen before, after, or another day. Calm handling matters more than timing.
    Ears and eyesCheck before; wipe gently only when safePain, discharge, redness, swelling, squinting, or odor are vet signs, not routine grooming jobs.
    Final brush and finishAfter the dog is fully dryDamp coat can hide tangles and moisture near the skin.
    MistakeWhy it can cause troubleSafer alternative
    Shaving or clipping because the dog shedsThe coat may need an individual assessment before any major trim decisionAsk a qualified groomer or veterinarian for coat-specific guidance
    Brushing only the surfaceLoose undercoat and tangles can stay hidden below the topcoatPart small sections gently and check the coat depth without forcing
    Using a deshedding tool too muchRepeated passes over one area can irritate skin or thin the coat unevenlyUse light, limited passes only when the skin and coat look normal
    Bathing before checking tanglesWater can make existing coat problems harder to work withBrush and comb-check before the bath when the coat is safe to handle
    Drying only the top layerDense coat can hold dampness near the skinDry thoroughly and recheck thick areas after the coat settles
    Forcing mats or tight spotsPulling can hurt the dog and injure skinStop and use a professional groomer
    Ignoring redness, odor, bald patches, or sudden shedding changesThese can point to a skin or health problemStop grooming that area and call a veterinarian
    Chasing every loose hairOver-grooming can leave skin sore before shedding is truly finishedStop while the dog is comfortable and the skin looks calm

    Mistake 1: Shaving or Clipping Without Coat-Specific Guidance

    Do not assume a double-coated dog should be shaved just because the dog sheds. Shedding is normal for many double-coated dogs, and a major coat change should be based on the individual dog, coat condition, season, health, and comfort.

    If shaving or clipping is being considered, ask a qualified groomer who can see the coat in person. If skin disease, heat stress risk, wounds, or medical fragility is part of the decision, involve a veterinarian.

    Mistake 2: Brushing Only the Coat You Can See

    A double coat can look smooth on top while loose undercoat, tangles, or packed hair sit deeper. Surface brushing may make the dog look tidy without actually checking the coat near the skin.

    Part the coat gently in a small area so you can see whether the brush or comb is reaching the layer that needs attention. If the tool stops, pulls skin, or makes the dog flinch, do not drag through it.

    PetMD guidance on matted pet hair explains why tight mats need careful handling and may need professional help. ASPCA dog grooming tips also support regular brushing and watching for skin problems while grooming.

    Mistake 3: Overusing Deshedding Tools

    A deshedding tool should not be scraped over the same spot until no hair comes out. Loose hair can keep releasing during seasonal shedding, and the goal is not to strip the coat bare.

    Keep pressure light. Stop for redness, bald patches, skin twitching, yelping, flinching, growling, snapping, panic, or any sign of pain. If you are not sure which tool category belongs on your dog’s coat, get guidance before repeating passes.

    AKC grooming guidance covers routine brushing and coat checks, while Texas A&M shedding advice points to regular brushing as part of managing loose hair.

    Mistake 4: Bathing Before Loose Coat and Tangles Are Checked

    Bathing before a coat check can make a grooming session harder. Water can tighten existing tangles, and dense undercoat can be harder to dry once it is packed or dirty. If you are not sure whether a spot is a tangle or something more serious, use our guide to dog matting vs tangles before you keep brushing.

    Brush and comb-check gently before bathing when the coat is safe to work. If you find painful mats, mats close to the skin, sores, swelling, discharge, parasites, or strong odor with irritation, stop and route the dog to a groomer or veterinarian. For prevention between baths, see how to prevent dog mats.

    Mistake 5: Drying Only the Surface

    Dense coats can feel dry on top while still holding moisture deeper down. Dampness near the skin can leave the dog uncomfortable and may worsen odor or irritation.

    Dry in small sections and check thick areas such as the neck, chest, belly, pants, tail base, and behind the ears. Avoid high heat, and stop for overheating, breathing trouble, collapse, panic, or unsafe handling.

    Mistake 6: Ignoring Skin or Shedding Changes

    Some shedding changes with the season. Sudden shedding changes, bald patches, sores, redness, swelling, discharge, parasites, dandruff flare, odor with irritation, pain, or excessive scratching are different. Grooming should not be used to cover up a skin problem.

    Call a veterinarian when the coat change seems sudden, the skin looks abnormal, or the dog seems painful or unwell.

    Simple Coat-Parting Check

    Use a calm, gentle check before and after brushing. Look at the surface coat, part a small section with your fingers, check whether loose undercoat or tangles are sitting below the top layer, then stop if the skin looks irritated or the coat resists.

    This is a check, not a dematting method. Do not pull through tight spots, cut mats out, shave close to the skin, or keep working through pain.

    When to Stop and Get Help

    Stop home grooming and use a qualified groomer or veterinarian for painful mats, mats near the skin, pelted coat, bald patches, sores, redness, swelling, discharge, odor with irritation, parasites, sudden shedding change, pain, panic, aggression risk, or unsafe handling. If the main problem is fear around tools, start with our guide to brushing a dog that hates being brushed before you try longer coat sessions.

    Use a groomer for coat work beyond your skill. Use a veterinarian for skin problems, wounds, parasites, pain, sudden coat changes, or medical concerns.

    FAQ

    What is the most common double coat grooming mistake?

    A common mistake is trying to remove all shedding instead of managing loose coat gently. Double-coated dogs shed, and too much brushing or tool pressure can irritate skin.

    Should I shave my double-coated dog?

    This page does not give shaving instructions. If shaving or clipping is being considered, ask a qualified groomer or veterinarian for coat-specific guidance.

    Can I brush out mats at home?

    Do not force mats. Tight, painful, skin-close, or severe mats should be handled by a professional groomer or veterinarian, depending on the skin condition.

    How do I know if I am brushing too much?

    Stop if the skin turns red, the dog flinches or pulls away, hair starts thinning in one area, or you feel tempted to keep brushing until no loose hair remains.

    When should I stop grooming a double-coated dog?

    Stop for painful mats, mats near skin, bald patches, sores, redness, swelling, discharge, odor with irritation, parasites, sudden shedding change, pain, panic, aggression risk, or unsafe handling.

    Bottom Line

    Double coat grooming should manage loose coat without hurting the dog or irritating the skin. Check below the surface, use light tool pressure, brush before bathing when the coat is safe, dry dense areas thoroughly, and stop early when mats, skin changes, pain, or panic appear.

  • How to Brush a Dog That Hates Being Brushed

    How to Brush a Dog That Hates Being Brushed

    If your dog hates being brushed, do not force a full brushing session. Stop, check for pain, tight mats, skin problems, parasites, and fear signs first. If the dog is safe and comfortable enough to practice, rebuild brushing with very short, reward-based steps: touch before tool, one easy area, one gentle stroke, reward, and stop before the dog escalates.

    This guide is for mild brushing resistance in a dog who can be handled calmly. It is not a plan for biting, growling, snapping, panic, painful mats, sedation, restraint, or brushing through pain. Those cases need a veterinarian, qualified groomer, or qualified trainer.

    First, Check for Pain, Mats, and Skin Problems

    A dog who resists brushing may not simply dislike the brush. The coat may pull at the skin, a body area may hurt, or the dog may have learned that grooming predicts discomfort.

    Before you practice brushing, check for:

    • Tight mats or tangles behind the ears, under the collar, in the armpits, along the belly, under the tail, or on the rear legs.
    • Red skin, sores, scabs, flea dirt, parasites, sudden bald patches, or a bad odor from the skin or ears.
    • Flinching, yelping, freezing, growling, snapping, guarding a body area, or repeated escape attempts.
    • Pain around the ears, paws, hips, tail, belly, or any area the dog suddenly will not let you touch.

    The ASPCA’s dog grooming tips note that brushing helps keep the coat in good condition and gives you a chance to look for skin concerns. If that check turns up pain, wounds, parasites, or sudden coat changes, pause home grooming and call your veterinarian.

    If you find tight mats, do not cut them out with scissors and do not brush through pain. The ASPCA’s matting guidance warns that mats can hide skin problems and that cutting them out can injure the pet. Use a qualified groomer or veterinarian for tight, severe, painful, or skin-close mats.

    What Not to Do When a Dog Resists Brushing

    Do not hold the dog down, chase the dog, punish the dog, brush faster to get it over with, or try to outlast growling, snapping, panic, or pain. Those choices can make the next session harder and can raise bite risk.

    Do not use sedation advice from a grooming article. If sedation or medication has entered the conversation, that is a veterinary decision.

    The AVSAB humane dog training position statement supports reward-based training and cautions against aversive methods. For brushing, that means making the task easier, pairing calm handling with rewards, and stopping before fear turns into a fight.

    Set Up a Low-Stress Brushing Spot

    Use a quiet spot with good footing. A towel, mat, or familiar surface can help the dog understand where the short practice happens. Keep the session simple: one coat-appropriate brush or comb, small rewards if they fit your dog’s health needs, and a timer.

    Start in a place where the dog can stay relaxed. Best Friends’ handling guidance recommends practicing in calm places first, pairing handling with rewards, and building gradually before adding harder distractions.

    If your dog already knows a calm station behavior, such as resting their chin on a towel or your hand, you can use it as a consent-style pause point. Fear Free’s chin-rest guidance explains how a chin rest can support cooperative care without holding the animal in place.

    Seven-day touch-before-tool brushing plan for mild dog brushing resistance, with short goals and stop points.
    Use this as a calm practice framework only. Stop for red-zone signs, pain, panic, growling, snapping, or bite risk.

    This plan is a starting point for calm, mild resistance. Stay on one step for more than a day if your dog needs it. If your dog shows red-zone signs from the scorecard below, stop and get professional help instead of making the step harder.

    DayGoalStop point
    1Touch the shoulder or side with your hand, reward, then release.30 to 60 seconds while the dog is still calm.
    2Touch easy grooming areas without the brush: chest, side, and back.1 to 2 minutes, with breaks.
    3Show the brush, reward, and put it away.Several short repetitions with no brushing.
    4Touch the dog with the back of the brush, reward, then stop.About 1 minute.
    5Make one gentle brush stroke on an easy area, reward, and pause.A few total strokes, not a full brushing session.
    6Brush one small section with breaks.2 to 3 minutes if the dog stays relaxed.
    7Repeat the easiest successful section and record the dog’s response.End before resistance starts.

    If the dog refuses food, turns away, stiffens, growls, snaps, freezes, yelps, guards a body area, or tries to leave, make the next session easier or stop and contact the right professional.

    Brush tolerance scorecard for a dog that resists brushing, showing green, yellow, and red stress signs and when to stop.
    The goal is to notice stress early, not finish brushing at any cost.

    Use this scorecard during every session. The goal is not to finish the coat at any cost. The goal is to notice stress early enough to keep the dog safe.

    ScoreWhat you may seeWhat to do
    GreenLoose body, accepts touch, can take rewards, stays near the brushing spot.Continue briefly, then stop on a good moment.
    YellowTurns away, lip licks, stiffens, tucks tail, shifts away, refuses food.Pause, reduce difficulty, shorten the session, or return to hand touch only.
    RedGrowls, snaps, bites, panics, yelps, guards a body area, or shows pain.Stop. Call a veterinarian, qualified groomer, or qualified trainer as appropriate.

    How to Brush One Small Area Safely

    Choose an easy area, often the shoulder or side. Touch with your hand first. If the dog stays loose, make one gentle pass in the direction the coat grows. Reward, pause, and stop early.

    Do not start with the worst tangle, belly, feet, ears, tail, or any area the dog guards. Build trust on an easy area first. Once the dog accepts that, slowly expand to nearby coat sections over later sessions.

    For long or curly coats, one small combed section may be enough for a session. If the coat is already matted, switch from home practice to professional help. Training a dog to accept brushing is not the same as removing painful mats.

    When to Stop and Call a Professional

    Call a qualified groomer for tight mats, coat maintenance beyond your skill level, or haircut-style work that cannot be done safely at home.

    Call a veterinarian for suspected pain, wounds, skin disease, parasites, sudden hair loss, ear pain, medication questions, or any medical concern.

    Call a qualified trainer or behavior professional if fear is not improving with easy steps, or if your dog shows growling, snapping, biting, panic, or repeated escape attempts. Bite-risk cases are not a home brushing challenge.

    FAQ

    Should I force my dog to be brushed?

    No. Forcing can increase fear and bite risk. Stop, check for pain or mats, and rebuild tolerance with short rewarded steps only if the dog can stay calm.

    What if my dog growls when I brush?

    Stop immediately. Growling is a warning sign. Check for pain, mats, and sensitive areas, then contact a veterinarian, qualified groomer, or qualified trainer depending on what you find.

    Can treats help a dog accept brushing?

    Yes, treats can help if the dog can eat calmly and the food fits the dog’s health needs. Treats do not replace stopping for pain, mats, panic, growling, snapping, or bite risk.

    How long should brushing sessions be for a dog that hates brushing?

    Start with seconds or one small area. Stop while the dog is still calm. A short successful session is better than a long session that ends with fear or a struggle.

    Can I brush out mats at home?

    Only small, loose tangles may be safe to work through gently. Tight, severe, painful, skin-close, or widespread mats need a qualified groomer or veterinarian.

    What brush should I use for a dog that hates brushing?

    Use a coat-appropriate brush or comb and keep pressure light. The tool matters less than the dog’s comfort, the condition of the coat, and stopping before stress escalates.

    Bottom Line

    For a dog that hates being brushed, the safest order is check first, train second, brush last. Rule out pain and mats, avoid force, practice short touch-before-tool steps, and stop for growling, snapping, panic, pain, severe mats, or bite risk.

  • How to Prevent Dog Mats at Home

    How to Prevent Dog Mats at Home

    Prevent dog mats by brushing and comb-checking high-friction areas before tangles tighten, keeping the coat dry and clean, and stopping early when hair pulls skin or the dog shows pain. This page is prevention only. It does not teach dematting, cutting, shaving, or brushing through painful mats.

    Any frequency here is a conservative starting point. Long, curly, wavy, feathered, or double coats usually need more attention than smooth coats, and the routine changes with coat, activity, moisture, and mat history.

    What Causes Dog Mats?

    Mats form when loose hair, friction, moisture, and skipped comb checks let the coat compact. They often start where hair rubs, bends, or traps dampness.

    ASPCA matting guidance notes that mats are uncomfortable and prevention depends on a dog’s coat and grooming needs. ASPCA general dog-care guidance also supports frequent brushing and checking the coat before bathing.

    Mat prevention zone map showing behind ears, collar line, armpits, chest and belly, leg feathering, and tail and pants with brush, comb check, and stop-point guidance.
    Use this as a prevention map only. Stop for pain, skin pulling, wounds, irritation, or tight mats and use a qualified groomer or veterinarian.
    ZoneWhy it matsConservative check rhythm
    Behind earsFriction and fine coatCheck most often
    Collar or harness lineCompression and rubbingCheck after gear-heavy days
    Armpits and chestMovement and moistureCheck often on long or curly coats
    Belly and legsDirt, dampness, frictionCheck after wet or outdoor days
    Tail, pants, featheringLong coat and sheddingCheck more during shedding

    Do not treat this as a universal schedule. A dog with a coat that mats easily may need checks more often.

    High-Friction Zones to Check First

    Start where mats usually form: behind the ears, under collars, armpits, chest, belly, inner legs, tail base, pants, and feathering. Use gentle sectioning, and stop if the coat pulls skin.

    Brush Before Bath: Why Water Can Make Tangles Worse

    Brush and comb-check before bathing when the coat is safe to work. ASPCA dog grooming tips and ASPCA general dog-care guidance support brushing or combing out mats before bathing.

    Do not bathe over mats, painful tangles, wounds, parasites, irritation, or skin pulling.

    Comb-Check Routine After Brushing

    A comb check verifies the coat after brushing. A pass means the comb glides through a small section without catching, tugging, pulling skin, or causing the dog discomfort. If the comb catches, stop that section and return to gentle brushing only if it is safe.

    If catching, pain, tight mats, skin redness, or resistance appears, route to a qualified groomer or veterinarian.

    Prevention by Coat Type

    Smooth coats may need only light brushing and skin checks. Long, curly, wavy, feathered, and double coats often need more frequent friction-zone checks. Exact timing depends on the individual coat, activity, moisture, and mat history.

    Use category-level tools only: slicker brush, pin brush, comb, and an undercoat rake when appropriate. This page does not recommend products.

    When Prevention Is Too Late and a Pro Is Needed

    Use a professional groomer for tight mats, severe mats, skin pulling, painful tangles, or coat work beyond your skill. Severe mat removal is not a home task. Use a veterinarian for wounds, irritation, parasites, bleeding, pain, medically fragile dogs, or skin problems.

    FAQ

    How do you prevent mats on a dog?

    Brush and comb-check friction zones before tangles tighten, keep the coat dry, brush before bathing, and stop early for pain or skin pulling.

    Where do dogs mat most often?

    Common zones include behind the ears, the collar line, armpits, chest, belly, legs, tail, pants, and feathering.

    Should you bathe a matted dog?

    No. Do not bathe over mats. Brush only if it is safe, and use a professional for tight or painful mats.

    Can small tangles become mats?

    Yes. Loose tangles can compact into mats if friction, moisture, and loose hair build up.

    When should a groomer handle dog mats?

    Use a groomer for tight, severe, skin-close, painful, or recurring mats, or when the dog resists handling.

    Bottom Line

    The best way to prevent dog mats is to check friction zones early, brush before bathing when the coat is safe, and comb-check gently after brushing. Once hair is tight, painful, skin-close, or pulling, stop home grooming and use a qualified groomer or veterinarian.

  • Dog Matting vs Tangles: How to Tell the Difference

    Dog Matting vs Tangles: How to Tell the Difference

    A loose tangle may separate with calm, gentle checks when there is no pain, skin pulling, tight mat, irritation, wound, parasite, bleeding, resistance, or unsafe handling. A mat feels compacted, pulls skin, resists gentle movement, or causes discomfort; it should stop home grooming and route to a qualified groomer or veterinarian.

    This page identifies and routes coat problems. It does not teach dematting, cutting, shaving, force-combing, or bathing over mats.

    Tangle vs Mat: Quick Definitions

    Coat issueWhat it usually meansHome action
    Loose tangleHair is crossed or lightly caught but still movableGentle check only if the dog is calm
    Mild tangleSmall snag with no skin pull or discomfortPause, brush gently if safe, then comb-check
    MatCompacted hair that resists gentle movementStop and route to a groomer
    Painful or skin issuePulling, redness, sores, bleeding, parasitesStop and route to a vet or pro
    Tangle vs mat stop-go framework showing loose tangle, stop if skin pulls, and call groomer or veterinarian for tight or painful mats.
    Use this as a stop/go guide only. Do not cut, shave, force-comb, or bathe over tight mats at home.

    Go slowly only when all of these are true: the dog is calm, the hair moves gently, there is no skin pulling, there is no pain, there is no redness or wound, and the brush or comb is not being forced.

    Stop when any resistance, skin pull, pain, tight mat, redness, parasite, bleeding, or defensive behavior appears.

    What a Loose Tangle Can Look and Feel Like

    A loose tangle may look like a small crossed section of hair that shifts when you lift it lightly. It should not feel hard, packed, skin-close, or painful.

    If a loose tangle does not separate with gentle brushing and a calm dog, stop the section and reassess. Do not increase pressure.

    What a Mat Can Look and Feel Like

    A mat can feel firm, compacted, or close to the skin. It may pull skin when moved and can hide irritation or sores.

    VCA grooming and coat-care guidance routes severe or extensive tangles to a groomer or veterinarian. ASPCA matting guidance notes mats are uncomfortable and progressed mats may require professional clipping. This page does not teach clipping or removal.

    Why Bathing Matted Hair Can Make Things Worse

    Water can tighten tangles and make coat problems harder to manage. Brush before bathing only when the coat is safe to brush. ASPCA dog grooming tips support brushing before bathing to remove dead hair and mats.

    Do not bathe over mats, skin irritation, wounds, parasites, or painful areas.

    When to Call a Groomer or Vet

    Call a groomer for compacted mats, tight tangles, skin-close mats, recurring mats, or coat work beyond your skill.

    Call a veterinarian for sores, skin irritation, wounds, bleeding, parasites, pain, infection signs, defensive behavior tied to pain, sedation needs, or medically fragile dogs.

    How to Prevent the Next Mat

    After the current problem is safely routed, prevention means friction-zone checks, line brushing when appropriate, comb checks, drying the coat well, and brushing before baths.

    FAQ

    What is the difference between a mat and a tangle on a dog?

    A tangle is usually loose and movable. A mat is compacted hair that resists gentle movement and may pull skin.

    Can I brush out a dog tangle at home?

    Only if it is loose, the dog is calm, and there is no pain, skin pull, irritation, wound, parasite, bleeding, or resistance.

    Should I cut out a dog mat?

    No. This page does not recommend cutting mats at home. Use a qualified groomer or veterinarian.

    Can I bathe a dog with mats?

    No. Bathing over mats can make tangles worse and hide skin problems.

    When does matting need a groomer or vet?

    Use a groomer for tight or severe mats. Use a vet for skin irritation, sores, bleeding, parasites, pain, infection signs, or medically fragile dogs.

    Bottom Line

    A loose tangle is movable and may be checked gently with a calm dog. A mat is compacted, resistant, painful, skin-close, or risky, and it should stop home grooming. When in doubt, choose the safer route and call a qualified groomer or veterinarian.

  • When to Stop a Dog Brushing Session

    When to Stop a Dog Brushing Session

    Knowing when to stop brushing is part of safe routine coat care. A session can end because the coat is done, the dog is tired, the skin or coat shows a warning sign, or handling is no longer safe. Stopping early is better than brushing through pain, panic, or owner frustration.

    Use four everyday outcomes: continue, pause, end for today, or call a professional. Continue only when the dog is comfortable, the coat is moving normally, and the skin looks normal.

    Stop-signal decision tree for dog brushing with continue, pause, end today, groomer, veterinarian, and behavior professional outcomes.

    The Quick Stop-Signal Rule

    Stop immediately for pain, yelping, flinching, skin pulling, bleeding, redness, sores, swelling, discharge, parasites, tight mats, pelted coat, panic, growling, snapping, freezing, repeated escape attempts, or owner loss of control.

    These are not signals to push through. They are routing points. Medical-looking signs belong with a veterinarian. Tight or severe mats belong with a qualified groomer. Handling fear, aggression risk, or bite risk belongs with a qualified trainer or behavior professional.

    Continue When Everything Looks Ordinary

    You can continue a brushing session when:

    • The dog is relaxed or only mildly wiggly.
    • The coat moves normally under gentle brushing.
    • The skin looks ordinary for your dog.
    • There is no flinching, yelping, skin pulling, panic, growling, or snapping.
    • You can keep the session short and calm.

    Even then, stop before the dog is tired. Routine brushing works best when your dog can repeat it without dreading the next session. For weekly planning, use the weekly dog brushing routine.

    Pause When the Session Needs a Reset

    Pause when the dog needs a break, the brush is clogged, your pressure feels too firm, the dog keeps shifting, or you are not sure whether a spot is a tangle, a mat, or a skin problem.

    A pause is not failure. Put the brush down, clean hair from the tool, let your dog relax, and reassess. If the session returns to calm, continue briefly. If the same problem repeats, end for today.

    End for Today Before It Turns Into a Fight

    End the session when comfort is fading, the dog is repeatedly avoiding the brush, or you are getting frustrated. A short, calm session is better than a long one that ends with force.

    Good reasons to end today include:

    • The dog keeps moving away after breaks.
    • The same zone keeps causing worry.
    • You are brushing harder just to finish.
    • The dog is tired from bathing, drying, nail care, or another grooming task.
    • You are no longer calm enough to handle gently.

    For a broader beginner routine, see the dog grooming checklist for beginners.

    Call a Groomer for Tight Mats or Coat Pulling

    Call a qualified groomer when the coat is tightly matted, pelted, close to the skin, or pulling the skin when you try to brush. Do not cut mats out with scissors. Do not keep brushing until the dog gives up.

    Severe mats can hide skin irritation and pain. If you are not sure whether a tangle is safe to handle, treat that uncertainty as a stop sign.

    Call a Veterinarian for Skin, Pain, Parasites, or Bleeding

    Call a veterinarian for wounds, parasites, swelling, discharge, bleeding, pain, sudden hair loss, hot spots, red or raw skin, or a dog that reacts as if an area hurts.

    Grooming is for noticing these problems, not diagnosing or treating them. Merck notes that signs such as oozing from the eyes, ears, or nose, hair loss, itching, red spots, and limping can indicate a dog may be sick. If brushing reveals a health concern, the safest next step is veterinary care.

    Call a Behavior Professional for Panic or Bite Risk

    Stop and use qualified help if the dog panics, snaps, growls, freezes, repeatedly tries to escape, or you feel bite risk rising. This page does not teach restraint, sedation, punishment, dominance handling, flooding, or casual muzzle use as a workaround.

    If you need to force the session to continue, the session should end.

    Write Down What Happened

    After stopping, make a short note:

    • Which body zone caused the stop.
    • What you noticed in the coat, skin, or behavior.
    • What action you chose: pause, end, groomer, veterinarian, or behavior help.
    • What to avoid next time.

    That note can prevent the next session from starting in the same problem area.

    Sources

    Bottom Line

    Stop brushing before the session becomes painful, frightening, or unsafe. Continue only when the coat, skin, dog, and handler are all calm enough. Pause for small resets, end for today when comfort fades, and call the right professional for mats, medical signs, panic, bite risk, or unsafe handling.

    FAQ

    When should I stop brushing my dog immediately?

    Stop immediately for pain, yelping, flinching, skin pulling, bleeding, red or wounded skin, parasites, tight mats, panic, growling, snapping, repeated escape attempts, or unsafe handling.

    Should I brush through mats if my dog does not like it?

    No. Tight, painful, widespread, close-to-skin, or skin-pulling mats should go to a qualified groomer or veterinarian. Do not cut them out with scissors at home.

    What if my dog growls during brushing?

    Stop the session. Growling is a warning signal, not a challenge to overcome. Use qualified help if fear, aggression risk, or bite risk is part of grooming.

    Is it okay to take breaks during brushing?

    Yes. Breaks are useful when the dog needs to reset, the brush needs cleaning, or you need to check pressure and position. If the same problem repeats, end for today.

    What should I do after stopping a brushing session?

    Write down the body zone, what happened, your dog’s response, and the next safe action. That may be a shorter session, a groomer, a veterinarian, or behavior support.

  • Weekly Dog Brushing Routine by Coat Type and Tolerance

    Weekly Dog Brushing Routine by Coat Type and Tolerance

    A weekly dog brushing routine works best when it matches your dog’s coat length, shedding level, and tolerance. Start with short, repeatable sessions instead of one long catch-up session. If the coat is painful, tightly matted, red, irritated, or your dog cannot be handled calmly, stop and use a qualified groomer or veterinarian.

    This routine is a planning guide, not a promise that one schedule works for every dog. Coat type, season, health, age, and handling comfort all change the plan.

    Weekly dog brushing planner by coat lane, weekly rhythm, missed-session reset, and stop signs.

    The Simple Weekly Brushing Rule

    Use the easiest routine your dog can tolerate consistently. A short smooth coat may only need quick checks and loose-hair passes. A long, curly, feathered, or double coat usually needs more frequent small-zone brushing so tangles do not build up.

    For broader grooming timing, use the dog grooming schedule by coat type alongside this weekly brushing planner.

    Weekly Brushing Planner

    Coat laneWeekly rhythmWhere to focusReset if you miss a session
    Short or smooth coatOne or two quick checksLoose hair, dirt, skin changes, pawsResume with a light pass; do not overbrush to catch up
    Long, curly, or silky coatSeveral small sessionsBehind ears, collar line, armpits, belly, tail, rear legsStart with friction zones and stop if tangles pull
    Double coat or shedding coatGentle shed checks, more during seasonal sheddingLoose undercoat, comfort, skin irritation, overheating riskUse shorter sessions rather than one intense session
    Nervous or low-tolerance dogTwo- to five-minute winsTouch-before-tool practice, calm release, reward breaksRestart with handling only before brushing again

    What to Check Before You Brush

    Before brushing, part the coat gently in a few areas and check for:

    • Red, raw, flaky, swollen, wounded, or painful skin.
    • Parasites, flea dirt, hot spots, or unusual odor.
    • Tight mats, pelted coat, or tangles close to the skin.
    • Sudden hair loss or a coat change that seems unusual for your dog.
    • Fear signs such as freezing, growling, snapping, panic, or repeated escape attempts.

    The ASPCA notes that grooming time can also be a chance to check for fleas and skin concerns, while VCA emphasizes that matting and coat problems can become uncomfortable. Keep the check gentle and stop if anything looks medical or painful.

    Short-Coat Weekly Routine

    For many short or smooth coats, the weekly routine can be simple:

    • Do a quick body check.
    • Use a gentle coat-appropriate brush or mitt category.
    • Wipe ordinary dirt from paws or coat if needed.
    • Stop if the skin looks irritated or brushing causes discomfort.

    Short coats still need observation. A dog can have skin irritation, parasites, paw problems, or handling stress even when the coat itself is easy.

    Long, Curly, or Feathered-Coat Routine

    Long, curly, silky, or feathered coats usually need smaller, more frequent sessions. Focus on friction zones where tangles often form: behind the ears, under the collar, armpits, chest, belly, tail, and rear legs.

    Do not brush hard through tangles. If a tangle does not loosen gently, stop. Severe mats, close-to-skin mats, pain, or skin pulling belong with a qualified groomer or veterinarian.

    Double-Coat and Shedding-Season Routine

    For double-coated or heavy-shedding dogs, increase brushing during shedding seasons, but keep pressure and session length conservative. The goal is to remove loose coat without scraping skin, overheating the dog, or turning the session into a struggle.

    If the dog is hot, tired, irritated, or trying to leave, pause or end the session. You can return later with a shorter pass.

    Missed a Week? Do Not Overcorrect

    If you miss a brushing session, do not make the next session twice as long. Use a reset:

    • Check skin and coat first.
    • Start with the easiest zone.
    • Brush for a few calm minutes.
    • Stop before your dog gets frustrated.
    • Schedule another short session instead of forcing the full routine.

    This is especially important for puppies, seniors, nervous dogs, and dogs with thick or mat-prone coats.

    When to Stop Brushing

    Stop brushing for pain, yelping, flinching, skin pulling, redness, sores, wounds, swelling, parasites, bleeding, sudden hair loss, tight mats, pelted coat, panic, growling, snapping, freezing, repeated escape attempts, or handling that no longer feels safe.

    Use a veterinarian for medical-looking skin, pain, parasites, wounds, sudden coat changes, or infection concerns. Use a qualified groomer for severe mats or coat work you cannot safely maintain at home.

    Helpful Companion Guides

    Sources

    Bottom Line

    A weekly brushing routine should be easy to repeat, matched to the coat, and calm enough for your dog to tolerate. Brush short coats lightly, split long or curly coats into small zones, adjust during shedding season, and stop early when the coat, skin, or behavior says the session is no longer safe.

    FAQ

    How often should I brush my dog each week?

    It depends on coat type and tolerance. Short coats may need one or two quick checks, while long, curly, feathered, or shedding coats often need smaller sessions several times a week.

    What if I miss my dog’s brushing routine?

    Do not overcorrect with a long session. Check the coat, start with an easy zone, brush for a few calm minutes, and schedule another short session later.

    Should I brush more during shedding season?

    Often yes, but keep the sessions gentle and short. More frequent light passes are safer than one harsh or exhausting brushing session.

    When should I stop brushing my dog?

    Stop for pain, red or wounded skin, parasites, tight mats, panic, growling, snapping, repeated escape attempts, or any handling that feels unsafe.

    Can brushing replace professional grooming?

    No. Brushing helps with routine maintenance, but severe mats, coat work you cannot safely manage, medical skin signs, pain, or unsafe handling need a groomer or veterinarian.

  • Dog Bathing Mistakes to Avoid at Home

    Dog Bathing Mistakes to Avoid at Home

    The biggest dog bathing mistakes are skipping the pre-bath brush, bathing over tangles, using an unsafe setup, spraying the face or ears carelessly, leaving shampoo residue, drying poorly, and forcing a frightened or painful dog through the bath. A safer home bath starts before the water turns on.

    Quick Answer

    Before bathing your dog, brush and check the coat, prepare non-slip footing, use lukewarm water, keep water away from eyes and ears, rinse until the coat feels clean, and dry for comfort. Stop for severe mats, wounds, parasites, ear discharge, pain, panic, growling, snapping, or unsafe handling.

    Dry dog bath setup with towel, closed shampoo, brush, and non-slip mat

    Bath-Prep Checklist

    Use this checklist before water touches the coat. It is a routine grooming check, not medical advice or a reason to push through pain or fear.

    Before the bathWhy it mattersStop if you see
    Brush and check the coatTangles can tighten after water, and brushing helps reveal skin issues.Severe mats, painful coat, wounds, or skin irritation.
    Check ears, paws, skin, and behaviorA bath should not hide pain, illness, or handling risk.Ear discharge, parasites, limping, panic, growling, or snapping.
    Set non-slip footingSlipping can make baths stressful and unsafe.A dog who cannot stand calmly or safely.
    Use lukewarm waterWater that is too hot or cold can upset the dog.Shivering, overheating, distress, or trying to escape.
    Control face and ear waterDirect spray near eyes, ears, and nose can frighten or irritate dogs.Head shaking, face sensitivity, ear pain, or strong odor.
    Rinse and dry patientlyResidue and damp coat can leave the skin uncomfortable.Fear of dryer noise, heat discomfort, or unsafe handling.

    Mistake 1: Skipping the Pre-Bath Coat Check

    Brush before bathing when the dog can tolerate it. VCA notes that burrs and tangles should be brushed out before a bath because they can become harder to remove afterward. The ASPCA also explains that brushing helps keep the coat in good condition and lets you inspect the skin.

    Do not bathe over severe mats. Do not cut mats out with scissors. If the coat is severely tangled, painful, tight to the skin, or paired with irritation, use a professional groomer or veterinarian.

    Mistake 2: Using the Wrong Setup or Water Approach

    An unsafe bath setup can turn a normal grooming task into a fear event. Use a stable, non-slip surface, keep supplies within reach, and use lukewarm water. Avoid chasing the dog around the room or lifting a struggling dog into a tub without a safe plan.

    For large or nervous dogs, shorten the goal. A quick paws-and-belly rinse may be safer than forcing a full bath.

    Mistake 3: Letting Shampoo or Water Get Into Eyes and Ears

    ASPCA Pet Insurance grooming guidance recommends avoiding the ears, eyes, and nose during bathing. Use controlled water flow around the face. A damp cloth can be safer than direct spray for many dogs.

    Stop if you notice ear pain, discharge, strong odor, swelling, head shaking, or sensitivity. Bathing is not a fix for ear problems.

    Mistake 4: Not Rinsing Long Enough

    Shampoo residue can irritate skin and leave the coat feeling dull or tacky. Rinse slowly, especially through dense, long, curly, or double coats. Lift sections of coat gently and check that water runs clear.

    Do not assume a quick surface rinse is enough on thick coats. Dense-coated dogs may need more careful rinsing than their coat length suggests.

    Mistake 5: Drying in a Way That Leaves Mats, Chill, or Fear

    Drying should match the dog and coat. Towel-dry thoroughly, especially around the chest, belly, legs, and undercoat. If using a dryer, avoid high heat, keep the noise and airflow tolerable, and stop if the dog becomes frightened.

    For long, curly, or mat-prone coats, drying without brush and comb checks can allow tangles to tighten. For fearful dogs, the priority is calm handling and safety, not a perfect finish.

    Mistake 6: Bathing Too Often or Using Bath Time to Solve Medical Issues

    Merck notes that dogs may be bathed with pet shampoo when dirty, smelly, or seasonally appropriate. Bathing more often is not always better. If you need a starting point by coat type, use the dog grooming schedule by coat type as a planning guide, then adjust for skin, coat condition, activity, and veterinarian guidance.

    Do not try to solve itching, redness, wounds, parasites, odor with inflamed skin, sudden hair loss, or recurring ear problems with repeated baths. Those signs need veterinarian guidance.

    When to Stop and Call a Groomer or Vet

    Stop the bath if the dog is panicking, growling, snapping, repeatedly trying to escape, or showing pain. Stop and call a groomer or veterinarian for severe mats, wounds, skin infection signs, parasites, ear pain or discharge, medical fragility, or unsafe handling.

    Puppies, seniors, and medically fragile dogs may need a shorter, gentler plan approved by a veterinarian or professional groomer.

    Helpful Companion Guides

    Bottom Line

    A good dog bath is mostly preparation: brush and check the coat first, set up stable footing, keep water away from eyes and ears, rinse patiently, and dry for comfort instead of speed. If the bath turns into pain, panic, medical concern, severe matting, or unsafe handling, stop and use a veterinarian or professional groomer.

    FAQ

    Should I brush my dog before or after a bath?

    Brush before the bath, especially if the dog has tangles or loose coat. You can do a second gentle brush after the coat is mostly dry if the dog tolerates it.

    Can I use human shampoo on my dog?

    Use dog shampoo unless your veterinarian tells you otherwise. Skin needs vary, and this guide does not recommend specific products.

    How often should I bathe my dog?

    Bathe when the dog is dirty, smelly, or seasonally needs it. Coat type, skin condition, activity, and veterinarian guidance matter more than a universal schedule.

    What if my dog is scared of baths?

    Do not force a full bath. Work on short, calm introductions to the bath area, water sounds, towels, and touch. Stop for panic, growling, snapping, or unsafe handling.

    Is air-drying okay?

    It depends on coat type, room temperature, and dog comfort. Thick, long, or curly coats may need more careful drying to avoid moisture and tangles. Avoid heat and forced drying if the dog is frightened.

    Sources