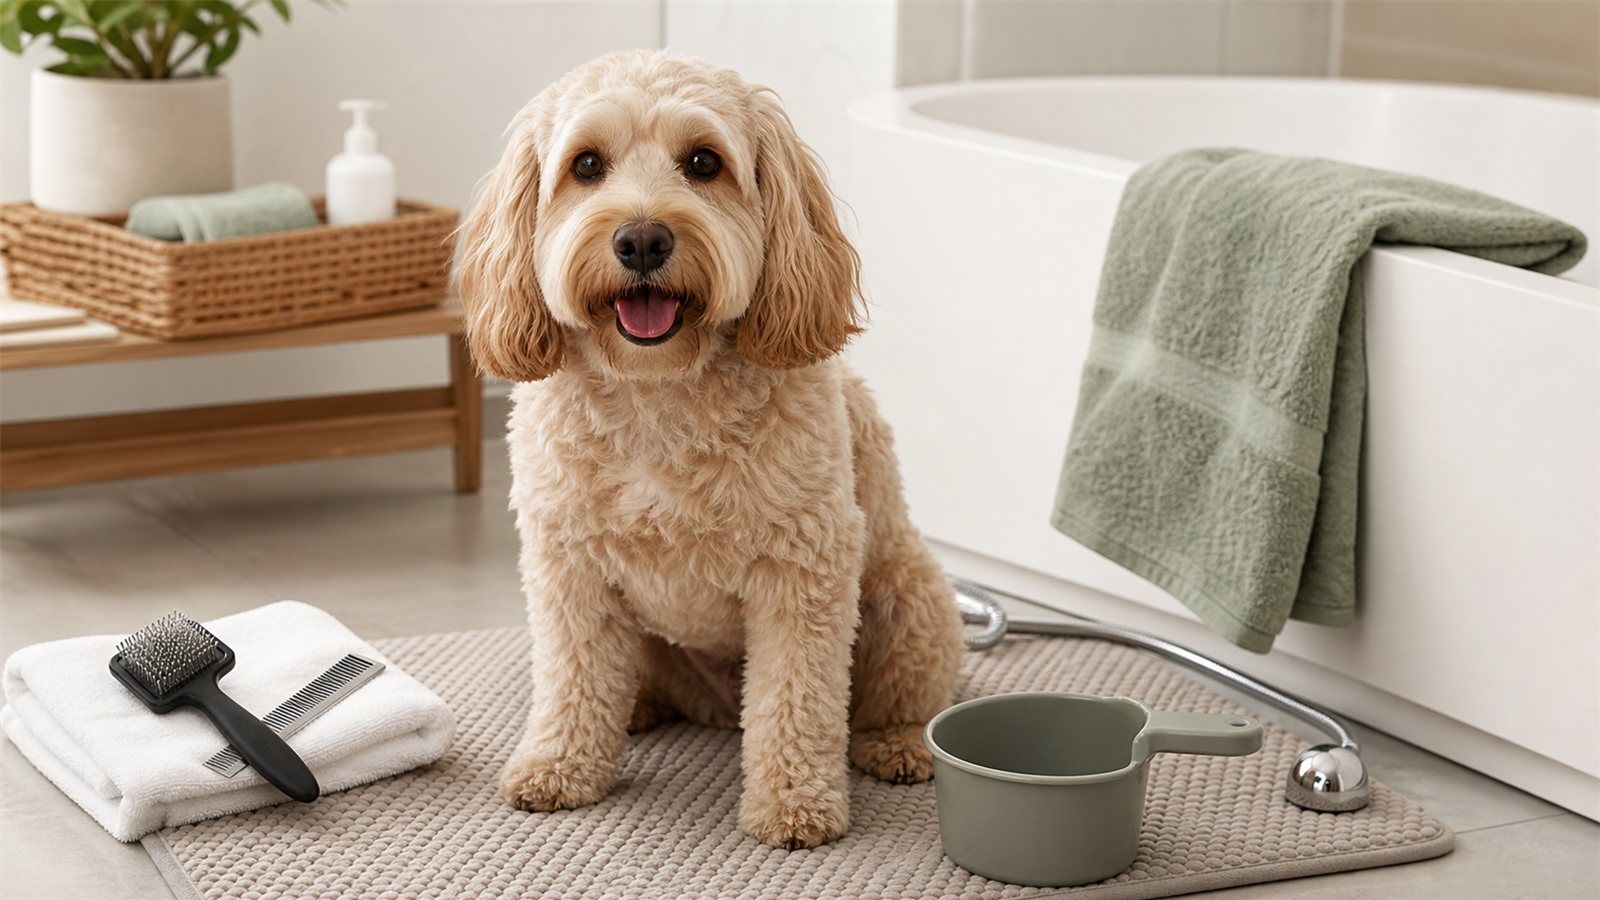
Tag: dog bath setup

  • Dog Bath Noise Reduction Plan at Home

    Dog Bath Noise Reduction Plan at Home

    To make a dog bath quieter, reduce the loud sounds before the dog enters the room: run the water briefly, close noisy drawers, silence the doorbell if possible, stage towels, and ask the household to keep the hallway calm. This is a setup plan, not a treatment plan for noise fear.

    Check the Room Before Calling the Dog

    Stand in the room and listen. Notice the faucet, fan, echo, rattling bottles, cabinet doors, and laundry machines nearby. Fix the easy sounds first. Move metal tools and plastic bottles off ledges where they may fall, and set towels where you can reach them without opening cabinets mid-bath.

    A Two-Minute Sound Sweep

    Most bathrooms hide more noise than owners realise, because we tune it out. Do this sweep with the dog out of the room and the door shut:

    • Stand still for 30 seconds. Note every sound you can hear: extractor fan, plumbing hum, a washing machine on spin, a neighbour’s TV through the wall.
    • Touch every hard object on a ledge. Shampoo bottles, razors, a metal comb, a glass jar. Anything that can clatter into a tub goes on the floor or in a closed drawer now, not mid-bath.
    • Open and shut the cabinet you’ll need. If it bangs, leave it open before you start or move the contents onto a folded towel.
    • Check the drain. A partially blocked drain gurgles loudly as it empties. Clear the hair trap first so the tub doesn’t make a sucking noise while the dog is still standing in it.
    • Silence the phone. A ringtone or notification buzz at the wrong second undoes ten minutes of calm handling.

    In practice, the sweep takes longer the first time and about ninety seconds after that. A common mistake is doing it with the dog already in the room — the rattling and door-shutting you do while “getting ready” is exactly the noise you were trying to remove.

    Reduce Water Noise

    If the faucet blasts loudly at first, run it before the dog comes in and adjust the pressure. Use a steady low stream when possible and avoid sudden changes from quiet to loud. Do not spray close to the ears or face; water noise near the head can make a nervous dog harder to handle.

    Fill First, Then Bring the Dog In

    The single loudest moment of most home baths is the first two seconds of tap water hitting an empty enamel or acrylic tub. Fill three to four inches of water before the dog arrives and that noise is gone — the water lands on water, which is far quieter than water landing on a hard shell. Keep the stream running against the side wall of the tub rather than straight down, and if your shower head has a “mist” or “rain” setting, it usually runs quieter than the jet setting at the same flow.

    For rinsing, a cup or a squeeze bottle is almost silent compared with a sprayer. It is slower, and that is the honest trade-off: you swap thirty seconds of speed for a dog that stays still. For thick double coats, use the sprayer for the body and switch to the cup for the neck, chest, and anywhere near the head.

    Silence or Skip the Dryer

    Forced-air dryers are usually louder than anything else in the bathroom, and they combine noise with air pressure and vibration on the skin — three stressors at once. If your dog tolerates a dryer, use it on the lowest speed, keep the nozzle moving, and never aim it at the ears. If your dog does not tolerate it, towels are a perfectly good substitute for most coat types.

    Practical alternatives that make no noise at all:

    • Microfibre or chamois towels. They absorb several times more water than terry cloth, so you need fewer passes.
    • Blot, don’t rub. Rubbing tangles the coat and adds friction the dog can feel; pressing and lifting removes more water with less fuss.
    • Work top-down. Head and neck, then back, then legs and belly, then tail.
    • Finish the ears by hand. Ear leather holds water in the folds, so patting the inside of each flap with a dry corner of towel matters more than a fast blast of air.
    • Warm the room instead. A pre-warmed bathroom lets a towel-dried dog finish drying naturally without shivering.

    If you do buy a dryer, look at the manufacturer’s stated sound level in decibels and compare models before you compare prices — a quieter unit you actually use beats a powerful one your dog refuses. Constant loud exposure is not just a behaviour problem either; hearing protection guidance from occupational health bodies such as the Centers for Disease Control and Prevention applies to the human holding the dryer as well.

    Deaden the Echo and the Scrabbling

    Hard tiled rooms bounce sound, so every clink is amplified. Two cheap fixes cut the ring dramatically:

    • A rubber or silicone mat in the tub. It stops nail-on-acrylic scrabbling, which is both loud and a sign the dog feels unstable. Better footing means less panic, and less panic means less noise from the dog itself.
    • Soft surfaces in the room. A bath mat on the floor, a folded towel on the toilet lid, and a hanging towel or two absorb reflections. It sounds trivial; stand in a bathroom before and after and you will hear the difference.

    Wet nails on a slick floor also invite a hurried scramble on the way out, which is how a claw catches. If your dog is already prone to catching a nail on loop pile, lay down a low-pile towel runner rather than a looped bath rug on the exit route.

    Noise Sources Ranked: What to Fix First

    Noise sourceWhy it bothers dogsQuiet fixEffort
    First blast of tap water into an empty tubSudden onset, high volume, close to the headPre-fill the tub before the dog enters1 minute
    Forced-air dryerLoud, sustained, plus air pressure on skinLow speed, or towel-dry onlyFree
    Nails scrabbling on tub/tileSignals loss of footing; echoes hardNon-slip rubber matOne-off purchase
    Bottles and combs fallingUnpredictable clatter startles mid-handleClear ledges before you start30 seconds
    Cabinet doors and drawersBang happens while your hands are busyStage supplies within arm’s reach1 minute
    Extractor fanConstant drone masks your voiceRun it before and after, not duringFree
    Washing machine spin cycleVibration through the floor plus noiseSchedule the bath around itPlanning only
    Doorbell and deliveriesArousal spike the dog can’t placeMute the chime or pick a quiet window30 seconds
    Shouted instructions between peopleAdds volume exactly when the dog is tenseAgree hand signals in advanceFree

    Work down that list in order. Fixing the top three gets you most of the way; the rest is polish.

    Build a Quiet Bath Kit

    Keep everything in one open caddy or basket so you never have to open a cupboard with a wet dog on the mat:

    • Two to four towels, already unfolded
    • A plastic jug or squeeze bottle for rinsing
    • Shampoo and conditioner with the caps already loosened
    • A rubber mat for the tub floor
    • A soft-bristled brush or comb for post-bath work
    • Treats in a silent container — a foil pouch or crinkly bag is its own noise problem
    • A hand towel reserved for the face and ears

    Colour-coding helps if more than one person bathes the dog, the same way owners use a colour system for face towels to keep the muzzle cloth separate from the body cloth. It removes one more moment of hunting through a pile mid-bath.

    Set your kit out once, photograph it, and rebuild it the same way every time — a repeatable layout is the cheapest noise reduction you’ll ever buy.

    Timing: Plan a Quiet Window

    Keep the Household Quiet

    Bath time is harder when doors slam, children run through the hall, or someone starts a vacuum. Pick a quiet window if you can. If the dog already reacts to doorbells or outside noise, avoid bath time during deliveries, busy entry times, or loud chores.

    Choosing the Hour

    The quietest hour in most homes is mid-morning on a weekday or mid-afternoon at the weekend, once the first round of deliveries has passed. Avoid the half hour around school pickup, bin collection day, and any window when contractors, gardeners, or lawn equipment are likely to start up outside. In apartment buildings, the hallway is often the problem rather than the flat — if your dog already reacts to footsteps and lift doors, the same awareness you use when tidying up after the shared stairwell applies to bath scheduling.

    A short pre-bath wind-down helps more than people expect: a normal walk, twenty minutes of settled rest, then the bath. A dog that has just been playing arrives already aroused, and an aroused dog reads ordinary bathroom noise as threatening.

    Use a Calm Voice

    Keep instructions short. A loud, excited, or frustrated voice adds to the room noise. If you need a helper, agree on simple cues before the bath begins.

    Agree Hand Signals With Your Helper

    Two people talking over running water end up raising their voices without noticing. Before you start, agree three signals: a flat palm for “stop and hold”, a thumb up for “carry on”, and a finger pointed at the door for “we’re done, let’s get out”. Decide in advance who holds and who washes, and do not swap roles mid-bath.

    Keep your own hands quiet too. Heavy, hurried handling reads as pressure to the dog even when the room is silent, which is why owners who pay attention to how firmly they press while brushing tend to have calmer dogs in the tub as well.

    Add Pause Points

    Plan breaks before the dog is overwhelmed. A pause can mean turning off the water, wrapping a towel around the shoulders, or letting the dog stand quietly for a moment.

    Where to Put the Pauses

    Fixed pause points work better than “I’ll stop if he looks worried”, because by the time a dog looks worried you have usually already missed two earlier signals. A workable structure for a typical bath:

    1. After the dog steps in — water off, one treat, ten seconds of nothing.
    2. After the body is wet — water off, reset your grip, let the dog shake if it wants to.
    3. Between shampoo and rinse — water off while you lather; this is the longest natural quiet gap in the whole bath.
    4. Before the face and head — the highest-stress zone for most dogs. Pause, then use a cloth rather than a stream.
    5. Before lifting out — towel over the shoulders first, then move.

    The whole bath should be shorter than you think. Ten minutes of calm handling beats twenty-five minutes of “nearly finished”.

    Stop Signs

    Stop if the dog freezes, trembles hard, growls, snaps, pants heavily, tries to escape, or cannot be handled safely. Do not force exposure to bath noise.

    Earlier Signals to Watch For

    The stop signs above are late signals. The early ones give you far more room to adjust, and they are the ones experienced handlers act on:

    • Lip licking or repeated swallowing with no food present
    • Whale eye — the whites of the eyes showing at the side
    • Ears pinned back and held there
    • A low, stiff tail or a tucked tail
    • Shaking off repeatedly when not especially wet
    • Turning the head away from your hand
    • Yawning out of context

    Seeing one of these means pause, not push on. Seeing three in a row means end the bath, dry the dog, and rethink the setup before you try again. Persistent noise-related fear is a recognised clinical issue rather than a training failure, and veterinary bodies such as the American Veterinary Medical Association point owners toward professional assessment when fear is severe or getting worse. Repeatedly forcing a frightened dog through a bath does not habituate it — it usually sensitises it further.

    Adjusting for Puppies, Seniors, and Dogs With Hearing Loss

    Puppies. First impressions stick. Keep early baths very short, very warm, and almost silent — a partly filled tub, a jug, and a towel. You are building the template for the next decade, not getting the dog perfectly clean.

    Senior dogs. Older dogs are often stiffer and less sure-footed, so scrabbling noise and slipping matter more. Use a thicker mat, support the hindquarters, and cut the bath into two shorter sessions if needed. Some seniors have partial hearing loss, which makes them more startle-prone to vibration and touch rather than less.

    Deaf or hard-of-hearing dogs. Sound reduction matters less; vibration and visual surprise matter more. Approach from the front where the dog can see you, keep a hand in contact so movement is never a surprise, and avoid stamping or dropping objects — they feel the floor.

    Anxious rescues with unknown history. Assume the bathroom itself may be a trigger. Feed meals in the bathroom with the door open for a week before you ever run water.

    After the Bath: Keep the Quiet Going

    The bath is not over when the water stops. A rushed, noisy exit can overwrite a calm twenty minutes.

    Give the dog somewhere quiet to settle afterwards rather than straight back into a busy kitchen. A calm ten minutes at the end is part of the plan, not an afterthought.

    Track What Works

    Memory is unreliable across a few weeks of monthly baths. A three-line note after each one tells you far more than a general impression:

    1. What time you bathed and what else was happening in the house
    2. Which noise fixes you used
    3. Where the dog first showed tension, and how long the bath took

    Over four or five baths, patterns appear — often something specific, like “always tenses when the extractor fan kicks in” or “fine until the sprayer touches the neck”. Owners who already keep a running photo record of face care can add a bath column to the same log rather than starting a new system. If you photograph anything, keep the same sensible limits you would apply to any grooming photo record: images are for tracking change, not for diagnosing problems yourself.

    Common Mistakes

    • Getting everything ready while the dog watches. The prep is louder than the bath. Do it first, then call the dog.
    • Using the sprayer near the ears because it’s faster. It is the single most common reason a previously fine dog starts refusing baths.
    • Bathing too often. Most healthy dogs need far fewer baths than owners give them, and every unnecessary bath is another noise exposure. Spot-clean instead — dealing with slobber day to day removes most of what people bathe for.
    • Talking the dog through it. Constant reassurance in a rising voice adds noise and tells the dog something is worth worrying about.
    • Pushing to “finish properly”. A half-rinsed dog you can bathe again next month is better than a fully rinsed dog that now fears the bathroom.
    • Blaming the dog. Noise sensitivity is a nervous-system response, not stubbornness.

    FAQ

    Should I use music during a dog bath?

    Only if it keeps the room steady and does not add more sound. Skip it if the dog reacts to it.

    Is a fan okay during bath time?

    Use a fan only if it is quiet, safe, and away from wet areas. Turn it off if the sound worries the dog.

    What if bath noise always causes panic?

    Stop home baths and ask a veterinarian, groomer, or qualified behavior professional for help.

    How loud is too loud for a dog’s bath?

    There is no single threshold you can measure at home without equipment, and any number you see quoted for a specific dog is guesswork. Use a practical test instead: if you have to raise your voice to be heard by someone standing next to you, it is too loud for a dog whose hearing is more sensitive than yours. Fix the sound rather than shouting over it.

    Does a bathroom door open or closed make it quieter?

    Closed is usually quieter for outside noise, but it increases echo inside and removes the dog’s escape route, which can raise stress on its own. A good compromise for anxious dogs is closed door, soft surfaces in the room, and a clear path to the door if you open it.

    Can I use earplugs or ear covers on my dog?

    Cotton in the ear canal is not recommended for home use — it can be pushed too deep or left behind. Snug head wraps designed for noise-sensitive dogs help some individuals and are ignored by others, and none of them substitute for reducing the noise at source. Ask your vet before putting anything in or over the ears.

    Should I bathe a noise-sensitive dog on the same day as fireworks or a storm?

    No. Stress carries over for hours. Give at least a full day between a known noise event and a bath, and ideally longer if the dog was badly affected.

    Is a sink or a tub quieter for small dogs?

    A sink is often quieter simply because it is smaller, closer to the tap, and needs less water — but the drop to the floor is dangerous, so never leave a dog unattended on a counter. A laundry sink with a rubber mat and a person’s hand on the dog at all times is a good setup for small breeds.

    How do I keep the face quiet without soaking it?

    Skip water on the face entirely. Use a damp cloth, work from the eyes outward, and dry immediately. Bearded breeds benefit from the same approach used for a muzzle wash after eating — cloth, not stream.

    My dog is fine with noise but hates the bath. Is this plan still worth doing?

    Yes, though the priorities change. Focus on footing, water temperature, and short sessions first. Noise reduction is a strong second-order improvement even when noise is not the primary trigger, because it removes the surprises that turn mild dislike into refusal.

    Bottom Line

    A quieter bath starts with the room. Lower the water sound, stage supplies, keep the house calm, and stop before fear turns into unsafe handling.

  • How to Bathe a Dog Without Soaking the Bathroom

    How to Bathe a Dog Without Soaking the Bathroom

    You can bathe a dog without soaking the bathroom by setting up the room before the dog comes in: block the main splash area with towels, choose one wet walking path, keep one dry exit path, and keep cords out of the wet zone. The goal is not a spotless bath. It is a safer bath with less water on the floor.

    Start With a Bathroom Splash Map

    Before turning on the water, look at where water usually escapes. Most splashes come from three places: the dog shaking, the rinse stream bouncing off the coat, and wet paws stepping out of the tub or shower. Place the first towel where the dog will step out, put a second towel where you will stand, and keep a used-towel drop spot away from clean towels so you are not reaching across the wet floor.

    In practice, it helps to run the map once with the water off. Walk the route yourself, open the door you plan to use, and notice what your elbow hits when you reach for shampoo. Most bathroom floods are not caused by the dog at all — they are caused by a person turning around with a wet hand, knocking a bottle into the tub, or stepping backward onto a towel that has already slid. Two more escape points worth marking: the gap between the shower curtain and the wall (water runs straight down it) and the toe-kick under the vanity, where water wicks in and stays damp for days. Tuck a rolled towel along the base of the vanity and pull the curtain inside the tub lip before the first rinse.

    Mark the Wet and Dry Paths

    Pick one wet route from tub to towel zone, then keep one dry route for you to step out safely. Do not let the wet dog run through the whole room. Close doors if that helps, but do not block the dog in so tightly that panic builds.

    A common mistake is making the wet path too long. The shorter the distance between the tub edge and the drying spot, the less water ends up in the hallway. If your bathroom is small, put the towel zone directly against the tub so the dog steps from water to absorbent surface in one move. If the dog is heavy or unsteady, plan the lift before the bath starts — decide which arm goes under the chest and which under the rump, and clear that space of bottles, bins, and scales so you are not stepping over obstacles while holding a wet dog.

    Prep the Dog Before the Water Turns On

    Ten minutes of prep outside the bathroom cuts both the mess and the bath time. Brush the coat out completely first: dry mats tighten into hard knots once wet, they trap shampoo, and they hold water that later drips across the floor for an hour. Work with light, even strokes — being deliberate about how firmly you brush matters more on a dog who is already a bit tense about bath day.

    Then run this short pre-bath list:

    • Trim or check nails if they are long — a slipping dog digs in, and long nails catch on mats and tub liners.
    • Wipe the face and muzzle first, while dry. Cleaning crust and food residue off before the bath means you do not have to spray near the head later. A quick pass over the muzzle after meals is a good habit to have in place already.
    • Empty the tub of razors, shampoo bottles, and bath toys so nothing goes flying during a shake.
    • Take the collar off and use a fabric or nylon slip lead if you need control; wet leather collars stain coats and hold odour.
    • Let the dog go outside first. A full bladder plus warm water is a predictable puddle.
    • Get everything within arm’s reach: shampoo already opened, cup or sprayer ready, towels stacked, brush on the counter. If you have to leave the room mid-bath, you will come back to a wet hallway.

    Set Up Towels Before the Bath

    Have one towel ready at the tub edge, one on the floor, and one dry towel within reach. If your dog shakes right after the water stops, the first towel should be close enough to cover the shoulders and chest quickly. Do not stack towels where they can slide under your feet.

    How many towels you actually need scales with coat, not just body size. A short-coated 40-pound dog may need two; a double-coated dog of the same weight can soak four before the undercoat stops dripping. Microfiber towels pull far more water per square inch than terry cloth and wring out fast, which makes them the better first towel; keep a big terry bath towel as the second pass for warmth. Bath mats with a rubber backing beat loose towels on the floor because they will not slide when a dog braces against them.

    If two or more people share the drying job, or you bathe more than one dog, assign towels a fixed role so a dirty face towel never lands on a clean body. Some owners run a simple colour-coded towel system — one colour for face and beard, another for body, another for paws. It sounds fussy for ten minutes, and then it saves you from re-washing a dog’s face with the towel that just did the feet.

    Contain the Splash: Mats, Curtains, and Barriers

    Most of the water that reaches your floor never needed to. Physical containment does more than technique:

    • A non-slip mat inside the tub is the single highest-value item. A dog that feels secure stops scrambling, and scrambling is what throws water over the rim.
    • A second mat or rubber-backed rug outside the tub gives the dog somewhere confident to land and absorbs the first shake.
    • Two curtain layers, both tucked in. Liner inside the tub, decorative curtain outside. If you only have one, tuck it in and clip the bottom to itself with a binder clip so a nose cannot push it open.
    • A splash guard or tall shower screen helps in walk-in showers, where water travels sideways along the floor and out the opening.
    • A tub-sized collapsible dog tub or laundry tub for small dogs — high walls, small footprint, and it empties into the drain.
    • An old towel jammed against the door threshold, which stops the thin sheet of water that always creeps out under the door.

    Close the toilet lid and move the bath mat and any laundry basket out of the room entirely before you start. Anything absorbent left in the splash zone will be found by the dog.

    Rinse Toward the Tub, Not the Room

    Use low water pressure when you can. Aim rinse water down the coat and back toward the drain, avoiding spraying across the dog toward walls, cabinets, or open doors. Keep water away from eyes, ears, nose, and mouth. If the face needs cleaning, use a soft damp cloth instead of spraying the head.

    Water temperature matters as much as direction. Lukewarm — comfortably warm on the inside of your wrist, never hot — keeps a dog still, and a still dog splashes less. Test it on your own forearm rather than your hand, which tolerates heat better than a dog’s skin does. Dogs also overheat faster than people, so a hot bathroom with a closed door and a hot rinse is a genuine welfare issue, not just a comfort one; general pet-care and heat-stress guidance from bodies like the American Veterinary Medical Association is worth reading before bathing a flat-faced or senior dog.

    A rinse order that keeps water going downward:

    1. Wet from the neck back, working toward the tail and down the legs.
    2. Shampoo the body, legs, then rear, saving the head for a damp cloth.
    3. Rinse from the top of the shoulders down, letting gravity carry water to the drain — never up the back toward the head.
    4. Rinse the belly and armpits last, where residue hides and later causes itching that makes a dog roll on your carpet.
    5. Squeegee with your hands — run flat palms down each leg and along the back before the dog leaves the tub. This removes a surprising share of the water and shortens both towel time and drip trail.

    Hold the sprayer head close to the coat rather than a foot away. Contact spraying pushes water into the coat instead of atomising it into the room, and it lets you use less pressure. If you only have a fixed showerhead, a plastic cup or a small watering can poured slowly against the coat splashes far less than an overhead stream.

    Rinse longer than you think you need to. Leftover shampoo is the most common cause of post-bath itching and flaking, and a dog scratching at residue two days later will do more damage to your floors and furniture than the bath ever did.

    Manage the Shake Instead of Fighting It

    The shake is not optional — it is how dogs remove most of their water, and it starts at the head and travels back. You cannot prevent it, so you time it:

    • Let the first shake happen inside the tub, curtain closed, before you lift the dog out. Say nothing and stay still; many dogs shake as soon as the water stops and the hands come off.
    • Gently cup a hand over the muzzle or hold the head steady if you need three more seconds to get a towel in place — the shake reflex begins at the head, so steadying the head delays it. Never restrain a dog that is panicking to get free.
    • Drape the towel over the shoulders and back first, not the head. A towel over the eyes triggers a bigger shake in most dogs.
    • Expect a second and third shake at the doorway and again in the hall. Have a towel on the floor at both spots.

    Some owners deliberately trigger the shake in the tub by lightly touching the base of the ear once the water is off. It works on many dogs and keeps a litre of water off your tiles.

    Keep Cords and Heated Tools Out

    No electrical cords, dryers, heaters, or plugged-in tools belong in the wet bath path. If drying tools are used later, move the dog to a dry setup first and check the floor again.

    If your bathroom outlets are not GFCI-protected, treat the room as a no-appliance zone entirely — modern electrical codes require ground-fault protection near sinks and tubs precisely because wet hands and wet floors are the risk case. Human hair dryers are a separate problem: their heating elements run far hotter than a dog’s skin tolerates and can cause burns you will not see until the coat is dry. If you use a dryer at all, use a dedicated pet dryer on the cool or low-heat setting, keep it moving, and never aim it into the ear canal or at the face.

    Build a Drying Station Outside the Bathroom

    The fastest way to stop soaking the bathroom is to stop drying in it. Set up a second station before the bath: a rubber-backed mat or old duvet cover on a hard floor, a stack of dry towels, a brush or comb, and treats. Move the dog there once the body is towel-blotted, and finish the job in a room you do not mind being damp.

    Dry in this order, because these areas hold water longest and cause the most problems if skipped:

    • Chest and neck — the biggest water reservoir on most dogs.
    • Ear flaps, then gently around the ear opening. Trapped moisture under a heavy flap is a classic set-up for irritation, which is why a deliberate routine for blotting the ears once the bath is over is worth building in. Never push anything into the canal.
    • Beard and muzzle, which stay wet long after the body feels dry. If you have a bearded breed, the same towel-and-comb pass you use after the water bowl works perfectly here.
    • Armpits, groin, and the tail base — folds and creases where damp lingers.
    • Between the toes and pads, last, so the dog is not walking wet paws over what you have already dried.

    Blot and squeeze rather than rub. Rubbing a wet coat tangles it, especially on curly and double coats, and turns a five-minute dry into a twenty-minute detangling session.

    Stop Signs During the Bath

    Stop the bath if the dog panics, struggles to breathe, collapses, slips hard, snaps, or cannot be handled safely. Stop for your own footing too. A soaked floor is not worth pushing through.

    Stopping early is not a failed bath — it is information for the next one. If the dog freezes, drools heavily, tucks the tail, or tries to climb out repeatedly, the setup is the problem more often than the dog is. Rinse off any shampoo already applied (never leave a dog with product on the skin), towel them, and end the session on a calm note. Then change one variable next time: a non-slip mat, warmer water, a quieter sprayer, a smaller tub, or a helper to hold and feed treats. Flat-faced breeds, seniors with arthritis, and dogs recovering from surgery all deserve shorter sessions and a shallower fill. And if your dog has open sores, hot spots, a fresh incision, or an ear infection, ask your vet what to use and what to keep dry before you bathe at all.

    Bathing Setups Compared

    SetupBest forSplash riskExtra gear neededWatch out for
    BathtubMedium and large dogs; owners who can kneelMedium — contained by walls but easy to over-sprayNon-slip mat, sprayer or cup, tucked curtainBack strain from lifting; slippery porcelain
    Walk-in showerLarge dogs who cannot be liftedHigh — water travels along the floor and outSplash guard, floor squeegee, door towelOpen thresholds; wet-tile slips for the handler
    Utility or kitchen sinkDogs under about 20 lbLow — small volume, high sidesRubber mat, hand sprayerHygiene: disinfect food-prep sinks after
    Collapsible dog tubSmall and medium dogs, apartmentsLow to mediumTub, drain hose or bucketStability — brace it against a wall
    Outdoors with a hoseBig, muddy, heat-tolerant dogs in warm weatherNone indoors, but very messyNon-slip mat, warm-weather timing onlyCold water is a welfare issue; no cold-day baths
    Self-serve dog washBig or difficult dogs; anyone without a good tubZero at homeYour own towels and shampooCost per visit; drying time before the car ride
    Professional groomerHeavy coats, matting, nervous dogsZero at homeNothingBooking lead time; brief them on skin issues

    There is no single right answer here. The honest trade-off is that the setups with the lowest splash risk (sink, dog tub, groomer) either limit dog size or cost money, while the ones that fit any dog (tub, shower) demand more containment work from you.

    Size and Coat Type Change the Splash Plan

    Small dogs

    Use a sink or a small tub with only a few inches of water. Small dogs shake fast and often, but each shake carries less water, so containment matters more than towel volume. Keep one hand lightly on the dog at all times — the real hazard is a jump off a counter, not the water.

    Large and giant breeds

    Plan the exit before the entry. A 70-pound wet dog cannot be lifted safely by one person, so use a walk-in shower, a ramp, or a step stool the dog is already trained on. Give yourself a wide dry landing area, because the first shake will reach across the room.

    Double coats

    Water sits under the guard hairs and comes out slowly for an hour. Rinse twice as long as feels necessary, use a high-velocity pet dryer if you own one (outside the bathroom, on cool), and expect the dog to keep dripping onto floors afterwards. Confine them to one easy-to-mop room until the undercoat is dry.

    Curly and wool coats

    Brush before and after — these coats mat as they dry. Blot, never rub, and comb in sections while damp.

    Bearded and drooly breeds

    Beards, chins, and jowls hold water long after the body is dry and can start to smell if they stay damp. The same habits that keep a beard fresh between baths — a quick comb-through after eating and a steady routine for mopping up drool — do double duty on bath day.

    Ear-flap breeds

    Heavy pendulous ears trap moisture against the skin. Lift each flap, blot the inner surface, and let air get to it; the same check you would do after a damp walk applies after a bath.

    Quick Checklist

    • Towel at tub edge

    • Flat towel on step-out spot

    • Dry exit path for the owner

    • Used-towel drop zone

    • Low-pressure rinse direction

    • No cords in wet zones

    • Cleanup towel ready before the dog shakes

    The Five-Minute Cleanup Sequence

    Clean up in an order that protects footing first and finishes with the parts that dry on their own:

    1. Floor first. Push standing water toward the drain or blot it with the used towels already on the floor. Slips happen after the bath, when everyone relaxes.
    2. Clear the drain. Pull hair out while it is still on the surface — a hair trap or a cheap drain screen saves a plumbing call later. Never wash hair down a bathroom drain deliberately.
    3. Wipe the tub walls and rim while they are wet; shampoo film and loose hair come off in one pass now and need scrubbing tomorrow.
    4. Move wet towels straight to the wash, not into a hamper with dry laundry, and wash dog towels separately from human ones.
    5. Dry the vanity toe-kick and the door threshold, the two places damp hides.
    6. Check paws before the dog leaves the room, so shampoo residue and stray hair do not travel. If your dog already walks through communal areas, the same care you’d take with wiping feet after the corridor keeps hallway carpet clean after bath day too.
    7. Reset the kit — refill shampoo, restack clean towels, hang the mat to dry — so the next bath starts organised.

    Run a fan or crack a window for twenty minutes afterwards. Bathrooms that stay humid grow mildew on grout and curtain hems, and the smell that gets blamed on the dog is often the room.

    Common Mistakes That Flood the Floor

    • Starting the water before the dog is in the tub. The noise builds anxiety, and an anxious dog fights the whole bath.
    • Leaving the shampoo bottle across the room. Every trip you make is a trail of water.
    • Using full water pressure. High pressure atomises water into a fine spray that coats mirrors, walls, and you.
    • Spraying the head. It is the single biggest trigger for shaking, thrashing, and ear water. Use a damp cloth.
    • Skipping the pre-bath brush. Wet mats hold water and shampoo, and they double drying time.
    • No mat in the tub. Scrambling paws throw more water than any sprayer.
    • Letting the dog bolt. A wet dog on carpet is a bigger cleanup than a wet tile floor. Keep the door shut until the first two shakes are done.
    • Bathing too often. Over-bathing strips skin oils and leads to more scratching and odour, not less.

    How Often to Bathe — and What to Do Instead

    Most healthy dogs need a full bath somewhere between once a month and once every few months, depending on coat, activity, and skin condition. Short-coated indoor dogs can go longer; dogs with medicated shampoo prescriptions follow the vet’s schedule, not a general rule. Bathing more often than the coat needs is a real cause of dry, flaky, itchy skin. General guidance on keeping pets and households healthy from public health agencies such as the Centers for Disease Control and Prevention is a sensible baseline alongside your own vet’s advice.

    Between baths, targeted spot-cleaning keeps a dog fresh and keeps you out of the bathroom entirely:

    If you are tracking a recurring issue — staining, odour, or irritation that keeps returning — keeping a simple dated record with photos makes vet appointments far more productive; a basic record of how the face looks week to week beats trying to remember when a problem started.

    Next step: before your dog’s next bath, spend ten minutes tonight staging the room — mat in the tub, three towels placed, a rolled towel at the door, shampoo open on the ledge. That one setup is the difference between mopping the bathroom afterwards and simply hanging up a towel.

    FAQ

    Should I bathe my dog in a tub or shower?

    Use the place where the dog can stand safely and you can rinse without flooding the room. Avoid slick floors and cramped setups that make the dog panic.

    What if my dog shakes water everywhere?

    Expect the shake. Keep a towel at shoulder height before the dog steps out and dry the chest, neck, and back first.

    What should I clean first after the bath?

    Check the floor first so no one slips. Then move wet towels, clear hair near the drain, and reset supplies.

    Frequently Asked Questions

    How much water should I put in the tub?

    Enough to reach the dog’s ankles to lower chest, no more. A shallow fill rinses feet and bellies without giving the dog something to splash in, and it makes the tub far less intimidating. Fill before the dog goes in so the running-water noise is over.

    What water temperature is right for a dog bath?

    Lukewarm — the temperature you would use on your own forearm, not your hands. Too hot dries the skin and can overheat a dog quickly in a closed bathroom; too cold makes a dog struggle and shake more. Turn the water off between rinses so the temperature does not drift.

    Can I use human shampoo on my dog?

    Not as a routine choice. Dog skin has a different pH than human skin, and human shampoos and conditioners can leave the coat dry and itchy. Use a shampoo formulated for dogs, and follow your vet’s product recommendation if your dog has a skin condition.

    How do I keep water out of my dog’s ears?

    Do not spray or pour water at the head at all — clean the face with a damp cloth instead. Some groomers place a large cotton ball loosely at the entrance to each ear canal (never pushed in) and remove it immediately after. Afterwards, lift each flap and blot dry.

    My dog is terrified of the bathroom. What can I do?

    Break the association into steps over several days: feed treats in the empty dry tub, then with the mat down, then with a few inches of standing water and no bathing at all. Non-slip footing solves a surprising share of “bath fear” because most dogs are actually afraid of slipping, not of water. If fear is severe, ask your vet about anxiety support or use a self-serve wash or groomer instead.

    Is it better to bathe a dog outside with a hose?

    Only in genuinely warm weather, and only with water that is not cold. Hose water is often much colder than a dog can comfortably tolerate, and outdoor baths in cool weather risk chilling. Outdoors is excellent for the truly muddy pre-rinse, though — hose the legs and belly outside, then finish properly indoors.

    How long should a dog stay in after a bath?

    Until the coat is dry to the skin, not just dry to the touch. A damp double coat can hold cold for hours. In cool weather, keep the dog indoors and out of drafts; if they must go out, wait until the undercoat is dry.

    Do towels or a dryer work better?

    Both, in sequence. Towels remove the bulk of the water fastest; a cool-setting pet dryer finishes the job and prevents damp spots in folds and under ears. Never use a human hair dryer on heat, and never leave a dog unattended in a heated drying box.

    How do I stop wet-dog smell after a bath?

    Wet-dog smell usually means something is still damp — most often the beard, ear flaps, armpits, or tail base — or that shampoo was not fully rinsed out. Rinse longer, dry the folds properly, and wash the towels and bedding the dog used. If the odour persists after a full dry, a systematic sniff-and-check of the beard area will usually find the source, and a lingering smell with redness or discharge is a reason to call the vet.

    Should I clean my dog’s face during the bath?

    Save the face for last and do it with a damp cloth, not the sprayer. Work from the eye corners outward, then the muzzle and chin, then under the jaw. A dedicated comb check for dried food around the mouth before the bath makes this step much quicker.

    Bottom Line

    A cleaner bathroom bath starts before the water starts. Set the towel zones, choose the wet path, protect the dry path, and stop if the room or the dog becomes unsafe.

  • Dog Bath Water Path Setup at Home

    Dog Bath Water Path Setup at Home

    A dog bath water path setup shows where water will splash, where towels will wait, where the wet dog will step next, and where cords must not cross. Planning this before the bath helps prevent slipping, rushing, and unsafe wet-floor mistakes.

    Map the Wet Zone First

    The wet zone is the tub, shower, basin, or wash area plus the first step out. Put towels where your hand can reach them without leaving the dog unattended.

    In practice, the wet zone is always bigger than people expect. A single full-body shake throws water two to three feet in every direction, and a dog with a long coat or heavy feathering will fling it further still. Before the first bath in a new setup, stand at the tub and physically walk the arc a shaking dog would spray — then treat everything inside that arc as “will get wet.” A common mistake is mapping only the floor and forgetting vertical surfaces: toilet paper rolls, a basket of clean laundry, a plug-in air freshener, or an open cabinet door all sit inside the splash arc and need to be moved or closed first.

    It also helps to mark the boundary in a way you can see. Painter’s tape on the floor, a bath mat edge, or the seam of a rubber runner gives you a visual line between “wet zone” and “dry zone,” which matters most when you are holding a squirming dog with one hand and reaching with the other. Once that line exists, every other decision — towel placement, cord routing, exit direction — becomes easier because you are only asking one question: is this thing inside the line or outside it?

    Gather Your Supplies Before You Turn On the Water

    The single biggest cause of a bad home bath is leaving mid-wash to fetch something. Once the dog is wet, you have lost your free hands. Stage everything inside arm’s reach of the tub, on the dry side of your tape line:

    • Shampoo and conditioner, caps already loosened or pre-diluted in a squeeze bottle
    • A non-slip mat for inside the tub and a second one for the step-out spot
    • At least two towels — one for the initial squeeze-dry, one for the walk to the drying area
    • A face cloth or soft flannel kept separate from the body towels, so you never drag shampoo residue across the eyes
    • A cup, pitcher, or hose attachment for rinsing low-pressure water over the back and legs
    • Cotton balls (for gently blocking ear canals on dogs prone to water in the ears) and a grooming comb
    • Treats placed in a closed container outside the splash arc so they stay dry
    • A drain hair catcher — undercoat blows out in the bath and a clogged drain turns a controlled wet zone into a flooded one

    Lay these out in the order you will use them, left to right. It sounds fussy, but the first time you reach without looking and find the conditioner exactly where you expected it, you will keep doing it.

    Set the Dry Towel Zone

    Choose a towel landing spot before the bath starts. The first towel should be close to the wet zone. A second towel can wait on the path to the drying area.

    The towel zone works best when it is elevated and dry — a closed toilet lid, a low stool, a laundry basket turned upside down, or a hook on the back of the door. Towels left flat on the floor soak up splash water and become useless exactly when you need them. If you keep towels on a hook, hang them so the folded edge faces you; grabbing a towel by its loose corner and having it unfurl into the tub is a small frustration that repeats every single bath.

    Towel Math: How Many You Actually Need

    A rough working rule: one towel per 20 pounds of dog for the initial squeeze-out, plus one dedicated face towel, plus one spare. A 70-pound double-coated dog can genuinely saturate three towels before the coat stops dripping. Sorting them by job helps — many owners find that assigning a dedicated cloth by hue keeps the face towel from ever being used on muddy paws, which matters more than it sounds when eyes and folds are involved.

    Warm the towels if you can. A few minutes in the dryer, or simply stored on a radiator, makes the step-out far less startling for dogs who tense up when cold air hits wet skin. Calm dogs shake less, and dogs that shake less keep your dry zone dry.

    Keep Cords Out of the Path

    Dryers, clippers, chargers, and extension cords do not belong where water drips or where the dog walks wet. If you cannot separate wet paws from cords, do not use electrical tools in that space.

    Bathroom and laundry-room outlets near water should be GFCI-protected — the type with TEST and RESET buttons on the face. If yours has those buttons, press TEST before bath day and confirm the outlet cuts power, then press RESET. If the outlet has no test buttons at all, treat that space as unsuitable for corded grooming tools; the U.S. Consumer Product Safety Commission publishes plain-language guidance on ground-fault protection and appliance safety around water that is worth reading once and following forever.

    Cordless tools have become the default for home grooming, and they remove most of the cord problem — but not all of it. Charging bases are still mains-powered, so keep the base station in a different room entirely, never on the vanity above the tub. If you must run a corded dryer, route the cable along a wall behind furniture, tape it down, and bring the dog to the dryer rather than the dryer to the dog. A common mistake is looping slack cord around a doorknob “out of the way,” which puts a hanging snag loop right at chest height for a bolting dog.

    Plan the Exit

    The exit path should be short, dry, and free from stairs if possible. Close off busy household traffic so the dog does not bolt through a slick hallway.

    Decide the exit direction before the dog is wet, and physically close the doors you do not want used. Most home bath accidents happen in the four seconds after a dog’s front feet hit the floor: the dog wants to shake, then run, then rub against the nearest carpet. Give that instinct somewhere safe to go. A hallway runner, a bath sheet laid end-to-end as a “landing strip,” or a closed bathroom door that keeps the dog in the room until the first shake is over all work well.

    If stairs are unavoidable — a basement tub, an upstairs bathroom — carry small dogs and leash large ones. Wet paw pads on painted or varnished stair treads offer almost no grip, and a dog that slips once on stairs will remember it at the next bath. Owners who share a corridor or lobby with neighbours often find the tidy-up after communal floors routine translates directly to bath day: same principle, same choke points, same need to keep grit and water off shared flooring.

    Traction: The Part Most Home Setups Get Wrong

    Water is only half the hazard; the other half is what the water is sitting on. Tile, sealed hardwood, laminate, and vinyl all become genuinely slick when wet, and a panicking dog’s claws cannot bite into any of them.

    Build traction into three specific spots:

    1. Inside the tub or basin — a suction-cup rubber mat, not a folded towel, which slides.
    2. The step-out square — a rubber-backed bath mat that will not skate when 60 pounds lands on it.
    3. The exit run — a runner, yoga mat, or line of towels covering the first six to eight feet.

    Test each one by pushing it hard with your foot while it is wet. If it moves, it will move under a dog. Cheap suction cups lose their grip once soap film builds up on the tub floor, so wipe both the mat and the tub with a clean cloth every few baths to restore suction — a two-minute job that quietly prevents the worst kind of fall.

    Water Temperature, Pressure, and Drain Setup

    Bathwater for dogs should feel lukewarm on the inside of your wrist — roughly body temperature, not the hot shower temperature you would choose for yourself. Dogs have a higher normal body temperature than people, but their skin is thinner and their tolerance for heat during restraint is lower. If steam is visible, it is too hot.

    Pressure matters as much as temperature. A wide, low-pressure flow rinses better and frightens less than a hard jet. If you use a shower head, set it to the gentlest spray and keep the head close to the coat rather than blasting from a distance — close and gentle drives water through the undercoat far more effectively than far and forceful.

    Set the drain up before you start:

    • Fit a hair catcher; undercoat and shed hair are the number-one cause of a slow drain on bath day.
    • Run the water for ten seconds first to check the drain is clear — discovering a blockage mid-rinse is how a controlled wet zone becomes a flooded floor.
    • If you are using a laundry sink or an outdoor basin, confirm where the greywater actually goes, and keep shampoo runoff out of storm drains where local rules require it.

    Rinse longer than you think you need to. Leftover shampoo is the most common cause of post-bath itching and flaking, and it is invisible until the coat dries. Run your fingers through the coat under running water: if it still feels even slightly slick, keep rinsing.

    Room-by-Room Comparison: Where to Set Up the Path

    LocationBest forTraction riskCord safetyMain drawback
    Bathtub / showerMost dogs, year-roundHigh on wet tile — mats essentialGFCI outlets usually present but close to waterAwkward back-bending; long exit path
    Walk-in showerLarge and senior dogsModerate; often textured floorGood if outlet is outside the roomSplash spreads widely without a curb
    Laundry / utility sinkSmall dogs under ~25 lbLow if floor is mattedUsually good; drain nearbyHeight limits dog size
    Kitchen sinkPuppies and toy breeds onlyLow, but counters get slickPoor — appliances and outlets everywhereFood-prep hygiene concerns
    Outdoors with a hoseMuddy, heavy-coated dogs in warm weatherGrass is good; patio is slipperyNever use corded tools outdoors when wetCold water; weather-dependent; loose dog risk
    Self-serve wash stationBig dogs, small homes, no drain accessPurpose-built, usually excellentManaged by the facilityTravel time; wet car on the way home

    If you rotate between two of these — indoors in winter, outdoors in summer — build a separate path plan for each rather than improvising the second one on the day.

    A 10-Minute Setup Walkthrough

    Do this in order, before the dog knows anything is happening:

    1. Clear the room. Remove bath mats you do not want soaked, laundry, bins, and anything on low shelves inside the splash arc.
    2. Close doors. Decide the one route out and shut everything else.
    3. Lay traction. Mat in the tub, mat at the step-out, runner along the exit.
    4. Route cords. Unplug and remove anything corded from the wet zone; move charging bases to another room.
    5. Stage supplies. Shampoo, cup, comb, face cloth, cotton balls, treats — left to right, dry side of the line.
    6. Hang towels. First towel within arm’s reach; second towel at the far end of the exit run.
    7. Check the drain and temperature. Hair catcher in, water run for ten seconds, wrist test.
    8. Pre-brush the dog. Loose hair and mats are far easier to remove dry; wet mats tighten and become painful.
    9. Then fetch the dog. Not before.

    Step eight is the one people skip and regret. A quick pre-bath brush-out also gives you a chance to notice sore spots, and going gently is the whole point — a light-handed approach to strokes prevents the brush burn that turns bath day into something the dog dreads.

    Small Dog vs Large Dog Path Differences

    Small dogs (under ~25 lb): the path can be short and elevated. A laundry sink or raised basin saves your back, and a single towel wrap usually contains the whole dog for the walk to the drying area. The main risk is a jump from height, so keep one hand on the dog at all times and never step away from a raised basin, even for a second.

    Medium dogs (25–60 lb): the classic bathtub setup. Traction and exit planning matter most here because these dogs are strong enough to bolt but small enough to slip through a gap in your body block.

    Large and giant dogs (60 lb+): plan for a wide wet zone, three or more towels, and a straight, obstacle-free exit. Consider bathing in a walk-in shower where you can stand beside the dog rather than reaching over a tub wall. Lifting a wet 90-pound dog out of a tub is a genuine injury risk for you — use a ramp, a non-slip step, or bathe somewhere the dog can walk in and out unaided.

    Senior or arthritic dogs of any size: shorten the path to the absolute minimum, add a second mat under the front feet, and keep the session under ten minutes. Standing still on a wet surface is tiring for stiff joints in a way that is easy to underestimate.

    Apartment and Shared-Building Considerations

    Small-space bathing is mostly a containment problem. The bathroom is usually the only viable room, and the exit path often runs straight into carpet.

    • Close the bathroom door and let the dog shake inside the room before opening it. One contained shake saves an hour of wiping walls in the hallway.
    • Lay a runner over any carpeted section of the route; wet dog plus carpet equals odour that lingers for days.
    • Ventilate. Run the extractor fan during and after the bath so humidity does not settle into the grout and cause mould.
    • Be considerate about timing if a dryer is involved — high-velocity dryers are loud through shared walls.
    • Wipe the corridor if any water tracks out. Managing damp at the entry point is the same discipline as the evening grit inspection many owners already do after walks.

    After the Bath: Closing the Path Down

    The water path does not end when the dog steps out. Work through the wet areas in a fixed order so nothing gets missed:

    1. Squeeze, don’t rub. Press the towel along the coat rather than scrubbing; rubbing creates tangles, especially behind the ears and in the armpits.
    2. Ears next. Water trapped under a heavy flap stays warm and damp for hours, which is exactly the environment ear problems like. A careful flap-and-fold blot-down after every bath is one of the highest-value two-minute habits in home grooming.
    3. Face, muzzle, and folds. Use the dedicated face cloth and get into the lip fold, chin, and any wrinkle. Owners of bearded breeds usually already have a post-drink blotting habit — bath day is the same routine, just wetter.
    4. Chin and throat. The underside dries slowest because it sits against the chest; the same under-jaw dry-off step used after water bowls applies here.
    5. Comb through while damp. This is when you catch a forming mat, before it tightens.
    6. Reset the room. Pick up mats and hang them to dry, wipe standing water, empty the hair catcher, and put towels straight into the wash. Damp mats left folded on the floor grow mildew fast.

    Keeping a short note of what you observed — a hot spot, a sore paw, a stubborn tangle — makes the next bath better. Some owners photograph problem areas over time; the same dated snapshot habit used for facial hygiene works just as well for tracking skin between baths, and it gives your vet or groomer something concrete to look at.

    Common Mistakes I See in Home Setups

    • Towels on the floor. They soak up splash and are useless by the time you need them. Elevate or hang them.
    • Bathing before brushing. Water tightens existing mats into felt. Always de-mat dry.
    • One mat, no runner. People protect the tub and forget the six feet of tile the dog actually runs across.
    • Shampoo left in the coat. Under-rinsing causes more post-bath itching than any shampoo ingredient.
    • Blasting with a hard spray. High pressure frightens dogs and rinses worse than a gentle, close flow.
    • Using human hair dryers on hot. Dog skin burns at temperatures people find comfortable. If you use a dryer, use the cool or low setting and keep it moving.
    • Leaving the dog to “get a towel.” If you have to leave, the setup was incomplete. Reset and start again.
    • Bathing too often. Over-bathing strips coat oils. Most healthy dogs do not need a full bath more than every four to eight weeks unless a vet has prescribed a medicated schedule; spot-cleaning the face, beard, and paws handles most of the day-to-day mess in between.

    Safety Boundaries

    Do not use electrical tools in wet traffic paths. Do not force a dog through panic, slippery exits, or stairs while wet. Stop for breathing difficulty, collapse, overheating, injury, severe fear, or unsafe handling. Call a veterinarian for collapse, breathing distress, overheating, injury, or pain. Call a groomer if bathing at home cannot be done safely.

    There is no prize for finishing a bath. If a dog is trembling hard, freezing in place, showing whale eye, or trying repeatedly to climb out, ending the session early and rinsing the shampoo out is the correct call — a half-finished bath is recoverable, a dog that learns to panic at the bathroom door is a much longer problem. Skin that looks red, greasy, crusted, or smells strongly even after a clean rinse is a veterinary question rather than a shampoo question; the American Veterinary Medical Association is a reliable starting point for owner-facing guidance on when a grooming issue crosses into a medical one. If your dog has a skin condition, a healing wound, ear tubes, or is recovering from surgery, ask your vet before the next bath what parts of this path need to change.

    Bottom Line

    The bath is easier when the water path is already decided. Know where the wet dog steps, where the towel waits, and where cords never go.

    Set your path once, run it the same way every time, and both you and the dog stop dreading bath day. Next, tighten up the part that causes most post-bath problems: work through the step-by-step flap dry-down so trapped water never sits in the ears overnight.

    Frequently Asked Questions

    How much space do I actually need for a dog bath water path?

    Plan for the wash area plus roughly six to eight feet of matted exit route. A shaking dog sprays two to three feet in every direction, so your wet zone is wider than the tub itself. Small bathrooms work fine if you close the door and let the first shake happen inside the room.

    Can I use a hair dryer on my dog after a bath?

    Only on a cool or low-heat setting, held moving and at a distance. Dog skin burns at temperatures people find comfortable, and human dryers run hotter than dog-specific ones. Never use a corded dryer standing on a wet floor, and keep the cord and any charging base entirely outside the wet zone.

    What kind of mat stops a dog slipping in the tub?

    A rubber suction-cup mat sized to the tub floor, plus a rubber-backed mat at the step-out point. Folded towels slide and give false confidence. Clean soap film off the tub and mat every few baths so the suction cups keep gripping, and push-test each mat wet before the dog gets in.

    How often should I bathe my dog at home?

    Most healthy dogs do well with a full bath every four to eight weeks, unless a veterinarian has prescribed a medicated schedule. Bathing more often strips protective coat oils and can trigger dry, itchy skin. Between baths, spot-clean the face, beard, paws, and rear, which handles the majority of everyday mess.

    Should I bathe my dog outside with a hose instead?

    Outdoors works well for muddy, heavy-coated dogs in warm weather and removes the indoor splash problem entirely. The trade-offs are cold water, weather dependence, a slippery patio, and the risk of a loose wet dog. Never use corded grooming tools outdoors, and check local rules about shampoo runoff reaching storm drains.

    What do I do if my dog panics halfway through the bath?

    Stop escalating. Rinse out any shampoo with gentle, lukewarm water, wrap the dog in a towel, and end the session calmly rather than forcing it to completion. Then rebuild confidence with short, treat-based visits to the empty tub. Persistent panic, or any dog you cannot handle safely, is a job for a professional groomer.

  • Dog Grooming Bathroom Setup

    Dog Grooming Bathroom Setup

    A safer dog grooming bathroom setup has clear zones before the dog enters the room: brush, bath, towel, drying, tools, drain awareness, and cleanup. Keep the floor dry where people walk, keep cords and electrical tools away from splash or standing water, leave the exit and airflow open, and stop if the dog cannot be handled calmly.

    This setup is for ordinary at-home grooming logistics. It is not a fix for panic, pain, wounds, severe mats, parasites, breathing trouble, or unsafe handling. In those cases, pause and use a veterinarian or qualified groomer.

    Set the Bathroom Before the Dog Comes In

    Bathroom grooming gets harder when towels, tools, and cleanup supplies are scattered. Set the room first so the dog spends less time waiting on a wet, cramped, or slippery surface.

    1. Clear the floor and exit path.
    2. Stage towels where you can reach them without stepping away.
    3. Keep brushes, combs, and other grooming tools outside splash zones.
    4. Check footing in the brush, bath, towel, and drying areas.
    5. Keep cords, chargers, dryers, and clippers away from water.
    6. Confirm ventilation and a calm route out of the room.

    The ASPCA dog grooming tips support brushing before bathing and using a practical bath setup with warm water. Wet floors and clutter are also basic safety hazards; OSHA slip, trip, and fall guidance supports keeping walking surfaces clean, dry, and clear.

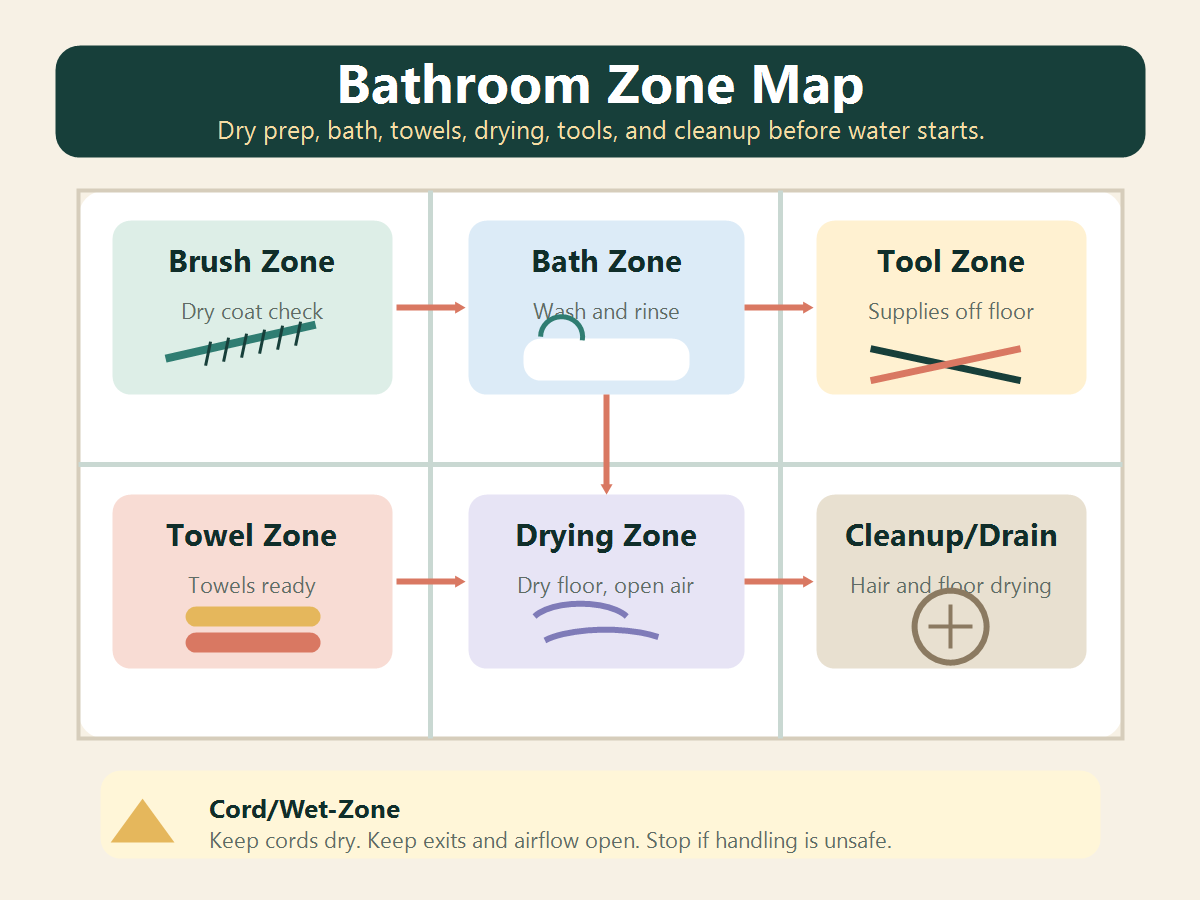
    Bathroom zone map for dog grooming showing brush, bath, towel, drying, tool, cleanup, drain, and cord wet-zone caution areas.
    Use this zone map as a quick check: dry prep first, keep bath/towel/drying/tools/cleanup separate, and keep cords out of wet zones.

    Think of the bathroom as a short workflow, not one crowded wet area. The goal is to move from dry coat work to bath, towel, drying, and cleanup without crossing cords through water or blocking the dog's exit path.

    ZonePurposeSetup note
    Brush zoneRemove loose coat and check for tangles before waterKeep it dry and away from tub splash.
    Bath zoneWet, wash, and rinseUse stable footing and do not lift a dog into a setup you cannot control safely.
    Towel zoneFirst dry-off step before the dog shakes water across the roomStack towels before the dog is wet.
    Drying zoneTowel drying and comfortable airflow when appropriateKeep cords away from standing water and away from the exit path.
    Tool zoneBrushes, combs, nail tools if used, and grooming suppliesKeep tools organized and out of the dog's walking path.
    Cleanup and drain zoneHair capture, drain awareness, floor drying, and suppliesClean hair and water before they become slip or clog problems.

    Small, Medium, and Large Dog Setup Notes

    Small dogs may fit in a sink or low tub only when lifting is easy, the surface is secure, and the dog stays calm. Keep one hand free for steady support and never leave the dog perched near an edge.

    Medium dogs usually need more towel staging and a clear turn-around path. If the dog bumps into cabinets, blocks the door, or cannot stand comfortably, the room is not set up well enough for a calm session.

    Large dogs need more floor space, more towels, and a plan that does not depend on awkward lifting. If the bathroom forces you to pull, drag, hoist, or trap the dog, choose a different setup or use professional help. For no-tub alternatives, see dog grooming without a bathtub.

    Footing and Floor Control

    Footing matters in every zone, not just inside the tub. A dog that slips may panic, twist, scramble, or resist the next bath. Keep the standing surface stable, dry the walking path as you go, and remove laundry, bottles, cords, and loose supplies from the floor.

    Do not block the doorway with towels, bins, stools, or a closed-in drying setup. The dog and handler both need a clear way out if the session has to stop quickly.

    Cord and Water Separation

    Keep electrical tools, chargers, and cords outside wet zones. UL Standards & Engagement discusses the risk of electric grooming appliances near water and safety measures such as GFCI protection. This article does not give electrical work or wiring advice.

    Do not run cords across wet floors, into splash zones, under towels, or through the dog's exit path. If you cannot keep the drying area dry and controlled, towel dry first and move the dog to a safer ventilated area before using airflow.

    Drying Zone

    The drying zone should be dry, ventilated, and calm. Start with towels. If airflow is used, keep it comfortable, keep the dog on secure footing, and stop for panic, coughing, breathing trouble, overheating signs, or unsafe handling. For more drying detail, use how to dry a dog after a bath.

    Do not crowd the drying zone with closed doors, blocked vents, wet cords, or piles of towels on the floor. A dry path out of the room matters as much as the drying tool itself.

    Cleanup Flow

    Cleanup is part of the setup. Plan for hair capture, towel placement, drain awareness, floor drying, and tool storage before you start. The CDC home cleaning guidance supports cleaning first and following product labels when using cleaning or disinfecting products.

    Keep cleaners away from pets, avoid mixing products, and let surfaces dry before the dog returns to the room. If the dog has parasites, wounds, discharge, or signs of infection, routine bathroom cleanup advice is not enough; ask a veterinarian or qualified professional.

    When to Stop

    Stop the session if the dog panics, becomes aggressive, has breathing trouble, shows pain, has wounds, has severe mats, has parasites, cannot stand securely, or cannot be handled without force. Stop as well if the room setup creates electrical, ventilation, slipping, lifting, or blocked-exit risk.

    A paused session is better than pushing through a bathroom setup that has become unsafe.

    Bottom Line

    A good dog grooming bathroom setup separates dry prep, bath work, towels, drying, tools, drain awareness, and cleanup before water starts running. Keep floors and exits clear, keep cords away from wet zones, use calm handling, and stop for pain, panic, breathing trouble, severe mats, parasites, wounds, or any setup you cannot control safely.

    FAQ

    What should I set up before bathing my dog in the bathroom?

    Set towels, secure footing, grooming tools, a clear exit path, drying space, and cleanup supplies before the dog enters the room.

    Where should grooming tools go in a bathroom setup?

    Keep brushes, combs, nail tools, dryers, chargers, and cords outside splash zones and out of the dog's walking path.

    Can I use a dryer in the bathroom?

    Only if the setup keeps electrical tools and cords away from water, the floor is dry and secure, ventilation is open, and the dog tolerates airflow calmly.

    Is a bathroom setup enough for every dog?

    No. Dogs with panic, aggression, breathing trouble, pain, wounds, severe mats, parasites, or unsafe handling needs should be routed to a veterinarian or qualified groomer.

    Sources

  • Dog Grooming in a Small Apartment

    Dog Grooming in a Small Apartment

    Dog grooming in a small apartment works best when you set up stations before you start: brush first, contain loose hair, clean only what needs cleaning, dry with airflow and ventilation, then clear the floor, drains, towels, and tools. The goal is not a no-mess promise. It is a calmer path through a tight space.

    Stop before you begin if your dog is too large to handle safely in the space, the floor is slippery, ventilation is poor, or the dog has severe mats, wounds, pain, panic, biting risk, heat or cold stress, or medical fragility. In those cases, use a professional groomer or veterinarian instead of forcing a home session.

    Quick Answer: The Small-Apartment Grooming Plan

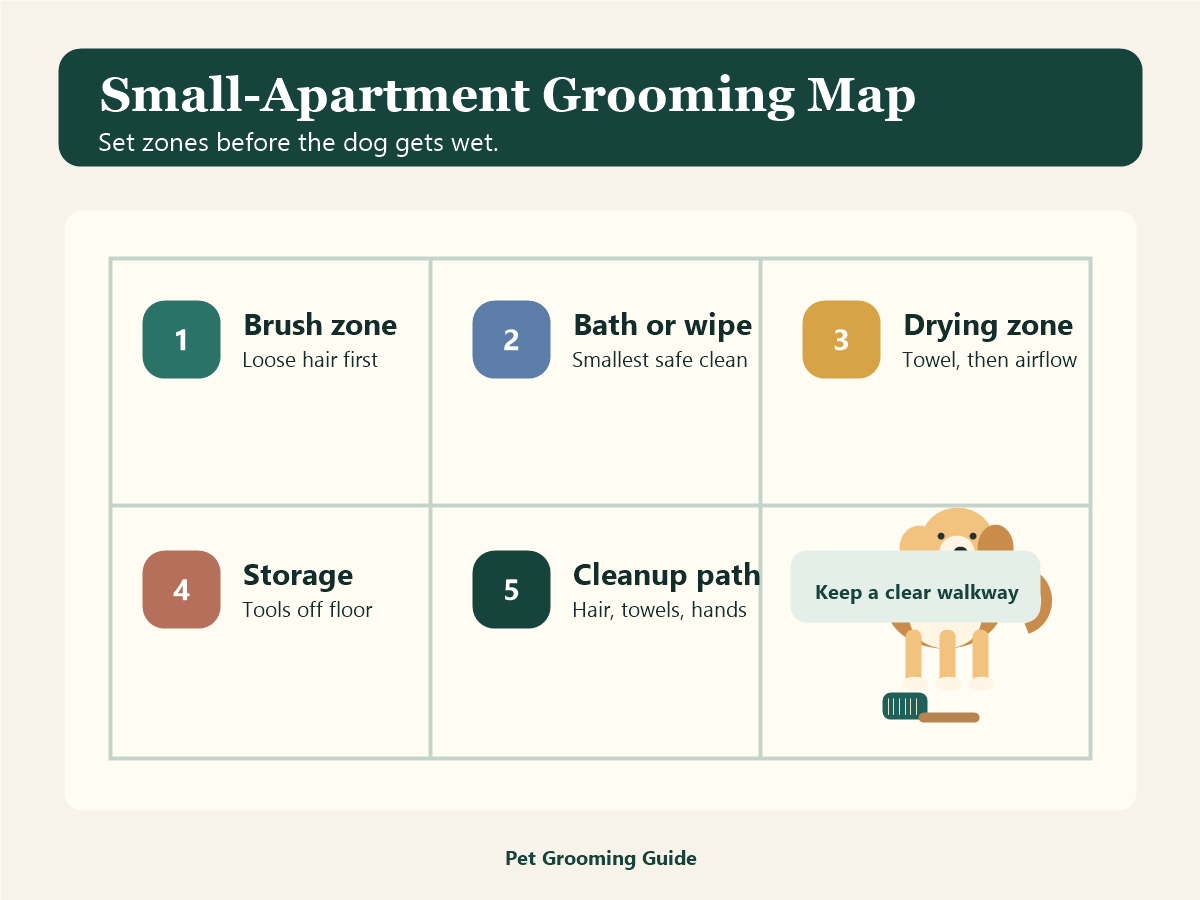
    StationWhat happens thereSmall-space rule
    Brush zoneLoose hair, coat check, small painless tangles onlyBrush before water so less hair reaches the bath area.
    Bath or wipe zonePaw rinse, wipe-down, shower, or safe basin when neededUse the smallest safe cleaning method for the mess.
    Drying zoneTowels first, then airflow if the dog tolerates itKeep air moving and avoid high heat in a closed space.
    Storage zoneTowels, brush, comb, cloths, waste bags, and cleanup toolsKeep tools off the floor and out of the dog’s path.
    Cleanup pathHair, drains, wet floors, towels, tools, and handsClean after the dog is settled so you are not dividing attention.
    Station map for dog grooming in a small apartment showing brush, bath or wipe, drying, storage, and cleanup path zones.
    Use this station map before the dog gets wet: brush first, pick the smallest safe clean, dry with ventilation, keep tools off the floor, then clean hair, towels, and hands.

    Plan the session like a short route through the apartment, not like one crowded grooming spot. A simple order is brush zone, bath or wipe zone, drying zone, storage zone, then cleanup path. For the broader sequence of home grooming tasks, see dog grooming order of operations.

    Keep one clear walking path for you and the dog. Move stools, loose rugs, cords, laundry baskets, and open bottles before the coat is wet. Put towels and cleanup cloths where you can reach them without stepping over the dog.

    If the apartment layout makes you turn, lift, restrain, or dry the dog in a way that feels unsafe, shrink the job. A wipe-down, paw rinse, or separate brush session may be the right answer.

    Brush Zone: Control Hair Before Water

    Start with brushing or a coat check when the coat allows it. The ASPCA dog grooming tips recommend brushing before bathing to remove dead hair and mats. In an apartment, that same step also helps keep loose coat from spreading into the bath and drying areas.

    Pick a spot with traction and enough room for the dog to stand naturally. A washable mat, towel, or easy-clean floor area can work if it does not slide. Keep a bag or bin nearby for hair from the brush, but do not let the dog step around loose hair piles or tools.

    Do not brush over painful skin, wounds, severe mats, or tight hair close to the skin. Do not keep working because the apartment is already set up. The coat check is allowed to end the session.

    Bath Or Wipe-Down Zone

    Use the smallest safe cleaning method that fits the mess. Light dirt may need only a paw rinse or wipe-down. A fuller bath may fit better in a shower, tub, or safe basin, depending on your dog and your space. If you do not have a tub, the dog grooming without a bathtub guide covers no-tub options.

    Before water starts, check footing. Slippery tile, narrow corners, unstable basins, and unsafe lifting are bigger problems in a small apartment because there is less room to recover if the dog slips or bolts.

    Keep water lukewarm, avoid spraying into the ears, eyes, and nose, and rinse carefully. Do not turn a cramped bathroom into a restraint area. If the dog panics, freezes, snaps, repeatedly tries to escape, or cannot stand safely, stop.

    Drying Zone: Airflow, Noise, And Ventilation

    Towel first, then use airflow only if the dog tolerates it. The AKC drying guide explains that airflow, not heat, dries fur, and that heat can burn skin. That matters in small rooms where heat, humidity, and noise build quickly.

    Do not run a dryer in a closed, poorly ventilated space. Open a safe ventilation path if you can, keep the dryer moving, and avoid aiming hot air close to the skin.

    Stop drying if the dog is distressed, the room feels hot or stuffy, the floor gets slippery, or you cannot keep the dryer, towels, and dog under calm control.

    Storage And Spill Control

    Small apartments reward setup. Before you start, place towels, brush, comb, cleanup cloths, waste bags, and any needed rinse supplies within reach. Close bottles when they are not in your hand. Keep sharp tools, cords, and slick containers off the floor.

    Do not stack supplies in the dog’s exit path. If the dog needs a break, you should be able to move away from the grooming zone without stepping over wet towels, cords, or loose tools.

    Cleanup Checklist For Small Spaces

    Clean after the dog is safe and settled. The CDC guidance on healthy dogs includes cleanup and handwashing as basic ways to reduce germ spread around dogs. In an apartment, cleanup also keeps wet floors, loose hair, and used towels from becoming the next problem.

    • Collect loose hair from the brush zone.
    • Check the bath or rinse area for hair and residue.
    • Remove hair from the drain catcher if one was used.
    • Wipe obvious water from floors before anyone walks through.
    • Set towels aside for washing or drying.
    • Clean brushes, combs, and rinse tools, then let them dry.
    • Wash your hands after handling hair, towels, drains, or cleanup cloths.

    Stop Signs And When To Use A Pro

    A small apartment can make a hard grooming session harder. Stop and use a professional groomer, veterinarian, or qualified handler if the dog has severe or widespread mats, wounds, painful skin, unsafe mobility, panic, biting risk, heat or cold stress, breathing distress, or medical fragility.

    Use a professional groomer for coat work that needs safer handling, better equipment, or skill beyond a basic home session. Use a veterinarian for wounds, raw skin, ear discharge, eye injury, limping, pain, parasites, bad odor from skin or ears, breathing trouble, heat stress, or sudden behavior change.

    Bottom Line

    For dog grooming in a small apartment, set the route before the dog is wet: brush zone, bath or wipe zone, drying zone, storage zone, and cleanup path. Keep footing secure, keep air moving, keep tools off the floor, and stop as soon as the space or the dog no longer feels safe.

    FAQ

    How do you groom a dog in a small apartment?

    Use stations. Brush first, choose a safe bath or wipe-down area, dry with towels and airflow, store tools off the floor, then clean hair, drains, floors, towels, tools, and hands.

    How do you control dog hair while grooming indoors?

    Brush before water, keep one planned brush zone, collect loose hair before moving to the bath area, and clean the floor after the dog is settled.

    How do you dry a dog in an apartment?

    Towel first, then use airflow with ventilation if the dog tolerates it. Avoid high heat, closed rooms, slippery floors, and drying setups that make the dog panic.

    Can you groom a dog without a bathtub?

    Yes, for some dogs and messes. A wipe-down, paw rinse, shower, or safe basin may work, but the setup still needs traction, space, calm handling, and a safe cleanup path.

    When is a small apartment unsafe for dog grooming?

    It is unsafe when footing is poor, ventilation is blocked, lifting is risky, the dog cannot be handled calmly, or there are medical, pain, matting, heat, breathing, or behavior stop signs.

    Sources

  • Dog Grooming Without a Bathtub

    Dog Grooming Without a Bathtub

    You can groom a dog without a bathtub by choosing the safest setup for the dog, the mess, and the room you have. Small dogs may use a sink only when lifting is easy and the surface is secure. Many dogs do better in a shower, with a paw rinse or wipe-down, or with a professional bath. Outdoor rinsing is only a mild-weather option when footing, water control, and handling are safe.

    Do not turn a no-tub problem into a handling problem. Stop and get help if the dog is too heavy to lift, slips, panics, bites, has severe mats, has wounds or skin irritation, shows pain, has chemical residue on the coat, or cannot be handled calmly.

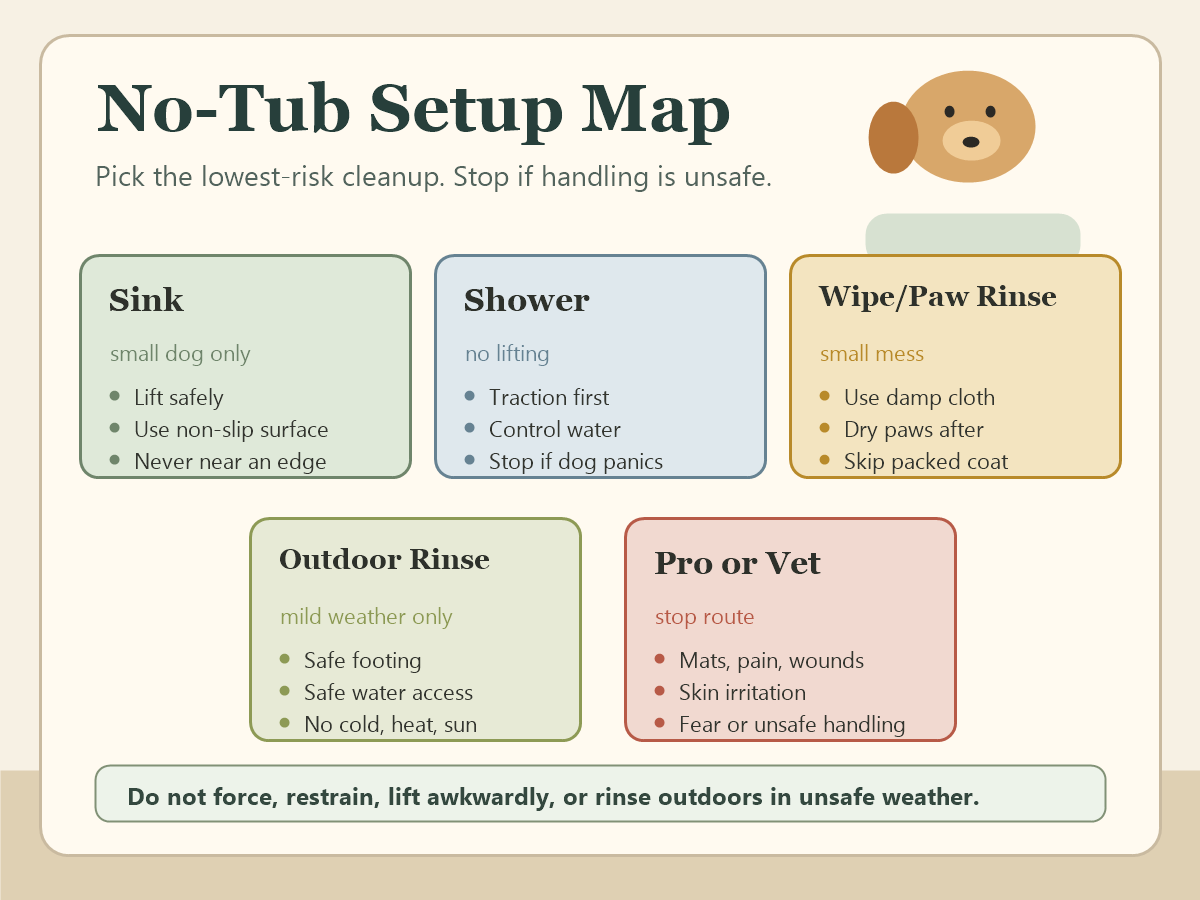
    No-tub setup map for dog grooming showing sink, shower, wipe or paw rinse, outdoor rinse, and pro or vet stop route.
    Use this setup map to pick the lowest-risk cleanup route. Stop for unsafe lifting, slipping, pain, mats, wounds, skin irritation, fear, or unsafe weather.
    SituationBetter optionSkip it when
    Small dog, safe lift, steady surfaceSink setupThe dog is heavy, jumpy, slippery, panicked, or near an edge.
    Medium or larger dog with bathroom accessShower setupThe floor is slick, water control is poor, or the dog tries to flee.
    Small mess on paws, belly, or coat surfaceWipe-down or paw rinseMud is packed in, the coat is matted, or the skin looks sore.
    Mild weather, secure footing, controlled waterOutdoor rinseIt is cold, hot, icy, windy, directly sunny, slippery, or hard to control the dog.
    Large, fearful, painful, matted, or medically fragile dogProfessional bath, groomer, or veterinarianHome grooming would require force, awkward lifting, restraint, or guesswork.

    Sink Setup: Small Dogs Only When the Lift Is Safe

    A sink can work for a small dog when the handler can lift the dog comfortably, the sink area is uncluttered, and the dog can stand on a non-slip surface without leaning near an edge. Keep towels within reach before you start, and use lukewarm water rather than hot water. If you are unsure what lukewarm should feel like, review dog bath water temperature before the bath.

    Brush or check the coat first. The ASPCA dog grooming tips recommend brushing before bathing and keeping water away from a dog’s ears, eyes, and nose. Use a cup, pitcher, or controlled sprayer rather than blasting water at the face.

    Skip the sink if the lift feels awkward, the dog stiffens or scrambles, the counter is crowded, or you would need to hold the dog in place by force. A sink bath should feel lower-risk than the alternatives. If it does not, use a shower, wipe-down, or professional bath.

    Shower Setup: Traction First, Water Control Second

    A shower is often better than a sink for dogs that should not be lifted. Set up the floor first with secure traction. Put towels where you can reach them without stepping away from the dog. Use a handheld sprayer, cup, or pitcher so you can keep water controlled and away from the face.

    Keep the water warm, not hot, and rinse thoroughly. The SF SPCA at-home grooming guidance supports warm water and complete rinsing during home baths. For mistakes to avoid before, during, and after the bath, see dog bathing mistakes.

    Stop the shower setup if the dog cannot stand securely, repeatedly tries to leave, freezes, snaps, or becomes too distressed to continue calmly. Do not solve poor footing with more restraint.

    Wipe-Down or Paw Rinse for Small Messes

    Not every mess needs a full bath. Light dirt on paws, belly fur, or the coat surface may be easier to handle with a damp cloth, warm washcloth, or short paw rinse. This keeps the session brief and avoids turning a small cleanup into a stressful full wash.

    The AKC clean dog paws guidance describes using dog-safe wipes or a warm soapy washcloth for muddy, sandy, or salty paws. For a dedicated routine, use how to clean dog paws after a walk.

    Skip a wipe-down if the coat is packed with mud, matted, sticky with an unknown substance, or sitting over red or painful skin. Those are not scrub-harder situations.

    Outdoor Rinse: Mild Weather Only

    An outdoor rinse is a narrow option, not the default no-tub answer. Use it only when the weather is mild, the footing is secure, water access is controlled, drainage is safe, and the dog stays calm. Keep the rinse short and bring the dog indoors to dry.

    Do not rinse outdoors in cold weather, hot weather, direct heat, icy conditions, high wind, poor footing, unsafe drainage, or any situation where the dog is hard to control. Do not use buckets or open containers in a way that creates slipping, lifting, or dumping risk. If the setup feels improvised in a bad way, choose a different cleanup path.

    Drying in a Small Space

    Dry with towels first. If you use airflow, keep it comfortable, keep ventilation open, and stop if the dog becomes frightened, overheated, or uncomfortable. The AKC drying guide notes that airflow does the drying and that heat can burn skin.

    Do not use high heat close to the skin, and do not send a damp dog into cold or hot outdoor conditions. For more detail, see how to dry a dog after a bath.

    When to Use a Groomer or Veterinarian

    Use a professional groomer when the dog is too large to handle safely, the coat is packed or matted, the dog is too fearful for calm home handling, or the bath setup would require force. Use a veterinarian for wounds, pain, bleeding, skin irritation, chemical exposure, heat or cold stress, or a medically fragile dog.

    If you are unsure whether the session should continue, the safer answer is to pause. The guide when to stop grooming and call a pro covers the stop signs that should end a home session.

    Conclusion

    The best no-bathtub grooming setup is the one that cleans the actual mess without adding lifting, slipping, weather, or handling risk. Use a sink only for small dogs when lifting and footing are safe, use a shower when traction and water control are good, choose a wipe-down for small messes, and keep outdoor rinsing limited to mild, controlled conditions. When the dog, coat, skin, or setup is not safe, stop and get professional help.

    FAQ

    How can I bathe my dog without a bathtub?

    Choose a sink, shower, wipe-down, paw rinse, mild-weather outdoor rinse, or professional bath based on dog size, coat condition, weather, footing, and handling safety.

    Can I wash my dog in the shower?

    Yes, if the floor has traction, the water is lukewarm, the dog can stand calmly, and you can keep water away from the ears, eyes, and nose.

    Is it safe to bathe a dog in a sink?

    Only for a small dog that can be lifted safely onto a steady non-slip surface. Skip the sink if lifting, balance, edge risk, or behavior is unsafe.

    Can I rinse my dog outside?

    Only in mild weather, on safe footing, with controlled water access and a calm dog. Do not rinse outside in cold, heat, direct sun, slippery conditions, or poor-control setups.

    When should I use a professional bath instead?

    Use a professional bath when the dog is too large, fearful, painful, matted, medically fragile, hard to handle calmly, or unsafe to lift or rinse at home.

    Sources