Tag: dog grooming

  • Paw Pad Care After Grooming

    Paw Pad Care After Grooming

    Paw pad care after grooming means checking each paw for trapped moisture, loose hair, small loose debris, nail-edge irritation, and normal comfort. For a routine grooming session, keep the check simple: let the dog stand safely, dry between the toes, look at the pads and nail edges, and stop if anything looks painful, swollen, bleeding, burned, cut, or unsafe to handle.

    This is not wound care, cracked-pad treatment, balm advice, allergy diagnosis, limping diagnosis, or embedded-object removal. Pain, limping, swelling, bleeding, discharge, burns, blisters, cuts, sudden sensitivity, excessive licking, or chemical exposure concern belongs with a veterinarian.

    Post-groom paw check card showing pad surface, pad edges, between toes, nail edges, dewclaw area, and stop signs.
    Use this paw-check card after routine grooming: check pads, pad edges, between toes, nail edges, dewclaw area, and whole-paw comfort, then stop for pain or injury signs.

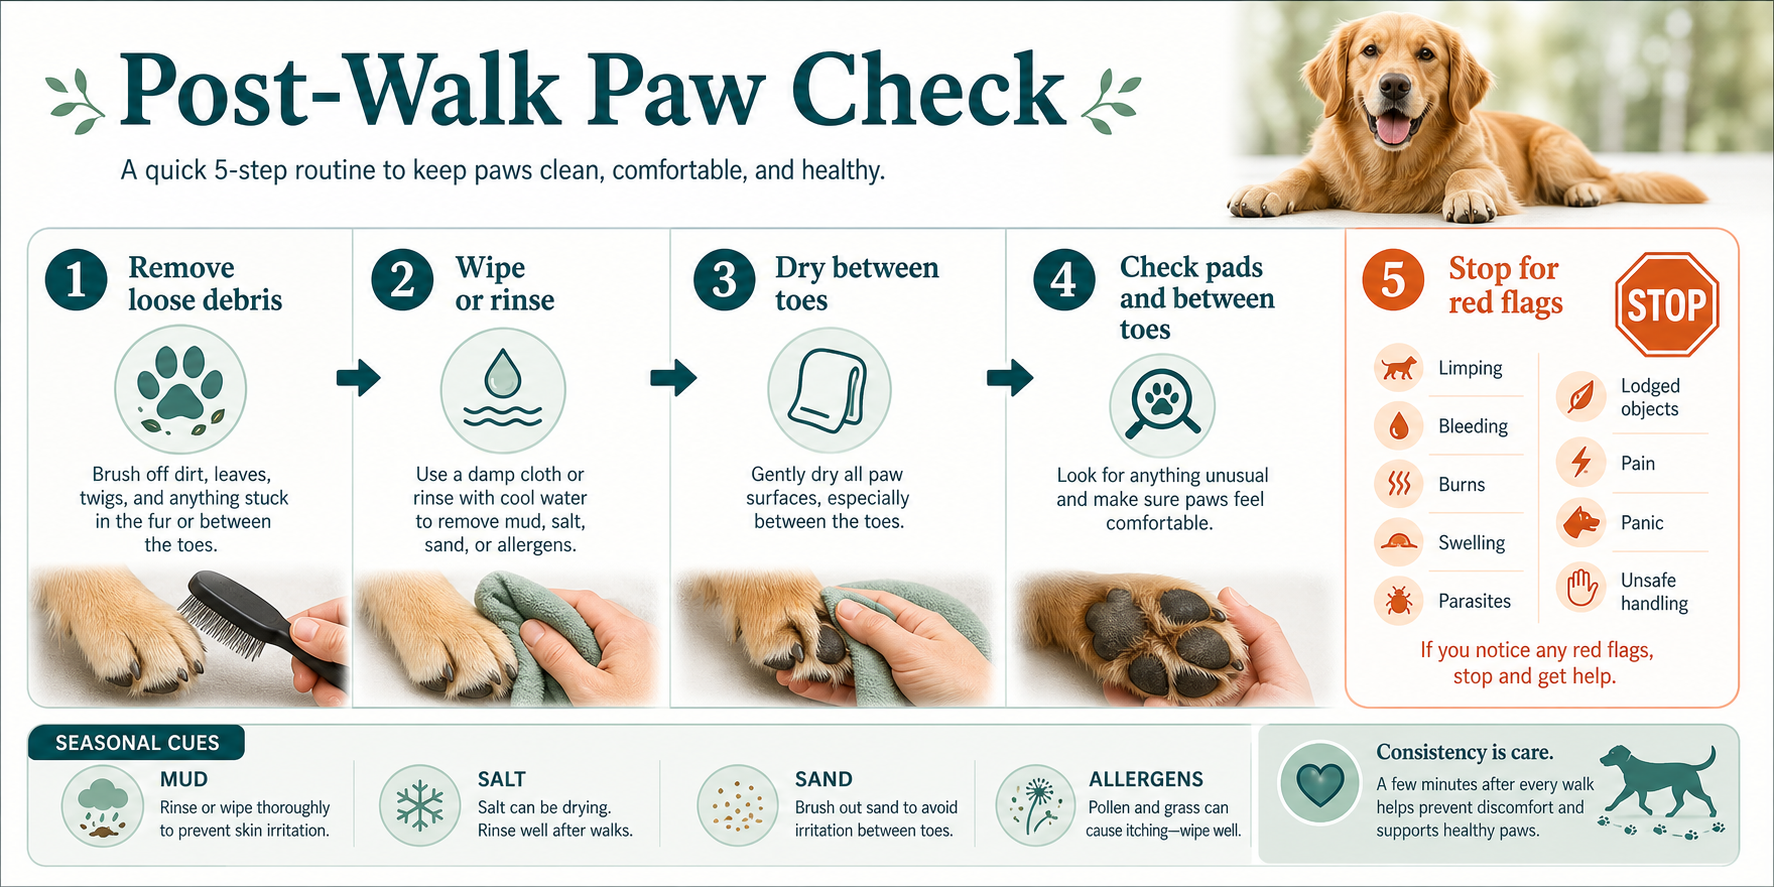
    Use this check after normal brushing, bathing, drying, or nail work. The goal is to catch moisture, loose hair, debris, or discomfort early without turning a grooming routine into home treatment.
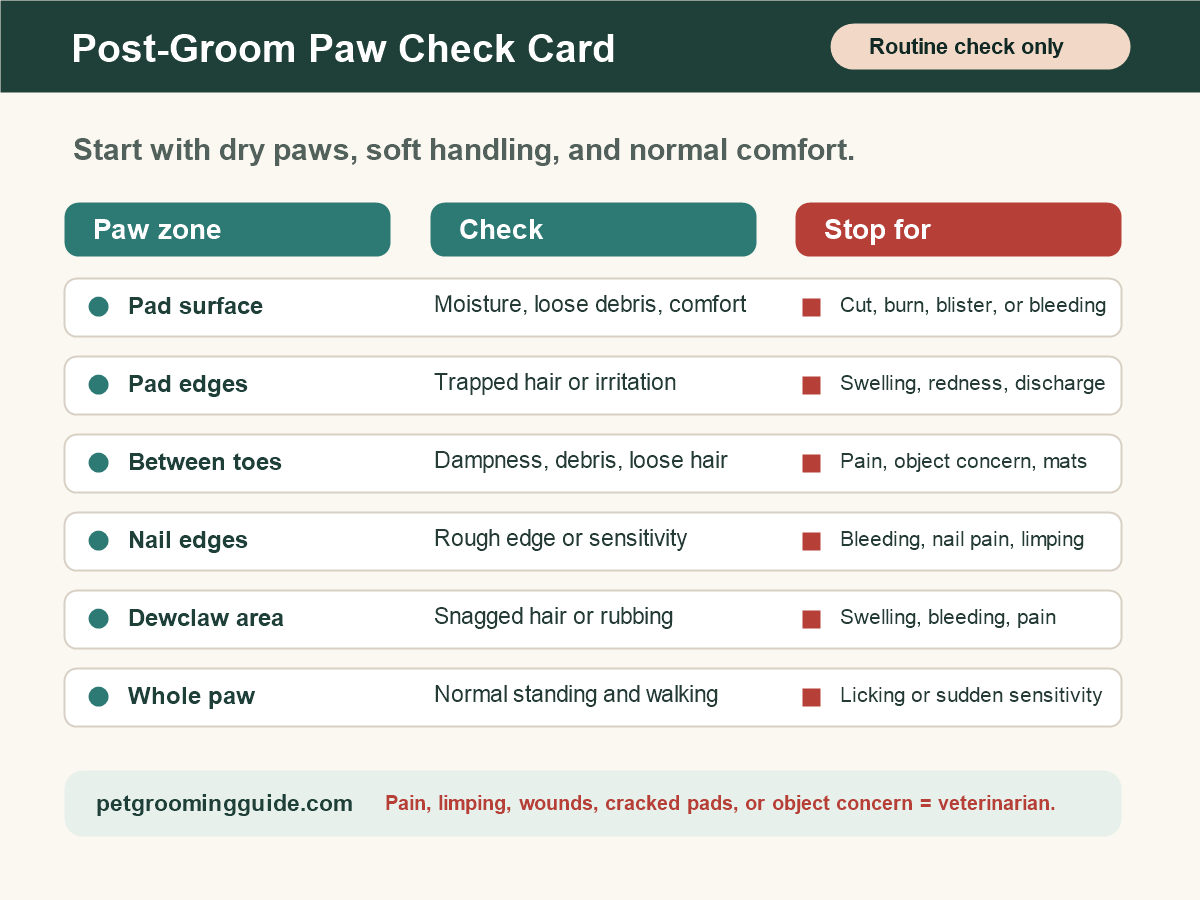
    Post-groom paw check card showing pad surface, pad edges, between toes, nail edges, dewclaw area, and stop signs.
    Paw zoneRoutine checkStop if you see
    Pad surfaceMoisture, loose debris, and comfort.Cuts, burns, blisters, or bleeding.
    Pad edgesTrapped hair, rubbing, or irritation.Swelling, redness, discharge, or pain.
    Between toesDampness, loose hair, small loose debris, or mats.Pain, embedded-object concern, painful mats, or unsafe handling.
    Nail edgesRough edge, sensitivity, and normal standing.Bleeding, quick pain, limping, or repeated pulling away.
    Dewclaw areaSnagged hair, rubbing, or moisture.Swelling, bleeding, redness, or pain.
    Whole pawNormal walking, standing, and comfort.Limping, excessive licking, sudden sensitivity, or panic.

    Step 1: Let Your Dog Stand or Rest Safely

    Check paws only when your dog can stand, sit, or rest without slipping. Keep the hold light. If your dog panics, growls, snaps, freezes, yelps, or pulls away as if the paw hurts, end the session.

    Do not force a paw hold to finish the checklist. A routine grooming check is only useful while the dog is safe to handle.

    Step 2: Dry Between Toes and Around Pads

    After a bath or wet grooming session, moisture can stay between toes, around pad edges, and near the dewclaw. Use a towel and gentle pressure. Do not rub hard, scrape, or apply products to irritated skin.

    The AKC’s paw-cleaning guidance includes checking between toes and paw pads, and the ASPCA’s paw-care advice after outdoor exposure supports washing and drying paws when irritants may be present. If grooming followed salt, lawn chemicals, cleaners, or unknown irritants, keep the home step to gentle cleanup and call a veterinarian if exposure is a concern.

    For a bath-specific routine, use how to clean dog paws after a walk as related cleaning context, but keep this page focused on the post-groom check.

    Step 3: Check Nail Edges Without Treating Injuries

    Look at each nail edge and the skin around it. A small rough edge can be noted for later grooming, but pain, bleeding, limping, swelling, or repeated pulling away means the nail check stops.

    This page does not teach quick treatment, bandaging, antiseptics, disinfectants, or home remedies. The AKC nail-trimming guidance explains why the quick matters during nail work; if the paw is painful or bleeding after grooming, do not try to solve it from a checklist.

    Step 4: Look Between the Toes

    Separate the toes only enough to see whether the area is damp, packed with loose hair, holding small loose debris, or matted. Do not dig into the paw and do not remove anything that may be embedded.

    Call a professional groomer for paw-hair trimming uncertainty, mats between toes, painful mats, or a task you cannot complete safely. Call a veterinarian for pain, limping, swelling, bleeding, cuts, burns, blisters, discharge, embedded-object concern, excessive licking, sudden sensitivity, or chemical exposure concern.

    Normal Cleanup vs Vet Concern

    SituationRoutine cleanupVet concern
    Damp paws after groomingTowel dry gently, especially between toes.Redness, swelling, odor with irritation, or pain.
    Loose hair around padsNote it for a safe future trim plan.Painful mats, skin-close mats, or unsafe handling.
    Small loose debris on the surfaceRemove only if it is loose and easy.Embedded-object concern or sudden pain.
    Nail edge feels differentObserve comfort and stop nail work.Bleeding, limping, quick pain, or swelling.
    Dog licks once or twiceRecheck for moisture or trapped hair.Excessive licking, sudden sensitivity, or abnormal walking.

    What Not to Do

    Do not use this routine to apply paw balms, medicated products, antiseptics, disinfectants, bandages, wound treatments, parasite treatments, allergy treatments, or cracked-pad treatments. Do not remove embedded objects. Do not diagnose limping.

    Those choices need a veterinarian when pain, injury, swelling, discharge, bleeding, abnormal walking, or unsafe handling is present. Cornell’s canine health guidance says limping usually indicates pain or weakness and deserves veterinary attention; treat limping as a stop sign, not a grooming checklist problem.

    FAQ

    What should I check on dog paw pads after grooming?

    Check the pad surface, pad edges, between toes, nail edges, dewclaw area, moisture, debris, comfort, and normal walking. Stop for pain, limping, swelling, bleeding, cuts, burns, blisters, discharge, excessive licking, or sudden sensitivity.

    Should I put balm on paw pads after grooming?

    This page does not recommend balms or products. If the paw pads look painful, cracked, bleeding, swollen, burned, or irritated, call a veterinarian instead of covering the problem.

    What if my dog limps after grooming?

    Stop grooming and call a veterinarian. Limping can signal pain or injury and should not be diagnosed from a grooming checklist.

    Can I trim mats between the toes?

    If paw-hair trimming is uncertain, mats are painful, or the dog reacts with pain, stop and call a professional groomer. If the skin looks abnormal or the dog is limping, call a veterinarian.

    How dry should paws be after grooming?

    Paws should feel dry enough that moisture is not sitting between the toes or around the pad edges. Use a towel gently and stop if drying causes pain, panic, redness, or sensitivity.

    Sources

  • How to Prevent Dog Mats at Home

    How to Prevent Dog Mats at Home

    Prevent dog mats by brushing and comb-checking high-friction areas before tangles tighten, keeping the coat dry and clean, and stopping early when hair pulls skin or the dog shows pain. This page is prevention only. It does not teach dematting, cutting, shaving, or brushing through painful mats.

    Any frequency here is a conservative starting point. Long, curly, wavy, feathered, or double coats usually need more attention than smooth coats, and the routine changes with coat, activity, moisture, and mat history.

    What Causes Dog Mats?

    Mats form when loose hair, friction, moisture, and skipped comb checks let the coat compact. They often start where hair rubs, bends, or traps dampness.

    ASPCA matting guidance notes that mats are uncomfortable and prevention depends on a dog’s coat and grooming needs. ASPCA general dog-care guidance also supports frequent brushing and checking the coat before bathing.

    Mat prevention zone map showing behind ears, collar line, armpits, chest and belly, leg feathering, and tail and pants with brush, comb check, and stop-point guidance.
    Use this as a prevention map only. Stop for pain, skin pulling, wounds, irritation, or tight mats and use a qualified groomer or veterinarian.
    ZoneWhy it matsConservative check rhythm
    Behind earsFriction and fine coatCheck most often
    Collar or harness lineCompression and rubbingCheck after gear-heavy days
    Armpits and chestMovement and moistureCheck often on long or curly coats
    Belly and legsDirt, dampness, frictionCheck after wet or outdoor days
    Tail, pants, featheringLong coat and sheddingCheck more during shedding

    Do not treat this as a universal schedule. A dog with a coat that mats easily may need checks more often.

    High-Friction Zones to Check First

    Start where mats usually form: behind the ears, under collars, armpits, chest, belly, inner legs, tail base, pants, and feathering. Use gentle sectioning, and stop if the coat pulls skin.

    Brush Before Bath: Why Water Can Make Tangles Worse

    Brush and comb-check before bathing when the coat is safe to work. ASPCA dog grooming tips and ASPCA general dog-care guidance support brushing or combing out mats before bathing.

    Do not bathe over mats, painful tangles, wounds, parasites, irritation, or skin pulling.

    Comb-Check Routine After Brushing

    A comb check verifies the coat after brushing. A pass means the comb glides through a small section without catching, tugging, pulling skin, or causing the dog discomfort. If the comb catches, stop that section and return to gentle brushing only if it is safe.

    If catching, pain, tight mats, skin redness, or resistance appears, route to a qualified groomer or veterinarian.

    Prevention by Coat Type

    Smooth coats may need only light brushing and skin checks. Long, curly, wavy, feathered, and double coats often need more frequent friction-zone checks. Exact timing depends on the individual coat, activity, moisture, and mat history.

    Use category-level tools only: slicker brush, pin brush, comb, and an undercoat rake when appropriate. This page does not recommend products.

    When Prevention Is Too Late and a Pro Is Needed

    Use a professional groomer for tight mats, severe mats, skin pulling, painful tangles, or coat work beyond your skill. Severe mat removal is not a home task. Use a veterinarian for wounds, irritation, parasites, bleeding, pain, medically fragile dogs, or skin problems.

    FAQ

    How do you prevent mats on a dog?

    Brush and comb-check friction zones before tangles tighten, keep the coat dry, brush before bathing, and stop early for pain or skin pulling.

    Where do dogs mat most often?

    Common zones include behind the ears, the collar line, armpits, chest, belly, legs, tail, pants, and feathering.

    Should you bathe a matted dog?

    No. Do not bathe over mats. Brush only if it is safe, and use a professional for tight or painful mats.

    Can small tangles become mats?

    Yes. Loose tangles can compact into mats if friction, moisture, and loose hair build up.

    When should a groomer handle dog mats?

    Use a groomer for tight, severe, skin-close, painful, or recurring mats, or when the dog resists handling.

    Bottom Line

    The best way to prevent dog mats is to check friction zones early, brush before bathing when the coat is safe, and comb-check gently after brushing. Once hair is tight, painful, skin-close, or pulling, stop home grooming and use a qualified groomer or veterinarian.

  • How to Clean Dog Paws After a Walk

    How to Clean Dog Paws After a Walk

    For normal dirty paws after a walk, wipe loose debris, rinse with lukewarm water if needed, dry between the toes, and inspect the pads. Stop for pain, bleeding, burns, blisters, swelling, limping, lodged objects, parasites, infection signs, panic, aggression, or unsafe handling.

    This is routine paw hygiene. It is not wound care, parasite treatment, burn treatment, or a guide to removing embedded objects.

    The Quick Post-Walk Paw-Cleaning Routine

    AKC paw-cleaning guidance supports using dog-safe wipes or a warm, soapy washcloth for muddy, sandy, or salty paws, along with checking the paws. ASPCA winter paw guidance supports washing and drying feet after walks to remove salt and chemicals.

    StepRoutine actionStop point
    WipeRemove loose mud, sand, grass, or surface gritPain, bleeding, lodged object
    RinseUse lukewarm water when paws have salt, chemicals, allergens, or sticky residueBurns, blisters, panic
    InspectCheck pads, between toes, nails, and fur around the pawLimping, swelling, parasites
    DryTowel pads and between toes so moisture does not sitRedness, odor, discharge
    Post-Walk Paw Check sequence showing remove debris, wipe or rinse, dry between toes, inspect pads, and stop for red flags.
    Use this sequence to keep routine paw cleaning separate from stop-and-call-a-professional signs.

    Mud, Sand, Salt, and Allergens: What Changes?

    The basic routine stays the same, but the reason for cleaning changes the emphasis.

    Walk conditionWhat to add
    MudWipe first, then rinse if mud remains between toes
    Sand or gritCheck between toes and around pads before drying
    Salt or ice-meltRinse rather than only wiping, then dry thoroughly
    Pollen or allergensWipe or rinse paws before repeated licking starts
    Wet pavementDry between toes and check for irritation
    Post-Walk Paw Check sequence showing remove debris, wipe or rinse, dry between toes, inspect pads, and stop for red flags.
    Use this sequence to keep routine paw cleaning separate from stop-and-call-a-professional signs.

    Do not use harsh cleaning products or home chemical mixes on paws. ASPCA dog grooming tips support warm-water rinsing after winter walks to remove salt and chemicals.

    How to Inspect Paw Pads and Between Toes

    Lift one paw only as far as the dog is comfortable. Spread toes gently enough to see between them. Look for redness, cuts, swelling, lodged debris, broken nails, parasites, or the dog pulling away in pain.

    If an object is embedded or the dog is limping, do not dig. VCA limping first-aid guidance and veterinary emergency guidance on paw pad injuries support routing deeper paw injuries and embedded objects to veterinary care.

    When a Wipe Is Enough and When to Rinse

    A wipe may be enough for light dust or dry grass. Rinse when paws touched salt, ice-melt, chemicals, sticky mud, allergens, or anything the dog might lick off.

    Use lukewarm water, not hot water. Keep the session calm and short.

    Drying Paws So Moisture Does Not Sit Between Toes

    After wiping or rinsing, dry the pads, nail area, and between toes with a towel. Moisture sitting between toes can make the dog lick or chew, and it can hide redness or irritation.

    Do not rub hard over sore skin. Stop if drying reveals pain, bleeding, swelling, discharge, or a strong odor.

    Stop Signs: Cuts, Burns, Limping, Parasites, or Lodged Objects

    Stop routine paw cleaning and contact a veterinarian or qualified professional for cuts, bleeding, limping, burns, blisters, swelling, lodged foreign bodies, parasites, infection signs, panic, aggression, or unsafe handling.

    FAQ

    Should I clean my dog’s paws after every walk?

    You do not need a full rinse after every clean sidewalk walk, but a quick check is useful. Rinse after salt, chemicals, mud, allergens, or visible residue.

    Can I use wipes on my dog’s paws?

    Dog-safe wipes can be used for routine surface dirt. Rinse instead when salt, chemicals, or sticky residue may be present.

    Should I rinse salt off dog paws?

    Yes. ASPCA guidance supports washing and drying paws after winter walks to remove salt and chemicals.

    How do I dry between my dog’s toes?

    Use a towel gently between the toes and around pads. Stop if the dog shows pain or you see redness, swelling, cuts, or discharge.

    When should paw cleaning become a vet visit?

    Use a vet for limping, bleeding, burns, lodged objects, parasites, infection signs, swelling, severe pain, or unsafe handling.

    Bottom Line

    Most post-walk paw cleaning is simple: wipe, rinse when needed, dry well, and inspect. If the paw check turns up pain, limping, bleeding, burns, parasites, swelling, or an embedded object, stop cleaning and call a veterinarian.