
You're looking at a fluffy, blue-eyed cat that's basically a cloud with a tail. And that coat? It's gorgeous, but it's also a full-time job.
Learning how to groom a Ragdoll cat properly is the difference between a happy, healthy feline and a matted mess that ends in a stressful, expensive trip to the groomer.
Ragdolls have a unique single-layer coat that doesn't mat like other long-haired breeds, but it still requires consistent care. As of 2026, the Ragdoll remains one of the most popular breeds in the US and UK, which means thousands of new owners are figuring out this grooming thing right now. The good news is that with the right tools and a solid routine, you can keep your Ragdoll's coat silky, tangle-free, and stunning without turning grooming into a battlefield.
Quick Answer
Groom your Ragdoll cat with a slicker brush and metal comb two to three times weekly. Focus on the ruff, armpits, and britches where mats form. Bathe every 6 to 8 weeks.
Trim nails monthly. Check ears weekly. Never use scissors near matted fur.
If mats are tight, use clippers or call a professional.
Why Grooming a Ragdoll Is Different From Other Cats
Most people assume a long-haired cat needs the same grooming as, say, a Persian or a Maine Coon. That's wrong. Ragdolls have what's called a single coat, meaning they lack the dense, woolly undercoat that makes other long-haired breeds shed in clumps and mat within days.
The Ragdoll's fur is fine, silky, and lies close to the body. It's actually closer in texture to rabbit fur than to a typical domestic longhair. That sounds great, and it is.
It means less undercoat to deal with and generally less shedding overall. But here's the catch: that fine texture tangles easily, especially in high-friction areas.
So why does this matter for grooming? Because the approach is completely different. You can't just run a standard brush through a Ragdoll the way you would with a fluffier breed.
You need tools that glide through silky fur without pulling, and you need a technique that targets the spots where mats actually form. The ruff, the armpits, the britches, and behind the ears are the danger zones.
The other thing that makes Ragdolls different is their temperament. They're famously relaxed, often going limp when you pick them up. That's the "ragdoll" trait that gives the breed its name.
While this makes grooming sessions easier, it also creates a false sense of security. A relaxed cat won't always tell you when something hurts. You can over-brush, pull too hard, or accidentally nick skin, and the cat just lies there.
You have to be more careful, not less.
What the Breed Standard Says
The Cat Fanciers' Association (CFA) breed standard describes the Ragdoll coat as "silky, soft, and smooth" with a "heavy" but not "woolly" texture. That's the breed ideal. But maintaining that ideal takes work.
A Ragdoll that isn't groomed regularly will develop mats that pull at the skin, trap dirt and moisture, and can lead to painful skin infections.
According to veterinary dermatology research, matted fur is more than a cosmetic issue. Tight mats restrict air circulation to the skin, create a warm, damp environment where bacteria and fungi thrive, and can cause pressure sores. In severe cases, a mat can cut off circulation to a patch of skin, causing necrosis.
This is why grooming isn't vanity. It's healthcare.
The Single-Coat Advantage and Disadvantage
Here's the honest breakdown:
- Advantage: Less undercoat means less seasonal shedding. You won't find tumbleweeds of fur rolling across your floor.
- Advantage: The coat is less prone to the thick, woolly mats that plague Persians and Maine Coons.
- Disadvantage: The fine, silky texture is prone to friction mats, especially under collars, in armpits, and where the cat rubs against furniture.
- Disadvantage: Fine fur tangles faster than coarser fur. A single missed week can mean knots.
So while Ragdoll grooming is easier than grooming a Persian, it's not optional. It's a consistent, weekly commitment.
What You Actually Need to Groom a Ragdoll
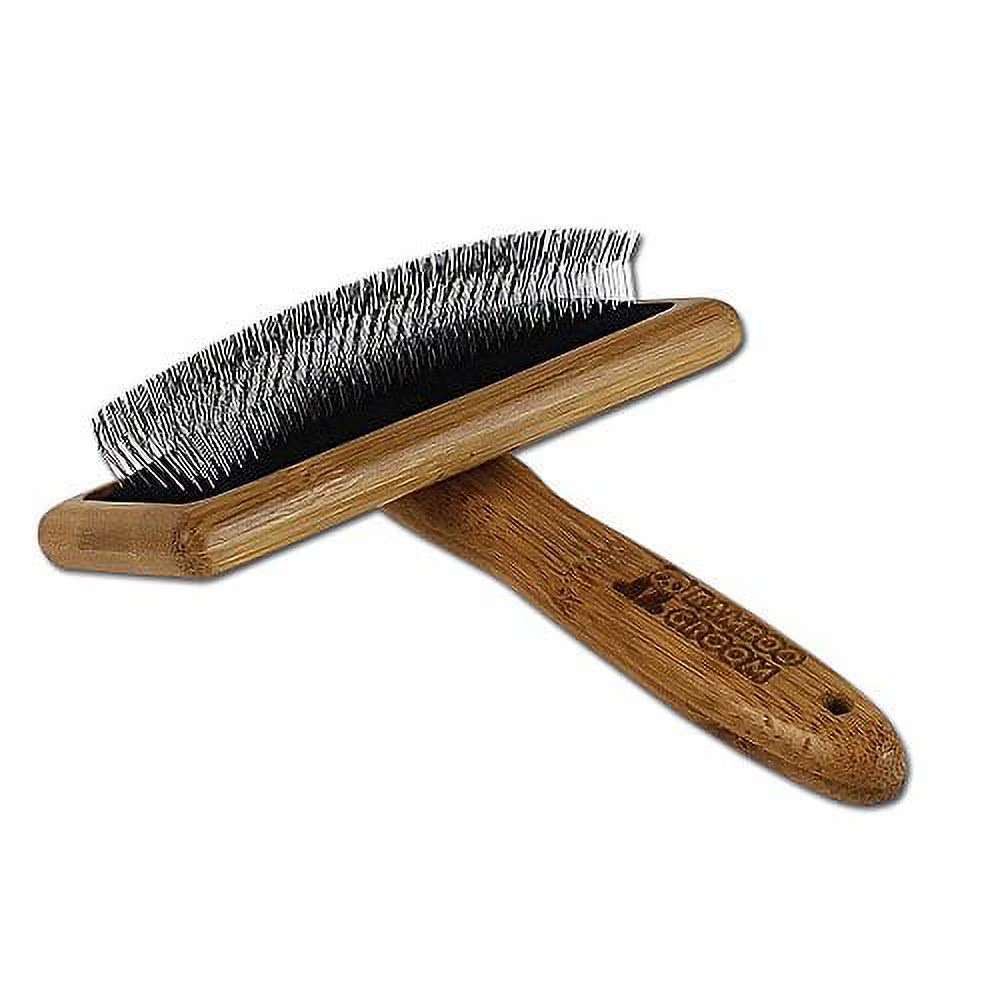
Image source: Bing (Web (fair-use with source credit)
Walking into a pet store to buy grooming supplies is overwhelming. There are aisles of brushes, combs, de-shedding tools, and sprays, and they all claim to be the best. You don't need most of it.
In our research, we found that a handful of well-chosen tools will cover everything you need.
Here's the short version. Get a slicker brush with fine, bent stainless steel pins. Get a wide-tooth metal comb.
Get a good mat splitter or mat remover. Get a cat-safe detangling spray. And get nail clippers.
That's the core kit. Everything else is optional.
The Essential Tools
| Tool | Purpose | Why It Matters for Ragdolls |
|---|---|---|
| Slicker brush | Daily or weekly brushing | Fine pins glide through silky fur and grab loose hair without scratching skin |
| Wide-tooth metal comb | Detangling and finishing | Reaches deeper than a brush, catches small knots a brush misses |
| Mat splitter or mat remover | Cutting through tight mats | Blades are angled to cut fur away from skin, safer than scissors |
| Detangling spray | Loosening knots before brushing | Reduces pulling and static, which Ragdolls are prone to |
| Nail clippers | Monthly trimming | Long nails can snag in the coat and cause mats to form |
| Grooming wipes | Spot cleaning between baths | Keeps white fur fresh without stripping natural oils |
What You Can Skip
There are a few tools that Ragdoll owners often buy and then regret.
- Furminator or de-shedding rakes. These are designed for dogs and cats with thick undercoats. Your Ragdoll doesn't have one. Using a rake on a single coat can pull out healthy guard hairs and irritate the skin.
- Electric grooming clippers. Unless you're dealing with severe mats, you don't need them at home. Most owners end up using them once, then never again.
- Deshedding shampoo. Again, it's formulated for undercoat-heavy breeds. For a Ragdoll, a gentle, cat-safe moisturizing shampoo is better.
Choosing the Right Slicker Brush
Not all slicker brushes are the same. The key is pin length and flexibility. Look for stainless steel pins that are bent at an angle.
Bent pins glide through the coat more easily than straight ones and cause less static. The brush should have a comfortable, non-slip handle. And it should be big enough to cover ground on a medium-long coat, but small enough to maneuver around the face and ears.
A good slicker brush will have pins with rounded tips. This is non-negotiable. Sharp-tipped pins will scratch your cat's skin, and because Ragdolls are so laid back, they might not even flinch.
You'll only notice the damage later when you spot red, irritated patches.
The Role of Detangling Spray
Ragdoll fur is prone to static, especially in dry climates and during winter when indoor heating is running. Static makes the fur fly away from the body, which causes tangles. A good detangling spray coats the fur with a light layer of moisture and silicone, which reduces friction and makes brushing easier.
Look for a spray that is alcohol-free and fragrance-free or lightly scented. Cats have sensitive noses, and a heavily perfumed spray will make grooming a miserable experience. Spray it lightly on the coat before brushing, then work it through with your fingers or the comb.
Wait a minute for it to dry slightly before you start brushing. It makes a noticeable difference.
How Often Should You Groom a Ragdoll?
The short answer is two to three times a week for a full grooming session. But that's not the whole story. The exact frequency depends on your cat's age, coat condition, and lifestyle.
A kitten under six months old needs shorter, more frequent sessions to get used to the process. Think five minutes, two to three times a week. The goal is desensitization, not a perfect coat.
You want the kitten to associate brushing with treats and positive attention.
An adult Ragdoll in good coat condition needs a full brush-out two to three times a week. Each session should take about 10 to 15 minutes. If you're consistent, you'll never deal with serious mats.
A senior Ragdoll may need more frequent grooming. Older cats groom themselves less effectively, and they often have arthritis that makes it painful to twist and reach certain areas. You might need to brush every other day, and you'll need to be more gentle around joints.
Seasonal Adjustments
Ragdolls are indoor cats, but they still react to seasonal changes. During spring and fall, they go through a natural shed cycle where they lose more fur. This means more brushing during those months.
You might need to bump up to daily sessions for a few weeks.
During winter, indoor heating dries out the air, which increases static and tangling. If your home has forced-air heating, consider running a humidifier in the winter. It helps the cat's skin and coat stay hydrated, which reduces static and shedding.
The "One-Week Rule"
Here's a rule of thumb that works for most owners. If you go one week without brushing your Ragdoll, you will notice small mats starting to form in the armpits and behind the ears. If you go two weeks, you'll have a mat problem that requires real work to fix.
We've seen this pattern repeated in aggregate reviews and owner forums. It's not that Ragdolls mat faster than other breeds. It's that their fine fur tangles quietly.
You don't notice until the tangle has become a mat, and then you're dealing with a much bigger job.
Realistic Time Commitment
Let's be honest about the time. A quick daily once-over with the slicker brush takes about five minutes. A full weekly session, including brushing, combing, and checking for issues, takes 15 to 20 minutes.
That's it. It's not a huge commitment, but it has to be consistent.
If you're a busy person who travels a lot, plan ahead. Arrange for a pet sitter who can brush the cat while you're away. A week without grooming can set you back significantly.
Step-by-Step: The Grooming Routine

Image source: Bing (Web (fair-use with source credit))
Now we get to the actual process. This is where most owners go wrong, not because they lack good tools, but because they lack a good sequence. The order of operations matters.
You can't just start brushing randomly and expect good results.
Step 1: Pre-Grooming Inspection
Before you put a brush on your cat's coat, do a visual and tactile check. Run your fingers through the fur, especially in the mat-prone zones: behind the ears, under the armpits, around the collar area, and on the britches (the longer fur on the back of the hind legs).
Feel for small knots and tangles. Feel for bumps, scabs, or irritated skin. Check for fleas or flea dirt.
This inspection takes two minutes and catches problems early.
If you find a mat, don't try to brush it out with the slicker brush. That will only pull at the skin and make the mat tighter. You'll handle it in the detangling step below.
Step 2: The Slicker Brush Pass
Start with the slicker brush. Begin at the back, near the base of the tail, and work your way forward. Brush in the direction of hair growth, using short, gentle strokes.
Don't press hard. Let the brush do the work.
Here's the technique that experienced groomers use. Hold the fur with your free hand at the base, near the skin. Brush through the tips of the fur first, then gradually work deeper.
This reduces pulling and makes the process more comfortable.
Work in small sections. Move from the back to the sides, then down the legs. Save the sensitive areas, like the face, chest, and belly, for last.
Step 3: The Comb Pass
After the slicker brush, switch to the wide-tooth metal comb. The brush catches loose fur, but the comb catches small tangles that the brush skipped. Comb through the entire coat, working in the same direction as the brush.
Pay special attention to the ruff, the thick fur around the neck and chest. This is the breed's signature feature, but it's also the most mat-prone area. Comb through it carefully, section by section.
The comb is also your mat detector. If it snags on something, stop and investigate. Don't yank through it.
Step 4: Detangling Small Knots
If you find a small knot, a dime-sized tangle that hasn't become a hard mat, you can usually work it out with your fingers. Hold the fur between your thumb and fingers, just above the knot, then gently work the knot apart with your other hand.
For slightly tighter knots, apply a small amount of detangling spray and let it sit for a minute. Then try to work the knot apart with your fingers or the wide-tooth comb. Never force it.
The key is to work from the outside of the knot inward, so you're teasing apart the outer layers first. This is less painful for the cat and less likely to damage the fur.
Step 5: Handling Mats That Won't Brush Out
If a knot has become a true mat, a hard, tight clump of fur, you have two options. Use a mat splitter or mat remover tool, or if the mat is too large or too close to the skin, consider professional help.
A mat splitter has curved blades that cut through the mat from the outside, leaving the skin untouched. You insert the blade between the mat and the skin, then gently pull it outward to slice through the mat. Work in small increments, always keeping the blade parallel to the skin.
Here's the hard rule. Never use scissors. Ever.
A mat hides the skin underneath, and cat skin is thin and loose. One wrong snip can result in a deep laceration that requires stitches. In our research, vet visits from at-home scissor accidents are disturbingly common.
Step 6: Finishing Touches
Finish the session with a final pass of the slicker brush to smooth the coat. Then check the face. Use a soft, damp cloth to wipe any eye discharge from the corner of the eyes.
Ragdolls are prone to teary eyes, especially the colorpoint varieties with white faces.
End on a positive note. Give your cat a treat. Make a fuss.
The goal is to create a positive association so your Ragdoll looks forward to grooming, or at least tolerates it without stress.
A Note on Grooming Table Etiquette
You don't need an expensive grooming table. A non-slip mat on a sturdy table or counter works fine. The non-slip surface is important.
It makes the cat feel secure, which prevents squirming. It also prevents injuries from slipping.
Never force a scared cat onto a high surface. If your cat is anxious, start on the floor. You can always move to a table later once trust is established.
Bathing a Ragdoll the Safe Way
Bathing a Ragdoll is a topic full of myths. One popular myth claims Ragdolls love water because the breed's founder supposedly named them after a sailor's ragdoll that enjoyed swimming. That's not accurate, and it sets owners up for a stressful experience.
Most Ragdolls do not like water. They tolerate it at best. The key to a successful bath is preparation, calm handling, and speed.
You're not giving your cat a spa day. You're getting the job done safely and efficiently.
When to Actually Bathe
Ragdolls don't need frequent baths. Every 6 to 8 weeks is plenty for most cats. Some owners bathe less often, and that's fine as long as the coat is clean and healthy.
You should bathe your Ragdoll when:
- The coat feels greasy or looks dingy
- There's a visible stain in the white fur
- The cat has gotten into something sticky or smelly
- You're preparing for a cat show
- The cat has a skin condition that requires medicated shampoo
Between baths, use grooming wipes to spot-clean white fur, especially around the paws, tail, and rear. This reduces the need for full baths.
Before the Bath
This is the step everyone skips, and it's the most important one. Brush your cat thoroughly before the bath. Remove all mats and tangles.
Wet fur mats faster and tighter than dry fur. A small tangle that was annoying before the bath becomes a tight mat afterward.
Also, trim the nails before the bath. A wet, slippery cat with sharp claws is a recipe for scratches on your arms and a panicked cat running through the house dripping water.
The Bath Setup
Gather everything before you bring the cat into the bathroom. You'll need:
- Cat-safe shampoo
- A large cup or plastic jug for rinsing
- A washcloth for the face
- A towel
- A non-slip mat for the sink or tub
Fill the tub or sink with about 3 to 4 inches of lukewarm water. Test it with your wrist. It should feel comfortably warm, not hot.
Cats have a higher body temperature than humans, so water that feels warm to you may feel cool to them. But never use hot water.
The Washing Process
Place the cat gently in the water. Use your non-dominant hand to hold the scruff or support the chest. This keeps the cat from jumping out.
Wet the coat using the cup, starting at the back and working forward. Avoid the head and face. Those get cleaned with the washcloth.
Apply the shampoo, starting at the back. Work it into a lather, then move to the legs, tail, and belly. Avoid the face, eyes, ears, and nose.
Use the washcloth with a tiny bit of diluted shampoo to wipe the face, especially around the eyes and mouth.
Rinse thoroughly. This is the most important step. Shampoo residue left in the coat will cause itching and matting.
Rinse until the water runs clear and you can't feel any soap residue in the fur.
Work quickly. The entire bath should take no more than 10 minutes from start to finish. A long bath stresses the cat and strips natural oils.
Drying Without Damaging the Coat
Drying is where most owners make mistakes. They rub the fur with a towel, which causes friction, static, and tangles. Instead, blot the coat gently with the towel.
Press the towel against the fur to absorb water, then move to a dry section.
After blotting, you have two options. Let the cat air dry in a warm, draft-free room, or use a blow dryer on low heat. If you use a blow dryer, keep it on the lowest heat setting and hold it at least 12 inches away.
Use your fingers to fluff the fur as you dry.
Never use high heat. Cat skin is thin and burns easily. Also, never let the cat air dry outside or in a cold room.
A damp cat can get chilled quickly.
The Post-Bath Routine
After the bath, keep the cat indoors in a warm room until fully dry. This can take several hours, even with a blow dryer. Make sure the cat has a cozy bed and a clean litter box.
Expect your Ragdoll to groom themselves extensively after the bath. This is normal. They're redistributing natural oils and getting rid of the unfamiliar scent.
Nail Trimming and Ear Cleaning Basics

Image source: Bing (Web (fair-use with source credit))
Nail trimming and ear cleaning are the two grooming tasks most owners avoid. They're quick, but they feel risky. The truth is that both are straightforward if you know what you're doing and take it slow.
Why Nail Trimming Matters for Grooming
Long nails don't just scratch furniture and people. They also affect the coat. Long nails snag in the fur, especially in the armpits and britches, and can create painful pulls that break the fur and cause mats.
Long nails also make grooming sessions uncomfortable. When you hold your cat's paw for brushing and the nails dig into the skin, the cat associates grooming with discomfort.
How Often to Trim
Every 4 to 6 weeks is the standard interval. You'll know it's time when you hear the nails clicking on hardwood or tile floors. If the cat is walking on rugs or carpet, you might not hear the clicking.
Check visually instead. When the nail extends past the paw pad, it's time to trim.
The Anatomy of a Cat Nail
You need to understand the structure before you cut. The nail has two parts: the hard outer shell and the inner quick, which contains blood vessels and nerves. The quick is visible as a pinkish line through the translucent nail.
Cutting the quick is painful and causes bleeding. In a light-colored nail, you can see the quick easily. In a dark-colored nail, it's much harder.
If you can't see the quick, cut very small amounts at a time.
The Trimming Technique
Here's a step-by-step method that works:
Position the cat: Place the cat on a table or your lap. Some owners prefer to wrap the cat in a towel, leaving one paw out. This is called a "purrito" and works well for anxious cats.
Expose the nail: Gently press on the toe pad to extend the nail. Do one nail at a time.
Identify the quick: Look for the pink area. In dark nails, look for the center where the nail starts to change texture.
Make the cut: Cut at a 45-degree angle, leaving about 2 millimeters beyond the quick. Use sharp, cat-specific clippers. Dull clippers crush the nail, which is painful.
Reward: Give a treat after each paw, or at least at the end of the session. Positive reinforcement builds trust.
What to Do If You Cut the Quick
If you cut the quick, stay calm. The nail will bleed. Have styptic powder or cornstarch on hand.
Apply a small amount of powder to the tip of the nail with gentle pressure for 30 seconds. The bleeding will stop.
Do not panic. The cat will be fine. Just give a treat, and try again next time with a smaller cut.
Ear Cleaning Basics
Ragdolls have upright, open ears that are prone to dirt accumulation. Check once a week during grooming. Look for wax buildup, dirt, redness, or a bad smell.
Any of these could indicate an ear infection, which requires a vet visit.
For routine cleaning, you need a cat-safe ear cleaning solution and cotton balls. Never use cotton swabs. They push wax deeper into the ear canal and can damage the eardrum.
Apply a few drops of the solution to a cotton ball. Wipe the visible part of the inner ear gently. Do not insert anything into the ear canal.
The solution loosens wax on its own, and the cat's natural ear-cleaning mechanism pushes debris out.
If the ears look excessively dirty, red, or smelly, don't try to fix it at home. That's a vet visit. Ear infections in cats are common, and they don't resolve without treatment.
When to Call a Professional Groomer
There will be times when professional help is the right call. This isn't a failure. It's recognizing your limits and putting your cat's well-being first.
When a Mat Is Too Severe
If a mat is larger than a golf ball, or if it's wrapped tightly around the skin, don't try to fix it at home. Mats that are tight against the skin can cause bruising and skin tears when you pull on them.
A professional groomer has the tools and experience to safely remove tight mats using electric clippers. They also know how to handle a cat that's stressed or in pain.
When the Cat Won't Cooperate
Some cats genuinely hate being groomed. If your Ragdoll is stressed, hissing, or attempting to bite during grooming, stop. Forcing it will only worsen the association and put both of you at risk.
A professional groomer can sometimes handle cats that owners can't. They have experience with anxious cats and have techniques to keep them calm. If your cat remains unmanageable at the groomer, ask for a vet referral.
Your vet can prescribe a mild sedative for future grooming sessions.
What to Expect at a Professional Grooming Session
A full grooming session typically includes brushing, mat removal, ear cleaning, and nail trim. Some groomers also offer a bath and blow-out, which is a deep cleaning using a high-velocity dryer to remove loose undercoat.
Expect to pay between $50 and $100 depending on your region and the complexity of the job. Cats with severe matting cost more, because the groomer has to spend extra time carefully removing mats without hurting the cat.
How to Find a Good Groomer
Ask your vet for recommendations. Look for a groomer who has experience with long-haired cat breeds. Ask them about their handling methods.
A good groomer should be patient, calm, and willing to stop if the cat is distressed.
Avoid groomers who boast about "fast" grooming or who use sedation without a vet consult. Sedation should always be prescribed by a vet, never by a groomer.
How Grooming Doubles as a Health Check
Grooming isn't just about aesthetics. It's the best opportunity you have to examine your cat's body on a regular basis. Cats are masters at hiding illness, and early detection often comes down to noticing a tiny change during a routine grooming session.
What to Look For While You Brush
As you work through the coat, pay attention to the skin underneath. This is your chance to check for a range of issues that you'd otherwise miss.
- Lumps and bumps: Run your fingers over the skin as you part the fur. Feel for any new lumps, which could be cysts, abscesses, or tumors.
- Fleas and flea dirt: Look for tiny brown specks on the skin, especially at the base of the tail and along the back.
- Redness or rash: Inflamed skin could indicate allergies or a fungal or bacterial infection.
- Dry patches or dandruff: Flaky skin might suggest poor nutrition, dehydration, or a skin condition.
- Sores or scabs: These could be from a bite, a scratch, or even a reaction to a new food.
- Hair loss patterns: Symmetrical thinning may indicate hormonal issues, while patchy loss is more likely from stress or parasites.
- Ear mites: Dark, crumbly material in the ears, along with head shaking, is a classic sign.
The Weight Check
While your cat is relaxed during grooming, run your hands along the ribcage. You should be able to feel the ribs easily, but not see them. If the ribs are prominent, the cat is underweight.
If you can't feel them, the cat may be gaining weight too fast.
Ragdolls are naturally large cats, but they're also prone to obesity. The breed is less active than most, and many owners overfeed. A routine weight check during grooming helps you catch a problem before it becomes a health issue.
When a Finding Means a Vet Visit
Some findings during grooming are not urgent but still warrant a vet visit. If you find a small lump, monitor it. Note its size and location.
If it grows or changes shape, schedule an appointment.
Other findings need immediate attention. If you find fleas, treat the cat and your home. If you find signs of a skin infection, like redness, pus, or a bad smell, call your vet right away.
These issues don't resolve on their own.
The Bonding Benefit
Beyond health checks, grooming is bonding time. Many Ragdolls come to enjoy these sessions, especially if they're associated with treats and calm attention. This bonding makes the cat more relaxed during handling, which is useful at the vet's office and in everyday life.
A cat that's used to being handled is easier to medicate, easier to clip nails for, easier to examine, and easier to transport. Grooming is a form of socialization that pays dividends for the entire life of the cat.
Grooming Products: What's Worth the Money
The cat grooming market is full of products, and it's easy to overspend. Some tools are genuinely excellent and make the process easier. Others are overpriced gadgets that end up in a drawer.
Brushes and Combs
A quality slicker brush will cost between $15 and $40. The Bamboo slicker brush from Paws & Alcott is a solid budget option. Premium brands charge more for ergonomic handles and higher-grade materials, but in our research, the difference in performance isn't dramatic.
A wide-tooth metal comb should cost between $10 and $20. Look for stainless steel, not aluminum, which can bend with repeated use.
Mat Removers
A mat splitter or mat remover runs between $10 and $30. These are specialized tools, so you should buy them only if you're dealing with mats regularly. Some brands to look for include, but aren't limited to, general pet grooming supply brands that offer mat splitters with safety features.
Detangling Sprays
Expect to pay $8 to $15 for a decent cat-safe detangling spray. The biggest expense here isn't the product itself, but the frequency of repurchase. A bottle typically lasts 2 to 3 months with regular use.
Shampoos and Wipes
Cat-safe shampoo costs between $10 and $20 per bottle. Look for a formula that's pH-balanced for cats and free of harsh chemicals. Grooming wipes are between $5 and $10 per pack.
What's Not Worth the Money
Skip the "deshedding" products. Skip the fancy grooming vacuums, which are loud and scary for most cats. Skip the designer brushes with wooden handles and copper pins.
They perform the same as standard options.
Here's the honest breakdown: you can spend $50 to $75 and get everything you need. A premium kit might cost $150, but it won't do a better job. Spend the money on quality basics and skip the rest.
Common Questions About Ragdoll Grooming
Do Ragdolls need haircuts?
No. Ragdolls do not need haircuts for health purposes. The breed's coat is naturally low-shedding and self-maintaining with regular brushing.
Some owners choose to trim the fur around the rear for hygiene, which is called a "sanitary trim." This is fine, but a full-body haircut is not necessary and can actually damage the coat's texture.
Why does my Ragdoll shed so much despite grooming?
Ragdolls are not heavy shedders compared to other long-haired breeds, but they still shed. Shedding increases during seasonal transitions, especially spring and fall, and in response to indoor heating. If your Ragdoll seems to shed excessively, increase brushing frequency to daily.
Also, check the diet. Poor-quality food can cause dry, brittle fur that sheds more.
Can I use dry shampoo on my Ragdoll?
Yes, but with caution. Waterless cat shampoos are available and can be useful for spot cleaning between baths. Look for a formula that's fragrance-free and alcohol-free.
Spray it on a cloth or your hands, then work it through the fur. Avoid spraying directly on the face. Dry shampoo is not a substitute for a full bath.
It cleans the surface but doesn't remove deep dirt or oils.
How do I get my Ragdoll to enjoy grooming?
Start slow and make it rewarding. Introduce the brush while the cat is relaxed, not during playtime. Keep sessions short at first, just two to three minutes.
Give treats before, during, and after grooming. Use a soft, positive voice. Over time, the cat will learn to associate the brush with good things.
What should I do with the fur I brush out?
You can throw it away, compost it, or donate it to a wildlife rescue. Bird rescue organizations sometimes collect cat fur to use as nesting material for wild birds. The fur can be placed in a wire suet cage or a mesh bag outside for birds to collect.
Just make sure the fur is clean and free of flea treatment residue.
Frequently Asked Questions
Why does my Ragdoll's white fur turn yellow?
Yellowing of white fur is common in Ragdolls, especially around the eyes, mouth, and rear. It's caused by tear stains, saliva, and urine residue. Regular cleaning with a damp cloth and grooming wipes helps.
If the yellowing is severe or accompanied by a smell, check with your vet. It could indicate a dental issue or urinary tract problem.
Can I use human scissors to trim my Ragdoll's fur?
No. Never use regular scissors to trim a cat's fur. Scissors are not designed for pet grooming.
They're less sharp, which means they pull and crush fur instead of cutting cleanly. More importantly, there's a high risk of snipping the skin. Use rounded-tip or blunt-tip safety scissors made for pets.
How do I get rid of mats that won't brush out?
If a mat won't brush out with a comb or mat splitter, you have one safe option left: shave it out with electric clippers. Use a clean, well-oiled pair of cat clippers with a #10 blade. Gently lift the mat with your fingers, insert the clipper between the mat and the skin, and shave the mat away.
If you don't have clippers or you're nervous, call a professional groomer or vet clinic.
What does a professional groomer cost for a Ragdoll?
Professional grooming for a long-haired cat typically ranges from $55 to $110 per session. If the cat has severe mats, expect a higher fee due to the extra time and care involved. Some groomers offer bundled packages that include bath, blow dry, nail trim, and ear cleaning.
Should I give my Ragdoll a bath before or after brushing?
Always brush before bathing. Wet fur mats quickly and tightly. Brushing before the bath removes loose fur and tangles that would become mats when wet.
After the bath, blot with a towel and dry gently before doing any additional brushing.
The Bottom Line: A Realistic Grooming Schedule
Let's put it all together into a routine that you can actually follow. The key is consistency. You don't need a perfect setup or premium tools.
You just need to show up and do the work on a regular basis.
Here's the schedule that works for most Ragdoll owners:
| Task | Frequency | Time Required |
|---|---|---|
| Quick brush with slicker | Daily or every other day | 5 minutes |
| Full grooming session | 2–3 times per week | 10–15 minutes |
| Nail trim | Every 4–6 weeks | 5–10 minutes |
| Ear check | Weekly | 1 minute |
| Bath | Every 6–8 weeks | 10 minutes bath + drying |
| Grooming wipes | As needed | 2 minutes |
What Happens If You Skip a Week
If you skip a week, you'll notice small tangles in the ruff and armpits. These are still manageable. A 20-minute grooming session can fix the issue.
If you skip two weeks, mats will start forming. You'll have to spend 30 to 45 minutes working them out, and some might require the clippers.
If you skip a month, you're in for a difficult afternoon. You'll likely need professional help, and your cat will probably need to be sedated at the vet's office for severe matting.
When You'll Know You've Got It Right
You'll know you've hit the right routine when the slicker brush glides through the coat without snagging. When the comb passes through the ruff without catching any tangles. When your cat lies relaxed while you groom them, maybe even purring.
When the coat has a smooth, silky sheen that feels like fine fabric.
That's the goal. It's achievable with 15 minutes and a few good tools, three times a week. Your Ragdoll's coat is a feature, not a bug.
It's part of what makes the breed so special. And with the routine above, it's entirely manageable.