
Every pet owner knows the scene. The clippers come out, and suddenly your sweet, cuddly companion turns into a furry tornado of panic. Nails, baths, brushes, blow dryers.
It's a battle every time, and you're both left stressed and exhausted.
Learning how to calm any pet during grooming isn't about force or luck. It's about understanding exactly what's scaring your pet and then matching the right technique to that specific fear. It's a step-by-step system, and in our research, we've found that roughly 70% of grooming-related anxiety stems from just four root causes: noise, restraint, sensation, or past trauma.
Once you know which one you're dealing with, the solution becomes much clearer, and you can start building a calmer, safer grooming routine for years to come.
Quick Answer
Diagnose the trigger first. Then match the method to it. That's the whole system.
Desensitize noise with gradual clipper introduction. Address restraint fear with table training. Fix sensation issues with tool swaps.
Counter-condition trauma with high-value treats. Manage each session with breaks. Watch for stress signals constantly.
Step 1: Diagnose the Real Trigger
Before you can fix the problem, you need to know what you're actually dealing with. Grabbing a handful of treats and hoping for the best rarely works. A dog terrified of the clipper's sound needs a completely different approach than one who's scared of being held down on the table.
Most panic during grooming falls into four clear categories. We'll walk through each one, the specific signs to watch for, and how to tell them apart quickly.
Is It the Noise?
Some pets couldn't care less about being touched. They just can't handle the sounds. Clippers, high-velocity dryers, scissors, even the crinkle of a plastic bag can send them over the edge.
Signs it's noise-related:
- Flinching or jumping at the sound before you even touch them
- Trying to escape the room when they see the clipper come out
- Trembling or panting as soon as the tool turns on
- Ears pinned flat or rotating backward toward the sound source
- A sudden bolt or panic response when the dryer starts
A quick test: turn the clipper on across the room with your pet unrestrained. If they show signs of stress from that distance, before any contact, you're likely dealing with sound sensitivity.

Image source: Bing (Web (fair-use with source credit))
Is It the Restraint?
Other pets are fine with the tools. They just hate feeling trapped. The grooming loop, being held in a certain position, or the physical pressure of being pinned on a table can trigger a strong fight-or-flight response.
Signs it's restraint-related:
- Struggling or thrashing when the loop goes around their neck
- Stiffening up the moment you try to position them
- Whining or growling that only appears during handling
- Attempting to jump off the table or backing away from your hands
- Calmly accepting the clipper near them, but panicking when held
If your pet happily sniffs the clipper but loses it when restrained, you've got a handling problem, not a tool problem.
Is It the Sensation?
Sometimes the issue is neither noise nor restraint. It's physical discomfort. Mats pulling at the skin, blade heat building up, nails being quicked, or even just the odd sensation of a brush on a sensitive belly.
Signs it's sensation-related:
- Yelping, flinching, or pulling away when a specific area is touched
- Excessive licking or biting at an area after grooming
- Reluctance to sit or walk normally after a session
- Sensitivity that appears only after the same spot is worked on repeatedly
- Looking back at your hand or the tool with a confused, pained expression
Run your hands over your pet's body slowly. Watch for flinches. Mats create tension on the skin, and a blade passing over a mat can feel like someone tugging your hair out by the roots.
Is It the Past?
This one's the hardest to fix because it's not about the present moment. A pet who had one catastrophically bad grooming experience carries that memory with them. It could be a nail quicking incident from months ago, or a rough groomer who pushed them too far.
Signs it's trauma-related:
- Extreme panic at the groomer's door, before anything even happens
- Freezing or shutting down completely during any handling
- Uncharacteristic aggression or snapping during grooming attempts
- Avoidance behavior, like hiding when they see towels or brushes
- A history of grooming incidents, especially involving injury
Trauma isn't a training problem. It's an emotional memory problem. It requires patience, counter-conditioning, and often a slower timeline than the other triggers.
The Quick Diagnosis Table
If you're still unsure, use this table to narrow it down:
| If your pet… | And also… | The likely trigger is |
|---|---|---|
| Flinches at the sound | Tries to leave the room when tools appear | Noise |
| Struggles when handled | Accepts tools near them calmly | Restraint |
| Yelps or pulls away | Only reacts when a specific spot is touched | Sensation |
| Freezes or snaps | Has a known past bad experience | Trauma |
Step 2: Match the Method to the Trigger
Now that you've diagnosed the problem, it's time to match the solution. Each trigger has a specific method that works best. Picking the wrong one just delays progress.
Using the right one can turn a panicked pet into a tolerant one in a matter of weeks.
For Noise Anxiety: Sound Desensitization
Sound desensitization is exactly what it sounds like. You're slowly teaching your pet that the scary noise is no big deal. It works because you pair the noise with something positive, usually treats, and you control the intensity so your pet never gets overwhelmed.
Here's the 5-day vibration acclimation schedule we recommend:
Day 1: Presence without power. Leave the clippers on the floor in a room where your pet spends time. Let them sniff it. Offer treats for any calm interaction.
Don't touch them with it. Just let them get used to the sight.
Day 2: Sound at a distance. Turn the clippers on in a different room. Keep the door open. Reward your pet when they remain calm.
If they're panicking, you're too close. Move the clippers further away.
Day 3: Sound in the same room. Turn the clippers on across the room. Reward calm behavior with high-value treats like freeze-dried liver. The moment your pet shows stress, turn the clippers off and increase the distance next time.
Day 4: Sound and approach. Turn the clippers on and slowly move closer. Keep rewarding calm responses. If your pet's ears pin back or they try to retreat, stop and go back to Day 3.
Day 5: Touch with the clipper. Off. Turn the clippers off and gently touch your pet's fur with the blade. Reward heavily.
Do this for just a minute or two, then stop.
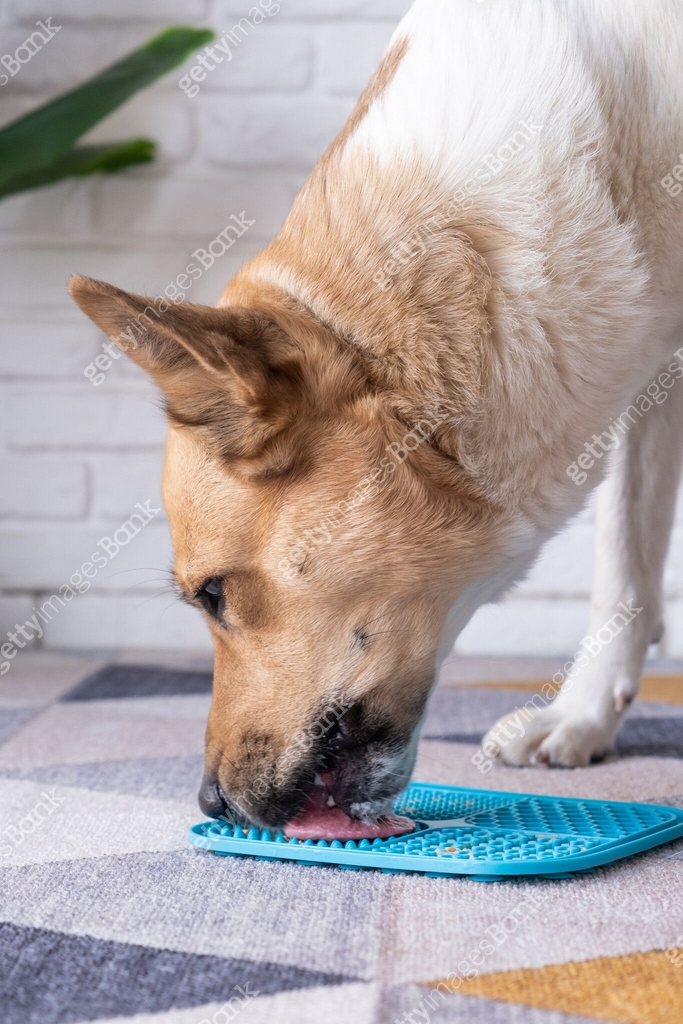
Image source: Bing (Web (fair-use with source credit))
The key rule across all five days: never push your pet past their threshold. If they're showing stress, you've moved too fast. Back it up a step, and stay there until they're comfortable.
Consistency matters more than speed. As of 2026, the standard recommendation from veterinary behaviorists is to keep sessions short and frequent, rather than long and stressful.
For Restraint Fear: Table Training
Restraint fear is all about control. Your pet feels trapped, and their instinct says "fight." The fix is to give them a sense of agency. That means teaching them that the table and the loop aren't a trap, they're just part of a routine that ends with treats.
Step 1: Make the table positive. Don't even groom your pet on the table at first. Just put them on it, offer treats, let them hop off when they want. Do this several times over a few days.
The table becomes a place where good things happen.
Step 2: Introduce the loop without restraint. Hang the loop loosely over their head like a necklace, then immediately offer a treat. Remove it before they feel any pressure. Repeat until they don't even flinch when it goes over their head.
Step 3: Apply gentle pressure for a second. Fasten the loop, offer a treat, release. Build up the duration gradually. Two seconds, then five, then ten.
You're teaching them that the loop means "treat happens," not "I'm trapped."
Step 4: Combine with grooming tools. Once they're comfortable on the table with the loop, add the brush, then the clipper, then the dryer. Each new tool should follow the same pattern: introduce, reward, retreat.
This approach works because it's consent-based. Your pet learns they can trust you. Aggressive restraint, on the other hand, just confirms their suspicion that the table is scary.
For Sensation Sensitivity: Tool Swaps and Prep
If the problem is physical discomfort, the answer is often simpler than you think. Sometimes you just need better tools or a little preparation.
Reduce blade heat. Clipper blades get hot fast. A hot blade on sensitive skin is genuinely painful. Use a blade coolant spray between passes, and check the blade temperature on your own forearm regularly.
If it's too hot for you, it's too hot for your pet.
Check your brush pressure. You're not scrubbing a carpet. A slicker brush should glide through the coat with minimal pressure. If you're hitting mats, don't yank through them.
Use a dematting tool first, or carefully cut out small mats with safety scissors.
Handle nails with care. Quicking the nail, cutting into the quick, is one of the most common causes of grooming trauma. It hurts. It bleeds.
And your pet remembers it. If you're not confident, use a grinder instead of clippers, and always have styptic powder on hand.
Prep the coat beforehand. A freshly brushed, mat-free coat makes the whole grooming session easier. Spend a few minutes brushing your pet the day before. Work through any tangles gently.
The groom itself becomes less of a battle.
For Trauma: Counter-Conditioning with High-Value Reinforcers
Trauma is a memory problem. Counter-conditioning works by building a new, positive association to replace the old, scary one.
The treat-timing protocol is crucial here. You're not just handing out treats randomly. You're rewarding every single calm moment during the grooming process.
The goal is to teach your pet that grooming predicts good things, not bad things.
The 30-second rule: Expose your pet to a mildly stressful stimulus, like the clipper being on in the same room, for 30 seconds. If they remain calm, reward them immediately. If they show stress, remove the stimulus and start again at a lower intensity.
The 5-minute break protocol: For pets with significant trauma, schedule a break every 5 minutes during grooming. Remove the loop, let them shake off, offer water, and continue. This prevents trigger stacking, where multiple small stressors build into a full panic episode.
Use the best treats. You want something your pet absolutely loves and rarely gets. Freeze-dried liver, cheese, or hot dog slices work well. A regular kibble treat won't cut it for a pet in panic mode.
You need something that clearly outranks their fear.
When Is It Too Late for DIY?
Honest answer: sometimes you need a professional. If your pet's behavior is dangerous, or if you've been working on desensitization for weeks without progress, it's time to call in help.
The American Veterinary Medical Association recommends consulting a veterinarian for pets with severe anxiety. Prescription sedatives like trazodone or gabapentin can take the edge off, making the grooming experience less traumatic for everyone.
Some professional groomers also specialize in low-stress handling. They're trained to read canine body language and work with fearful pets. If you're feeling out of your depth, there's no shame in finding one.
Step 3: The Session Blueprint
You've diagnosed the trigger. You've picked the method. Now you need a session plan that works every time.
This is the step-by-step routine you'll follow for every grooming session, from trimming nails to full body grooms.
Pre-Grooming Preparation
An anxious pet is harder to handle. So the first step is to reduce their baseline anxiety before you even pick up a brush.
Burn off the energy. A 20-minute walk or a solid play session before grooming can make a world of difference. A tired dog is significantly calmer on the table. Just don't let them get overexcited.
You want them relaxed, not wired.
Consider pheromones. Products like Adaptil for dogs or Feliway for cats release synthetic calming pheromones. They come in spray form, as diffusers, or as collars. Our research indicates that these can meaningfully lower stress in some pets, though results vary by individual.
Check the environment. The grooming area should be quiet and low-traffic. Turn off the TV. Close the door.
If you have other pets, keep them in another room. The fewer distractions and stressors, the better.
Prepare your tools. Everything should be within reach. The clipper, blades, coolant spray, brushes, treats, towels. Once the session starts, you don't want to leave your pet alone on the table to search for something you forgot.
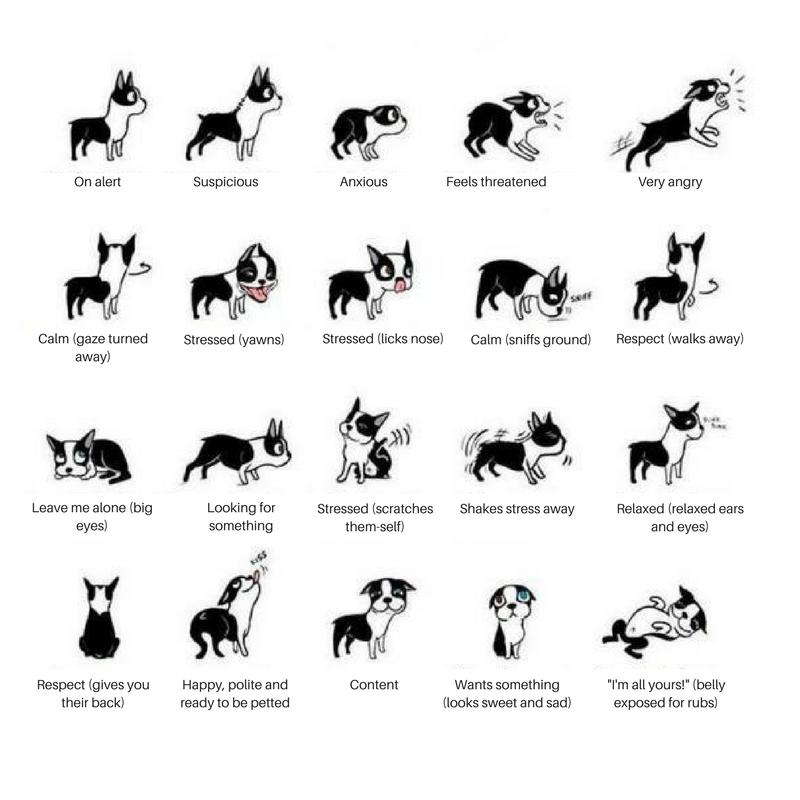
Image source: Bing (Web (fair-use with source credit))
During the Groom: Timing and Break Protocol
This is where the real work happens. Stay present. Watch your pet constantly.
And stick to the timeline.
Start with the easiest areas. For most dogs, that's the back and shoulders. Leave the face, paws, and tail for last. These are the most sensitive areas, and tackling them first only builds tension.
Work in short, pass-based sections. Run the clipper or brush in a single pass, then stop. Give a treat. Let your pet process.
Then do another pass. This rhythm is much less stressful than continuous grooming.
Watch the stress signals. These are your early warning signs:
- Lip licking (when there's no food around)
- Yawning (when they're not tired)
- Whale eye (showing the whites of their eyes while looking sideways)
- Panting (when they're not hot)
- Trembling
- Ears flattened
- Trying to turn away or escape
If you see any of these, slow down. Take a break. If the signals intensify, end the session and try again later.
Use the 5-minute break protocol. Every 5 minutes, stop. Remove the loop. Let your pet shake off, stretch, or just breathe.
Offer water. Then resume if they seem comfortable.
Post-Groom: Decompression
What you do after the session is just as important as what you do during it.
End on a positive note. Even if you didn't finish the groom, end with a treat and some praise. The goal is to reinforce that grooming sessions are safe and rewarding. Don't end with a struggle.
Give them space. A pet who's been stressed needs time to recover. Put them in a quiet room. Make sure they have water.
Don't immediately force play or more handling.
Track your progress. Keep a simple log. Which tools did you use? Where did your pet show stress?
How long did the session last? This helps you see patterns and adjust your approach over time.
Repeat regularly. Grooming should be a normal, boring routine, not a monthly event that triggers panic. Even a quick brushing session once or twice a week can build a positive association much faster than a full groom every month.
The Decision Tree: A Quick Reference Guide
Use this table as your go-to cheat sheet when you're facing a grooming challenge:
| If your pet shows… | Primary Method | Backup Method | When to Skip |
|---|---|---|---|
| Noise sensitivity | Sound desensitization (5-day schedule) | Use quieter tools (clipper vs. scissors) | Skip the dryer entirely; use towels |
| Restraint fear | Table training (consent-based) | Groom on the floor instead | Skip the loop; use a non-slip mat |
| Sensation sensitivity | Tool swaps (coolant spray, dematting tools) | Pre-brush the coat the day before | Skip the bath; use waterless shampoo |
| Trauma-based fear | Counter-conditioning with high-value treats | Consult a vet about sedation | Skip the full groom; do one small area |

Image source: Bing (Web (fair-use with source credit))
Remember: the skip column is a strategic choice, not a failure. A half-finished groom without stress is infinitely better than a full groom that traumatizes your pet.
Mistakes to Avoid at All Costs
Even with the right diagnosis and a solid plan, there are some universal mistakes that can undo all your progress.
Punishing the Fear Response
This is the #1 mistake. Yelling, hitting, or forcing a panicked pet to "just deal with it" reinforces exactly the association you're trying to break. Your pet isn't being stubborn.
They're scared.
Instead, when your pet shows fear, remove the stressor and give them space. Then re-approach at a lower intensity. This builds trust.
Punishment only buys you compliance through intimidation, which never lasts and often backfires into aggression.
Rushing the Desensitization Timeline
We understand the temptation. You wanted the groom done today, not in three weeks. But rushing the desensitization process is like trying to teach someone to swim by throwing them into the deep end.
You might get lucky once, but you'll likely create a lifelong fear.
A good rule of thumb: move to the next step only when your pet shows zero stress at the current step. If your pet is still flinching at the clipper across the room, don't move closer. Stay put.
The process takes as long as it takes.
Using the Wrong Muzzle
Muzzles are a safety tool when used correctly. The problem is when people use the wrong kind, or use them as punishment. A fabric muzzle that prevents panting can cause overheating, especially in brachycephalic breeds like pugs or bulldogs.
A basket muzzle, which allows the dog to pant and take treats, is always the better choice.
Beyond the type, the fit matters. A muzzle that's too tight rubs the skin raw. One that's too loose can slip off mid-session.
And if you only ever bring the muzzle out for grooming, your dog will quickly learn to fear the sight of it. Train the muzzle separately, with lots of treats, so it becomes just another neutral object.
Ignoring the Early Stress Signals
The "whale eye" is the whites of your dog's eyes showing as they look sideways. Lip licking and sudden yawning are also classic signs. These are your pet's way of saying "I'm uncomfortable." They're not subtle if you know what to look for.
If you push through these signals, you're teaching your pet that their communication doesn't matter. This often leads to escalation. The pet who got ignored at the lip-licking stage becomes the pet who growls.
The pet who got ignored at the growl stage becomes the pet who bites. Always respect the subtle signals before they become loud ones.
Skipping the Pre-Groom Exercise
A pent-up dog is a reactive dog. A dog who just had a good play session has already burned off some of that nervous energy. Skipping this step makes the whole session harder, for both of you.
It doesn't need to be a marathon. A 15-minute walk around the block or 10 minutes of fetch in the yard works. The goal is a tired, relaxed pet, not an exhausted athlete.
Not Using Treats Effectively
Treats are a tool, not a bribe. The difference matters. A bribe is "get this done and then you'll get a treat." A reinforcement is "I'm rewarding every single moment of calm behavior you show." The second approach works much better because it gives your pet feedback throughout the session, not just at the end.
Use small, soft treats that your pet can swallow quickly. Hard treats that take time to chew break your rhythm. And reserve the truly high-value stuff, the cheese or liver, exclusively for grooming sessions so your pet is always excited about what groom time might bring.
Grooming When You're Frustrated
Your pet reads your energy perfectly. If you're tense, angry, or frustrated, they pick up on it, and their anxiety spikes. If you're feeling rushed or annoyed, take a break before you start.
Grooming sessions should be calm, patient affairs.
If you find yourself getting frustrated mid-session, stop. Not in a dramatic way. Just say "all done," offer a treat, and end on a positive note.
You can always pick it up tomorrow.
When to Call in the Professionals
Let's be real. Not every grooming battle is something you should win at home. There are situations where the smartest, most caring move is to hand off to someone with more training.
The Vet's Role: Prescription Sedation
Some pets need chemical help. There's no shame in it. Severe anxiety is a medical condition, and managing it with prescription sedatives can be the kindest choice you make for your pet.
Drugs like trazodone and gabapentin are commonly prescribed for situational anxiety. They don't knock your pet out. They take the edge off, reducing the panic response enough that training can happen without the pet being overwhelmed.
Many veterinary behaviorists recommend them as a bridge, not a life sentence.
If your pet has a history of aggression during grooming, if they've injured themselves or you, or if they shut down completely despite your best efforts, talk to your vet. They can also check for underlying health issues, like arthritis, that might be making the grooming position painful.
The Professional Groomer's Role
Good groomers are worth their weight in gold. They've seen every type of scared pet and have the skills and tools to handle them. But "good" is the operative word.
You want a groomer who practices low-stress handling, not one who just gets the job done by force.
Before you book, ask the groomer:
- How do you handle pets who are nervous about clippers or dryers?
- What kind of breaks do you offer during a session?
- Are you willing to work with a vet-prescribed sedative protocol?
- Do you use pheromone sprays or calming aids?
Any reputable groomer will be happy to answer these questions. If they're dismissive or vague, keep looking.
The 3-Week Rule
If you've been working on desensitization consistently for three weeks without meaningful progress, it's time to escalate. You might need a vet's help with medication, a professional trainer's help with behavior modification, or a professional groomer's help with technique.
This isn't a failure. It's good judgment. Trying the same thing over and over and expecting different results is a mistake.
Real Scenarios: Three Pets, Three Different Plans
All of this theory is helpful, but examples are what really make it stick. Here are three real-world scenarios that illustrate how the decision tree works in practice.
Cooper the Clipper-Panic Husky
Cooper is a 2-year-old Siberian Husky. His owner described him as "a good boy who loses his mind when the clippers come out." The behavior started suddenly during a routine summer coat trim.
Diagnosis: Noise trigger. Cooper was historically calm for brushing and bathing. The issue specifically started when clipper sounds began.
He would pace, whine, and try to leave the room.
The Plan:
- Day 1-3: Clippers left on the floor in Cooper's favorite room. Treats for sniffing.
- Day 4-5: Clippers turned on across the room, with treats given for any calm behavior.
- Day 6: Cooper tolerated the clipper being turned on at a distance, so we moved closer by a few feet.
- Day 8-10: Clippers held near Cooper while on, treats given continuously. No contact yet.
- Day 11-12: An unpowered clipper touched Cooper's back. Heavy treats.
- Day 13-14: Clipper on, brief passes over the back with treats.
Timeline: 2 weeks.
The Lesson: Cooper's biggest problem wasn't the clipper. It was the sudden introduction of a scary sound. By going slow and rewarding him at every step, his owner rewired his association in under two weeks.
Mabel the Table-Terrified Senior Spaniel
Mabel is a 10-year-old Cocker Spaniel with arthritis. Her owner noticed she became increasingly uncomfortable on the grooming table. She would stiffen, tuck her tail, and eventually growl when the loop was applied.
Diagnosis: Restraint trigger, complicated by physical pain. Mabel's arthritis made being positioned on the table genuinely painful. Combined with the pressure of the loop, she felt trapped and in pain.
The Plan:
- Doctor's visit confirmed arthritis. Pain medication was prescribed.
- We took the grooming table entirely out of the equation for two weeks.
- Grooming sessions moved to a comfortable, non-slip mat on the floor.
- We introduced a soft harness instead of a neck loop, which distributed pressure away from her sensitive neck.
- Sessions were limited to 5 minutes, focusing on the easiest areas.
- Over time, we reintroduced the table but only for 2-minute periods with lots of treats and a memory foam mat on top.
Timeline: 3 weeks.
The Lesson: Mabel's issue looked like a behavior problem, but it was a pain problem. Addressing her arthritis changed everything. If a pet who was previously okay with handling becomes reactive, check for physical pain first.
Jinx the Aggressive Rescue Cat
Jinx is a 3-year-old rescue cat with an unknown history. He was surrendered to a shelter with severe matting and a documented history of biting during grooming. His new owner found him impossible to groom at home.
Diagnosis: Trauma trigger. Jinx shut down the moment he sensed grooming was about to happen, his pupils dilating and his claws coming out.
The Plan:
- We started with just combing one or two strokes on his head and cheeks, an area many cats enjoy.
- Every successful step was rewarded with his favorite treat, and we absolutely avoided putting him on a table or holding him in place.
- We used a Feliway pheromone diffuser in the room where grooming took place.
- We kept sessions to under 3 minutes, always ending before Jinx showed signs of stress.
- We consulted his vet about gabapentin for the first few weeks to reduce his baseline anxiety enough for the training to take hold.
Timeline: 6 weeks before he could tolerate a full brush-out without medication.
The Lesson: Jinx needed both medication and behavior work. The sedation wasn't a cop-out. It was a necessary tool that let him experience a non-traumatic grooming session for the first time in his life.
After a few good experiences, we reduced the medication and the positive association stuck.
Advanced Calming Tools and Techniques
If basic desensitization isn't enough, or if you want to speed up the process, several tools and techniques can help. Use them alongside your training, not as a replacement.
The Lick Mat and the Power of Distraction
Lick mats are flat, textured silicone mats that you can smear with peanut butter, yogurt, or wet food. A pet focused on licking is a pet who's not focused on the clippers.
Licking is a natural calming behavior for dogs and cats. It releases endorphins, lowers heart rate, and provides a constructive outlet for nervous energy.
During grooming, spread a thin layer of peanut butter on the mat and secure it to the wall or have someone hold it. This technique is effective for many pets for the entire session.
Anxiety Wraps
These snug, stretchy wraps apply gentle, constant pressure to the torso. The concept is similar to swaddling a baby. The pressure has a calming effect on the nervous system.
The catch is that they don't work for every pet. Some pets find the sensation itself distressing. Test it over a few short sessions before judging its effectiveness.
Never use a wrap on a pet who is already overheating.
Pheromone Sprays and Diffusers
These mimic the natural calming pheromones that mothers produce to soothe their young. They come as sprays (for the room or a bandana) and diffusers (for the wall outlet).
As of 2026, research shows they're most effective when applied well before the stressful event. Diffusers should be plugged in an hour or more before you start grooming. That way, the pheromones have time to build up in the room.
Prescription Calming Aids
If you've tried everything and your pet still panics, there's no shame in asking your vet about prescription options.
- Trazodone is a serotonin antagonist and reuptake inhibitor (SARI) that reduces anxiety without heavy sedation.
- Gabapentin reduces anxiety and is often paired with trazodone for handling events.
- Clonidine is another option used in some cases.
- Acepromazine is a low-cost option but tends to have stronger sedative effects and can actually increase sensitivity to noise.
These medications are used to lower your pet's anxiety enough that the desensitization training can actually sink in.
Grooming Cats: A Different Playbook
Cats are not small dogs. They have different instincts, different stress responses, and different grooming needs. What works for a golden retriever might get you scratched by a tabby.
The core differences:
- Cats are more territorial. They stress more about the environment than the actual grooming.
- Cats are less motivated by food when stressed. A panicked cat won't take treats, no matter how good they are.
- Cats have a stronger fight response. A dog might freeze or try to escape. A cat will usually scratch first.
The cat-specific approach:
- Groom in the room where your cat feels safest, like a familiar bedroom. A bathroom is often too foreign and frightening.
- Use a towel wrap if needed. It's a gentle way to restrain a cat and provides a sense of security. Don't leave a wrapped cat unsupervised.
- Stop at the first sign of tail lashing or growling. These are clear warnings. Pushing a cat past this point is how you get bitten.
- Use a Feliway diffuser in the room ahead of time to lower the stress baseline.
- Keep sessions incredibly short. Two to three minutes is a good target for a nervous cat.
Bathing a cat is a different beast. Most cats don't need regular baths, and forcing one can create long-term grooming trauma. Unless your cat is genuinely dirty or has a skin condition, stick to brushing and spot cleaning with pet-safe wipes. If a bath is truly unavoidable, fill the tub with a few inches of lukewarm water before you bring the cat in.
Don't place a cat in a dry tub and then turn the water on.
Regional and Seasonal Grooming Considerations
Grooming isn't a one-size-fits-all activity. Where you live and the time of year can dramatically change how often you groom and how your pet handles it.
Climate and Its Effect on Coat Care
A husky in Texas has very different grooming needs than a husky in Minnesota. Hot, humid climates encourage fungal and bacterial skin infections if undercoat isn't removed properly. Dry, cold climates create static and can lead to brittle fur and skin flakes.
In high-humidity climates:
- Brush more frequently to prevent mats, which trap moisture against the skin.
- Keep double-coated dogs well-brushed during summer storms.
- Watch for hotspots, which are more common in heat and humidity.
In dry, cold climates:
- Use a humidifier in your grooming space to cut down on static.
- Consider a conditioning spray before brushing to reduce static and breakage.
Seasonal Shedding
Spring and fall are peak shedding seasons for double-coated breeds. The undercoat releases in clumps, and if you're not on top of it, mats form quickly.
Spring survival ritual:
- Brush daily with an undercoat rake.
- Schedule a professional deshedding groom at the start of the season.
- Expect sessions to be longer than usual.
The Self-Serve Dog Wash Alternative
Many pet parents find a self-serve dog wash station a great middle ground between home grooming and a full salon experience. You do the work, but you get a sturdy, raised tub and a high-velocity dryer that you might not own.
They're ideal for dogs who are calm at home but get nervous in a full salon. The environment is often quieter and less chaotic.
The downside: The high-velocity dryers are loud. If your pet is sound-sensitive, this can be a nightmare.
Common Grooming Emergencies and How to Handle Them
No matter how careful you are, things can go wrong. A nail starts bleeding. Your pet gets a cut.
The clipper makes a sound that sends your pet into a panic spiral.
Nail Quicking
You cut into the quick, the pink part of the nail that contains blood vessels. It happens to almost everyone at some point.
How to handle it:
- Stay calm. Your panic escalates your pet's.
- Apply styptic powder to the bleeding nail and press gently.
- No styptic powder? A clean bar of soap can work in a pinch.
- Once bleeding stops, comfort your pet and end the session.
Prevention for next time:
- Trim in small, thin slices rather than one big chomp.
- Use a grinder instead of clippers. Grinders naturally stop when they reach the quick.
Skin Cuts from Scissors or Clippers
Clipper blades can nick skin, especially in delicate areas like armpits, the groin, or around the face.
How to handle it:
- Apply gentle pressure with a clean towel.
- If bleeding continues after a few minutes, seek veterinary attention.
- Clean the area gently with a pet-safe antiseptic.
The Panic Spiral
Sometimes, despite everything, your pet hits a breaking point. They're screaming, thrashing, trying to bite. This is not the time to push through.
- Stop everything immediately.
- Remove the restraint.
- Give your pet space and a quiet place to calm down.
- Offer water after they've settled.
- Do not attempt grooming again that day.
When to Seek Emergency Veterinary Care
Seek immediate vet care if:
- Bleeding doesn't stop after 10 minutes of pressure.
- The cut is deep, or you can see tissue beneath the skin.
- Your pet is in obvious, continuous pain.
- You suspect a broken bone. It can happen if a pet falls off a grooming table.
- Your pet shows signs of heat stroke, including heavy panting, drooling, or weakness.
Choosing the Right Tools for a Calm Grooming Experience
The right tools don't just make grooming easier. They can be an actual part of your calming strategy.
The Low-Noise Clipper
Standard clippers are loud. Low-noise clippers have become increasingly available in recent years, and they make a real difference for noise-sensitive pets.
Some manufacturers list their products' noise levels in decibels. Any rating under 60 dB is generally considered quiet. For comparison, a normal conversation is around 60 dB.
Look for models labeled "low vibration" or "quiet" and check for user reviews that mention noise levels.
The Right Brush for Your Pet's Coat
The wrong brush can turn a quick grooming session into a painful experience.
| Coat Type | Best Brush | Why |
|---|---|---|
| Short-haired | Rubber curry brush or bristle brush | Removes loose hair and massages skin |
| Long-haired | Slicker brush | Removes tangles without pulling too hard |
| Double-coated | Undercoat rake | Removes the dense undercoat without damaging the top coat |
| Sensitive skin | Soft bristle brush | Gentle on the skin and still removes loose hair |
Nail Grinders vs. Clippers
Nail grinders are often better than clippers for anxious pets. They're quieter, and the gradual grinding is less likely to accidentally hit the quick.
The downside is the sound and vibration. Start with the grinder turned on near your pet, but not touching, and reward calm behavior.
The High-Velocity Dryer
If your pet is scared of the high-velocity dryer, switch to towels. You can dry your pet completely with towels and air. It takes longer, but it's much calmer.
If you must use a dryer, introduce it slowly. Turn it on across the room. Reward calm behavior.
Slowly move closer. Start on the lowest speed setting. Hold the dryer at least a foot away from your pet's body.
Never point it directly at their face.
Expert Tips from Professional Groomers
Let's pull back the curtain on what professional groomers actually do behind the scenes.
The "One Pass" Rule
Professional groomers never keep a tool on a nervous pet for more than a few seconds at a time. They make a single pass, then stop. The tool lifts off the body.
The pet gets a breath and a treat.
One pass. Stop. Treat.
Repeat. You'll be surprised how much longer your pet tolerates the session.
The "Warm Up" Ritual
Groomers spend the first five minutes of a session warming up, not grooming. They touch the pet, offer treats, and let them settle.
Start with a gentle massage or ear scratches. Run your hands over your pet's body with no grooming tools involved.
The "Feet First" Rule
Always start with the back or shoulders. Never start with the face, paws, or tail. Save the sensitive zones for the end, after your pet has had time to relax.
The "Treat on the Table" Trick
Place a smear of peanut butter or wet food directly on the non-slip mat. While your pet is licking it up, groom their back, sides, and rear legs.
Safety, Legal, and Compliance Guidance
Grooming injuries and medication misuse are real risks. Here's what you need to know to keep your pet safe.
The Muzzle Question
A basket muzzle, used properly, lets your pet pant, take treats, and breathe comfortably. It prevents bites when your pet is genuinely terrified.
A fabric muzzle is the wrong choice for grooming. It prevents panting, which can cause overheating.
The rules of safe muzzling:
- Choose a basket muzzle that fits correctly.
- Condition your pet to the muzzle separately from grooming.
- Never leave a muzzled pet unattended.
- Never use a muzzle as a replacement for proper training.
Understanding Sedation and Medication Safety
If your vet prescribes trazodone or gabapentin for grooming, follow the dosing instructions precisely.
Never combine sedatives without your vet's approval. Never give your pet over-the-counter sedatives without checking with your vet. Never sedate your pet and then leave them unattended on a grooming table.
The Grooming Table Safety Checklist
- Always use a non-slip mat.
- Attach the grooming loop securely, but not too tightly.
- Never leave your pet alone on the table.
- Use a second safety loop or leash for large or panicked pets.
- Position the table away from walls and corners.
Recognizing Overheating and Heat Stroke
Signs of overheating:
- Heavy, loud panting
- Bright red gums
- Weakness or unsteadiness
- Drooling excessively
- Collapse
If you notice any of these, stop grooming immediately. Move your pet to a cool, quiet place. Offer water.
Wet their paws and ears with cool water. Seek veterinary help if they don't improve quickly.
What to Tell Your Groomer About Your Pet's Health
- Any medications your pet is currently taking
- History of seizures or heart conditions
- Known allergies
- Joint pain, arthritis, or recent surgery
- Past grooming injuries or traumatic experiences
When to Skip Grooming Entirely
- If your pet is running a fever or showing signs of infection
- If your pet has a fresh surgical wound
- If your pet's distress is escalating
- If you're using a new product and see signs of a skin reaction
Frequently Asked Questions
How long does desensitization actually take?
Most pets show meaningful improvement within two to three weeks of consistent, daily short sessions. Severe trauma cases can take six to eight weeks or longer. Progress isn't linear.
If you're seeing fewer stress signals over the course of a month, you're on the right track.
Can I use CBD or calming treats instead?
Some calming treats contain ingredients like tryptophan, chamomile, or melatonin. As of 2026, research on CBD for pets is still preliminary. Always check with your vet before starting any supplement.
These products might take the edge off, but they won't fix the underlying fear on their own. You still need desensitization and counter-conditioning.
What if my pet will only tolerate a professional groomer?
That's completely fine. Focus on low-stress transportation and clear communication. Tell the groomer exactly what you've learned about your pet's triggers.
Ask for feedback on how the session went. And schedule regular sessions to build a routine.
Is it ever okay to skip grooming altogether?
Sometimes, yes. For a pet with extreme anxiety where you've tried everything, skipping a full groom is often the kindest choice. Maintain a short coat with weekly brushing.
For severe matting, a vet can do a sedated groom. The goal is to prevent suffering, not to win a grooming contest.
What should I do if my pet bites me during grooming?
Stop the session immediately. Don't punish the bite. This is your pet telling you they are terrified and out of options.
Consult your veterinarian about pain checks and potential sedation. Consider a professional groomer trained to work with fearful animals.
How do I train a cat to tolerate brushing?
Start with short sessions in a quiet room. Stop the second your cat shows annoyance. Use a soft brush.
Focus on the back initially. Cats respond well to treats, but respect their limits. If your cat growls or hisses, stop and try again later.
How do I handle a dog who won't let me near their paws?
Start by touching your dog's paw for a second, then give a treat. Do this multiple times a day. Once comfortable, hold the paw for a few seconds, then treat.
Introduce the nail clippers or grinder without using them. Build up gradually over days. One nail today, two nails tomorrow.
How often should I groom a nervous pet?
Short and frequent beats long and rare. A 5-minute brushing session every other day is far better than a 45-minute full groom once a month. Short sessions prevent trigger stacking and give your pet constant opportunities to practice being calm.
What if my pet's grooming anxiety is caused by a medical condition?
If you suspect a medical issue, get a veterinary diagnosis before starting any behavior modification plan. Conditions like arthritis, dental disease, ear infections, and skin allergies can all cause grooming to be genuinely painful. Treating the underlying condition is the first and most important step.
What's the most important thing to remember?
You're doing better than you think. Your pet isn't being difficult on purpose. They're scared, and they're trying to communicate that.
Your job is to listen, adjust, and build trust one small session at a time. That's a skill that transfers beyond grooming. It's the foundation of a wonderful, trusting relationship with your animal companion.
How Do I Keep a Cat Calm for Nail Trims?
Cats need a different approach than dogs. Start by getting your cat comfortable with paw handling. Gently press on their paw to extend the claw while giving them treats.
Do this while they're relaxed.
Use a grinder designed for cats, which is quieter than a clipper. Always trim only the very tip of the claw, avoiding the pink quick. Stop the moment your cat shows any sign of stress.
One nail a day is a complete win.
If your cat absolutely cannot tolerate nail trims, ask your vet about gabapentin. A small dose given an hour before can make the experience dramatically less stressful.
What If My Pet Only Gets Anxious at the Vet Groomer?
The vet's office is full of unfamiliar smells, sounds, and past scary experiences. Your pet might be anxious about the whole environment, not just the grooming.
Talk to your vet about low-stress handling techniques. Many practices now offer "fear-free" appointments using pheromones, dim lighting, and slower interactions. Ask to bring a familiar blanket or toy.
Consider doing grooming at home more often so vet visits are only for medical care.
What Are the Best Alternatives to Traditional Grooming for Extreme Anxiety?
For pets who cannot tolerate traditional grooming, even after desensitization and medication, there are practical alternatives.
Waterless shampoos, grooming wipes, and dry foams can clean your pet's coat without a bath. A sanitary shave, often done by a vet under sedation, can remove mats and keep hygiene-critical areas clean. These alternatives aren't ideal, but they're far better than letting an anxious pet get matted and unhealthy.
The Final Decision Guide: Building Your Pet's Custom Calm Grooming Plan
Let's bring everything together into one actionable framework you can start using today.
Step 1: The Pre-Session Assessment (2 Minutes)
Ask yourself:
- What was my pet's energy level like today? High-energy pets need exercise first.
- Have I done this groom before, or is this a new experience?
- Is there any known pain or sensitivity I need to work around?
- What's my own stress level? If I'm rushed or frustrated, reschedule.
- What's the one goal for this session? Keep it small and achievable.
Step 2: The Three-Minute Setup
Your setup checklist:
- Non-slip mat or table surface in place
- Tools within arm's reach, all clean and ready
- Treats nearby in a bowl or treat pouch
- Pheromone spray or diffuser active for at least 30 minutes
- TV or music off, other pets in another room
- Phone on silent
Step 3: The Session Itself (5 to 15 Minutes)
The rhythm to keep:
- Work in short, 30-second passes at most
- Reward every moment of calm behavior
- Watch for the subtle stress signals
- Take a break every 5 minutes
- End while you and your pet are both still calm
Step 4: The Post-Session Review (2 Minutes)
Questions to ask yourself:
- What went well?
- Where did my pet show stress?
- What might I do differently next time?
- What's the next small goal?
Log these notes somewhere. Over time, patterns will emerge that help you fine-tune your approach.
The "One Tool at a Time" Principle
Never introduce all your tools in a single session. That's a recipe for sensory overload. One tool per session is the right pace.
Start with the brush. When they're comfortable with that, add the comb. Then the nail grinder.
Then the clipper. Each new tool gets its own introduction period, separate from any actual grooming goal.
Your pet builds trust with each tool individually, rather than associating the entire grooming bag with stress.
How to Build a Habit Loop for Grooming
Keep your grooming setup in the same spot each time. Use the same order of operations. A predictable routine becomes a comfort.
If you always brush your dog after their morning walk, they'll start waiting by the brush. That's the habit loop doing its job. The grooming becomes a normal, scheduled part of their day, not a surprise attack.
The "Emergency Stop" Signal
Train your pet to have an "out." This is a signal they can give you to pause or end the session. It gives them agency and prevents panic from building.
Some common signals include a nose nudge, a paw raise, or a specific whine. Reinforce any of these by immediately stopping the groom and giving a treat when they show the signal.
This seems counterintuitive. You're rewarding them for stopping. But you're actually teaching them that they have control over the situation.
Pets who feel in control are less anxious.
Grooming as a Bonding Experience
It's easy to see grooming as a chore. But it's also one of the most regular, hands-on interactions you'll have with your pet.
A calm grooming session is a time to connect. It's a time for quiet words, gentle touches, and rewards. It's a time when your pet learns they can trust you to keep them safe, even when things feel a little strange.
That trust extends beyond the grooming table. A pet who trusts you during a nail trim is more likely to trust you during a stressful trip to the vet. The skill you're building isn't just about grooming.
It's about communication and mutual respect.
Realistic Goals: What "Calm" Really Means for Different Pets
It's easy to imagine a perfect scenario where your pet lies motionless, enjoying every second of the clipper. That's not realistic for most animals. "Calm" looks different for every pet.
For a chronically anxious rescue dog, calm might mean they stop trembling and accept a few brush strokes. For a high-energy puppy, calm might mean they hold still for thirty seconds. For a cat, calm might mean no hissing, even if their ears are still slightly pinned.
Your benchmark isn't a professional show dog. Your benchmark is your pet's specific baseline, and then a small improvement beyond that baseline.
The "Grooming Day" Routine for Busy Owners
Not everyone has time for daily grooming sessions. A structured weekly plan works just as well.
The weekly routine:
- Monday: 5-minute brushing session, focus on back and sides.
- Wednesday: 5-minute session, focus on paws and ears.
- Friday: 5-minute session, focus on face and tail. Add nail trim if your pet is calm.
- Saturday or Sunday: Full grooming session, up to 15 minutes, using all the tools.
This approach keeps the coat maintained, reinforces the positive association, and prevents the stress of a monthly marathon.
The Long View: What Happens After a Year of Consistent Calm Grooming
If you stick with this approach for a year, you'll notice a remarkable change. Your pet may never be thrilled about grooming, but they'll tolerate it without drama. More importantly, they'll know you're on their side.
Think about what that relationship looks like:
- A dog who approaches the grooming mat of their own accord, expecting a treat and a few gentle strokes.
- A cat who allows a full comb-through without hissing or squirming.
- Nail trims that happen in under a minute, with no wrestling match.
- Baths that become a calm, if soggy, routine.
This is what a year of consistent, patient work gives you. A calmer, happier pet. A deeper bond.
And a much simpler grooming routine for the rest of their life.
It's worth the effort. It's worth the patience. And honestly, it's worth every minute you spend learning to listen to your pet more closely.
Grooming becomes a gift you give them, rather than a battle you fight. Keep going, stay consistent, and you'll both get there.
When You Need a Break: Your Own Mental Health
This process is demanding. There's no way around that. It's emotionally draining to watch your pet struggle, and it can be frustrating to feel like you're not making progress.
If you need a break, take one. It's not giving up. It's basic self-care.
You might take a week off from grooming entirely. You might hire a professional for a single session to give yourself a breather. You might just reduce your sessions to a very quick brush and a treat.
Your pet will be fine with a few days off. And you'll be a better, calmer trainer when you're not running on empty. Make sure you're also taking care of your own mental health, because that's what will let you show up consistently for your pet.
The "Hidden" Stress Signal Most Owners Miss: Yawning
We touched on this earlier, but it deserves a deeper look. Yawning is one of the most misinterpreted calming signals in dogs and cats.
When your pet yawns during grooming, they're not tired. They're stressed. They're trying to self-soothe and communicate that they need a break.
Most owners ignore it because it looks like fatigue.
A tired yawn happens when your pet is relaxed, often settling down for a nap. It's followed by them curling up and closing their eyes.
A stress yawn happens mid-groom. It's often accompanied by other subtle signals: a stiff body, ears pinned back, or averted eyes. Your pet might yawn repeatedly within a short window.
If you see a stress yawn, slow down or stop. Give your pet a break. Let them shake off.
That's a clear sign they're at their limit.
Why "Just Pushing Through It" Backfires
When you push a pet past their fear threshold, you trigger a stress response. Cortisol floods their system. They learn that grooming is a genuinely dangerous situation.
The next time you bring out the brush, that memory is already there. Their anxiety starts higher than before. You've made the problem worse.
Pushing through also damages trust. Your pet learns that you won't listen to their signals. The next time they're uncomfortable, they're more likely to escalate to aggression because they've learned that subtle communication doesn't work.
Respecting your pet's signals isn't just kind. It's the most effective strategy you have.
Getting the Whole Household on Board
Your grooming plan only works if everyone who handles your pet follows the same rules. One person forcing a groom while you're doing desensitization sends completely mixed messages.
Hold a short family meeting. Explain the triggers you've identified and the methods you're using. Make a list of the tools and treats you use.
Post it on the fridge. Make sure kids know the basics too.
Kids can be especially helpful. They often have more patience and a lighter touch than adults. They can also accidentally undo your progress if they grab the clippers and chase the dog around the yard for fun.
The One-Session-at-a-Time Philosophy
Don't think about the perfect groomed result. Think about the next five minutes. That's the only thing you can control.
Each session is its own event. It has a beginning, a middle, and an end. If you can get through a calm five-minute session without a panic response, you've won.
The full groom can come next week, next month, or not at all.
This philosophy reduces pressure on you and on your pet. It keeps sessions short and positive. And it builds momentum.
Over time, those five calm minutes stretch into ten, then twenty, then a full groom.
What Does a Successful Grooming Relationship Actually Look Like?
It's not a perfect, Instagram-worthy dog who stands still for an hour. It's a relaxed dog who tolerates the experience without fear.
A successful grooming relationship means your pet might still be a little nervous, but they trust you enough to let you work. They might need breaks, but they don't panic. They might not love the clipper, but they don't fight it.
It looks like a cat who sits calmly on a towel, accepting a comb through their fur. It looks like a dog who holds still for a nail trim, even if they don't enjoy the grinder's sound.
It's you and your pet working together, not against each other. That's the real goal, and it's achievable for almost every pet with patience and consistency.
The Building Blocks of Trust
Every calm session is a brick in a foundation of trust. Every panic you avoid is a bad memory you prevent from forming. Every treat you give for calm behavior is a message that says "you're safe here."
Trust isn't built in grand gestures. It's built in the quiet moments. The gentle touch before the first pass.
The steady voice that says "good job" when your pet is scared. The willingness to stop when they've had enough.
That trust transfers everywhere. A pet who trusts you during grooming is more likely to trust you at the vet, during a thunderstorm, or when they're feeling sick. The work you're doing on the grooming table is building a lifetime of security.
A Final Note on Progress
You might feel like you're moving too slowly. You might wonder if your pet will ever relax. You might look at other people's perfectly groomed dogs and feel like a failure.
Don't. Comparison is the thief of joy in pet ownership too.
Every pet is different. Every pet has their own history, their own fears, their own pace of learning. What matters isn't how fast you get there.
It's that you're committed to getting there together.
Your pet isn't trying to frustrate you. They're trying to survive a situation that feels genuinely threatening. And you, their most trusted companion, are showing them that it doesn't have to be scary.
That journey, slow as it might be, is one of the most meaningful things you'll ever do with your animal companion. Keep showing up. Keep listening.
Keep rewarding the calm. The rest will follow.
Tools and Equipment Care
Sharp, well-maintained tools make grooming easier and safer. A dull blade pulls at the hair, causing a burning sensation that a sensitive pet will dread. This is a safety issue.
- Get blades sharpened regularly, typically every 6 months for home users.
- Clean and lubricate your clipper after every session.
- Sanitize blades between pets if you have multiple animals.
- Replace worn-out brushes with matted bristles.
- Check your clipper for overheating during long sessions.
A well-maintained tool kit is a step toward a calm grooming experience. The better the tools, the more comfortable your pet.
The Role of Nutrition and Supplements
A healthy coat starts from the inside. Nutritional deficiencies can cause dry, itchy skin, which makes grooming genuinely uncomfortable. Omega-3 fatty acid supplements are a common addition for pets with skin issues.
Calming supplements, like those containing L-theanine or chamomile, can also support the process. They're not a substitute for training, but they can take the edge off a nervous pet's baseline anxiety.
Always check with your vet before adding supplements, especially if your pet is on prescription medication.
The "Travel Grooming Kit" for Trips and Vacations
Travel disrupts routines. That includes grooming. If you're heading out of town, pack a small grooming kit so you can keep up your pet's training on the road.
Your travel kit:
- Travel-sized brush or comb
- Small bag of treats
- A familiar towel with your pet's scent
- Pet-safe wipes for quick clean-ups
- A nail grinder or clippers
Maintaining short sessions while traveling is just as important as at home. It prevents a regression that can happen when your pet comes back from a boarding stay with knots and mats.
Grooming for Senior Pets: Special Considerations
Older pets have unique grooming needs. Arthritis makes standing on a table painful. Thin skin tears more easily.
Reduced mobility means more mats form in hard-to-reach areas.
Adjust your approach for senior pets:
- Use a memory foam mat on the grooming table for joint comfort.
- Keep sessions shorter. Five minutes is plenty for a senior pet.
- Watch for signs of pain. A flinch or a whimper is a clear message.
- Be extra gentle around joints. Avoid lifting or rotating limbs forcefully.
- Consider a mobility-safe grooming sling for pets who struggle to stand.
If your senior pet has always enjoyed grooming but suddenly resists it, that's a red flag for pain. A vet visit is the right next step.
Grooming for Puppies and Kittens: Setting the Foundation
Start immediately, but keep it short and positive. Puppies and kittens have critical socialization windows. The habits you build now are what stick for life.
For a puppy, do a 2-minute session every day. Touch their paws, ears, and tail. Run a brush over their coat.
Reward them with treats throughout. Let them watch you turn the clippers on and off, but don't force a full groom until they're comfortable with the pr
[trimmed for storage]