Tag: home dog grooming

  • When to Stop Grooming and Call a Pro

    When to Stop Grooming and Call a Pro

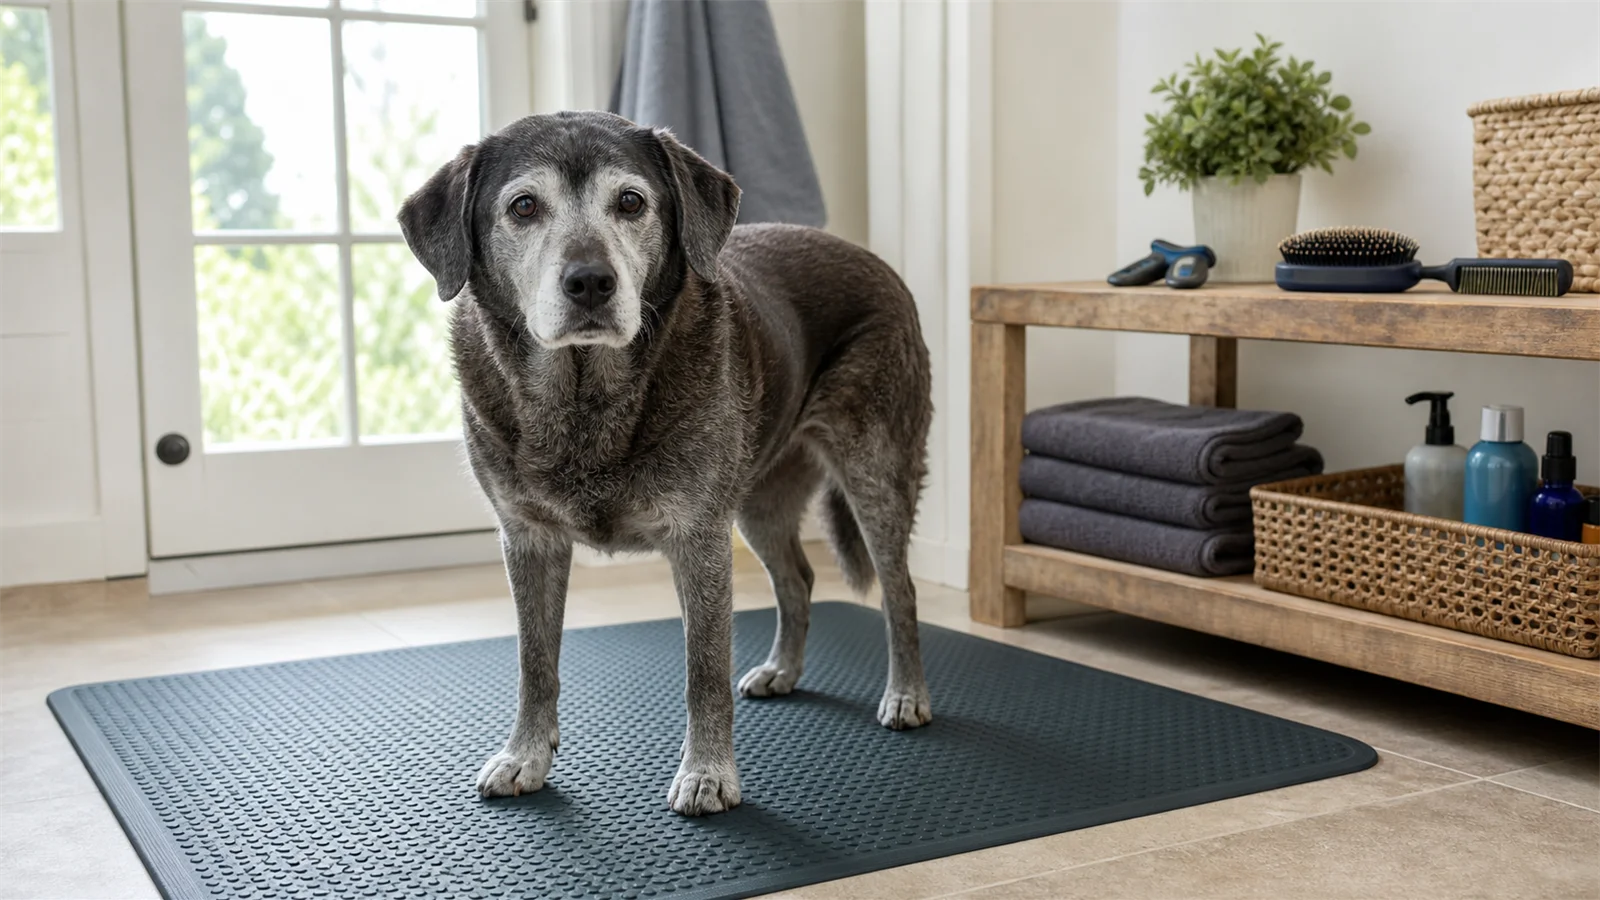
    Stop grooming and call a professional when the coat, skin, behavior, breathing, paws, nails, ears, eyes, or tools move outside a calm routine home session. Some problems belong with a groomer, some belong with a veterinarian, and unsafe tools belong with the manufacturer or service route.

    This is a routing guide, not a treatment guide. It does not diagnose, treat, sedate, restrain, demat severe coats, or repair tools.

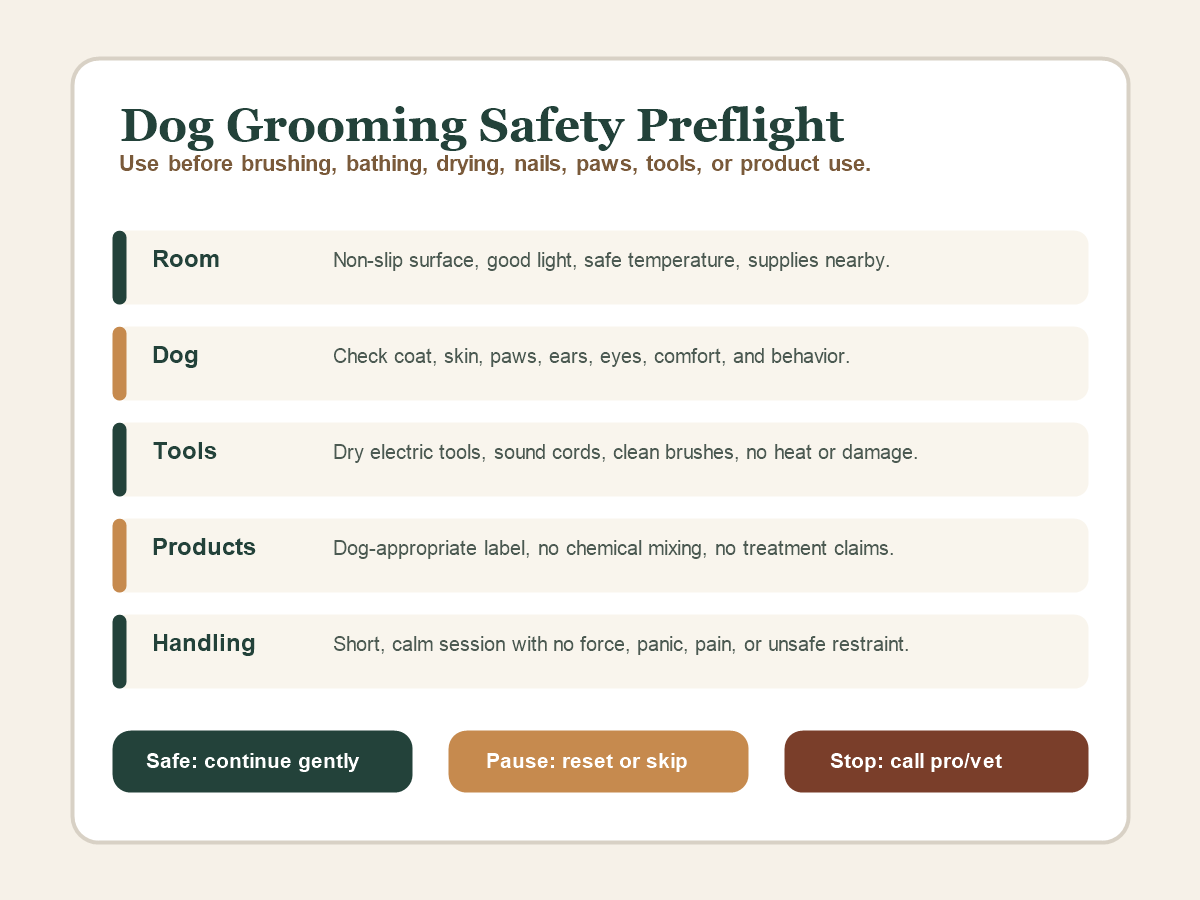
    The Simple Rule: Pause, Stop, or Call

    SignalWhat it usually means for the home session
    Mild wiggles, short attention span, normal coatPause, shorten the session, or retry later
    Tangles beyond your skill, coat uncertainty, advanced trim needStop and call a professional groomer
    Pain, wounds, bleeding, swelling, discharge, limping, breathing troubleStop and call a veterinarian
    Damaged, wet, sparking, overheating, rusty, or broken toolStop using the tool and contact the manufacturer or service route

    If you are unsure, end the session. A stopped session is easier to fix than a pushed session that becomes painful or unsafe.

    Original Red, Yellow, Green Routing Matrix

    Pet Grooming Guide original framework: sort the moment by risk, then choose the safest next route.

    StatusExampleNext action
    GreenCalm dog, normal coat, safe toolsContinue gently
    YellowDog needs a break, minor tangle, owner unsure about one taskPause, simplify, or skip that task
    Red – groomerSevere mats, advanced trim, coat uncertaintyStop and call a professional groomer
    Red – vetPain, wounds, limping, discharge, breathing troubleStop and call a veterinarian
    Red – manufacturerDamaged cord, sparks, rust, overheating, wet electrical toolStop using the tool and contact the service route

    Coat and Mat Stop Signs

    Call a professional groomer for severe mats, painful mats, pelted coat, mats close to skin, or coat problems you cannot separate safely with gentle brushing. Do not cut mats out at home and do not force a brush through them.

    Call a veterinarian if mats are paired with sores, bleeding, swelling, discharge, skin odor with irritation, parasites, or obvious pain. A groomer can help with coat handling, but medical signs need veterinary guidance.

    Skin, Ear, Eye, and Paw Stop Signs

    Stop grooming and contact a veterinarian for wounds, sores, bleeding, redness, swelling, discharge, odor with irritation, eye squinting, eye discharge, eye pain, ear pain, ear discharge, strong ear odor with discomfort, limping, paw pain, burns, blisters, embedded-object concern, sudden sensitivity, excessive licking, parasites, or severe scratching.

    Do not try to treat these during grooming. Do not apply medication, pesticide products, antiseptics, disinfectants, bandages, or home remedies from this page.

    Behavior and Handling Stop Signs

    Pause for normal restlessness. Stop for panic, growling, snapping, repeated attempts to escape, aggression risk, or any handling that would require force.

    If there is no medical emergency but the dog cannot be handled safely, call a professional groomer or a qualified handling-support route. If the behavior is sudden, paired with pain, or paired with medical signs, call a veterinarian.

    Breathing, Heat, and Chemical Exposure

    Stop immediately and call a veterinarian or emergency veterinary route for breathing trouble, collapse, heat stress signs, burns, blisters, or chemical exposure concern.

    Do not continue drying, bathing, clipping, brushing, or nail work while you wait through breathing or collapse signs.

    Nails and Paws

    Stop nail work for pain, bleeding, repeated pulling away, limping, swelling, sudden sensitivity, or unsafe handling. Pain or bleeding means the session ends.

    For paw pads, stop and call a veterinarian for cuts, burns, blisters, discharge, swelling, embedded-object concern, excessive licking, limping, or chemical exposure concern. If the issue is setup rather than injury, use the dog nail trimming setup checklist before trying again another day.

    Tool and Electrical Stop Signs

    Stop using a grooming tool and follow the manufacturer or professional service route for damaged cords or plugs, cracked housing, sparks, burning odor, overheating, water exposure, rust, broken or sharp blade teeth, missing guards, abnormal noise, or dropped electrical tools.

    Do not open the tool, repair cords, sharpen blades, diagnose electrical problems, or keep using a tool because it still turns on. For basic non-repair care, use the appropriate tool-cleaning guidance after the tool is safe to handle.

    Call Groomer vs Call Vet

    Call a groomer whenCall a veterinarian when
    The coat is matted beyond gentle brushingThe dog has pain, bleeding, swelling, discharge, or injury
    The trim requires skill you do not haveThe dog is limping, collapsing, struggling to breathe, or showing heat stress signs
    The dog needs a calmer professional setup without a medical emergencyEar, eye, paw, skin, chemical, parasite, or sudden sensitivity signs appear
    You are unsure how to handle coat safelyThe issue looks medical, painful, infected, or urgent

    FAQ

    When should I call a groomer instead of trying at home?

    Call a groomer for severe mats, painful mats, advanced clipping, breed-specific trims beyond your skill, coat uncertainty, or handling that cannot be completed calmly and safely.

    When should I call a vet after grooming?

    Call a veterinarian for pain, limping, wounds, bleeding, swelling, discharge, odor with irritation, eye or ear symptoms, burns, blisters, breathing trouble, collapse, chemical exposure concern, parasites, or sudden skin changes.

    Should I keep grooming if my dog panics?

    No. Stop the session. Panic increases injury risk and can make future grooming harder. Resume only with a safer plan and appropriate professional help if needed.

    Can I fix a clipper problem during grooming?

    No. Stop using damaged, wet, sparking, overheating, rusty, or broken tools and follow the manufacturer or professional service route.

    Bottom Line

    A safe home grooming session has permission to stop. Pause for mild restlessness, call a groomer for coat or handling tasks beyond your skill, call a veterinarian for pain or medical signs, and stop using any damaged or unsafe tool. Ending early is part of safe grooming.

    Sources

  • Dog Grooming Kit Checklist for Beginners

    Dog Grooming Kit Checklist for Beginners

    A beginner dog grooming kit should cover routine brushing, bathing, drying, nails, paws, gentle face and ear-area cleanup, safe setup, comfort breaks, and dry storage. It does not need professional tools, brand-specific bundles, medicated products, sedatives, restraints, dematting blades, or anything meant to replace a groomer or veterinarian.

    Use this checklist by category. The goal is not to buy everything at once. The goal is to know what belongs in a safe starter kit, what can wait, and what should stay out of a beginner home kit.

    Starter Dog Grooming Kit Checklist

    CategoryWhat to includeWhy it belongs
    Brush and comb categoryA coat-appropriate brush or comb categoryHelps remove loose coat and find tangles early
    Bath basicsDog-safe shampoo category and towelsSupports routine bathing without human products
    DryingAbsorbent towels and a safe drying areaReduces trapped moisture after baths
    Nails and pawsNail tool category and paw-check suppliesSupports routine inspection and cautious nail care
    Face and ear-area wipingSoft cloths or wipes approved for dogsKeeps cleanup gentle and surface-level
    SetupNon-slip mat and good lightingHelps prevent slipping and rushed handling
    StorageDry container, labels, and cleaning scheduleKeeps tools organized and easier to inspect
    ComfortTreats, breaks, and a calm session planHelps the dog learn grooming in small steps

    This page stays category-level on purpose. Specific products, brands, costs, retailer links, and rankings belong outside this informational checklist.

    Original Starter, Optional, Stop Matrix

    Pet Grooming Guide original framework: build the kit in three lanes: starter items, optional later items, and stop-and-call boundaries.

    Task areaStarter kitOptional laterStop and call
    Brushing and comb checksCoat-appropriate brush/comb categoryExtra coat-specific toolsSevere mats, painful mats, skin redness, swelling, or discharge
    Bath and dryDog-safe shampoo category and towelsExtra drying aids if safe and appropriateChemical exposure concern, sores, bleeding, or panic
    Nails and pawsNail tool category, towel, and lightPaw-hair trimming tools only with skillLimping, pain, bleeding, swelling, or embedded object
    Ears and faceSoft cloth or wipe categoryNone without a clear needEar pain, discharge, eye symptoms, or facial pain
    Tool careDry storage, labels, and inspection routineInventory logDamaged cords, cracks, rust, sparks, overheating, or wet electric tools
    ComfortBreak plan, treats, and short sessionsTraining or acclimation planPanic, aggression risk, unsafe handling, or forced restraint

    Optional Items That Can Wait

    Optional tools depend on coat type, comfort level, and whether the basic routine is already calm and repeatable.

    • Clippers or trimmers can wait until the dog is comfortable with sound and handling.
    • Deshedding tools can wait until you understand coat type and pressure risk.
    • Specialized combs can wait until you know where tangles form.
    • Travel-size duplicates can wait until the home kit is stable.
    • Any tool with blades, cords, batteries, chemicals, or sharp edges can wait until you can inspect and store it safely.

    If a tool comes with a manual or label, that instruction is the authority. Stop using damaged tools, wet electric tools, missing guards, cracked housings, rusty blades, or anything that sparks, overheats, smells like burning, or feels unsafe.

    What Does Not Belong in a Beginner Kit

    Do not build a home kit around advanced or medical tasks. These are not beginner grooming supplies:

    • Sedatives or calming medications.
    • Restraint systems for forced handling.
    • Medicated shampoos chosen without veterinary direction.
    • Pesticide products chosen as grooming shortcuts.
    • Wound-care supplies for treating grooming injuries.
    • Dental scaling tools.
    • Dematting blades for painful or severe mats.
    • Ear medications.
    • Tools meant for electrical repair, blade sharpening, or clipper repair.

    The safer choice is a modest kit and a clear stop rule. When the task exceeds your skill, your dog is distressed, or the skin or coat does not look normal, pause the home session and route to the right professional.

    Storage and Cleaning Matter

    A kit is safer when it is easy to inspect. Store tools dry, away from bath areas, and separated from household cleaners. Keep labels and manuals with any item that has blades, cords, batteries, or chemicals.

    After each session, remove hair from brushes and clippers where appropriate, let damp items dry fully, and discard anything damaged. For the broader routine, pair this kit page with the dog grooming checklist for beginners.

    When to Skip Grooming and Call Someone Else

    Stop the session and call a veterinarian or professional groomer for severe mats, painful mats, wounds, sores, bleeding, redness, swelling, discharge, persistent odor with irritation, ear pain or discharge, eye symptoms, limping, pain, panic, aggression risk, breathing trouble, chemical exposure concern, or unsafe handling.

    Call the manufacturer or service route for damaged electrical tools, cracked housings, sharp or broken blade teeth, rust, overheating, sparking, burning odor, missing guards, or wet electric tools.

    FAQ

    What should be in a dog grooming kit for beginners?

    A beginner kit should include safe categories for brushing, bathing, drying, nails, paws, surface-level face and ear-area cleanup, non-slip setup, comfort breaks, and dry storage. It should not start with advanced or medical tools.

    Do I need clippers in a beginner dog grooming kit?

    Not always. Clippers can wait until the dog is comfortable with handling and sound, and until you understand safety, blade heat, guards, and manufacturer instructions.

    Should a dog grooming kit include ear medicine or medicated shampoo?

    No. Ear medications, medicated shampoos, pesticide products, and treatment supplies should be used only with appropriate veterinary direction.

    Is this a product buying guide?

    No. This is a category checklist. It intentionally avoids brands, models, costs, retailer links, product rankings, product tables, and buying CTAs.

    Bottom Line

    A safe beginner dog grooming kit is modest, organized, and category-based. Start with brushing, bathing, drying, paw checks, surface-level cleanup, setup, comfort, and storage basics. Leave severe mats, medical signs, forced handling, damaged electrical tools, and treatment products to the right professional route.

    Sources

  • How to Groom a Dog at Home Safely

    How to Groom a Dog at Home Safely

    To groom a dog at home safely, start with a calm setup and a quick body check, brush and comb before bathing, decide whether a bath is needed, rinse and dry thoroughly, check paws and nails carefully, keep face and ear work surface-level, and stop as soon as the dog, coat, skin, or tool setup becomes unsafe.

    You do not have to finish every grooming task in one session. For many dogs, the safest home groom is short, calm, and intentionally unfinished.

    At-Home Dog Grooming Order

    Use this order as a safety flow, not a race. Skip any step that would make the session too long, stressful, or risky.

    StepWhat to doStop or skip if
    1Set up a quiet, well-lit room with non-slip footingThe dog is already panicked or the floor is slippery
    2Check coat, skin, paws, eyes, and ears before tools touch the dogYou see pain, swelling, bleeding, discharge, severe mats, or unsafe handling
    3Brush and comb gently before any bathMats are tight, painful, close to skin, or in a sensitive area
    4Bathe only if needed, using a dog-appropriate shampoo categoryA bath would make the session too long or the dog is not safe to bathe today
    5Rinse well and dry fully on a non-slip surfaceThe dog overheats, panics, struggles to breathe, or cannot be handled calmly
    6Check paws and nails within your skill levelThere is limping, bleeding, swelling, paw guarding, or nail-trim uncertainty
    7Wipe face and ear areas only where appropriateThere is eye squinting, discharge, ear pain, odor with irritation, or facial pain

    Original Safe-Order Framework

    Pet Grooming Guide original framework: build the session around stopping early, not getting everything done.

    1. Set the room: quiet space, bright light, towels, non-slip footing, and tools placed before the dog arrives.
    2. Check first: look for mats, soreness, skin changes, paw problems, ear/eye concerns, and stress level.
    3. Brush before water: gently loosen loose coat and find tangles before bathing.
    4. Choose the smallest useful session: brush-only, bath-only, paw check, or full routine only when calm and safe.
    5. Route up quickly: use a groomer for severe coat problems or handling limits, and use a veterinarian for pain, injury, discharge, limping, or medical concern.

    Set Up the Room First

    Choose a quiet area with good light, a stable surface, towels, and clean water if bathing. Keep electric tools away from water and damp surfaces. Read product labels and tool manuals before the dog is on the grooming surface.

    Skip the session if the room is too hot, the surface is slippery, the dog is already panicked, or you cannot keep the setup controlled without force.

    Do a Quick Body and Coat Check

    Before brushing or bathing, look over the coat and skin. This is a safety check, not a diagnosis.

    Stop and call a veterinarian or professional groomer if you see severe mats, painful mats, wounds, sores, bleeding, redness, swelling, discharge, odor with irritation, eye squinting, ear pain, limping, obvious pain, parasites, sudden skin or coat changes, panic, aggression risk, or unsafe handling.

    Brush and Comb Before Bathing

    Brush and comb gently before a bath to remove loose coat and find tangles. Bathing over tangles can make coat problems harder to manage, especially on thick, curly, or double-coated dogs.

    Do not force a brush through mats. Do not cut mats out at home if they are tight, painful, close to the skin, or in a sensitive area. That belongs with a qualified groomer or veterinarian, depending on the dog and skin condition.

    Decide Whether to Bathe Today

    A bath is not always required. If the dog is clean enough and the main need is brushing, stop after brushing and comfort checks. If a bath is needed, use a dog-appropriate shampoo category and follow the label.

    Avoid human shampoos, medicated products chosen without veterinary direction, pesticide shortcuts, or chemical mixtures. Rinse well and keep water and shampoo away from the eyes and ear canal. For bath-specific mistakes, use the dog bathing mistakes guide before repeating the routine.

    Dry Fully and Watch Comfort

    Drying matters because trapped moisture can irritate skin and make thick coats uncomfortable. Use towels first and keep the dog warm, calm, and secure on a non-slip surface.

    If using any electric drying tool, follow the manufacturer instructions, avoid heat stress, and stop for panic, overheating, breathing trouble, collapse, or unsafe handling. This guide does not teach advanced salon drying.

    Check Paws and Nails Carefully

    After brushing or bathing, check the paws for trapped moisture, debris, nail-edge issues, and signs of discomfort. Nail work should stay within what you can safely do. If you need a dedicated setup check, use the dog nail trimming setup checklist.

    Stop and call a veterinarian for limping, pain, swelling, bleeding, cuts, burns, blisters, discharge, excessive licking, chemical exposure concern, or sudden sensitivity. Stop and call a groomer for paw-hair trimming uncertainty or mats between toes.

    Keep Ears and Face Surface-Level

    For the face and ear area, keep home grooming gentle and surface-level. Wipe only where appropriate and do not insert tools or cotton swabs into the ear canal.

    Ear pain, discharge, odor with irritation, head shaking, eye discharge, eye squinting, or facial pain should stop the grooming session and move the decision to a veterinarian.

    Skip This Today Decision Box

    If this is trueSafer choice
    The dog is nervous but not unsafeDo one short task and end positively
    The coat has small tangles you can brush gentlyWork slowly, then stop before frustration
    The dog has painful mats or skin changesStop and call a groomer or veterinarian
    Nails are stressful todaySkip nails and use a nail-specific setup guide later
    Bathing would make the session too longBrush today, bathe another day
    Tools look damaged or wetDo not use them; follow the manufacturer route

    Cleanup After the Session

    When the session ends, clean and dry the grooming area, remove hair from tools, store tools away from moisture, and note any issue you should revisit later. If the dog seems sore, itchy, unusually tired, or uncomfortable after grooming, stop home grooming and consider veterinary advice.

    FAQ

    What order should I groom my dog at home?

    Start with setup and a body check, then brush and comb, decide on bathing, rinse and dry, check paws and nails, do gentle face or ear-area wiping if appropriate, and clean up. Stop anytime safety changes.

    Do I have to bathe my dog every time I groom?

    No. Many home sessions can be brushing, paw checks, or comfort work only. A shorter session is often safer than trying to do everything at once.

    Can I remove severe mats at home?

    No. Severe, painful, tight, or skin-close mats should be handled by a professional groomer or veterinarian. Do not cut them out at home.

    When should I stop grooming immediately?

    Stop for wounds, bleeding, swelling, discharge, pain, panic, breathing trouble, collapse, chemical exposure concern, severe mats, damaged tools, wet electric tools, or unsafe handling.

    Bottom Line

    Safe home grooming is a sequence of small decisions. Set up the room first, check the dog before tools touch the coat, brush before bathing, skip tasks that are too much for today, and route pain, injury, severe mats, discharge, panic, or unsafe handling to a veterinarian or qualified groomer.

    Sources

  • How to Keep Dog Grooming Notes at Home

    How to Keep Dog Grooming Notes at Home

    Dog grooming notes do not need to be complicated. A useful home record can be as simple as the date, the grooming task, the body area you checked, how your dog tolerated it, whether you took a photo, and what should happen next.

    Three-minute home dog grooming notes template with date, task, body area, tolerance, photo, and follow-up fields.
    A simple grooming note should help you remember patterns and explain concerns clearly, not diagnose a problem at home.

    The Three-Minute Grooming Note

    Use the same short format after brushing, bathing, paw checks, nail handling, ear checks, or any grooming session where you noticed a change. The goal is to make the next decision calmer and more accurate.

    FieldWhat to writeWhy it helps
    DateJune 15, 2026Shows whether something is new, improving, or repeating.
    TaskBrushing, bath prep, paw check, nails, ear checkKeeps the note tied to a real grooming activity.
    Body areaLeft ear, rear legs, tail base, paws, belly, coat sectionMakes patterns easier to discuss with a groomer or veterinarian.
    ToleranceCalm, unsure, pulled away, growled, yelped, hid, tried to biteHelps you decide whether to shorten the next session or stop.
    PhotoYes or no, with a short labelCreates a visual reference without relying on memory.
    Follow-upTry shorter session, call groomer, call vet, leave area aloneTurns the note into a safer next step.

    What Notes Can And Cannot Do

    Home grooming notes are a memory tool. They can help you explain what you saw, when it happened, and how your dog reacted. They cannot diagnose skin disease, ear infections, pain, anxiety, parasites, allergies, or behavior problems.

    If a dog repeatedly pulls away, cries, guards a body area, shows skin changes, has odor, has discharge, or seems painful, stop grooming that area and ask a qualified professional. The dog brushing stop guide can help you separate a short pause from a session that should end for the day.

    What To Record After Routine Sessions

    For normal at-home grooming, write only what would help you make a better decision next time. Keep it factual and short.

    After this sessionRecord thisSkip this
    BrushingCoat section, tangles, mats, shedding level, toleranceGuessing why a mat formed without evidence
    Bath prepBrush-first result, skin check, product used, rinse concernsUsing the note as a product review or medical conclusion
    Paws or nailsWhich paw, handling tolerance, any limping or sensitivity noticedContinuing if the dog shows pain or escalating stress
    Ears or faceOnly what you observed from the outside, plus odor or sensitivityPutting tools into the ear canal or trying to treat at home

    For a broader routine, pair your notes with the beginner dog grooming checklist or the weekly brushing routine.

    Fictional Sample Note

    This is a fictional routine note, not medical guidance:

    Date: June 15, 2026
    Task: Brushing after walk
    Body area: Rear legs and tail base
    Tolerance: Calm on rear legs, turned away at tail base
    Photo: Yes, small tangle before brushing
    Follow-up: Keep next session shorter, brush tail base first, stop if pulling away repeats.

    When Notes Should Become A Professional Handoff

    Turn your notes into a handoff when the pattern repeats, the same area stays sensitive, you see skin changes, your dog becomes more stressed over time, or you are unsure whether grooming is safe to continue. A useful handoff includes:

    • The dates you noticed the issue.
    • The body area involved.
    • What you were doing when your dog reacted.
    • Whether you have photos.
    • What you stopped doing at home.

    Before any home grooming session, use the pet grooming safety checklist to check the room, tools, products, body areas, and stop signs.

    What To Tell A Groomer, Veterinarian, Or Behavior Professional

    Be specific and calm. Instead of saying “my dog hates grooming,” try: “On June 15, he pulled away when I brushed near the tail base. I stopped. It happened again two days later, and I have a photo of the tangle.” That kind of note is much easier for a professional to act on.

    Helpful Companion Guides

    Sources

    This guide uses general dog grooming and care guidance from the ASPCA dog grooming tips, ASPCA general dog care, and VCA Hospitals grooming and coat care guidance.

    Bottom Line

    Keep dog grooming notes short, factual, and tied to the next safe action. Record the date, task, body area, tolerance, photo status, and follow-up. Use the notes to remember patterns and communicate clearly, not to diagnose or push through stress.

    FAQ

    Do I need a grooming notebook?

    No. A phone note, printed checklist, calendar entry, or simple spreadsheet can work as long as you record the same basic fields each time.

    Should I take photos every time?

    No. Photos help when you see a visible change, tangle, mat, skin concern, or repeated issue. Do not force a photo if handling the area makes your dog more stressed.

    Can grooming notes replace a vet visit?

    No. Notes can help you explain what happened, but they do not replace veterinary care when there are signs of pain, skin changes, odor, discharge, bleeding, limping, or repeated distress.

    What is the most useful thing to write down?

    The most useful note is usually the body area, what you were doing, and how your dog reacted. That gives you and a professional a clear starting point.

  • Pet Grooming Safety Checklist for Dogs at Home

    Pet Grooming Safety Checklist for Dogs at Home

    This pet grooming safety checklist is for dogs groomed at home. Before brushing, bathing, drying, nail work, paw checks, face wiping, ear-area wiping, or tool use, confirm that the room, dog, tools, products, and handling plan are safe enough to continue.

    Although the keyword says “pet,” this page is dog-only. Cats, rabbits, birds, reptiles, and small pets need species-specific handling and safety guidance.

    Dog grooming safety preflight checklist covering room setup, dog body check, tool safety, product label, handling, and safe pause stop decisions.

    Room Setup Checklist

    CheckSafe to continue when…Stop or change setup when…
    SurfaceDog has stable footingFloor, tub, or table is slippery
    LightingYou can see coat, skin, nails, and paws clearlyYou are guessing
    Water and electricityElectric tools are away from waterTools, cords, outlet, or hands are wet
    TemperatureDog is comfortableRoom is too hot, cold, or poorly ventilated
    SuppliesItems are within reachYou must leave the dog unattended

    A non-slip surface and calm room are not decoration. They reduce rushing, slipping, and unsafe handling.

    Dog Body Check

    Before grooming, scan the coat, skin, paws, ears, eyes, and behavior. You are not diagnosing; you are deciding whether home grooming is appropriate today.

    Stop for severe mats, painful mats, wounds, sores, bleeding, redness, swelling, discharge, odor with irritation, limping, pain, eye or ear symptoms, panic, aggression risk, breathing trouble, collapse, overheating, chemical exposure concern, or unsafe handling.

    For routine task planning after the safety check, use the dog grooming checklist for beginners.

    Tool Safety Check

    Inspect every tool before it touches the dog.

    • For brushes and combs, look for broken teeth, sharp edges, trapped debris, or rust.
    • For clippers, trimmers, dryers, or other electric tools, check cords, housing, guards, blade condition, heat, smell, sound, and dryness.
    • Stop using tools with damaged cords, cracked housings, sparks, burning odor, overheating, wet electric parts, rust, sharp or broken teeth, missing guards, abnormal noise, or any sign that the tool was dropped or damaged.

    This page does not teach electrical repair, clipper repair, or product servicing. If a tool seems unsafe, stop using it and follow the manufacturer route.

    Product-Label Check

    Use only dog-appropriate routine grooming products and follow the label. Do not mix chemicals, invent disinfectant recipes, claim sterilization, use medicated products without veterinary direction, or substitute household products for dog grooming products.

    The CDC advises cleaning first before sanitizing or disinfecting, following product labels, using ventilation, not mixing products, and not wiping or bathing pets with disinfecting products. If chemical exposure is possible, stop grooming and contact a veterinarian or appropriate emergency route rather than trying to treat the problem from a checklist.

    Handling and Comfort Check

    The dog should be able to stand, sit, or rest without forced restraint. Short sessions are safer than long sessions that push the dog into panic.

    Pause if the dog is restless or tired. Stop if the dog panics, growls, snaps, repeatedly tries to escape, shows pain, or cannot be handled safely.

    If the issue happens during brushing, the when to stop dog brushing session decision tree gives a more specific brushing route.

    Safe, Pause, Stop Card

    StatusWhat it looks likeWhat to do
    Safe to continueCalm dog, ordinary skin, safe tools, clear setupContinue gently
    PauseDog is tired, distracted, or mildly worriedTake a break or skip the next task
    Stop/callPain, medical signs, severe mats, panic, damaged toolsEnd the session and route to a veterinarian, groomer, behavior professional, or manufacturer

    Cleanup Checklist

    After grooming:

    • Dry damp surfaces.
    • Remove loose hair from tools.
    • Let tools dry before storage.
    • Put products away where the dog cannot reach them.
    • Note any skin, paw, nail, coat, or behavior issue that needs follow-up.

    For coat-care rhythm after the session, see the weekly dog brushing routine.

    Sources

    Bottom Line

    Home dog grooming is safer when you check the setup before you start. Confirm stable footing, clear lighting, dry and sound tools, dog-appropriate product labels, and calm handling. Pause early when the dog is worried or tired, and stop for pain, medical signs, severe mats, damaged tools, chemical concerns, panic, or unsafe handling.

    FAQ

    Is this checklist for all pets?

    No. This page targets dog grooming at home. Cats, rabbits, birds, reptiles, and small pets need species-specific handling and safety guidance.

    What is the most important dog grooming safety rule?

    Stop when the dog, skin, coat, tool, product, or setup becomes unsafe. Do not push through pain, panic, medical signs, electrical risk, or severe mats.

    Can I use restraint to finish grooming?

    This page does not teach restraint or forced handling. If a dog cannot be groomed safely and calmly at home, stop and use a professional route.

    Should I disinfect all grooming tools?

    Clean first and follow product labels and manufacturer instructions. Do not invent disinfectant recipes or make sterilization claims.

    What should I check after grooming?

    Dry damp areas, clean loose hair from tools, store products safely, and note any skin, paw, nail, coat, or behavior issue that needs follow-up.