Tag: nail and paw care

  • Winter Dog Paw Grooming After Salted Sidewalks

    Winter Dog Paw Grooming After Salted Sidewalks

    Winter dog paw grooming after salted sidewalks is a rinse, wipe, dry, and inspect routine. It helps remove routine salt, ice, and sidewalk residue after walks. This page does not recommend balms, boots, brands, or product rankings, and it does not cover cracked paw treatment, burn treatment, wound care, bleeding-quick treatment, limping or pain diagnosis, parasite treatment, or force-based restraint.

    Door-Entry Salt Cleanup Flow

    • Pause on a stable mat.

    • Rinse or wipe paws with warm water or a clean damp cloth.

    • Pay attention to between-toe spaces without digging.

    • Dry the paw and between toes.

    • Inspect pads and toe spaces.

    • Stop for injury signs, pain, lodged objects, or unsafe handling.

    The order matters more than the equipment. In practice, the whole flow takes ninety seconds to two minutes for a medium dog once the habit is set, and the biggest time saver is doing it at the door rather than letting the dog walk through the house first. Once salted slush is tracked onto carpet or licked off in the living room, you have lost the two things this routine is designed to protect: the paw itself and your ability to see it clearly. A common mistake is starting the sequence in the bathroom at the other end of the hallway — by then the residue is already spread and the dog has usually begun grooming its own feet.

    What to Keep by the Door

    • A non-slip mat or old bath towel the dog can stand on without sliding.
    • A shallow bowl or jug of warm (not hot) water, refilled after each walk.
    • Two cloths: one damp for wiping, one dry for finishing.
    • A microfibre or waffle-weave towel for between-toe drying.
    • Good light — an overhead bulb or a small lamp — so the inspection step is a real look, not a guess.

    That is the entire winter kit. If you are still assembling your general supplies, the basic tools worth owning overlap heavily with what a door station needs, and nothing on this page requires a specialist purchase.

    Rinse, Wipe, Dry, Inspect

    Rinsing or wiping removes routine salt and sidewalk residue. Drying helps finish the routine, especially between toes. Inspection is a look-only check for whether the paw still belongs in routine grooming. Do not scrape ice painfully, dig between toes, or continue if the dog reacts as though the paw hurts.

    Each step has a purpose that is easy to skip. Rinsing works because most sidewalk deicer residue is water-soluble — plain warm water dissolves and carries it off far better than dry brushing does. Wiping is the lower-fuss version for dogs who dislike standing in water, but it only works if the cloth is genuinely damp and you refold to a clean face between paws; a saturated, gritty cloth just redistributes residue. Drying is the step people abandon halfway, and it is the one that matters most in winter: damp fur between the toes in a cold, salty week is exactly the environment that leads to irritation and licking. Inspecting takes ten seconds — spread the toes gently, look at each pad, look at the webbing, then let go.

    Water Temperature and Timing

    Use warm water that feels comfortable on the inside of your wrist. Cold water does not dissolve residue as well and makes an already chilled dog less cooperative; hot water is never appropriate on paws that have just come in from freezing conditions, because a dog with cold-numbed feet cannot reliably tell you it is too hot. Work through one paw at a time and keep the dog’s weight supported on three legs. If your dog has been out in deep snow for a long stretch, let the paws come up to room temperature for a minute before rinsing rather than going straight from snowbank to water.

    Drying is where technique beats gadgets. Press the towel between each pair of toes rather than rubbing the top of the foot, and finish with a squeeze around the pad and the carpal pad higher up the leg. The same principle behind getting a coat properly moisture-free applies in miniature here — surface dry is not the same as dry.

    What Sidewalk Salt and Deicers Actually Leave Behind

    “Salt” on a winter sidewalk is rarely just rock salt any more. Municipalities and property managers now use a mix of sodium chloride, calcium chloride, magnesium chloride, potassium acetate, and beet- or brine-based pre-treatments, often applied before a storm rather than after. That matters for grooming in three ways:

    • Brines dry into a fine film, not visible crystals. Paws can look clean and still carry residue, which is why a wipe or rinse is worth doing even after a walk on bare-looking pavement.
    • Calcium and magnesium chloride are hygroscopic — they hold moisture — so residue left in the fur between toes stays damp longer than plain water would.
    • Grit and sand are mixed in for traction, and it is the grit, not the salt, that most often lodges in the webbing. That is a look-and-stop situation, not a dig-it-out situation.

    Dogs also self-clean. A dog that licks its paws for several minutes after a walk is ingesting whatever is on them, which is one of the practical reasons the door-entry rinse exists. General winter pet-safety guidance from professional veterinary bodies such as the American Veterinary Medical Association consistently points in the same direction: clean the feet after walks, keep antifreeze and deicer containers out of reach, and get a vet involved rather than treating irritated paws at home. If your dog has swallowed a mouthful of deicer or you suspect any ingestion beyond incidental licking, that is a call to your veterinarian, not a grooming question.

    Stop Signs After Salted Sidewalks

    Stop and route out for limping, pain, burns, blisters, cuts, bleeding, swelling, cracked paw injuries, lodged objects, infection signs, panic, aggression, or unsafe handling.

    “Route out” simply means the paw leaves routine grooming and goes to a veterinarian — you stop cleaning, you do not attempt to treat, and you do not repeat the rinse to “see if it looks better.” Some winter signs are subtle rather than dramatic: a dog that suddenly sits down mid-walk and lifts one foot, a paw that is held up at the door, a pad that looks glossy or unusually red, persistent licking of one specific foot, or a dog that has tolerated paw handling all year and now snatches the leg away. Veterinary teaching hospitals — the small-animal service at Cornell’s College of Veterinary Medicine among them — publish plain-language owner guidance on when a limp or a foot lesion warrants an exam; when in doubt, the honest trade-off is a phone call versus a paw problem that gets worse over a cold week.

    Behavioural stop signs count too. Freezing, whale eye, lip licking, or trying to leave the mat are the early end of a spectrum, and pushing through them teaches the dog that the door mat is a bad place. Recognising early stress signals during handling is part of doing this well, not a separate skill.

    Snow Balls, Ice Clumps, and Long Paw Hair

    Snow packs into the fur between the toes and around the pads, then compresses into hard ice balls that pull on the skin with every step. This is a mechanical problem, not a salt problem, and it is far more common in dogs with feathered feet — spaniels, retrievers, doodles, herding breeds, and most double coats.

    The safe approach is melting, not removing:

    1. Stand the dog on the mat and let the paw sit in warm water, or hold a warm damp cloth against the clump for thirty to sixty seconds.
    2. Let the ice release on its own. Support the foot; do not pull, twist, or pick at the clump.
    3. Dry thoroughly once it is gone.
    4. If it will not release, or the dog reacts as though it hurts, stop — that is a stop sign, not a stubborn ice ball.

    Prevention is mostly maintenance. Keeping the hair between the pads short and level with the pad surface (a groomer’s trim, or careful work if you are already confident) dramatically reduces clumping, as does keeping the fur on top of the foot tidy. Feathered feet also mat quickly in wet-cold weather, and knowing the difference between a loose knot and a true mat tells you whether a comb is appropriate at all. A quick run-through with a comb after drying — the same principle as testing a coat right down to the skin — catches winter tangles in the leg feathering before they tighten.

    Rinse vs Wipe vs Dry-Only: Which to Use When

    MethodBest forRemoves salt film?TimeWatch-outs
    Warm-water rinse (bowl or jug)Heavily salted routes, slush, brine-treated pavement, ice clumpsYes — most thorough60–120 secMust be followed by real drying; slippery floors
    Damp-cloth wipeShort walks, light residue, dogs who hate waterPartially — good on visible grit and film30–60 secRefold to a clean cloth face between paws
    Dry towel onlyFresh untreated snow, dry cold, no deicer on the routeNo15–30 secEasy to over-use out of habit; salt film is invisible
    Rinse + comb-throughFeathered or long-haired feet, ice balls, matting riskYes2–4 minComb only after drying, never through wet ice

    The honest answer is that most winter walks in a salted city call for a rinse or a proper damp wipe, and a dry towel alone is only enough on genuinely untreated ground. If you are unsure what your route is treated with, assume it is treated — brines leave nothing you can see.

    Building the Habit: A Winter Door Routine That Sticks

    The routine fails for logistical reasons far more often than behavioural ones. A few things that make it survive a whole season:

    • Set the station up before the first freeze, not after. A jug and two towels left permanently by the door removes the decision-making from a cold, wet moment.
    • Cue it the same way every time. Same mat, same order of paws (front left, front right, back left, back right is easy to remember), same release word at the end.
    • Pay the dog. A small treat after the last paw turns a chore into something the dog walks toward. Dogs who already resent handling need the slower approach used when a brush-shy dog needs rebuilding — short sessions, one paw, stop while it is still going well.
    • Small homes need a small footprint. A folding tray, a hook for damp towels, and a lidded bin for used cloths is enough; the same space-saving thinking behind grooming in a tight floor plan applies at an entryway.
    • Note what you see. A one-line entry — “left front pad pink after Tuesday’s walk” — is what turns a vague worry into a useful history. Simple notes on what changed and when also make a vet visit far more productive.

    Next step: set up a permanent door station this week — a mat, a jug, and two towels — and your dog’s winter paw routine will take under two minutes a walk instead of becoming a floor-mopping argument.

    How This Differs From a Paw Wash Station

    A paw wash station is the setup. This page is the winter salted-sidewalk scenario and the post-walk flow.

    Put differently: the station is the where, this page is the when and why. The same mat and jug also handle the year-round version — the general post-walk routine used for everyday dirt on the feet — as well as the muddier seasons, where thaw-season slop on the coat needs a different order of operations. Salted sidewalks are a narrow winter case sitting inside the broader cold-weather coat and skin routine, and the frequency of everything else you do is still driven by what your dog’s coat type demands. Trail walks add their own debris, which is why post-trail checks for a dog’s feet and coat look for different things than a city sidewalk does.

    Common Mistakes After Salted-Sidewalk Walks

    • Skipping the drying step. The single most common winter shortcut, and the one most likely to cause between-toe irritation.
    • Scrubbing. Salt residue rinses off; friction on cold pads does not help and can make a sore paw worse.
    • Picking at ice with fingernails, combs, or scissors. Melt it, or stop.
    • Letting the dog lick the paws before cleaning. Wipe first, then reward — a treat at the door often redirects the licking usefully.
    • Using hot water on cold feet. Warm only.
    • Bathing the whole dog every time. Frequent full baths in winter strip the coat and are unnecessary for a paw problem; several of the classic washing errors owners repeat show up worst in cold months.
    • Cleaning only the visible bottom of the pad. Residue collects in the webbing and around the dewclaw as much as under the foot.
    • Treating a stop sign at home. Redness, cracking, blisters, bleeding, and limping belong to a veterinarian, full stop.

    FAQ

    Should I rinse paws after salted sidewalks?

    Routine winter cleanup can include a warm-water rinse or clean damp wipe, followed by drying and inspection.

    Should I scrape out ice or lodged material?

    No. Do not dig at lodged objects or painful areas from this page.

    Does this page recommend boots or balms?

    No. This guide is non-commercial and does not make product recommendations.

    How long should the whole routine take?

    Ninety seconds to two minutes for a short-coated dog, three to four for feathered or long-haired feet that need a comb-through after drying. If it routinely takes longer, the station is usually in the wrong place or the towels are already damp from the previous walk.

    Do I need to rinse after every winter walk?

    If the route is treated — and in most towns and cities it is, often pre-treated with brine before snow even falls — then yes, rinse or damp-wipe every time. On genuinely untreated ground in dry cold, a dry towel and a quick look are enough.

    Is it enough to just wipe with a dry towel?

    Not on salted or brined pavement. A dry towel lifts loose grit and snow but leaves the dissolved film behind. Use a damp cloth at minimum.

    Should I wash the legs too, or just the feet?

    Slush splashes higher than people expect, especially on small dogs and on the chest and belly. If the leg feathering is wet and gritty, wipe up to the carpus (wrist) and dry it. That is still routine grooming, not a bath.

    My dog licks his paws constantly after winter walks — what does that mean?

    Occasional licking right after a walk is normal grooming behaviour and usually settles once the paws are clean and dry. Persistent licking, licking focused on one foot, or licking that continues for hours is a veterinary question, not a grooming one — stop the routine on that paw and get it looked at.

    Does snow itself hurt paws, or is it only the salt?

    Both matter, in different ways. Compacted ice between the toes pulls mechanically on skin and fur, and prolonged exposure to freezing surfaces is a cold-injury risk in its own right. Deicer residue is a chemical and ingestion concern. The rinse-dry-inspect flow addresses the routine end of both; anything beyond routine is a stop sign.

    Do puppies and senior dogs need anything different?

    The steps are identical, but the tolerance is not. Puppies benefit from shorter sessions and a lot of reward, so the door mat becomes a familiar place early. Seniors may have less balance on three legs — support them against your leg or let them lie down — and arthritic dogs often object to a paw being lifted high, so bring the bowl to the foot rather than the foot to the bowl.

    Can I use the same routine after the dog has been boarded or at daycare in winter?

    Yes, and it is worth doing: kennel and daycare yards are often salted too. The wider settling-back-in check after a stay away covers the rest of the coat; the paw flow on this page is unchanged.

    What if I don’t have a bathtub or an easy water source near the door?

    A jug of warm water and a shallow basin do the job entirely — no plumbing needed. The same improvisation used for washing a dog without a tub works at an entryway, and for paws you only ever need a couple of inches of water.

    Bottom Line

    Rinse, dry, and inspect paws right at the door after salted-sidewalk walks, and stop for any injury sign instead of treating it at home.

  • Dog Nail Length Check at Home

    Dog Nail Length Check at Home

    A dog nail length check at home is an observation routine. It helps you decide whether to schedule a trim or ask for professional help. It is not a trimming tutorial, quick-finding guide, paw-pain diagnosis, or treatment page. Stop before handling becomes stressful or unsafe.

    The Three-View Nail Check

    View What to notice

    Standing side view Nails that reach the floor or change the paw’s natural stance may need a trim plan.

    Walking sound check Clicking on a hard floor can be a cue to check length.

    Snag and dewclaw check Nails that snag or dewclaws that are easy to miss may need attention from a groomer, vet, or trained handler.

    Running Each View in Practice

    The three views take about two minutes total once you know what you are looking at. The order matters: check the dog standing first, while the paw is loaded and natural, then move to sound, then to close handling. Flipping a dog onto its back first tends to make the standing view impossible afterwards, because the dog is already braced.

    • Standing side view. Get your eyes down to floor level, not looking down from above. On a level, hard surface, look at the gap between each nail tip and the floor. In a comfortable nail length you should see daylight under the tips when the dog is standing square. Nails that touch, or that visibly push the toe upward or sideways, are the clearest signal to plan a trim.
    • Walking sound check. Walk the dog across tile, laminate, or sealed concrete at a normal pace and listen. A faint tick from one or two nails is common; a steady click-click from every step usually means most nails have outgrown the pad line. Carpet muffles everything, so this cue only works on hard flooring.
    • Snag and dewclaw check. Run a hand gently along blankets, a towel, or a fleece bed near each paw and watch for catching. Then find the dewclaw on the inner front leg (and the rear leg on breeds that have them). Dewclaws never touch the ground, so they never wear down — they are the nail most likely to curl back into the skin unnoticed.

    A common mistake is judging length from a lying-down dog with the paw held up. Gravity and a relaxed toe make nails look shorter and straighter than they are under weight. Always confirm with the standing view.

    Why Nail Length Matters Beyond Appearance

    Overlong nails are not just a cosmetic issue. When a nail hits the ground before the pad does, the toe is levered backward with every step. Over weeks that changes how a dog loads the wrist and shoulder, and many owners notice a dog with very long nails standing with splayed toes, “rocking back” onto its heels, or slipping more on smooth floors. Dogs that are already stiff — seniors, or dogs recovering from injury — feel this soonest.

    There is a second, practical reason to check often rather than seldom. The blood vessel and nerve inside the nail (the quick) grows outward with the nail. The longer a nail is left, the further forward the quick sits, and the less nail can safely be removed at any one session. That is why a dog whose nails have been left for months usually needs several short trims spaced a week or two apart rather than one big correction — a plan a groomer or veterinarian should set. General guidance from veterinary professional bodies such as the American Veterinary Medical Association is consistent on this point: gradual, low-stress handling beats one stressful session.

    Use Cues, Not Calendar Alone

    Some dogs wear nails down faster on hard, rough surfaces. Dogs on soft surfaces or with lower activity may need checks more often. Actual nail length and the dog’s comfort override a fixed calendar.

    Lifestyle Factors That Change Wear Rate

    Two dogs of the same breed and age can need checks on completely different schedules. Use the table below as a starting point, then let the three-view check confirm or override it.

    Dog’s typical routineNatural nail wearSuggested check interval
    Daily walks on pavement, sidewalk, or gravelHigh — front nails often self-maintainEvery 2–3 weeks
    Mixed walks: some pavement, some grass and trailsModerateEvery 2 weeks
    Mostly grass, dirt yard, or soft trailsLowWeekly to fortnightly
    Indoor-only, apartment dog, or carpeted homeVery lowWeekly
    Senior, arthritic, or reduced-mobility dogVery low, unevenWeekly
    Puppy under 6 monthsRapid growth, minimal wearWeekly
    Any dog’s dewclawsNone — never contacts groundEvery check, every time

    Note that wear is rarely even. Rear nails often wear less than front nails, and one paw may wear differently if the dog favours a leg. Check all four paws plus dewclaws rather than assuming the whole set matches. If you already run a routine grooming rhythm, folding the nail check into it is easiest — a coat-based grooming rhythm gives you a natural weekly or fortnightly slot to use.

    Light Nails vs Dark Nails: What You Can See

    Nail colour changes how much information a home check gives you, so it is worth knowing the limits before you draw conclusions.

    • Light or clear nails. You can usually see the pink quick as a shadow inside the nail. In a well-maintained nail, there is a clear band of opaque nail beyond where the pink ends. When the pink appears to run almost to the tip, the nail is overdue and the quick has grown forward.
    • Dark or black nails. The quick is not visible from outside. All you have is external shape: how far the nail extends past the pad, whether the tip has started to curve downward or sideways, and whether it contacts the floor when standing. This is exactly why the standing view and walking sound cue exist — they work regardless of nail colour.
    • Mixed sets. Many dogs have some light and some dark nails on the same paw. Use the light ones as a rough gauge of how far the quick has advanced, but do not assume the dark ones match exactly.

    Trade-off to be honest about: with dark nails, a home check tells you whether a trim is needed, not how much to take. That second question is a trimming decision, and this page deliberately stops short of it.

    Dewclaws: The Nail Most Often Missed

    Dewclaws sit higher on the inside of the leg and never touch the ground, so nothing files them down. Left unchecked, they curl in a full circle and can grow back into the skin — a genuinely painful problem that often shows up first as licking at one wrist, a smell, or sudden flinching when that leg is touched.

    Make dewclaws a fixed step, not an afterthought:

    1. With the dog standing or sitting calmly, slide your hand up the inside of each front leg above the paw.
    2. Feel for the small nail sitting a couple of centimetres above the other toes. Push back the fur if it is hidden.
    3. Look at the curve. A healthy dewclaw is a shallow hook; a nail curving toward or touching the skin needs a professional appointment, not a home fix.
    4. Repeat on the rear legs. Some breeds have rear dewclaws, some have double rear dewclaws, and some have none at all — know which applies to your dog.

    If a dewclaw has already grown into the pad or skin, stop the check there and book a veterinary visit. That is a wound, not a grooming task.

    What You Need for a Two-Minute Check

    You do not need special equipment to observe nail length, but a few basics make the check faster and calmer:

    • A hard, level, non-slip surface. Tile with a rubber-backed mat gives you both the sound cue and secure footing.
    • Good light. A phone torch angled from the side shows the tip curve and the pad line far better than overhead room light.
    • A comb or your fingers to part the fur on hairy-footed breeds, whose nails hide completely under foot furnishings.
    • High-value treats so the paw handling ends on a positive note every single time.
    • Somewhere to note what you saw — a phone note is enough.

    If you are still assembling your basics, a well-stocked set of at-home grooming tools covers the comb, mat, and light you will reuse for every other part of the routine.

    Nail Checks Through the Dog’s Life Stages

    Puppies. Nails grow quickly and wear almost nothing, so weekly checks are less about length and more about building tolerance. Touch each paw, hold it for two seconds, release, treat. Do this before you ever need a real trim and the adult dog will be far easier to handle.

    Adult dogs. Match the check interval to the wear table above. Watch for changes in pattern — if a dog that used to self-maintain its front nails suddenly needs trims, it may be walking less or shifting weight for a reason worth mentioning to a vet.

    Senior dogs. This group needs the most attention and often gets the least. Reduced activity means almost no natural wear, while stiff joints make long nails more destabilising on slick floors. Shorten the check interval, keep sessions brief, and support the dog’s body weight rather than lifting a leg high. Guidance from veterinary teaching hospitals such as the Cornell University College of Veterinary Medicine reinforces the general principle that mobility problems in older dogs deserve a professional assessment rather than a home workaround.

    Making Paw Handling Easy

    Most home nail checks fail on handling, not observation. The dog pulls the paw away, the owner grips harder, and the next check is worse. Practise the handling separately from the check itself:

    • Touch the shoulder, then the leg, then the paw — in that order, over several short sessions.
    • Hold for one or two seconds only, then release before the dog pulls away. Releasing after a struggle teaches the struggle.
    • Pair every paw touch with a treat, even on days you are not checking anything.
    • Keep sessions under two minutes. Ending early is a win.

    Watch for early stress signals — lip licking, head turning away, a hard stare, whale eye, a tucked tail, or sudden freezing. Recognising early stress signals during grooming lets you stop before a dog escalates, and the same patient approach that works for a dog who resists the brush works for paws.

    Fitting the Check Into Your Routine

    The easiest nail check is the one attached to something you already do. Good natural anchor points:

    Logging What You See

    A one-line note per check is more useful than memory. Record the date, whether nails touched the floor, whether you heard clicking, dewclaw condition, and anything unusual on one specific toe. Over a few months you will know your dog’s real growth rate and can book trims before nails ever reach the floor. Keeping simple grooming notes also gives your groomer or vet a concrete history instead of a guess.

    Common Mistakes to Avoid

    • Judging length only from above. Overhead views hide the tip curve. Get level with the floor.
    • Checking on carpet. You lose the sound cue entirely and the nail tips sink into the pile.
    • Forgetting dewclaws. The single most common cause of a genuinely painful nail problem in an otherwise well-kept dog.
    • Checking one paw and assuming the rest match. Wear is uneven; all four plus dewclaws, every time.
    • Turning a check into a wrestling match. If the dog is fighting the hold, the useful information stops and the stress begins. Stop and try again later.
    • Waiting for the click before acting. By the time every step clicks, the quick has usually grown forward and the correction takes multiple sessions.

    Stop Signs During a Nail Check

    Do not continue a home check for limping, pain, swelling, bleeding, torn nails, embedded or curling nails, cracked paw pads, infection signs, panic, aggression, or unsafe handling. This page does not explain bleeding-quick treatment, wound care, cracked-paw treatment, or limping diagnosis.

    Groomer or Veterinarian: Who to Call

    Knowing which professional to contact saves a wasted appointment. Use this as a rough sorting guide, and default to the veterinarian whenever pain, blood, or lameness is involved.

    What you observedBest next call
    Nails touch the floor, clicking on tile, no painGroomer (or vet nurse nail-trim appointment)
    Very overgrown nails needing staged shorteningGroomer or veterinary team, with a multi-visit plan
    Dog panics or snaps during paw handlingVeterinarian first — sedation or behaviour plan may be needed
    Dewclaw curling toward or into the skinVeterinarian
    Split, torn, bleeding, or loose nailVeterinarian, promptly
    Limping, swelling, heat, or smell around a toeVeterinarian, promptly
    Cracked, raw, or ulcerated padsVeterinarian
    Sudden change in nail colour, shape, or brittleness across several nailsVeterinarian

    What to Do If Nails Look Long

    If the check suggests nails are long, plan the next step calmly. That may mean using a nail-trimming setup checklist, scheduling a groomer, or asking a veterinarian when signs are outside routine grooming. Do not trim under pressure or force a paw hold.

    Planning the Next Step Calmly

    “Calmly” means with a decision already made, not improvised while the dog squirms. In practice that looks like this:

    1. Finish the check and reward the dog. End the session cleanly, even if you found something.
    2. Write down what you saw — which toes, which paws, and whether it was length, curve, or damage.
    3. Choose the appropriate professional using the table above rather than deciding mid-session.
    4. Book before it worsens. Long nails do not shorten on their own, and every extra week pushes the quick further forward.
    5. Keep practising paw handling in the meantime so the appointment itself goes better.

    If your dog needs a trim and you also have a full groom due, sequence matters — nails, coat, and bath do not all belong in the same order for every dog, and understanding what comes before the water saves you repeating steps.

    Next step: run one two-minute three-view check tonight on a hard floor, note what you see, and you will know today whether to book a trim this week or simply check again in a fortnight.

    FAQ

    How do I know if my dog’s nails are too long?

    Use standing view, walking sound, snagging, and dewclaw checks as observation cues.

    Is this a nail trimming guide?

    No. This page only helps decide whether trimming or professional help may be needed.

    What if my dog limps or has a torn nail?

    Stop the home grooming routine. Limping, torn nails, bleeding, pain, and swelling are outside this page’s scope and call for a veterinarian.

    How often should I check my dog’s nail length?

    Weekly for indoor, senior, low-activity, and puppy dogs; every two to three weeks for dogs walked regularly on pavement. Dewclaws should be looked at during every single check regardless of interval, because they never wear down naturally.

    Should a dog’s nails touch the floor when standing?

    No. In a comfortable length, you should be able to see a small gap between the nail tips and the floor with the dog standing square. Nails resting on or pushing against the floor are a cue to plan a trim.

    Is clicking on the floor always a sign of long nails?

    Not always, but it is a reliable prompt to look. A faint tick from one or two nails on hard flooring can be normal, especially on rear paws. Steady clicking on every step from most nails almost always means the set has outgrown the pad line.

    Can I check nail length on a dog with black nails?

    Yes, for the length question. Shape, floor contact, and sound all work regardless of colour. What you cannot judge on dark nails is the position of the quick, which is why how much to remove is a trimming decision for someone with the right tools and experience.

    Do dogs walked on pavement still need nail checks?

    Yes. Pavement mainly wears the front nails, and it does nothing at all for dewclaws or, in many dogs, the rear nails. Never treat “she walks on concrete daily” as a reason to skip the check.

    My dog pulls the paw away every time — what now?

    Stop trying to complete the check in one go. Spend a week doing two-second paw touches paired with treats, releasing before the dog withdraws. Then attempt a single paw per session. If the dog escalates to growling, snapping, or panic, that is a conversation for your veterinarian rather than a handling problem to push through.

    Does the nail check change in winter?

    Often, yes. Less outdoor time and more soft indoor surfaces slow natural wear, so many dogs need a shorter check interval in cold months. Damp, salted, or gritted pavements are also worth a paw inspection at the same time.

    Can puppies have their nails checked?

    Absolutely, and they should. Puppy nails grow fast and wear almost nothing. Weekly handling sessions at this age build the tolerance that makes every future check and trim straightforward.

    Bottom Line

    Check standing posture, walking sound, and snags rather than relying on a calendar alone, and stop for any pain or injury sign above.

  • Paw Pad Care After Grooming

    Paw Pad Care After Grooming

    Paw pad care after grooming means checking each paw for trapped moisture, loose hair, small loose debris, nail-edge irritation, and normal comfort. For a routine grooming session, keep the check simple: let the dog stand safely, dry between the toes, look at the pads and nail edges, and stop if anything looks painful, swollen, bleeding, burned, cut, or unsafe to handle.

    This is not wound care, cracked-pad treatment, balm advice, allergy diagnosis, limping diagnosis, or embedded-object removal. Pain, limping, swelling, bleeding, discharge, burns, blisters, cuts, sudden sensitivity, excessive licking, or chemical exposure concern belongs with a veterinarian.

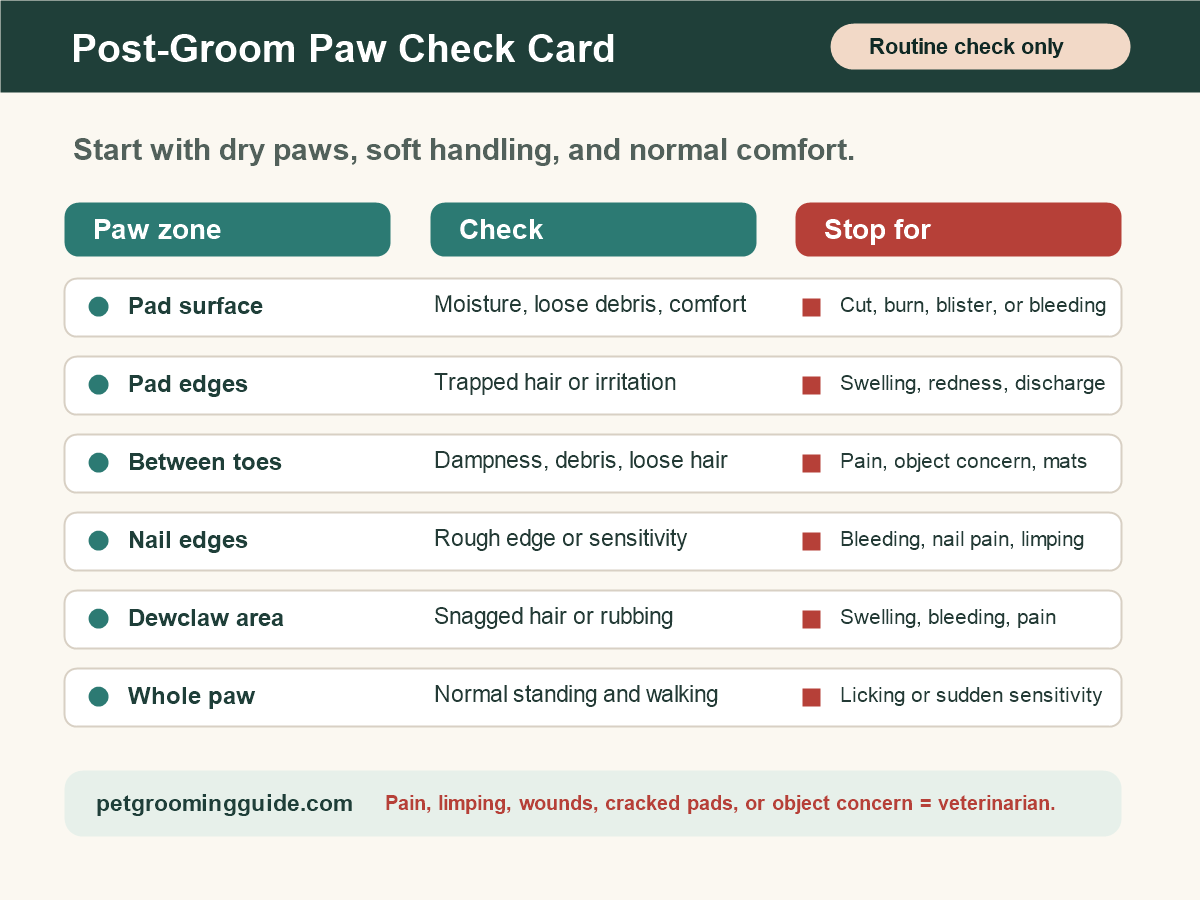
    Post-groom paw check card showing pad surface, pad edges, between toes, nail edges, dewclaw area, and stop signs.
    Use this paw-check card after routine grooming: check pads, pad edges, between toes, nail edges, dewclaw area, and whole-paw comfort, then stop for pain or injury signs.

    Use this check after normal brushing, bathing, drying, or nail work. The goal is to catch moisture, loose hair, debris, or discomfort early without turning a grooming routine into home treatment.

    Post-groom paw check card showing pad surface, pad edges, between toes, nail edges, dewclaw area, and stop signs.
    Paw zoneRoutine checkStop if you see
    Pad surfaceMoisture, loose debris, and comfort.Cuts, burns, blisters, or bleeding.
    Pad edgesTrapped hair, rubbing, or irritation.Swelling, redness, discharge, or pain.
    Between toesDampness, loose hair, small loose debris, or mats.Pain, embedded-object concern, painful mats, or unsafe handling.
    Nail edgesRough edge, sensitivity, and normal standing.Bleeding, quick pain, limping, or repeated pulling away.
    Dewclaw areaSnagged hair, rubbing, or moisture.Swelling, bleeding, redness, or pain.
    Whole pawNormal walking, standing, and comfort.Limping, excessive licking, sudden sensitivity, or panic.

    Step 1: Let Your Dog Stand or Rest Safely

    Check paws only when your dog can stand, sit, or rest without slipping. Keep the hold light. If your dog panics, growls, snaps, freezes, yelps, or pulls away as if the paw hurts, end the session.

    Do not force a paw hold to finish the checklist. A routine grooming check is only useful while the dog is safe to handle.

    Step 2: Dry Between Toes and Around Pads

    After a bath or wet grooming session, moisture can stay between toes, around pad edges, and near the dewclaw. Use a towel and gentle pressure. Do not rub hard, scrape, or apply products to irritated skin.

    The AKC’s paw-cleaning guidance includes checking between toes and paw pads, and the ASPCA’s paw-care advice after outdoor exposure supports washing and drying paws when irritants may be present. If grooming followed salt, lawn chemicals, cleaners, or unknown irritants, keep the home step to gentle cleanup and call a veterinarian if exposure is a concern.

    For a bath-specific routine, use how to clean dog paws after a walk as related cleaning context, but keep this page focused on the post-groom check.

    Step 3: Check Nail Edges Without Treating Injuries

    Look at each nail edge and the skin around it. A small rough edge can be noted for later grooming, but pain, bleeding, limping, swelling, or repeated pulling away means the nail check stops.

    This page does not teach quick treatment, bandaging, antiseptics, disinfectants, or home remedies. The AKC nail-trimming guidance explains why the quick matters during nail work; if the paw is painful or bleeding after grooming, do not try to solve it from a checklist.

    Step 4: Look Between the Toes

    Separate the toes only enough to see whether the area is damp, packed with loose hair, holding small loose debris, or matted. Do not dig into the paw and do not remove anything that may be embedded.

    Call a professional groomer for paw-hair trimming uncertainty, mats between toes, painful mats, or a task you cannot complete safely. Call a veterinarian for pain, limping, swelling, bleeding, cuts, burns, blisters, discharge, embedded-object concern, excessive licking, sudden sensitivity, or chemical exposure concern.

    Normal Cleanup vs Vet Concern

    SituationRoutine cleanupVet concern
    Damp paws after groomingTowel dry gently, especially between toes.Redness, swelling, odor with irritation, or pain.
    Loose hair around padsNote it for a safe future trim plan.Painful mats, skin-close mats, or unsafe handling.
    Small loose debris on the surfaceRemove only if it is loose and easy.Embedded-object concern or sudden pain.
    Nail edge feels differentObserve comfort and stop nail work.Bleeding, limping, quick pain, or swelling.
    Dog licks once or twiceRecheck for moisture or trapped hair.Excessive licking, sudden sensitivity, or abnormal walking.

    What Not to Do

    Do not use this routine to apply paw balms, medicated products, antiseptics, disinfectants, bandages, wound treatments, parasite treatments, allergy treatments, or cracked-pad treatments. Do not remove embedded objects. Do not diagnose limping.

    Those choices need a veterinarian when pain, injury, swelling, discharge, bleeding, abnormal walking, or unsafe handling is present. Cornell’s canine health guidance says limping usually indicates pain or weakness and deserves veterinary attention; treat limping as a stop sign, not a grooming checklist problem.

    FAQ

    What should I check on dog paw pads after grooming?

    Check the pad surface, pad edges, between toes, nail edges, dewclaw area, moisture, debris, comfort, and normal walking. Stop for pain, limping, swelling, bleeding, cuts, burns, blisters, discharge, excessive licking, or sudden sensitivity.

    Should I put balm on paw pads after grooming?

    This page does not recommend balms or products. If the paw pads look painful, cracked, bleeding, swollen, burned, or irritated, call a veterinarian instead of covering the problem.

    What if my dog limps after grooming?

    Stop grooming and call a veterinarian. Limping can signal pain or injury and should not be diagnosed from a grooming checklist.

    Can I trim mats between the toes?

    If paw-hair trimming is uncertain, mats are painful, or the dog reacts with pain, stop and call a professional groomer. If the skin looks abnormal or the dog is limping, call a veterinarian.

    How dry should paws be after grooming?

    Paws should feel dry enough that moisture is not sitting between the toes or around the pad edges. Use a towel gently and stop if drying causes pain, panic, redness, or sensitivity.

    Sources

  • How to Clean Dog Paws After a Walk

    How to Clean Dog Paws After a Walk

    For normal dirty paws after a walk, wipe loose debris, rinse with lukewarm water if needed, dry between the toes, and inspect the pads. Stop for pain, bleeding, burns, blisters, swelling, limping, lodged objects, parasites, infection signs, panic, aggression, or unsafe handling.

    This is routine paw hygiene. It is not wound care, parasite treatment, burn treatment, or a guide to removing embedded objects.

    The Quick Post-Walk Paw-Cleaning Routine

    AKC paw-cleaning guidance supports using dog-safe wipes or a warm, soapy washcloth for muddy, sandy, or salty paws, along with checking the paws. ASPCA winter paw guidance supports washing and drying feet after walks to remove salt and chemicals.

    StepRoutine actionStop point
    WipeRemove loose mud, sand, grass, or surface gritPain, bleeding, lodged object
    RinseUse lukewarm water when paws have salt, chemicals, allergens, or sticky residueBurns, blisters, panic
    InspectCheck pads, between toes, nails, and fur around the pawLimping, swelling, parasites
    DryTowel pads and between toes so moisture does not sitRedness, odor, discharge
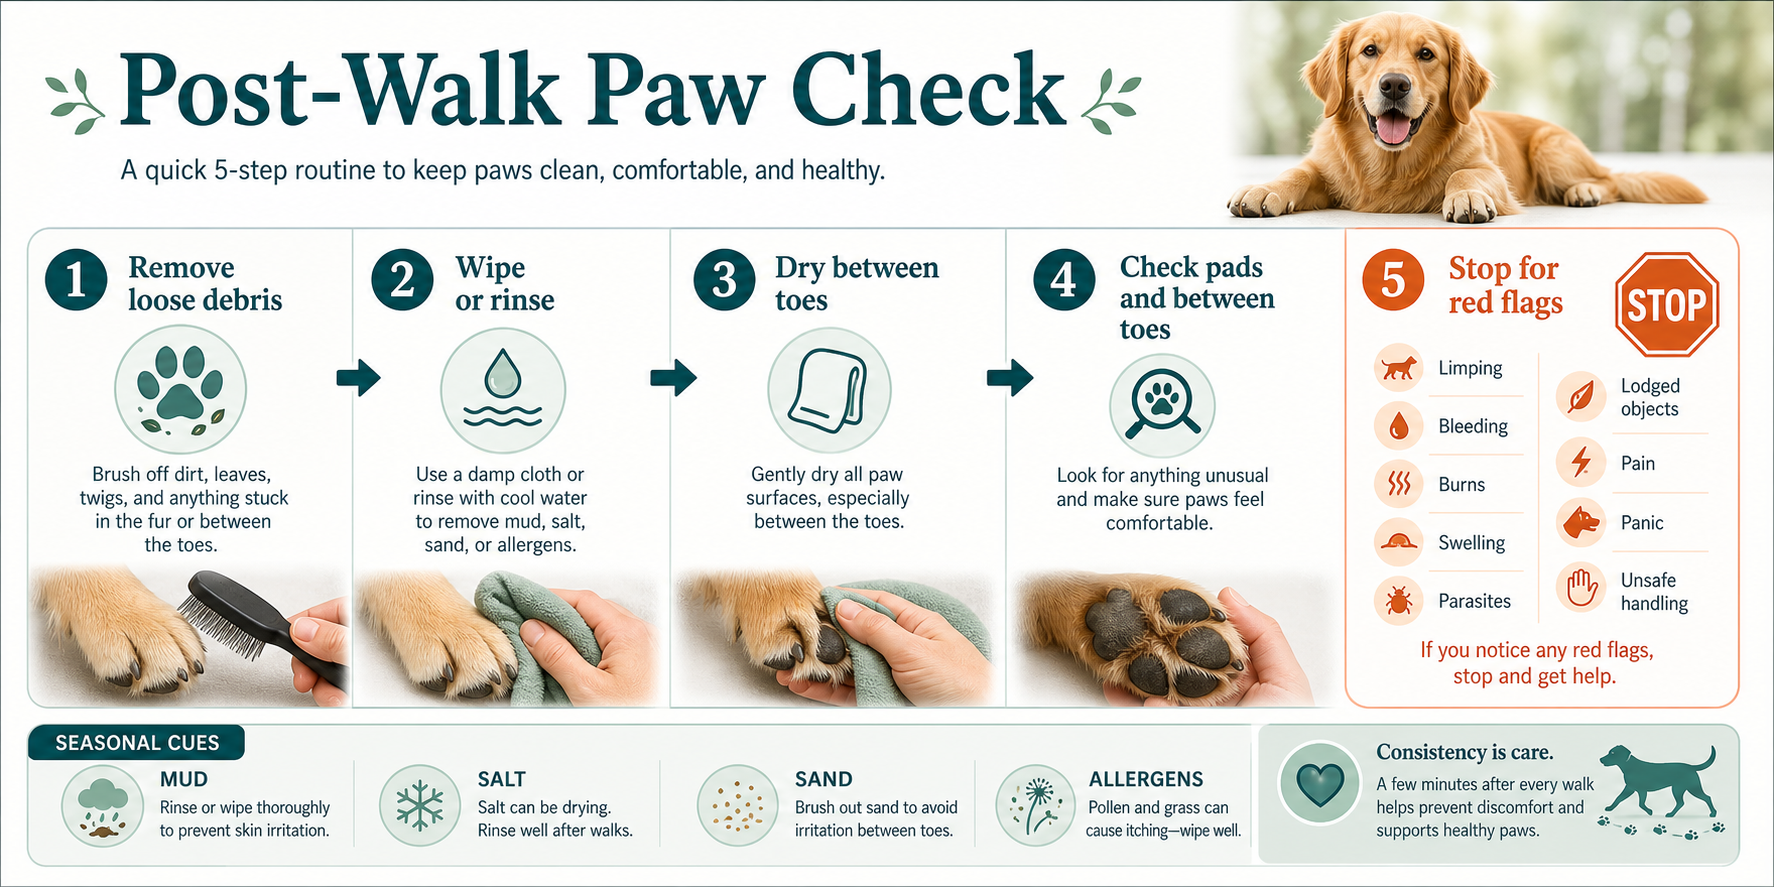
    Post-Walk Paw Check sequence showing remove debris, wipe or rinse, dry between toes, inspect pads, and stop for red flags.
    Use this sequence to keep routine paw cleaning separate from stop-and-call-a-professional signs.

    Mud, Sand, Salt, and Allergens: What Changes?

    The basic routine stays the same, but the reason for cleaning changes the emphasis.

    Walk conditionWhat to add
    MudWipe first, then rinse if mud remains between toes
    Sand or gritCheck between toes and around pads before drying
    Salt or ice-meltRinse rather than only wiping, then dry thoroughly
    Pollen or allergensWipe or rinse paws before repeated licking starts
    Wet pavementDry between toes and check for irritation
    Post-Walk Paw Check sequence showing remove debris, wipe or rinse, dry between toes, inspect pads, and stop for red flags.
    Use this sequence to keep routine paw cleaning separate from stop-and-call-a-professional signs.

    Do not use harsh cleaning products or home chemical mixes on paws. ASPCA dog grooming tips support warm-water rinsing after winter walks to remove salt and chemicals.

    How to Inspect Paw Pads and Between Toes

    Lift one paw only as far as the dog is comfortable. Spread toes gently enough to see between them. Look for redness, cuts, swelling, lodged debris, broken nails, parasites, or the dog pulling away in pain.

    If an object is embedded or the dog is limping, do not dig. VCA limping first-aid guidance and veterinary emergency guidance on paw pad injuries support routing deeper paw injuries and embedded objects to veterinary care.

    When a Wipe Is Enough and When to Rinse

    A wipe may be enough for light dust or dry grass. Rinse when paws touched salt, ice-melt, chemicals, sticky mud, allergens, or anything the dog might lick off.

    Use lukewarm water, not hot water. Keep the session calm and short.

    Drying Paws So Moisture Does Not Sit Between Toes

    After wiping or rinsing, dry the pads, nail area, and between toes with a towel. Moisture sitting between toes can make the dog lick or chew, and it can hide redness or irritation.

    Do not rub hard over sore skin. Stop if drying reveals pain, bleeding, swelling, discharge, or a strong odor.

    Stop Signs: Cuts, Burns, Limping, Parasites, or Lodged Objects

    Stop routine paw cleaning and contact a veterinarian or qualified professional for cuts, bleeding, limping, burns, blisters, swelling, lodged foreign bodies, parasites, infection signs, panic, aggression, or unsafe handling.

    FAQ

    Should I clean my dog’s paws after every walk?

    You do not need a full rinse after every clean sidewalk walk, but a quick check is useful. Rinse after salt, chemicals, mud, allergens, or visible residue.

    Can I use wipes on my dog’s paws?

    Dog-safe wipes can be used for routine surface dirt. Rinse instead when salt, chemicals, or sticky residue may be present.

    Should I rinse salt off dog paws?

    Yes. ASPCA guidance supports washing and drying paws after winter walks to remove salt and chemicals.

    How do I dry between my dog’s toes?

    Use a towel gently between the toes and around pads. Stop if the dog shows pain or you see redness, swelling, cuts, or discharge.

    When should paw cleaning become a vet visit?

    Use a vet for limping, bleeding, burns, lodged objects, parasites, infection signs, swelling, severe pain, or unsafe handling.

    Bottom Line

    Most post-walk paw cleaning is simple: wipe, rinse when needed, dry well, and inspect. If the paw check turns up pain, limping, bleeding, burns, parasites, swelling, or an embedded object, stop cleaning and call a veterinarian.